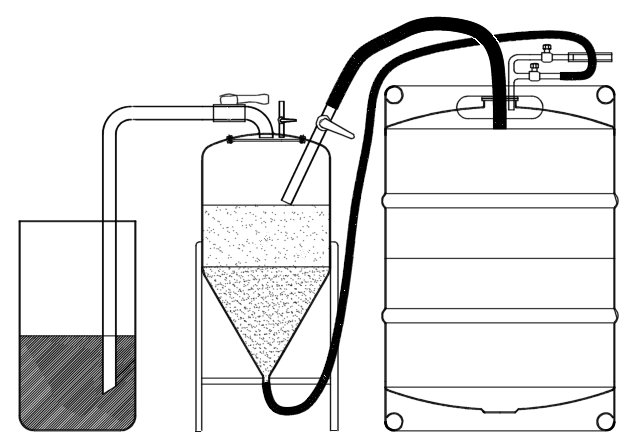
Closed-system pressurized fermentation technique!

Homebrew Talk - Beer, Wine, Mead, & Cider Brewing Discussion Forum

Help Support Homebrew Talk - Beer, Wine, Mead, & Cider Brewing Discussion Forum:

This site may earn a commission from merchant affiliate links, including eBay, Amazon, and others.

What do you guys think about pressure fermentations? Time for a poll.

  • I've done it and I liked it just fine!

  • I've done it, nothing wrong with it, but prefer normal fermentation techniques.

  • I've done it, hate it, and never will do it again!

  • I've never done it, but it is on my list!

  • I've never done anything. I only brew beer in my mind.


Results are only viewable after voting.
I have a few questions for anyone who has tried this fermentation technique:
Will beers, such as a weizen, still taste right when fermented under pressure?
Will the yeast be as sesitive to temp swings as they are when fermented under an airlock? I want to try a lager. Will the dry yeast or liquid yeast work better with this technique?

Wortmonger: Where did you find the cheap back pressure relief valve?

Thanks for the interesting thread!
 
A spreadsheet shows the equivalent volumes.

Because the Corny is so narrow it most likely would be less wort volume. I would think 3.5 gallons is all they can work with or you loose beer out the vent.

Sanke
T volume 15.500
batch 12.000
percent 77.42%

Corny
T volume 5.250
batch 4.065
percent 77.42%

I feel that it is worth it if you can only store corny's in a fridge and have plenty of them although cleaning so many of them would be quite a chore.

I would and have used Sanky's for fermentation and they are quite heavy to say the least but they are not hard to clean at all as described earlier in this thread.

I do not have all my equipment in one place and so I have to cart the wort to the fermenter and pump it into the fermenter which is not hard to do. I have my burner on a cart with wheels so I can finish cooling the wort in the back yard and then move it to the fermenter and let the trub settle. As soon as the trub is on the bottom I start the pump and fill the Sankey in the fridge and pitch the yeast. I made a relief valve and hold at 15 Psi after 3 days @ 65 F wort temperature. I use a Ranco controller to keep it at 62F (in the inside air) but after 4 days I tape it to the Keg. The reason for this is to minimize run time for the compressor and have more stable temperature for the beer. If you tape the sensor to the keg right away it cools the beer way to fast for the yeast. I use WLP001 yeast most of the time for ales and WLP830 for my lagers. In a hurry (Nottingham). :)
 
I have a few questions for anyone who has tried this fermentation technique:
Will beers, such as a weizen, still taste right when fermented under pressure?
Will the yeast be as sesitive to temp swings as they are when fermented under an airlock? I want to try a lager. Will the dry yeast or liquid yeast work better with this technique?

Wortmonger: Where did you find the cheap back pressure relief valve?

Thanks for the interesting thread!

Don't go cheap on your spunding valve. I told Poindexter what I would buy if doing it all over and his valve is superior to what I use. Here is post #39 in this thread about what I recommend he buy.

As for will beers like weizens taste right, I don't see how this would change them in any way. I ferment at the same temperatures I would normally, even though with this system you are supposed to have no ill effects at higher temperatures. The only thing I would be worried about in fermenting a hefe-weizen or any wheat beer is the krausen height. I don't think this is an issue though as Poindexter has done some experiments closer to this with his keg ferments. Here is his thread on his ferments both under pressure and with a keg blow off to see how much yeast came out during blow off. I can only "talk" about 12 gallons in a 15.5 gallon fermenter. I never have any problems with anything getting in my spunding valve except when I forgot to set my valve low enough and had to bleed pressure quickly. I got a couple of shots of foam and then after cleaning up the mess it was fine and nothing else made it to the outside of the fermenter.

Temperature swings I couldn't comment on either as I have mine in a temperature controlled lagerator during ferment. I wouldn't think there would be any difference in temperature in any fermentation technique unless yeast activity heat is considered, but I just figure the normal 5-10* core temperature rise of any ferment above ambient.

Lager I haven't tried, but after brewing as many as I have under this technique I am confident it would only benefit a lager more than my ales. Dry or liquid is the same as any other preference. Which ever yeast you would like to use, use it. I am actually thinking of starting to use dry yeast in the future, but am happy now with White Labs liquid.

WBC said:
I made a relief valve and hold at 15 Psi after 3 days @ 65 F wort temperature. I use a Ranco controller to keep it at 62F (in the inside air) but after 4 days I tape it to the Keg. The reason for this is to minimize run time for the compressor and have more stable temperature for the beer. If you tape the sensor to the keg right away it cools the beer way to fast for the yeast. I use WLP001 yeast most of the time for ales and WLP830 for my lagers. In a hurry (Nottingham).
I differ in that I hold my beer at 5 psi during the initial ferment until I am a few points from estimated finish (3-5 days and "estimate" with my refractometer) and then completely un-tap and let the keg fire up to whatever it goes to pressure-wise. After a complete week of primary, I drop to 33* and let sit a week. I am going to stretch this to two weeks total for my next batch and then a week at 33* before transfer to serving keg. I just feel like the yeast can clean the beer up a bunch more and maybe help with my new late clarifying issue on my last two beers. The last two for some reason have not cleared as fast and I think I rushed them too quick into the kegerator. They taste wonderful, but didn't clear until almost floated.

I don't worry about the beer chilling to fast for the yeast as I like to have the beer colder than ferment and let it ramp up to wanted temperature. I have always placed the sensor right on the keg and it has worked wonderful for me. I usually pitch at 60*F and set my controller for 65*F. I also use WLP001 for most all ales, and the next day I am always on temperature and have a strong odor of CO2 in my lagerator. I do have to say though, from what I have researched you could get a much faster ferment at a higher temperature with no noticeable negative results. I am brewing mine for smooth tastes and almost mimic lager brewing in my ales with the obvious differences of cold maturation and shorter primary fermentation times.

My batch before last was a regular single infusion with a mash out decoction. It turned out wonderful and was a fav around my friends. I filled a pig up for payment of a new Sanke keg and drank the rest very fast. I finished at 1.012 right on the money and was very pleased with the outcome of the beer. I anxiously awaited tasting the triple decoction next batch. Same recipe just different hop times at the end and no dry hopping. Wow, this beer was instantly smoother and rounded off flavors in the beginning. It still has a little yeast in suspension after a week in the kegerator and I figure won't clear until the near end like the last one did. Last beer I had in 3 1/6 bbl Sankes, this one is in one 1/2 bbl. I have to say that if you have never done a decoction, try one on your favorite beer recipe that you have brewed numerous times before and tell me how much more the beer tastes. I am blown away, this isn't even the same beer. I am pumped about doing a lager now, but have to wait. I was asked to brew a wedding keg for a friend using the same recipe as the last two, but this time I am going back to single infusion. I have a mighty tasty beverage in the triple decocted APA, but it doesn't taste like APA anymore. This next one will have lots of time to mature before it is even chilled for serving, and I may do a secondary racking to another keg prior to taking to the reception as I don't want to risk the cloudy beer I usually get in my home kegerator for the first couple of pints (well used to until these last two beers anyways).

So, am I happy with my system? Overwhelmingly yes! Does it still need improvement? Hells yeah! I hope the new two week primary at fermentation temperature followed by the week at 33*F for crashing will help me out, and we will see if it does. Until then I can only think filtering for faster beer might be in my future. I have never had to before, but I have also never gone through beer this fast before. I have more people than ever wanting to try it and they all have more than a glass. My hopes are that one of these tasters wants to help me and sees the possibilities of going big. Oh well, the dream remains the same, lol. Hope everyone is enjoying reading about the technique as I have doing it.
 
Wortmonger,
Thanks for the reply. Originally I thought I could brew a lager at room temps under pressure and have it taste like it was fermented at 50F, but after more consideration I doubt this would be the case. I will try it however after I purchase a quality valve.

I was originally going to attempt this technique with a keg pressure tester w/needle valve. Becuase of my lack of spunding valve Ill have to put pressureized fermentation off untill I can purchase a good one.

I do think I will use what I've got on hand to try "green racking" (4-8 pts from finish into a sealed keg) for natural carbonation. Any tips on this technique would be greatly appreciated.
 
Only thing I would do if you are doing your "green racking" is to wait until you are 2-4 pts not 4-8 from finish. That is more than plenty to get you to whatever carbonation level you are wanting. If you did that then just let the keg alone until you are sure you are finished and then chill it. Only thing is you will have a lot more yeast sediment in your keg than I do. This isn't that bad though since after a few servings it too will all come out and be clear beer. Honestly, the only way I know you would have the clearest beer is to finish the full ferment and add priming sugar in your target keg before transferring your finished clear beer into it. Then do just as you would for the couple of pts off technique that you are trying anyways. Try a bunch of stuff, it's all cool and a great learning experience. I am now leaving my beers in the primary keg longer for extra sediment drop prior to transfer. We'll see if this helps my clarity in the kegerator. Good luck and let me know if I can help you out anymore, but I think you will get it done easily. ;D
 
Well, I rolled out my last batch just this past weekend. It was intended as a wedding present for a friend, but due to absolutely no one with any sense of intelligence I was told at the last minute I couldn't serve that beer for free because they sold alcohol on the premises. I had asked about this and everyone said it was fine until the day of... So I have 14.5 gallons of refreshment and didn't even have to go to his wedding, lol. We ended up giving them a nice crystal vase so I figure that was good enough.

As for the beer I am sure you are reading this for, wow. I brewed 12.5 gallons of a higher gravity beer than I wanted initially with the intention of blending down to what I really wanted. I used the hop tea dry hop method talked about in the Hot French Randall thread and man am I happy. I didn't use enough, but I am happy. It was very simple to do and add to my pre-boiled blending water. I added this concoction to a keg and transferred the primary under counter-pressure to my blended keg. Wow, that went very easy and now I had 14.5 gallons of a nice light 3.8% ABV session beer. I let it mature at room temperature for a month and then transferred to another keg for absolute clarity of a traveling keg (I normally don't use a secondary but this keg was going places). The result, a clear keg of beer with lots of bubbles and a nice smooth taste. Not watery as some might suspect, just a weaker beer. I upped the carbonation to take in account the lighter mouth feel and it worked great to make a crispy beer. I now have what I need to move on to lager brewing and space saving fermentation. Blending wasn't hard to do and I get 2 more gallons of delicious beer for the same fermentation space as before. I'm finally where I want to be.

God, I love the HBT!:rockin:
 
Hmmm... thread bump, trying to catch up. I've heard of folks using Sanke kegs as fermenters before but didn't know about the tradeoffs. I've been thinking (far far from now) when I go to 10 gallon batches I'd do that for sure, since kegs are plentiful and cheap.

Now I think I've caught the bug... I have a recipe here for a 3 gallon batch of IPA I put together I was going to do in a Mr Beer since all my 6 gal fermenters are full. I might just have to toss it in a corny and throw on a spunding valve instead. I've been wanting to get one anyway for conditioning. Other than the valve I think I'd just need to build a beer-line hose with out-out QDs to do the counter-pressure transfer once I'm done with the dry hop. I have all the rest of the hardware.

:mug:
 
Awesome, sounds like a plan then, lol. I really just like the fact I have a pressurized vessel to ferment in that surpasses the Blichmann in psi rating. We used cornies to make starters in for 15bbl cylindroconicals at the brewery and they worked great for that. I figure with a spunding valve you can ferment in a corny easily. If done at high enough pressure you could do 4 gallons in a 5 gallon corny. Poindexter has a corny spunded ferment thread here.
 
You doing the spunding valve I recommended to Poindexter? I really should practice what I preach and drop the cash on this stuff as well. Mine is getting rusty and the damn relief valve ball sticks if you leave it on a minimal spew of beer from transferring. I wonder how the "recommended" relief valve works and how easy it is to clean. Maybe I will PM Poindexter and find out.
 
wow... talk about a cool set-up!

I'm embarrassed to admit this but I have stock-pile of sanke kegs at my house. It's a simple situation of me having commercial beers on tap for long periods of time, (before I could keep up with my HB'd stuff) taking kegs to Patriots games for the tailgates, not having a chance to run them back to the store and the stores I get them from being jerks about taking kegs back after a period of time. I'm not going to admit how many I have but.. it's more then two.. and we'll leave it at that. I've tried to give them back and not even get my deposit but they won't take 'em.

I'm just about done with my all-grain rig and have been looking at the rows of sankes as perfect fermenters... and this is a tremendous idea.

I have one real noob question though... I don't think I saw it actually said and I want to make sure...

Did you alter the kegs themselves in any way?? Or just modify the tap? I THINK I read that you just simply modified a tap to get beer/cleaner/whatever in and out of the keg and that part actually looks fairly straightforward and I get the spunding valve part... i just want to be positive around whether the keg itself needs any modification.
 
Hey, thanks for your interest. I really like using the keg as a fermenter, and I did cut off 3/4" off my dip-tube which leaves me with 1 quart in my fermenter when I am transferred to my serving/secondary. However, after doing so and using the system I still get a little sediment in my target keg during transfer. I wouldn't change a thing on my kegs if I were you. My problem can be fixed with a larger siphon tip thing I need to make. Like this from Austin Homebrew Supply, only for keg dip-tube size.
rackingcanetip.jpg

Or, you could just pour a pint or two before you start the keg transfer. Last, if you weren't going to have carbonated beer, you could unseal the keg and use a normal siphon setup and prime your keg as usual.

I like having everything done before transfer and am getting good at clean (low foaming and low sediment) transfers. This way I have beer that just needs to age/chill/tap.


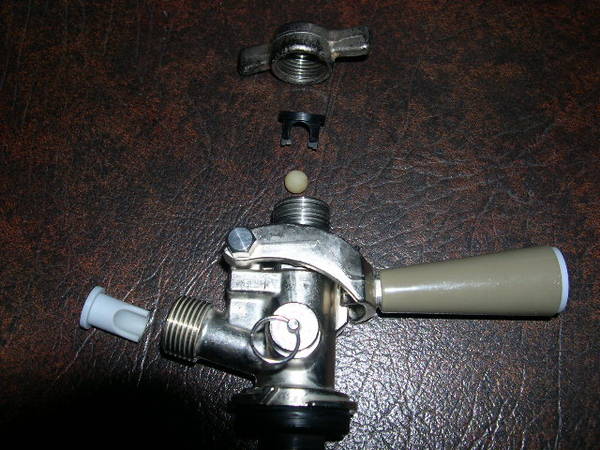
I figured I would go ahead and describe the modified Sanke tap, since it is less of a modification and more of a removal and addition type of thing, so here goes.

Here is what the Sanke tap looks like with the pieces that are normally there taken out. This is how I have the fermenter tap when I am transferring to my target keg (of course there would be a gas-in beer threaded nut and gas line coming from my CO2 Bottle same as a normal tap for serving).
Un-modified_Tap.JPG


Here is what I look like at the end of my fermentation when I have already built carbonation and have chilled the beer to 33*F (spunding valve not pictured on the gas side with check valve removed). The only difference is during normal fermentation I have a beer line hooked up to the beer side (beer check valve installed) with a spigot for testing/measuring gravity and the spunding valve on the gas side with, of course, no check valve.
Modified_Tap.JPG
 
In the immortal words of Montgomery Burns... "Exxxxxxxcellent"

This is tremendous... thanks for all the info!

Luckily I think I have a couple of sanke taps laying around too. Looks like I'm getting another package from McMaster soon (I should buy stock in those guys... with my AG rig build going on it seems like a package comes every other damn day)
 
LOL, I hear you. I really need to find out about that relief valve from Poindexter. If is isn't easy to take apart and clean (which it sounds easy to clean without taking apart) I might have to continue using this bronze one for transfers. It is just not accurate for fermentation as it only goes to 25 psi and I need upward of 30 psi to carbonate at fermentation temperatures. The stainless pressure gauge is a must IMHO for any use other than in the room uses.
 
I'm going to try a cheap $18 valve without the gauge. I figure if I'm in the ballpark I'll be happy the first time around. If I decide to keep going, I'll upgrade later to a nicer rig. For now I'm spending my money hoarding hops. :D
 
Well, you will have no idea what your release pressure is that way unless you hook up the valve to your CO2 tank to set it at the same pressure at the same temperature as your fermenter. If you are just wanting it for counter transfer then I would just pull the keg tap relief valve for that when needed to keep the flow going to the target keg.
 
I wish I had more large kegs to bulk mature/age a lot more of my beers in. I really like having the small ones for the variety in the kegerator though. Ferment in these things and clean -up is a snap. My favorite thing though is having carbonated beer going into my secondary/serving container and then just serving the first couple of pints out of the kegs for sediment expulsion. This winter I wanted to fill a couple of lager kegs up and let them go outside all winter for lagering, can't do that with many other vessels ;).
 
Wortmonger,
I only use unmodified Sanke kegs for fermentation now and love it. I use a cart with wheels to wheel it from the brewing area to the fridge in the garage and it just slides into the refrigerator (no lifting). I have used a spunding valve I made from a relief valve from Grainger Industrial Supply.

Link: Pneumatics & Hydraulics > Air Compressor Accessories > Compressor Valves > Valve,Pressure Relief : Grainger Industrial Supply

I just plumb the relief valve into the hose connected to your pressure valve. It must not get clogged by krausen in the first days of fermentation so I only connect this after this period has passed which you already know.

I read your thread before and like to compare notes about spunding techniques as there are many ways to have carbonated beer but this is very fast and less wasteful as you are using the natural sugars in grain to carbonate your beer.
 
I love it and would be glad to share notes. Also, I just added you to the Wiki article so people could link to your comments. Let me know if you don't want to be there, but here it is. A sealed up keg is/would be so much easier to transport if you had to, fermented or not.
 
Thanks, Posting me in your Wiki is fine. I love this stuff and have always tried to make my life easier as a brewer without being lazy at the same time. :)
 
Wortmonger,

In one of your posts you said

This is an interesting patent. It would mean I could only do 13.5 gallon batches in the keg. I am thinking up an "under-pressure, Burton-Union/wort recovery type of thingy". With that, I should be able to do full 15 gallon blended batches "pre-ferment", as opposed to post like the big boys do.

What design have you considered to recover Krausen that overflows during the first few days of fermentation? Where have you found information on this subject? I have a Heliarc and can back gas weld and so anything I want to fabricate is possible sans cost.
 
Well since writing that, I have found that required head space is significantly decreased with the increase in pressure. How much so I don't know, but I can't boil enough to worry about so I blend with water after fermentation is complete. I would say though you could ferment 13.5 gallon easily under minimal pressure (5-15 psi) without worrying so much about blowing kraeusen, beer style pending of course.
 
Ok, Being that I can not see in the Keg it is hard to know just how it acts and I will try 13.5 and see how it goes. I was considering something like this...

Wort recovery keg modification.gif
 
That device is tall, but should collect your blow off and allow CO2 to escape. I don't think you would have that much coming out at 13.5 gallons in a 15.5 gallon keg though anyway. I'd first try a simple regular fermentation with 13.5 in a Sanke and see what happens blow off-wise. You may not even need the collector at all. I gave up on the wort collection for pressurized fermentation as it smashes the kraeusen down so I don't worry at all when I ferment. If your keg is sealed and you have 13.5 gallons under controlled pressure, you have nothing to worry about based on my experience, but wort collection is something I have only thought about on paper and in my head.
 
I see no way to shorten the hight of the krausen recovery without using a pump or CO2 to push the liquid back into the keg. Using valves and a higher (temporary) pressure of CO2 you could push the liquid wort back into the keg 1 or 2 times a day during the first days of fermentation. You could do a full 15.5 gallon batch. :)

See picture.

Wort recovery 2c.jpg
 
Possibly. I'm not going to max out my fermenter though. Honestly, after this last batch of pressure fermented beer I am just going to ferment 12-13 gallons and blend up to 15.5 if I wanted to. It tasted great and no worries about anything.
 
Wow, that thing is huge! Looks sweet, though I wonder why it needs to be so big and complex? I assume there are some reasons other than the obvious that you chose not to simply use a normally-sealed keg and tap connectors that are already there. I am very curious though how yours will work compared to mine.

"Tiny is mine. As tall as a tapped keg it is, and wide as the rim on the keg-skirt it goes." :D Or, so says Brew-buddy Yoda... anyways!;)
 
well, its really not all that big, the picture makes it look huge.. that is for sure.

here is another pic...

pferment3.jpg


I already had the modified end part that i ordered from st. pats awhile back... but i was initially going to do a normal fermentation with it..however i am going to try the pressurized one now. heh

other than just going with your way and using a tap, i didnt really trust the tube and all the components inside the keg to ferment in... how do you sanitize the ball and all that, and the rubber gasket around it?

this setup just has a normal racking tube going down from the end cap and that is it. easy to clean.

i'll let you know how it works out, i am curious too.
 
LOL, wow what a difference a picture makes, lol. Ok, I get it now. I don't worry about the tube so much, as it it easy to clean. I don't scrub anything and rely on PBW/Oxy-Clean and then Star-San. The tube can be taken apart if needed, but it is really just a spring that has been welded to a half-ball and packed behind the Buna or Viton rubber seal. Once I get the flash boiler steam maker setup, I will just hook it up to my kegs and not worry about even having to use Star-San on them anymore. Though I never think I will be without the "All Mighty and Powerful" Star-San in my brewery, it would be nice to have steam sanitized kegs.
 
thanks for this post its really informative. I see you use a brazed plate heat exchanger. What method do you use for keeping hops from getting into the exchanger and what method of cleaning and sanitizing do you use? I recently started using one so any information would be appreciated. Thanks.

Amos
 
I simply use a hop sack during the boil and the Therminator can handle the break just find under pump pressure. I recirculate back into the kettle for cooling and pretty much do the same with cleaners for cleaning. I am so sorry it took me this long to get back to your post. I just missed it some how.
 
Amazing information, i'm going to be trying this on my next 10 gallon batch. Just need to order the spunding valve parts.

I'm glad I already have a few spare kegs around the house to try this with, if I could only find a couple smaller ones.
 
Glad to see the research continues!! I flew up to Alaska for four months with one checked bag and one carry on in May 2008. Been here 11 months, signed a two year contract yesterday.

I am flying down to North Carolina in the next few weeks to get:

1. my car
2. my spunding valve
3. my All-Clad skillet
4. some other crap

First thing I am going to is crack out rapid fire spunded batches to fill up the pipeline in my new keezer. I still lust for a repeat of that Roggen I made in Texas last year. If you are comning to Fairbanks drop me a line.
 
Someone asked about cleaning the spunding valve made up of the parts wortmonger described. It is a peice of cake, actually.

First I fill the (5 gal Cornbelius) keg with a couple quarts of hot water, than a half scoop of oxyclean, then a couple more quarts hot water. Recap the keg, shake shake shake your money maker. Hook up some CO2 to the grey post, put the spunding valve on the black post. Turn the valve down or open until hot oxyclean water is shooting out the discharge.

Depress, dissemble, tip the keg over into that old bottling bucket that isn't good for much of anything else anymore anyhow.

After the keg is washed and re-assemboled, fill the keg with some plain hot water, shake shake shake, CO2 to grey, spunding valve on black, rinse out the valve.

When you get there, repeat with your disinfectant of choice.

It is cake man, cake.
 
Has anyone made a video of this yet? This is a great technique. I kind of understand it, but a video would help a lot. Maybe showing the parts all disconnected first?
 
Has anyone made a video of this yet? This is a great technique. I kind of understand it, but a video would help a lot. Maybe showing the parts all disconnected first?


It's getting to be a long thread, mine is running right now, "video uploading please wait." EDIT: Got it. Stitll processing, "video quality may improve when processing is complete.

[youtube]uSPZ2a5h_Rg[/youtube]

Hydrometer sampling already documented:

[youtube]HjCy3ub5Enk[/youtube]
 
Back
Top