Keg polishing, before or after bulkhead welding?

Homebrew Talk - Beer, Wine, Mead, & Cider Brewing Discussion Forum

Help Support Homebrew Talk - Beer, Wine, Mead, & Cider Brewing Discussion Forum:

This site may earn a commission from merchant affiliate links, including eBay, Amazon, and others.

Grossy

Well-Known Member
Joined
Aug 13, 2011
Messages
504
Reaction score
160
Location
Tucson
I am just about ready to build three keggles, and I want to polish them.

Should I polish them first, and then silver solder the bulkheads on.

Or silver solder the bulkheads first and then polish.


It seems like it would be easier to polish first. However soldering the bulkheads on will mess up the polish.

Any ideas from people who have done this, and what issues can you tell me to look out for.

Thanks,
Grossy
 
Polish first, then put liquid paper in the areas you don't want solder to get around the fitting hole. After you solder the fitting, use a solvent to remove the liquid paper, and it will just need a small buffing.
 
Polish first, then put liquid paper in the areas you don't want solder to get around the fitting hole. After you solder the fitting, use a solvent to remove the liquid paper, and it will just need a small buffing.

Agreed. But I would also mark and mask off where you are going to solder the fittings and not polish those areas. I'm not sure how much difference it makes for solder but I polished one of my kegs before having them welded and ended up with a small pinhole in one of the welds on the polished keg only. This also could have been coincidence but I would still either mask it off or rough it up before soldering.

Good luck.
 
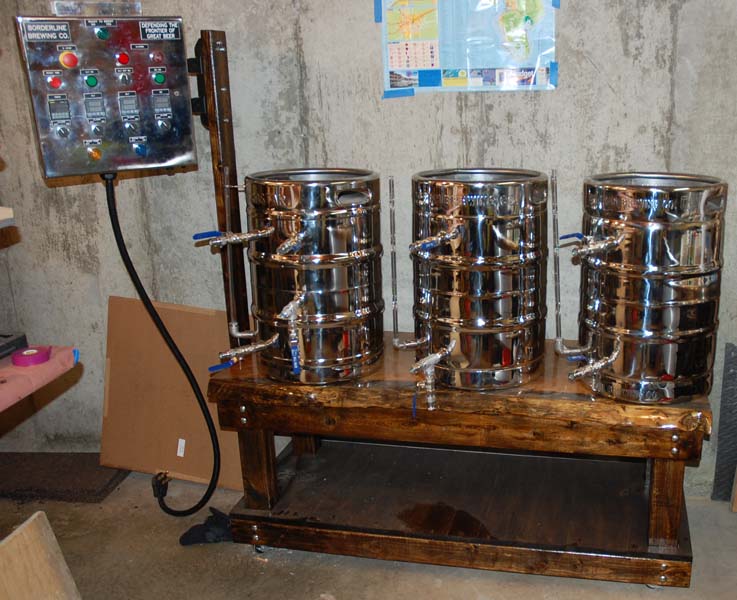
I polished up 3 keggles in a project that's nearing completion, so here's my take. I'd recommend doing all of the metal work first (holes, welding, soldering, etc). It is a little easier polishing the kegs when there are no bulkhead fittings or any other extrusions, but the difference is very little, as it took me about 6-8 hours/keggle anyway. I had my 1/2" fittings solder welded, but had to add the larger fitttings for heating elements into two of the units after polishing. I did have to go back and re-buff a few spots out - the extra polishing wasn't too too bad, but the hardest part was trying to work on highly polished kegs without scratching, marring, etc. If you have to drop off the kegs to have someone else do the soldering or welding, then you run a higher risk of getting more scratches and marrs on the kegs as well. The 8 hours of work on each might not seem that much, but it's a miserable 8 hours, that I had to break up into at least 2 sessions. It's real dirty, as polishing compound and bits and pieces of the buffing wheels go flying, as well as the metal "dust" that you're actually removing from the kegs, and standing outside with a 4 1/2" or 7" grinder (I used both) for hours at a time was tough on my back too. I thought I did a great job on the first keg, but then the second keg came out better, and the third even better. But by the time I was done, I didn't want to bother going back to redo the first one to make it shine more because it's such a PITA. Just my 2 cents. Good luck. It's a great feeling when they're done. Not sure I'd do it again.
 
When my welder , put on the fittings . He bead blasted it for free .Well worth it . that took 1/2 the labor out of polishing. Make sure they put water in it if they do any plasma cutting the slag will stick to the bottom if not.
 
One big thing hint that I wish I had before building keggles was thinking about the plumbing and placement of valves. I have ball valves on the outlets of all my 1/2" fittings, and for cosmetic purposes only, I realized that I wanted them all lined up the same way. With the 1/2" NPT fittings, most need to be be very tight to keep from leaking (Even with pipe dope, and not teflon tape). You may be able to play around with about a 1/2 of rotation, but if you're trying to line up the valve handles so everything is uniform, you really need to tighten everything up (i.e. valve to nipple to coupling), and then position them where you want them to be, and mark them for soldering/welding. I just silver soldered in the 1/2" couplings without doing this, and now some of my valve handles are 30-40 degrees off from where I really would have liked them.

mounted_panel.jpg
 
Back
Top