WAORGANY Brewing e-HERMS Brewery Build

Homebrew Talk - Beer, Wine, Mead, & Cider Brewing Discussion Forum

Help Support Homebrew Talk - Beer, Wine, Mead, & Cider Brewing Discussion Forum:

This site may earn a commission from merchant affiliate links, including eBay, Amazon, and others.
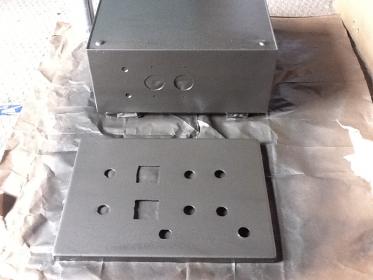
Well I got much accomplished on my build today! Cut out all the holes needed for the kegs, HLT and BK, mounted all the SS bling, and cut the holes for the outlets on the control box, leak tested the kegs, and everything is starting to look good and come together. Getting very excited. Will work on the control panel more tomorrow and maybe will be ready to start wiring next weekend!

image-1402999127.jpg

Measure three times drill once.

image-1792281797.jpg

Step bit worked great for all the holes, used a cheap set from Harbor Frieght.


image-667353447.jpg

The Barney Mobile in the back ground, used a friend garage since he has all the cool tools, then we worked on his car

image-2869171288.jpg

Outlets for Chugger Pumps.

image-4150474588.jpg

Brew Kettle

image-3304785423.jpg

Inside BK


image-1695541266.jpg

Hot Liquor Tank

image-1323003261.jpg

Inside HLT

image-3751940663.jpg

Starting to look like a brewery

image-931719287.jpg

The outlets on control panel.

image-3294942705.jpg

Leak testing, added 5 gallons of water to check all but the top outlets, everything looks good so far.

image-483737484.jpg

The look of things to come, no the control panel won't be sitting on the MT, nor will the wife let me keep it set up on the kitchen island, and yes I still need to put the elements into boxes mounted on the side of the kegs.
 
Might as well do it slowly and make sure it's right. And this is a hobby after all, we all have to work to get money for our addiction. Great job :rockin:
 
Wow! Lookin good. That's some shiny beer makin stuff you got there.

So, what did you figure out for the inlet on the mash tun?
 
Begin2Brew said:
Wow! Lookin good. That's some shiny beer makin stuff you got there.

So, what did you figure out for the inlet on the mash tun?

Nothing yet, I think I am going to get the set up that BobbyM sells just haven't ordered it yet.
 
Awesome! Looks like you made some serious progress which I bet feels great. I myself am digging into potentially another pot build if I sell my HLT!

Gotta love those step bits...

Did you use a green lee for the 1 1/4 hole for the element? I used step bits, but thought you told me you had some greenlees (assuming that was for the panel.)
 
Great job so far! I would be getting some flack for taking up the kitchen, :).

I'm curious on the green lee question too. I just dropped a couple hundred on arming my toolbox with green lee punch outs and step bits.
 
Unfortunately for me I only own two greenlees, the conduit size for the control panel and a 15/16'' one.
 
Awesome! Looks like you made some serious progress which I bet feels great. I myself am digging into potentially another pot build if I sell my HLT!

Gotta love those step bits...

Did you use a green lee for the 1 1/4 hole for the element? I used step bits, but thought you told me you had some greenlees (assuming that was for the panel.)

I used the step bits they worked great no issues, I do have a full set of Green Lee punches, four sizes. I will use the 1 1/4" punch for mounting the element to the gang box, if either of you need to use my punches just let me know, only cost you some grain, LOL. I am at the airport almost weekly, let me know. Thanks, yeah can't wait to get this finished and brewing again. All the best.


Great job so far! I would be getting some flack for taking up the kitchen, :).


I'm curious on the green lee question too. I just dropped a couple hundred on arming my toolbox with green lee punch outs and step bits.
 
I used the step bits they worked great no issues, I do have a full set of Green Lee punches, four sizes. I will use the 1 1/4" punch for mounting the element to the gang box, if either of you need to use my punches just let me know, only cost you some grain, LOL. I am at the airport almost weekly, let me know. Thanks, yeah can't wait to get this finished and brewing again. All the best.

Boy that is tempting :D is the 1 1/4 a radio chassis? or conduit? (I am about to embark on my 25G HLT pot (ordered it Monday)). The last time around I used a 1 1/8 conduit chassis from my neighbor and then a step bit to bring it up to 1 1/4 for the holes.
 
WAORGANY said:
...so let the wiring begin....ready to sit down watch the race and begin wiring things up...here goes nothing!!!

Good luck! I am slowly adding components so I only have to wire a little at a time. I just had brew session three on my partial system.
 
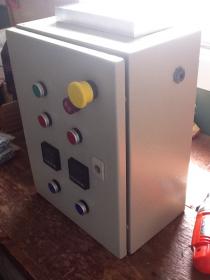
Did a little wiring today!


image-1110940733.jpg

Everything mounted back inside the control box

image-914180779.jpg

More stuff mounted ready to wire

image-2002218738.jpg

110 for pumps mounted on the bottom

image-2637694690.jpg

Power in mounted on upper right side

image-3651832107.jpg

The front looking good ready to roll, need a new lock mechanism the cheap plastic one broke

image-2615858063.jpg

Power out for elements and RTD probe connections

image-769703878.jpg

Heat sink

image-1116381965.jpg

Power in, left to right, ground, neutral, hot 2, hot 1

image-2463219933.jpg

Power in down to breakers
 
Yeap getting there, will try to get this all wired by the end of this coming weekend if possible.

Very cool. I just built my new 25G eherms pot last night (- the herms coil). Did a wet test and no leaks so I am quite happy!

My buddy and I are hoping to brew this weekend,... but we will see.
 
Very cool. I just built my new 25G eherms pot last night (- the herms coil). Did a wet test and no leaks so I am quite happy!

My buddy and I are hoping to brew this weekend,... but we will see.

Yes my HERMS coil is the last thing I need to do on my kettles, that and cut holes in the gang boxes for elements and wire them and add an outer casing to the RTD temp probes. getting so close.
 
Got the holes cut out in the gang boxes and the back plates mounted to the back of them to mount heating elements, will get them all put together and attached to the kegs tomorrow.
 
Attached the assembled elements into the kegs this afternoon, last thing to do is make the coil for HERMS and wire the elements!!!! Add pics soon.

image-2113595421.jpg

Brew Kettle inside ready to roll, just have to wire element.

image-1164296048.jpg

HLT inside view still need to wire and make HERMS coil, going to use copper tubing @20' 1/2"

image-2113595421.jpg
 
20' will not be enough. You should try for 50-feet of copper tubing.

Well good luck finding anything over 20' at the local supply places, Home Depot, Lowes, and even the mom and pop shops look at you like your crazy when you ask for 30+ feet...which is what I wanted so I figured 20' it is I think 50' is way too much, I have read others doing it with 30' no problem, if the water is circulating through 10 feet shouldn't make that much difference, I am going with 20' feet and if it doesn't work, not long enough I will bump it up, thanks. At some point I would like to use SS anyways...oh to dream!
 
Well good luck finding anything over 20' at the local supply places, Home Depot, Lowes, and even the mom and pop shops look at you like your crazy when you ask for 30+ feet...which is what I wanted so I figured 20' it is I think 50' is way too much, I have read others doing it with 30' no problem, if the water is circulating through 10 feet shouldn't make that much difference, I am going with 20' feet and if it doesn't work, not long enough I will bump it up, thanks. At some point I would like to use SS anyways...oh to dream!

I found the post below from Tiber Brew's build...

nice!

as for the length of your copper tubing, I would suggest 25ft. I had planned on putting together two 25ft tubings (as you can see in the first pic) but it came to pretty much the height of the keg itself. 25ft fits perfectly. leaves room for the element and is about 2-3 inches from the brim....
 
I can't say how 1/2 inch tubing works as I went with 60 feet of 3/8 (re purposed IC). Flow rate is good and I can ramp at least 10 degrees in one pass (that is the most I've tried). The more contact area the better. Either smaller tubing or more length will be more efficient.

Stainless is not nearly as good a conductor as copper. All things being equal, you will loose efficiency with SS.

Thanks, good point on the conductivity of copper!
 
WAORGANY,

How goes the wiring of your control panel? Have you determined how you are going to use your SWA-2451?
 
WAORGANY,

How goes the wiring of your control panel? Have you determined how you are going to use your SWA-2451?

I haven't done much on it the last few days been busy with other life stuff LOL. I am not sure how I will use the SWA but figured that the timer aspect could come in handy, I will have to work on figuring that all out once its up and running. Will keep everyone informed. Thanks.
 
Finished and attached the HERMS coil today after the race...

I built it from 3/8" ID soft copper tubing, 20' with two short sections of straight tubing and two 90 elbows, flux and solder together and attached to ss with compression fittings looks good ready to finish the control box and begin the stand.

image-747515655.jpg

Rolled the tubing around a corney keg, worked great took maybe five minutes.

image-3689551161.jpg

Nice and simple ready to heat up some water!
 
Back
Top