Temperature Controlled Plastic Conical Build

Homebrew Talk - Beer, Wine, Mead, & Cider Brewing Discussion Forum

Help Support Homebrew Talk - Beer, Wine, Mead, & Cider Brewing Discussion Forum:

This site may earn a commission from merchant affiliate links, including eBay, Amazon, and others.

lockwom

Well-Known Member
Joined
Jan 2, 2010
Messages
108
Reaction score
13
Inspired by all of the topics in

https://www.homebrewtalk.com/f51/super-simple-15g-plastic-conical-276378/
and
https://www.homebrewtalk.com/f51/ebay-aquarium-temp-controller-build-163849/

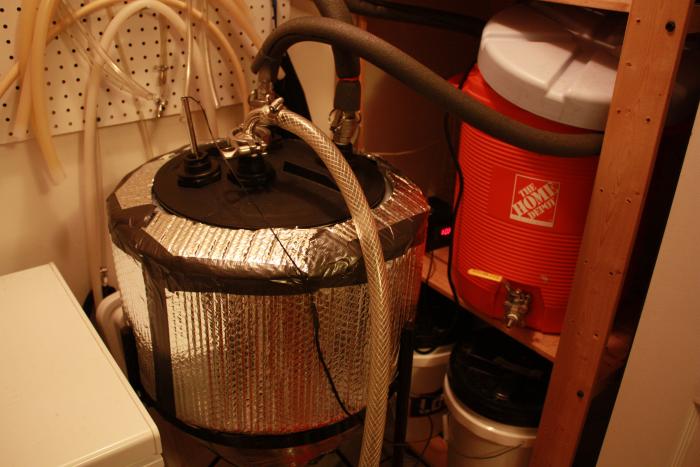
I built an insulated plastic conical fermenter.

- Purchased inductor (MDPE cone) and stand from RuralKing
- Use old Home Depot mash tun as cooler to store ice (I use a bigger 70 qt rectangular cooler for 10 gallon batches)
- Used aquarium temperature controller, hobby box, small thermister from DigiKey (that fits in a thermowell) that I soldered to a mono audio cable with leftover wiring to build a simple temp controller.
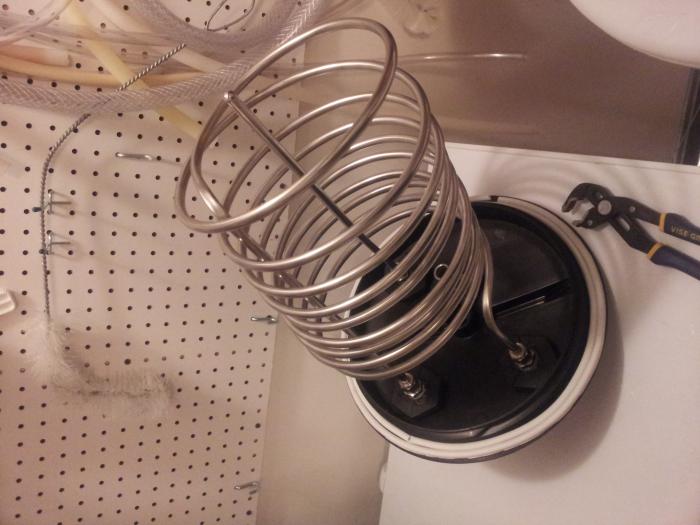
- 25 ft stainless steel wort chiller to immerse in fermenting beer
- Use pump that came with Mark's Keg Washer (simple pond pump) to recirculate ice water through beer during fermentation.
- 1/3 HP pump with CIP spray ball on camlock. Use Iodophor to sanitize before pouring wort, and PBW to clean up system. The CIP is only used for cleanup and santization, but removed during fermentation.
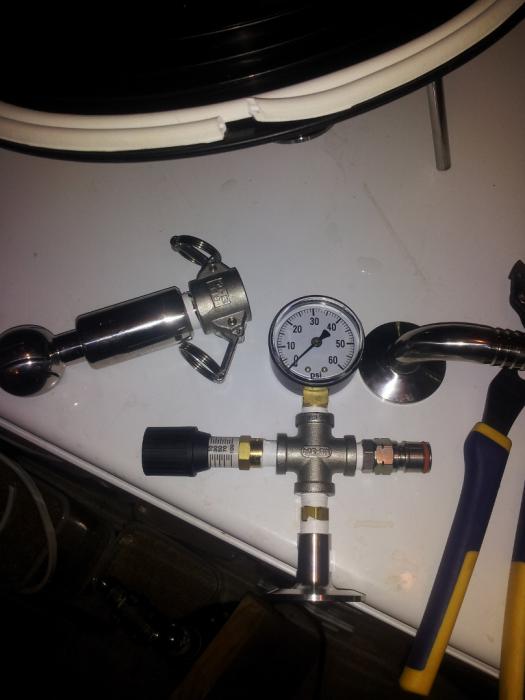
- A 3/4" triclamp elbow is used to recirculate cleaner sanitizer, and as a blowoff tube. I sealed with silicone and weather stripping so that I can fermented with blowoff, but also maintain pressure of a few PSI inside conical (see photo of homemade spunding valve)
- Homemade spunding valve also has ball lock gas post so that I can top off CO2 after dumping yeast, or when I have extended primary on a lager and want to be paranoid.
- Simple insulation from Home Depot duct taped.

I use lots of ice via pump to chill beer to pitching temp, dump trub, aerate, then pitch yeast. To maintain temps, I change out frozen 2L bottles of ice once or twice a day, depending on the activity of yeast.

The bling factor of this build was the stainless triclovers. However, if I ever upgrade to a stainless conical, the fittings are fully translatable. I've been so happy once I got this set up, my interest in a stainless system has diminished; this fully temperature-controlled system with spunding was cheaper than a barebones stainless conical without fittings like the Brewhemoth or Blichmann. Plus I can really see when the CIP cleans out all krausen lines with the large lide opening, and fully disassemble, clean and sanitize threads and parts. If I ever had problems with the plastic cone, the replacement is a mere $60 and very briefly drill holes again.

To install the side pickup, I used a Viton gasket insead of normal EPDM or Buna-N since it's immersed in beer. Otherwise it's all silicone, stainless, and the plastic conical.

Doesn't hurt that the outside is covered in insulation. During parties, nobody suspects it's plastic until I tell them.

Beers fermented so far (all 10 gallons):

- IPA, Chico at 66 F
- Kolsch, WY1007 at 60 F
- Oktoberfest (in progress) at 50 F, while my house is 74 F in July (notice the temp controller hovering near 10 C, this is after 36 hours with active fermentation inside)

You could tell I was getting progressively confident with the fermenter's temp control abilities.

If anybody's considering a conical, think about building a plastic one. It's easy to drill plastic, plus the insulation is the real key to excellent temperature control without buying a second large freezer. I think it's more efficient to transfer energy directly into the wort rather than the surrounding air. During active primary with yeast swimming around, I think it's especially efficient to avoid any temperature gradients.

I like the conical for:

- Dumping trub in the fermenter
- Giving friends viable yeast from a recent batch (I normally propagate my own with different strains between batches)
- Bulk fermenting 10 G at one time, instead of two carboys
- Filling two cornys with the side pickup at the fermenter rather than moving the fermenter(s) around
- Less left-behind waste in the fermenter, I leave behind just about a qt of material below the side pickup.
IMG_1436.jpg


ferm2.jpg


IMG_1434.jpg


IMG_1435.jpg


20130403_224101.jpg
 
I built a diptube by cutting a stainless steel elbow installed in a compression fitting, but never used it.

The dead space below the side port diptube only holds about a quart based on where I drilled it, and is usually full of yeast, dry hop matter, etc. I think a diptube is only necessary if the side port is far higher up the cone, because I'm happy to leave some of that stuff behind.
 
Before I only tested to about 3 PSI. With this lager, it's at atmospheric pressure, aapparently the seal has failed.

The silicone and and weather stripping are only protecting against inadvertent dust floating in.

I contacted 'allclene' from the original thread, and he estimates finishing at 10 psi in there.
 
I see you got the Oktoberfest down to 50 degrees. Have you been able to hold that temp?

I held it for 6 days, until it attenuated 75%. Let it rise to 60 F, which required half the amount of ice to maintain temp.

Dumped trub/yeast once it finished primary, lowered temp, and they've been lagering in kegs for a long time, and will continue to until October.

I could tell when they reached final gravity when temp control would lower it substantially since the only heat was from ambient, not internal fermentation.
 
This is an amazing build - great stuff sir! You have all the bases covered - pumps, immersion chiller, temperature control, shiny triclovers, etc :D

I had a question about how you purge the trub before pitching, and how you extract the flocculated yeast. Is it as simple as...opening the valve a bit, and shutting it once clear wort starts coming out?

I also had a general question about thermowells - is it basically just a hollow stainless tube, with one end sealed off - and you thread the temperature probe down to the bottom? And thus the probe measures the "air" temperature at the bottom of the tube, which is ideally a good approximation of the temperature of the wort?

Also: I don't see a valve on the side pickup. Maybe it's there, and I'm just not good at recognizing triclover clamps/connections, or is it not present in that picture?

Sorry for all the questions :) Again, insanely cool and inspiring build!!! You really got the gears turning in my head, heh.
 
So, the million dollar question: How many dollars did this cost you to put together?
 
Looks good! its amazing how good just using ice in the home depot cooler works! 50 degrees!

Im actually looking at doing DIY temp control for all our nanobrewery fermenters that are 60 and 100 gallon. im also looking at using stainless steel coil for an immersion coil system.
I see you have a bunch of plastic bulkheads at the top to plumb in the chiller and thermowell, are those just compression fittings i see used to seal things up?
 
Awesome job! I would love to see the complete price list. Depending on how i expand production in the future, I may have to follow your setup!

Matt
 
I had a question about how you purge the trub before pitching, and how you extract the flocculated yeast. Is it as simple as...opening the valve a bit, and shutting it once clear wort starts coming out?

Since the outlet is 1.5", as is the butterfly valve, I haven't had any problems with a clogging, but possibly because I make a quick trub/hop dump at the start.

My procedure so far is: transfer whirlpooled/chilled beer into two sanitized plastic 5 gallon carboys filled to the brim (plastic keeps them light), and dump them in the top of the sanitized fermenter. I do this because it's very far from where I brew. Wait 15-30 minutes, and make first trub dump.

This yields lots of hot/cold break and hop matter that made it through the whirlpooling. Even with the Oktoberfest with an estimated 25 IBUs, it's a very green sludge that settles at the bottom of the cone. I keep dumping until it ceases to be very green, perhaps just under 1 quart for a hoppy beer.

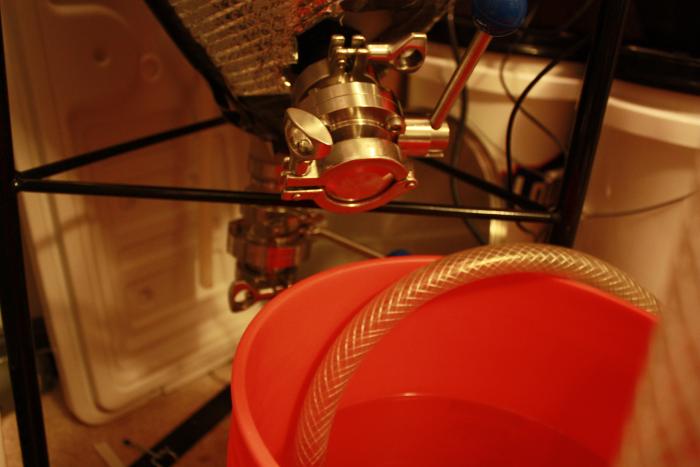
Before I dump anything on either butterfly valve, I remove the triclover cap and spray star san on the face and let it sit for 30 seconds.

Same deal with the yeast, I wait until primary is mostly finished, and decide if I want to repitch this yeast. If so, then I capture some that I intend to dump: unhealthy yeast and more trub that settled. The "middle third" should be the healthy yeast, and the last third you dump is also discarded. I keep pressure canned jars of water for the yeast capture, merely open the lid, dump the water and save the yeast in this sterile jar in the fridge.

I also had a general question about thermowells - is it basically just a hollow stainless tube, with one end sealed off - and you thread the temperature probe down to the bottom? And thus the probe measures the "air" temperature at the bottom of the tube, which is ideally a good approximation of the temperature of the wort?

You've got it! If you look closely, mine is slightly angled to measure the temperature in the middle of the cone based on where I could install the plastic bulkhead on the lid.

Also: I don't see a valve on the side pickup. Maybe it's there, and I'm just not good at recognizing triclover clamps/connections, or is it not present in that picture?

If you look at the first picture, you see that I use a butterfly valve:

http://www.brewershardware.com/1-Tri-Clover-Butterfly-Valve.html

Triclover stuff looks confusing if you've never interacted with it, but I find it to be very intuitive once you have it on hand.

Sorry for all the questions :) Again, insanely cool and inspiring build!!! You really got the gears turning in my head, heh.

Good to hear, honestly this build is inspired by everybody's else's input. Standing on the shoulder of giants, I couldn't help but share.
 
Looks good! its amazing how good just using ice in the home depot cooler works! 50 degrees!

If I could use some sort of system to electrically chill water (or possibly glycol) for recirculation, I would; changing the ice once or twice per day can be a bit of a pain for a lager. On the other hand, keeping beers around 60-70 is significantly easier. And this ice solution was cheap!

Im actually looking at doing DIY temp control for all our nanobrewery fermenters that are 60 and 100 gallon. im also looking at using stainless steel coil for an immersion coil system.
I see you have a bunch of plastic bulkheads at the top to plumb in the chiller and thermowell, are those just compression fittings i see used to seal things up?

Indeed they are! I just hacked off the end of the stainless "wort chiller" and fit them in the compression fittings attached to the plastic bulkheads. The lid holes for the bulkheads were drilled with a drill hole saw bit.

Those plastic bulkheads are very cheap with the EPDM gaskets (no beer contact) and IMHO make a better seal than a more expensive stainless bulkhead. Plus they have male and female threaded options.
 
So, the million dollar question: How many dollars did this cost you to put together?

Awesome job! I would love to see the complete price list. Depending on how i expand production in the future, I may have to follow your setup!

Sounds like I owe you guys a price list. Work is a busy right now, but I will sit down and enumerate the items I bought, including upgrades to make it work more smoothly.
 
Sounds like I owe you guys a price list. Work is a busy right now, but I will sit down and enumerate the items I bought, including upgrades to make it work more smoothly.

Awesome, thank you. I am going to be stealing some ideas from what you did here so I'm anxious to see what the rest of it costs as well.

Do you keep the lid off of the cooler to get the recirc tubes in there? If so, I wonder if it would be much more efficient if you drilled through the lid so that you could seal it.
 
Nice build you have there.

Couple quick questions:

What is the cleaning process for the conical? Are you doing it by hand or CIP setup of some kind?

With the ice chest, would it be more effective to maybe have a mini fridge instead of the ice chest? This way you could simply place a bucket of water in the mini fridge and cycle the cooling lines through an immersion chiller in the mini fridge instead of having to deal with ice changes. (hope that made sense)

I don't know if a mini fridge would be able to keep a bucket of water cool enough. I made a glycol chiller out of an old dehumidifier and a 24 quart cooler. I used RV antifreeze in the cooler the dehumidifier has no problems getting 3 gallons of the rv antifreeze below freezing and it holds temp for a pretty long time.
 
If I could use some sort of system to electrically chill water (or possibly glycol) for recirculation, I would; changing the ice once or twice per day can be a bit of a pain for a lager. On the other hand, keeping beers around 60-70 is significantly easier. And this ice solution was cheap!

you know honestly it wouldnt be too hard to make an electric system. we've been bouncing back and forth with a few different ideas. with a conical as small as yours i would say you might be able to pull off something like this. http://www.shine7.com/aquarium/chiller.htm

or an idea would be to simply find a mini fridge with the radiator on the back and take it apart, plumb the cooling element into your home depot cooler and radiator on the back. im sure that could keep your chill water cold.

otherwise a commercial aquarium chiller would probably also work.

Indeed they are! I just hacked off the end of the stainless "wort chiller" and fit them in the compression fittings attached to the plastic bulkheads. The lid holes for the bulkheads were drilled with a drill hole saw bit.

Those plastic bulkheads are very cheap with the EPDM gaskets (no beer contact) and IMHO make a better seal than a more expensive stainless bulkhead. Plus they have male and female threaded options.

perfect, thanks for the insider advice. im gonna do the same thing with my conicals
one more slightly unrelated question. Your conicals look like the same screw top ones we have. how have you been making an air tight seal around the screw top lid?
 
Hi, I know this thread is old but I was curious to what you used to connect your cooling coil to the lid. Are those regular compression fittings on the end of the tube? Are the soldered fittings? I'm trying to figure out a similar setup and I'm stuck on this one part.
 
Having now carefully read the entire thread, I retract my question that you already answered. Thanks, and God bless the United State of America.
 
I fully realize that this is a really old post. but I was hoping for an update on how your system has lasted. After reading a lot about plastic tanks and the number of people recommending against them because of chance of infection or only recommending using them for a short period of time, I was wondering if you are still using it. If not how long did it last and why are you not still using it. I would be very interested in having the benefit of your experience with it long term before building one myself.
 
I fully realize that this is a really old post. but I was hoping for an update on how your system has lasted. After reading a lot about plastic tanks and the number of people recommending against them because of chance of infection or only recommending using them for a short period of time, I was wondering if you are still using it. If not how long did it last and why are you not still using it. I would be very interested in having the benefit of your experience with it long term before building one myself.

highly doubt that he will respond. his last post was November 2013
 
We used them in our brewery for the last 2 years with very few issues and they are still being used today. A few points to consider:

1. We had neoprene jackets made for ours. Bought the neoprene online, measured the tanks and my mother-in-law sewed the neoprene into jackets. This works incredibly well for keeping out light and insulating the tanks.. which leads to point 2.
2. We took stainless steel herms coils and retrofitted them as cooling coils for the fermenters. We mounted them inside the fermenter with standard bulkhead and compression fittings. Glycol is pumped into the coils to help control fermentation temperature and to cold crash. We used the same bulkhead fittings to add a racking port to each fermenter, which leads me to point 3.
3. Since all the bulkhead fittings are threaded, they should be taken apart and cleaned regularly. Ideally after every batch. To be honest, we don't take them apart after every batch because we do a pretty extensive CIP run after every batch, which leads me to point 4.
4. We added a TC fitting to the dump valve and added a bulkhead fitting that has 1.5 TC on both sides to the lid. Now we can mount a spray ball on the inside of the lid and use a pump to recirculate cleaner from the dump valve, to the top of the lid and into the spray ball. We let this run for 30-45 min and it cleans everything incredibly well (you need a kick ass pump though). The TC in the lid also acts as a blow-off port during primary fermentation, but only because we were able to make the lids air-tight, which leads me to point 5.
5. We found gaskets from stout tanks and kettles that fit perfectly onto the plastic lid, allowing for an air tight seal when screwed in. Without the gaskets air would find its way in and out of the lid.

They're not perfect, but if you take care of them and try to address their shortcomings, they can last for a long time. I don't know when ours will become "unusable" but after 2 years of continuous use they still make great beer. I hope this helps!
 
I fully realize that this is a really old post. but I was hoping for an update on how your system has lasted. After reading a lot about plastic tanks and the number of people recommending against them because of chance of infection or only recommending using them for a short period of time, I was wondering if you are still using it. If not how long did it last and why are you not still using it. I would be very interested in having the benefit of your experience with it long term before building one myself.

I'm sorry I feel off the HBT bandwagon. Since I was last on here, I:
- Sold my house, got divorced, moved across country
- Pedaled my bicycle around Iceland, around both islands of New Zealand, and across the USA.
- I lived in a truck camper with a DIY retrofit for solar power and lived off that.

Pretty obvious I couldn't brew when living on my bicycle. I'm still deciding how much I want to participate in online forums. I just started doing BIAB on a 10 liter scale using induction, and having a blast with way less equipment, effort, cleanup time, etc.

Here are my answers:
- Worked great. I always ran the high powered pump with PBW after racking to kegs and unthreading the threaded fittings and bulkheads.
- Dozens of batches, but obviously no sours touched it. But iodophor soaking for fittings and for the spray ball inside never gave me any infections.

I'll interlace some details from PatrickLS83:

1. We had neoprene jackets made for ours. Bought the neoprene online, measured the tanks and my mother-in-law sewed the neoprene into jackets. This works incredibly well for keeping out light and insulating the tanks.. which leads to point 2.
2. We took stainless steel herms coils and retrofitted them as cooling coils for the fermenters. We mounted them inside the fermenter with standard bulkhead and compression fittings. Glycol is pumped into the coils to help control fermentation temperature and to cold crash. We used the same bulkhead fittings to add a racking port to each fermenter, which leads me to point 3.
3. Since all the bulkhead fittings are threaded, they should be taken apart and cleaned regularly. Ideally after every batch. To be honest, we don't take them apart after every batch because we do a pretty extensive CIP run after every batch, which leads me to point 4.
4. We added a TC fitting to the dump valve and added a bulkhead fitting that has 1.5 TC on both sides to the lid. Now we can mount a spray ball on the inside of the lid and use a pump to recirculate cleaner from the dump valve, to the top of the lid and into the spray ball. We let this run for 30-45 min and it cleans everything incredibly well (you need a kick ass pump though). The TC in the lid also acts as a blow-off port during primary fermentation, but only because we were able to make the lids air-tight, which leads me to point 5.
5. We found gaskets from stout tanks and kettles that fit perfectly onto the plastic lid, allowing for an air tight seal when screwed in. Without the gaskets air would find its way in and out of the lid.

They're not perfect, but if you take care of them and try to address their shortcomings, they can last for a long time. I don't know when ours will become "unusable" but after 2 years of continuous use they still make great beer. I hope this helps!

His answer is perfect. I didn't maintain contact with the eager buyer for my conical system, but we was fully aware of the cleaning process. Keep it tidy and you'll be happy.

Also, his neoprene insulation is likely much better than Reflectix. With no airgap, Reflectix provided barely-better-than-nothing performance, and fermenting lagers in the hot summer definitely led to annoying levels of exterior condensation. But no suffering in brew performance. These conicals are great if you're willing to invest the time!
 
Back
Top