How low to mount pump for reliable priming

Homebrew Talk - Beer, Wine, Mead, & Cider Brewing Discussion Forum

Help Support Homebrew Talk - Beer, Wine, Mead, & Cider Brewing Discussion Forum:

This site may earn a commission from merchant affiliate links, including eBay, Amazon, and others.

Yorg

Well-Known Member
Joined
Jun 3, 2007
Messages
168
Reaction score
1
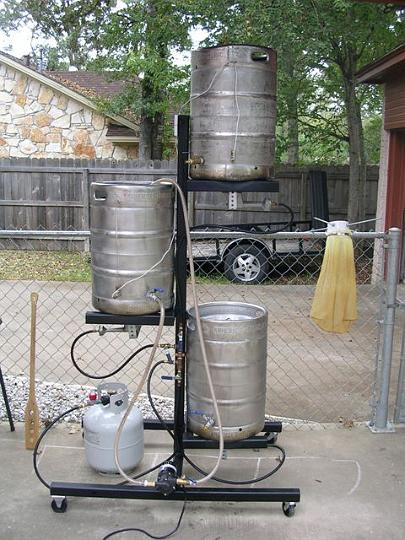
I have just tested my new setup with the March pump.
My tuns have been about a thrid full, so, OK, not full gravity pressure.
Sure when it gets going, the flow is pretty good.
Getting it to prime however is such a PITA.
I can't seem to reliably get a flow.
My pump is mounted horizontally with inlet upward and about 1 to 1.5 feet below the outlets of my tuns.
Most of the time I open a valve, and the liquid just sits there in the hose with an air bubble in it, and the pump gnashing empty.
How low below your outlet do you need to be?
Do you need to have some sort of dump valve below the assemply to draw liquid down through the pump or a vent or something?

Cheers,
Yorg
 
I would guess that your grain bed is not allowing the air to come up out of the hose, and the pump can't draw enough fluid to force it out the other end. I would suggest that you prime the lines/pump with plain water before douging in. That way, when the mash is done, you just open the valve and pump away!

Hope that helps. :mug:
 
I've read of this method, and I plan to use it in my rig:
1. Putting the outlet "up" and attaching a tee to it
2. Attach a ball valve to the remaining 2 openings of the tee, one that opens to more tubing (where you want your fluids to go), and one that opens to air.
3. Keepin the "to tubing" ball valve closed, open the "to air" valve and bleed air out of the circuit.....then close when primed.

Putting your outlet up will force all the air out of the pump head and prevent cavitation (gnashing). I hear 12" is adequate to prime with.
 
ScubaSteve said:
I've read of this method, and I plan to use it in my rig:
1. Putting the outlet "up" and attaching a tee to it
2. Attach a ball valve to the remaining 2 openings of the tee, one that opens to more tubing (where you want your fluids to go), and one that opens to air.
3. Keepin the "to tubing" ball valve closed, open the "to air" valve and bleed air out of the circuit.....then close when primed.

Putting your outlet up will force all the air out of the pump head and prevent cavitation (gnashing). I hear 12" is adequate to prime with.

This is essentually the way I have mine configured. Here is a pic of the in/out orientation (in is on the bottom). I do not have a fully assembled pic, but on the out, it goes to a tee, then from each end of the tee there is a valve. One is to the chiller the other goes to a pitcher. The one leading to the pitcher is my purge valve. From all valves in a closed position, I first open the kettle valve, then the purge quickly to allow air to escape, this is fo like 2-3 seconds, if I am good, only about a cup of wort comes out. Then I close the purge, open the chiller valve and start the pump. I always get full flow every time. Never a priming issue. My pump sits about 12 inches below the kettle.

5.jpg
 
Mine is mounted right below my BK and now that I know how, I can prime it no problem. I also use it on my MLT. It's much higher, but can still have the same problem if not done properly. My pump is mounted with the inlet/outlet horizontal, but ScubaSteve is right, the best way is vertical with the inlet down.

I also think the T with a bleeder valve is a great idea, but you should be able to consistently prime your pump without it. I wonder how a T with a needle valve for bleeding off the air would work.

Here's how I get mine primed.
- Make sure the hoses are secure and won't leak air
- Open the ball valve on the pump outlet
- Open the ball valve on the kettle drain and allow the hose and pump to (mostly) fill.
- Partially (or mostly) close the pump outlet valve and turn the pump on. Any air bubbles on the inlet side hose should slowly start to fill up. Once the air in the hose is gone, you can open the outlet valve completely. There should be no more air that would cause cavitation.

DSCN2508.JPG
 
Fantastic guys.
That gives me a lot to go on.
Cheers.
 
Guys, I now have a pic of the offending assembly.
Just to nail this:
Do you think, given all the posts, that simply rotating the pump so the inlet is down should fix it.
Or do you think I should give it more head. Let me re-phrase that: Should I mount the pump a bit lower.

pump assembly2.jpg
 
Just looking at that pic, I would think that closing the second (higher) discharge and venting the lower of the two valves with the QDs should be enough to bleed the air out. I have never used a march pump, but I am assuming you can mount it like that.
 
Wow! Now that's some beer pron! If it works, use it. If not, lower it ;)
 
Yorg, I'd try mr_x's suggestion first. You should be able to bleed it out easily enough with the maze of valves you've got there.

Q: Explain the need for all the valves since you're using QDs. It seems like it would've been a lot easier and cheaper to just have a valve on the outlet of your pump and move around the inlet/outlet hoses with QDs.
 
Just out of curiosity, have you moved 200F water through those lines yet? I had considered using plastic foam for insulation, but thought it would melt.

One other piece of advice about the pump cavitation. When you do your testing, I recommend trying to pump really hot water (200F +). It is easy to get and maintain prime on a pump with 70F water. Water that is closer to saturation more easily results in pump cavitation. Just a thought.
 
Mine is mounted about 6" below the tun & I've never had trouble getting flow. I just open the valves and let the line fill, then turn the pump on.
 
Thanks for the responses.
I'll explain the valves in a moment.
Re:
david_42 said:
Mine is mounted about 6" below the tun & I've never had trouble getting flow. I just open the valves and let the line fill, then turn the pump on.
Got a pic? Ideally with the tuns connected.

natehilde said:
Just out of curiosity, have you moved 200F water through those lines yet? I had considered using plastic foam for insulation, but thought it would melt.
I have passed 80C water through it, and that's when I have the problems.
The pipe insulation you see works fine for the purpose of insulating the HERMS part of the process (which I've now abandoned in favour of steam). The wort from the boil is uninsulated, since it is on the way to the chiller anyway.

Lil' Sparky said:
Q: Explain the need for all the valves since you're using QDs. It seems like it would've been a lot easier and cheaper to just have a valve on the outlet of your pump and move around the inlet/outlet hoses with QDs.

The valves were an experiment designed to allow the hook up of all the equipment, and be able to move through the brewing process without pugging and unplugging anything.
Here's a diagram:

Last night, based on a number of your suggestions, and on the Australian site Aussiehomebrewer.com, I made a mod.
Here is a pic.
BTW. I am going to start another thread, requesting that folks post a pic of their pump and plumbing assemblies, with a description of how it works, what works well and not so well. Please post there.
Cheers,
Yorg.

Schematic process options.jpg


Pump assembly version 3.jpg
 
ScubaSteve said:
I've read of this method, and I plan to use it in my rig:
1. Putting the outlet "up" and attaching a tee to it
2. Attach a ball valve to the remaining 2 openings of the tee, one that opens to more tubing (where you want your fluids to go), and one that opens to air.
3. Keepin the "to tubing" ball valve closed, open the "to air" valve and bleed air out of the circuit.....then close when primed.

Putting your outlet up will force all the air out of the pump head and prevent cavitation (gnashing). I hear 12" is adequate to prime with.

Great post Steve. I am having a helluva time getting my pump to prime from HLT to MLT. When going to kettle from MLT, I get a good flow right away though (weird). This sounds like it will solve my air problem. Thanks.
 
After reading this thread a while back, I re-oriented my pump head where the outlet is up, and it's much easier to prime.

One thing I'll add. If your hoses (especially the one to the inlet of the pump) isn't sealed tight, then you can get air into the line which can get caught in the pump and cause cavitation. Make sure those hose clamps are tight!
 
Lil' Sparky said:
After reading this thread a while back, I re-oriented my pump head where the outlet is up, and it's much easier to prime.

One thing I'll add. If your hoses (especially the one to the inlet of the pump) isn't sealed tight, then you can get air into the line which can get caught in the pump and cause cavitation. Make sure those hose clamps are tight!

Thanks Sparky, I now suspect that that is a contributing factor since I am getting lots of air from seemingly nowhere.
 
The basic nugget of wisdom for pump priming is giving the outlet a direct open vent to air to allow liquid to drain down into the pump head. In the first pic, the problem is having the outlet go down and into a "P-trap". In other words, once that section fills with liquid, the air in the line preceding the pump is now trapped. Think of air only liking to rise straight up to escape. Give it that path.
 
Back
Top