Show us your element housings/pots. How did you do it?

Homebrew Talk - Beer, Wine, Mead, & Cider Brewing Discussion Forum

Help Support Homebrew Talk - Beer, Wine, Mead, & Cider Brewing Discussion Forum:

This site may earn a commission from merchant affiliate links, including eBay, Amazon, and others.
Another thing to note...

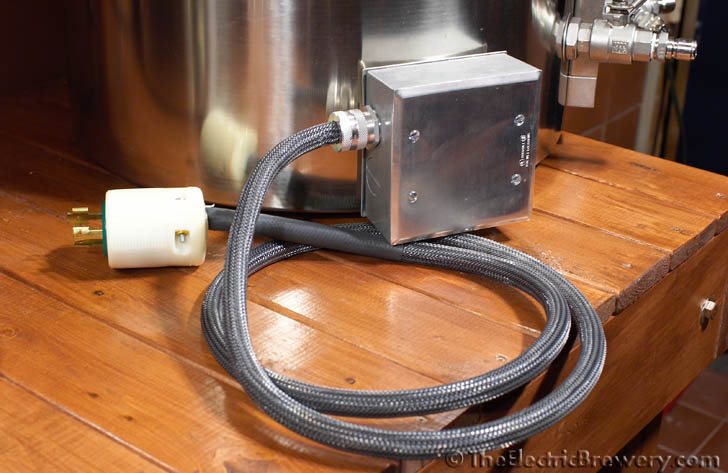
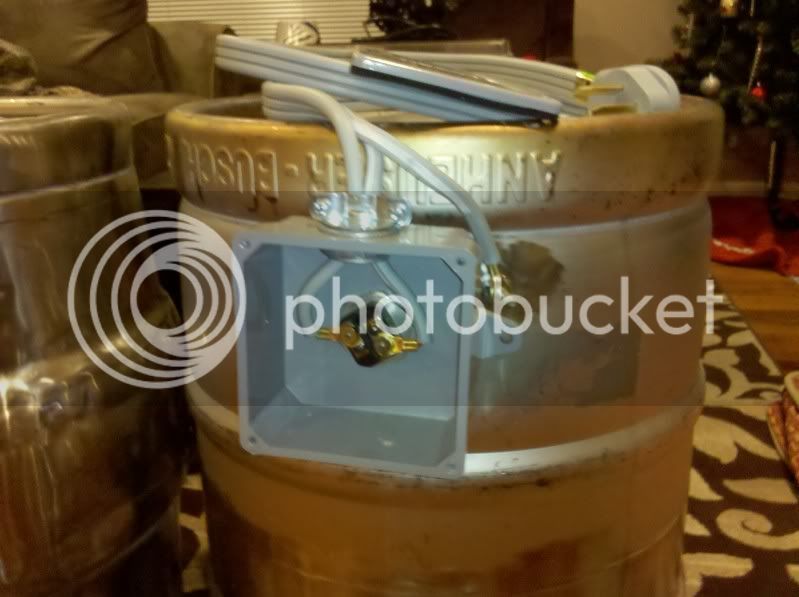
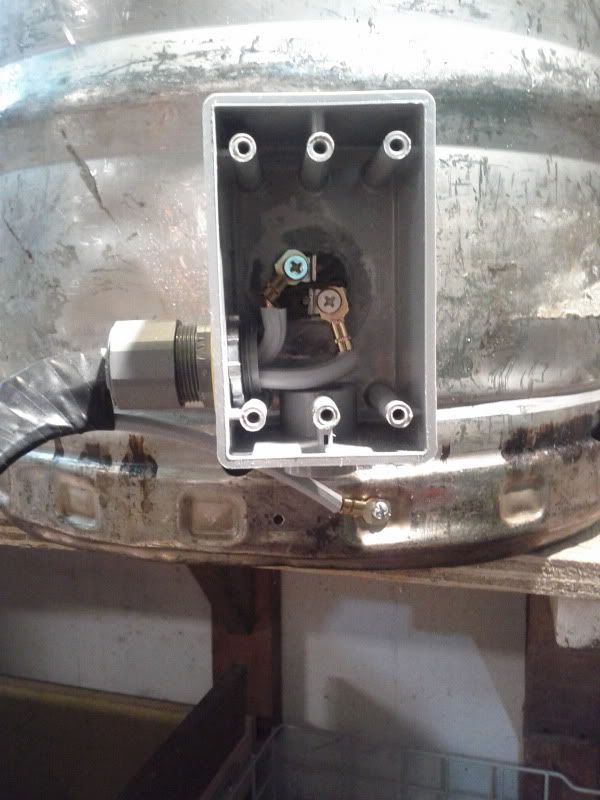
To mitigate the risk you mention of potential leakage into the box, I drilled a ~1/4" hole in the bottom of the box to act as a drain port in the event of any leak. I figured in theory there could never be enough buildup of water (from a leak) that would ever allow the water level to rise to the point of the terminals -- plus I find myself checking to see if I have any leaks periodically throughout my brew day. I was super paranoid about that, so it keeps me at peace rather than have to worry about killing myself for a batch of beer. :cross:

This is a good idea....I'd drill 2 holes in the bottom so you can relieve pressure. If the box is completely sealed, it may not drain through just one hole because the vacuum will prevent the fluid from draining.
 
I know this was asked already but I'd like to hear a few more answers. So whenever you guys want to move/lift and dump your keggle you have to drag those cords around? Or is the dangling cord no biggie.

I don't have 220v so I'd need to mount two 2000watt elements in mine. I don't know if I should do one box or two. I just had a heat stick fail and pop my gfci so I'm considering mounting them now.

My HLT and BK both unplug from my control panel, leaving a minor length of cord attached, but that isn't an issue at all since I clean in place. My CIP cycle consists merely of circulating hot water and PBW, then rinsing with cold water. The only vessel I remove from the stand is my MLT, which isn't plugged into anything. Even the MLT is easy to clean, with dumping the grain out, disassembling the false bottom, then giving it a good rinse.

This is just my experience, and how I do it, but I'm happy with it.

TB
 
electric_connection1.JPG


this is my electrical connection---1 inch stainless lock nut on the inset of the keggle, holding element (+gasket).

The rubber housing is a 1 1/2 inch plumbing connection, clamped on with the hose clamps. The ground wire is just visable, clamped across the element nut.

The power cord goes through a drilled PVC cap that clamps down on it when the hose clamp is tight.


t
 
I know this was asked already but I'd like to hear a few more answers. So whenever you guys want to move/lift and dump your keggle you have to drag those cords around? Or is the dangling cord no biggie.

My HLT and BK disconnect at the control panel with a 6 foot cord each:

IMG_3580.jpg


My HLT (and most HLT's) doesn't need cleaning. Only contains water. So it never gets moved.

My BK simply gets titled 90 degrees into the large sink right beside it for a scrub after brewing.

IMG_5206_letters.jpg


IMG_7248.jpg


The pre-wash arm goes a great job at getting most of the stuff out and then a quick wipe with a sponge to clean the element is all that is needed.

Kal
 
electric_connection1.JPG


this is my electrical connection---1 inch stainless lock nut on the inset of the keggle, holding element (+gasket).

The rubber housing is a 1 1/2 inch plumbing connection, clamped on with the hose clamps. The ground wire is just visable, clamped across the element nut.

The power cord goes through a drilled PVC cap that clamps down on it when the hose clamp is tight.


t

While there are many great methods here, I wanted to compliment you on the simplicity and effectiveness of this one. I will be replicating it. Thanks:rockin:
 
I did the basically the same thing as most of you and placed the O-ring between the plastic box and the welded fitting.

For future reference, it takes a 1-1/4" hole to fit the electrical element.

IMG_20110108_175122.jpg


IMG_20110108_181339.jpg
 
I may go this route, using some insulating sleeve inside, and drilling some drain holes, thanks Ihearthops. I have a cheapo element wrench socket from Loew's, so replacing the element would not be a problem. This would be welded to the keg around the one inch element bung, because you can never have enough triclamps!
fermenter001.jpg
 
How to attach the elements to our Blichmann kettles in a safe and secure manner took some thinking. I spent many months on this. We wanted the entire kettle to be electrically grounded for safety reasons the same way any power tool or appliance chassis is grounded.

Grounding means that the entire metal chassis (in this case the entire kettle) is connected to your house's electrical system ground plane. This ensure that any stray current can find its way to ground instead of through something else (such as the brewer!) in the off chance that something goes wrong and one of the 'hot' wires becomes disconnected and touches the kettle. Without proper grounding the kettle would instead simply become energized and pose a great danger to the brewer. A proper electric brewing setup should always have everything properly grounded!

I also don't want any wires exposed as they could be easily damaged. Kettles are heavy and moving them around while you clean them means the brewer will inadvertently bump parts sticking out against other things. No matter how careful you are, it will happen. I wanted the wires to be protected as much as possible and completely covered up.

So I stole ideas from how Blichmann does weldless fittings and came up with this:

IMG_1553.jpg


IMG_3580.jpg


element_box_cutaway.jpg


Complete instructions with parts list is here: http://www.theelectricbrewery.com/heating-elements

Kal

Kal,

What did you use to seal the 3/4" hole in the box opposite the one you installed your cord in?

Thanks.
 
What did you use to seal the 3/4" hole in the box opposite the one you installed your cord in?
2-gang boxes come with screw in plugs. My 2-gang boxes had 4 holes.
You can see one of the plugs below the cord grip in this picture:

IMG_3581.jpg


Kal
 
I copied Kal's design for my BK and HLT.
They were easy to build, and work like a champ!
Thanks a million Kal!!
 
2-gang boxes come with screw in plugs. My 2-gang boxes had 4 holes.


Kal


Aaaaaaah. That was too obvious for me, I guess. The best place to hide those screw in plugs from me is apparently in the box.

Many thanks. I should have this done in time to brew a nice english brown this weekend.

Thanks, Kal.
 
Mine is a SS lock nut welded onto a tri-clover cover plate. The element threads into that and the cover is simply a 1-1/4" PVC ell into which I made some cuts on the table saw. This makes slightly flexible "fingers" which grip the wrench flats of the element by way of the hose clamp. The cord end of the cover is a threaded bushing glued in and a 3/4" cable clamp screwed into that. The whole thing is easily removed for cleaning.

HtrOutside35r.jpg
 
Just finished my element covers/boxes. 2" TC X 1" NPS element plate from Hillbilly Stills soldered through 14ga stainless plate which in turn is bolted to water-tight box. Provides grounding point and covers element wiring inside the box. Cable strain relief on the side for my 10/3 cords and that's it.

Have to say, even it's going slow, the build is really fun.

Thanks to many from the forum for continuing inspiration.

image-2161930115.jpg


image-570233868.jpg


image-3147754716.jpg
 
IMG_20120324_174945.jpg


IMG_20120405_070858.jpg


IMG_20120324_174937.jpg


Electrical tape provides no insulation value, its only there to keep the ground wire as close to the power leads as possible so it doesnt get snagged on anything. The tape also matches the aesthetics of the rest of my brewhouse, which some would describe as "Ghetto-Fabolous"
 
Just finished my element covers/boxes. 2" TC X 1" NPS element plate from Hillbilly Stills soldered through 14ga stainless plate which in turn is bolted to water-tight box. Provides grounding point and covers element wiring inside the box. Cable strain relief on the side for my 10/3 cords and that's it.

Have to say, even it's going slow, the build is really fun.

Thanks to many from the forum for continuing inspiration.

Kevin,

can you please post some more information regarding your build? How are you attaching the TC to the pot/keggle, and how are you securing the heating element inside the TC?
 
I had a 2" triclamp ferrule welded to my Blichmann boil kettle and the 2" triclamp fitting in my box/cover is threaded for 1" NPS so element screws right into it and the whole thing is clamped to kettle.

image-3829827179.jpg
 
What do you guys think of this design? I was thinking about something like this for my setup which I am currently building.(https://www.homebrewtalk.com/f170/just-another-electric-brewery-build-thread-317746/#post3951391)

This setup would use 2 high temp silicon O-Rings and a Nut inside the kettle. The electrical box would have a 1.25" hold punched and be on the THREADED side of the element using the 2nd o-ring to make a seal. This design should be water tight from the inside and outside of the kettle.

O-RINGS: http://www.highgravitybrew.com/Prod...ating-Element-Replacement-O-ring-157p3505.htm
INSIDE NUT: http://www.highgravitybrew.com/ProductCart/pc/Weldless-Heating-Element-Kit-157p2652.htm

RED: O-RINGS
BLACK: Electrical Box
GREEN: Inside Nut
BLUE: Kettle Wall

EDIT: As an alternative the 2nd O-RING could be moved down 1 layer so it is inside the electric box.

 
Not good. There is nothing preventing the wort from traveling along the threads from inside the kettle to inside your electrical box.
 
Here's my latest installation, it uses Kal's o-ring inside washer method (blichmann) as he described in this thread. The element is 2000w 120v, and I've added a toggle switch. The box is an extension ring, not an actual box. This is thinner.
No silicone, nothing but the oring and metal-to-metal seating. I was able to tighten it down all the way, flattening the kettle wall.
The bolts run through the box extension holding the two covers and gaskets together on either side.
7326-kettle-stir-plate.jpg

7325-inside-kettle.jpg
 
I run a slow recirculation with the mash tun, and the stirring helps me keep the temps straight in the BK, which is acting as a rims heater. Bit more details here
 
TC15F10NPSCOV-400-2.jpg

As much as I love DIY, I couldn't pass up on these tri-clover adapters from Brewers Hardware. I don't have the tools or skills to do all the machining like they did. Can't wait to get them wired up.
 
TC15F10NPSCOV-400-2.jpg

As much as I love DIY, I couldn't pass up on these tri-clover adapters from Brewers Hardware. I don't have the tools or skills to do all the machining like they did. Can't wait to get them wired up.

Are you just going to weld them in? whats your plan?
 
sasky7777 said:
As much as I love DIY, I couldn't pass up on these tri-clover adapters from Brewers Hardware. I don't have the tools or skills to do all the machining like they did. Can't wait to get them wired up.

I saw these a couple weeks ago and thought they looked perfect. What has your experience been?
 
TC15F10NPSCOV-400-2.jpg

As much as I love DIY, I couldn't pass up on these tri-clover adapters from Brewers Hardware. I don't have the tools or skills to do all the machining like they did. Can't wait to get them wired up.

Are you welding in half or full ferrules? This smaller one? http://www.brewershardware.com/1.5-Tri-Clover-Ferrule-Short.html

Or is this one better to weld in? http://www.brewershardware.com/1.5-Tri-Clover-Ferrule-Long.html

Or the larger one? I am going to copy you but would like to know which ferrule most people use(short or long?)
 
If you haven't welded a ferrule yet you need to consider the type of element so it doesn't touch the ferrule on the kettle which can be common with the 1-1/2" ferrule and fold back elements. You need at least 1/2" projection from the kettle with the ferrule in order to get a clamp on it. The short ferrules are usually used to weld on to a tube but can be used on the side of a kettle. They are easier to silver solder on than weld because of how short they are.
 
If you haven't welded a ferrule yet you need to consider the type of element so it doesn't touch the ferrule on the kettle which can be common with the 1-1/2" ferrule and fold back elements. You need at least 1/2" projection from the kettle with the ferrule in order to get a clamp on it. The short ferrules are usually used to weld on to a tube but can be used on the side of a kettle. They are easier to silver solder on than weld because of how short they are.

I ordered the long type ferrule from brewers hardware this morning and it sounds like the right decision(although its hard to tell from your response you make it sound like no fold back elements will fit a 1.5" ferrule).

I figured the fold back elements would fit fine since it fits in the 1.5" RIMS tube from brewers hardware.

However I have no real world experience are you saying the 1.5" long ferrule won't work with standard fold back elements? I realize the ripple elements won't work. Will the long 1.5" ferrule welded in the side of a brew kettle work with fold back elements? If not someone please let me know asap so i can try to adjust my order.
 
You'll be fine with the longer ferrule and a straight element. No worries.

Yeah the ripples are a pain with 1-1/2" TC that's why I went with 2" TC on my boil kettle.
 
You'll be fine with the longer ferrule and a straight element. No worries.

Yeah the ripples are a pain with 1-1/2" TC that's why I went with 2" TC on my boil kettle.

Thanks man! I feel better now. Can't wait. Love this design. Now i just need to find a welder locally!

Anyone know if this element is shorter than it actually says? I'd like to buy this for the BK and HLT but for some reason amazon lists it as 17". kind of hard to believe and I haven't found another site that really lists the length properly. I have a 10 gallon blichmann boilermaker that is only 14" in diameter.

This is the only 4500w ULWD element i could find in a fold back design but I am concerned about the length and cannot find more details anywhere.


http://www.amazon.com/dp/B0002YUDSI/?tag=skimlinks_replacement-20
 
Last edited by a moderator:
This is the same one (50w per sq. inch = ULWD) and fits a 14" tank so it is less then 14". When I get home I can get you the exact installed length if the helps. It’s less expensive too.

http://www.ronshomeandhardware.com/2923-4500W-240V-FLD-Elemen-p/565426.htm

Thanks man! I feel better now. Can't wait. Love this design. Now i just need to find a welder locally!

Anyone know if this element is shorter than it actually says? I'd like to buy this for the BK and HLT but for some reason amazon lists it as 17". kind of hard to believe and I haven't found another site that really lists the length properly. I have a 10 gallon blichmann boilermaker that is only 14" in diameter.

This is the only 4500w ULWD element i could find in a fold back design but I am concerned about the length and cannot find more details anywhere.


http://www.amazon.com/dp/B0002YUDSI/?tag=skimlinks_replacement-20
 
Last edited by a moderator:
Thanks! you just confirmed this element is fine! i dont know why amazon says it is 17". Thanks for the cheaper source! I pulled the trigger. now I have to find a welder :)
 
Wait...wuh? Can you tell me about what's going on here? If I am correct, is that a control knob for an old heater?

Naah. It's something called a Chill Chaser. A hand held immersion heater with a temperature control knob from a company that's no longer in business. Bought it cheap on eBay. It's now mounted in the side of my MLT. Took the cord off and put in a plug with J-B Weld. Easier to clean and store with out a cord dragging.

Chill_Chaser.jpg

29201d1309945012-gfci-problem-chill-chaser-emlt-chill-chaser.jpg
 
Back
Top