Single Vessel Electric Build: 1.5 to 5 gallon batches

Homebrew Talk - Beer, Wine, Mead, & Cider Brewing Discussion Forum

Help Support Homebrew Talk - Beer, Wine, Mead, & Cider Brewing Discussion Forum:

This site may earn a commission from merchant affiliate links, including eBay, Amazon, and others.

OEHokie

Well-Known Member
Joined
Jan 8, 2010
Messages
89
Reaction score
0
Location
Arlington, VA
ScubaSteve's build was definitely an inspiration: https://www.homebrewtalk.com/f11/single-vessel-all-electric-ns-nc-brewery-158608/ Mine is basically going to be the bastardized mini-version of his that won't look as good.

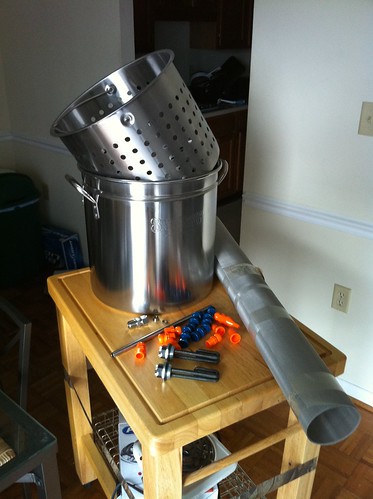
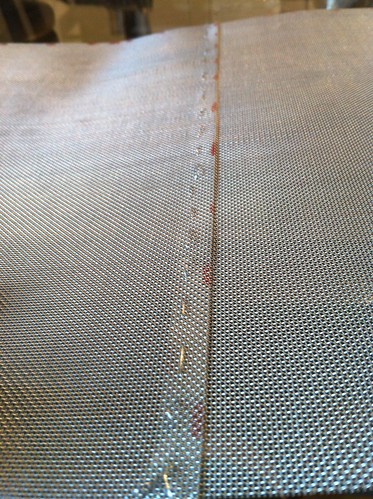
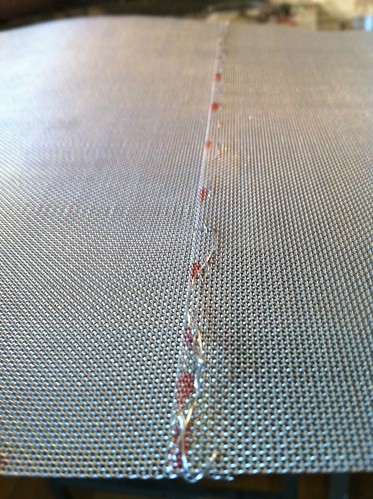
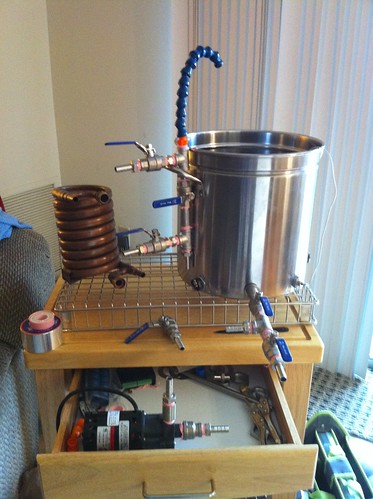
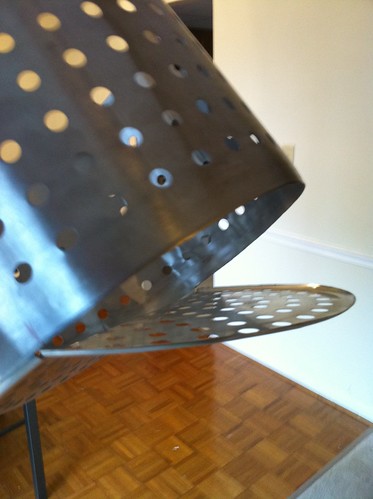
My brew process is going to be basically the same. I've ordered a 36 quart stainless steel stockpot w/steamer basket. I'm going to line the steamer basket with SS mesh and use this as my first all-grain setup.

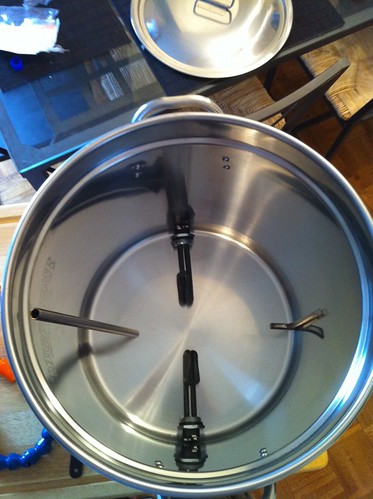
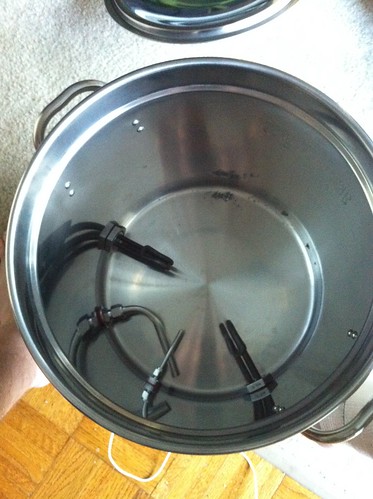
At the bottom of the pot I'm going to have two 1500W Extra low density heating elements running off of two separate 120V/20A breakers in my kitchen (I live in an apartment). Also at the bottom will be the SS dip tube and temperature probe.

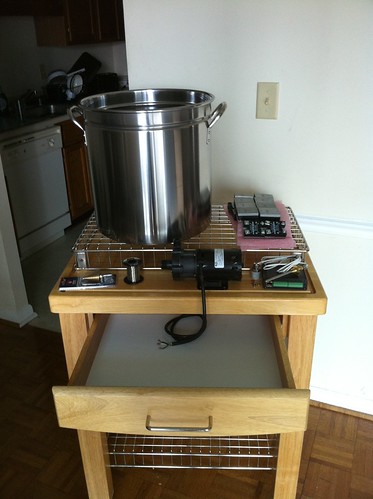
I've ordered the BCS-460 to control my heating elements and pump. I picked it over the brewtroller because of the better integration with the internet.

Since I want to brew very small... ~1.5 gallon batches... there's an issue with the deadspace at the bottom. The pot diameter is 13.5" which means that every inch takes 2.5 quarts. I'm going to put something in the bottom (don't know what yet, open to suggestions) that will displace enough water, so more of it overlaps the basket.

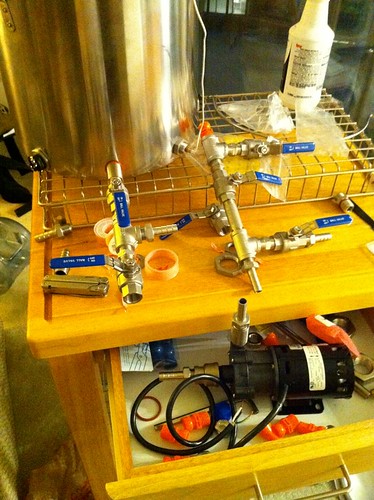
What else... the control box. Not sure what I'm going to do with this yet. I did like the toolbox version done here: https://www.homebrewtalk.com/f51/simple-brewing-est-2009-build-147021/ So, I may give that a shot. The march pump won't be in the box. One of the 120V connections is going to power one of the heating elements, while the other is going to power the second heating element, march pump and bcs-460. When I do the micro-batches I might not need both elements. I'm going to have covered toggle switches for both heating elements that can cut the power (overriding the BCS). The outlets in my kitchen aren't GFCI, so I'll have that inside the box too. I will also have 3+ SSRs (one for each heating element and one for the march pump, and for the solenoid valves if I get those).

Question: Is that how most people (in the automated setups) control their march-pump (100% on or off)... or is there a better solution to provide variable power, using the BCS?

Question: When recirculating, how do I get all the fluid back into the kettle? The march pump won't be able to push it out once it gets past the pump, correct?

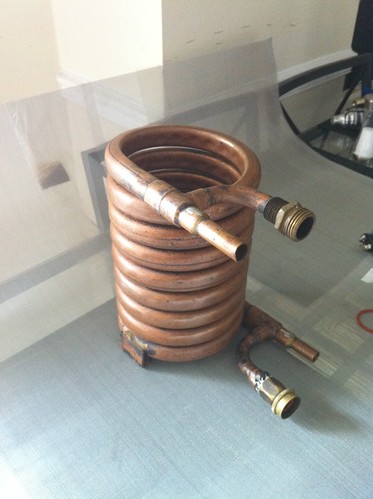
I'm going to have a CFC to cool down the wort (I really liked ScubaSteve's all copper one, so I might look into making one of those too).

It's not going to have a permanent stand... though I do have a kitchen cart that I will be using most of the time.

Equipment list:
  • Six 2 gallon jugs for mini-fermenters (in possession)
  • 36 Quart Stockpot (ordered, ~$100 (amazon))
  • BCS-460 w/temperature probe (4") and SS fittings (ordered, $~225)
  • March Pump (ordered ~$110 (ebay))
  • 2x 1500W Extra Low Density Heating Elements ($50, plumbing supply. Thanks Harkin)
  • 10x 120V 25A SSRs ($30, ebay... have extra if anyone is interested)
  • Valves (waiting)
  • SS Mesh (ordered, mcmaster)
  • chillzilla (ordered, $110, eBay!)

Next, I'm going to reserve some spots on here for pictures later.

I'm a little weak on electrical knowledge, so any pointers are welcome.
 
I would highly suggest you use the 1500W ultra low density elements from plumbing supply. They are a bit more expensive, but you will no doubt have grist in the bottom and you will blow the 2000W high density ones. I have blown 3 of the high density ones in my rigs (a CB20 and a single vessel BIAB with internal chiller for small batches). 3000w is more than enough to boil 1-7 gallons of wort and still get a 1g/hr boiloff rate.

Before you build, you may want to consider building a rims tube with your toolbox.

You already noted your biggest problem, deadspace. The elements can only be mounted so low.

You will need to connect your elements on separate circuits. I use two elements and simply plug one into my PID and the other one into another circuit. I only need the second one for full boil so it doesn't need to be controlled.

Thanks for the tip on the heating element. When you said they were a bit more expensive, I wasn't expecting only $20, that's not bad. I went ahead and ordered them.

What would building a rims tube get me for this kind of setup?
 
You are going to have temp loss during your mash so a rims tube would allow you to maintain perfect temp during your mash without direct heat. If you build a portable one, integrated into your toolbox (there is a build on here somewhere that was pretty slick), it would also allow you to integrate it into a modular build later in life. It would probably be a good investment.

An idea for your deadloss problem is to use a voile curtain and line it in your brewpot, drop in the grain, and use the rims tube to recirculate during your mash. Once the mash is done, just lift out the curtain with the grain. You only need to make sure the curtain doesn't affect your pickup tube.
 
Good on ya! I'm really excited to see what you come up with. A couple tiny pearls of wisdom I have gained from building said system that isn't even finished yet:

1. If you can, make it so you can swap in a bigger vessel. You're using some expensive gear (bcs-460, etc.) so you might as well be able to use it with multiple systems.

2. Try "tack" soldering the screen in the basket with a soldering iron. I used epoxy and I think it's less aesthetic. I tried a propane torch and it overheated the screen, but an iron should work nicely.

3. PM Sent :mug:
 
@Harkin:
I'll look at adding in a rims tube later once I get an idea of how well this works (and once my wallet recovers a little bit). The voile curtain is a good idea. I was also thinking that I could make a custom mesh basket that goes around the heating elements, dip tube and sensor. That's something I'll experiment with.

@Scuba:
Yeah, I was thinking about that. It'd be great to re-use stuff if I ever decide to do larger batches. I'll leave room in my control box to add in 240V stuff for when I buy a house (not anytime soon) that way I'll just need a new heating element/kettle and can reuse most everything else. Thanks for the tip on the iron... yet another thing I'll have to buy :( Are you still going to be using loc-line?

Thanks for the help!
 
I really like the loc-line, but I'm thinking about using a single silicon hose with camlocks that can be quickly swapped between my RIMS, Sparge, CFC output, or submersible pump for CIP.
 
I ordered some loc-line. I'm going to try and use it to assist with a lot of things... could possibly do whirlpooling with it, clean in place, etc. I think it'll be pretty useful.

I also ordered some SS mesh and some SS wire. I'm going to try to stitch a basket together that can fill more of the kettle while avoiding the heating elements/tubes/etc. I'll experiment with a tiny bit of the mesh first to see if stitching will work. I'll also try and tack it with a soldering iron... and if all else fails... JBWeld into the steamer basket.
 
Wow. That rocks. :rockin: I love Ebay!!!!

P.s. Wear gloves when you're doing the mesh basket ;)
 
Received my first batch of equipment today. Get most of the rest tomorrow. Pictured is the 36 quart stainless steel stockpot w/steamer basket, two 1500W/120V Extra low density heating elements, loc-line, stainless steel mesh, a stainless steel tube (to be used as the dip tube) and a coupler for it. All on top of the stand I'm going to use for most of my brewing (an old kitchen cart).


Issues:
  • The SS tube for the dip tube is a lot thicker/stronger than I expected, and I'm going to need to bend it... and cut it. Fortunately I have extra so if I mess up a bend I can just chop it off and try again.
  • The heating elements are pretty big... about 1.25" diameter, so now I need to order the washers/nuts/o-rings
  • Joining the two halves of the loc-line together... that stuff is tough.

Possible bottom arrangement:

The heating elements are pretty self explanatory. The tube on the left will be the dip tube (still needs bending). The allen wrench on the right represents the temperature probe (not received yet)... got the 4" one. I'm a little concerned about the proximity to the heating elements, but there isn't really anything I can do about that.

The allen wrench will also probably help me bend the dip tube, because it's the right diameter to fit inside.

:mug:
 
Just a suggestion....I'd personally put the elements both towards the back (but not too close) for aesthetics. You'll probably get more even heating your way, but I'd hate to have wires sticking out from the sides.

Maybe you can sneak into Lowe's and bend the tube real quick?

I really dig the elements though....almost stubby enough to use in a vertical fashion....I might use something like that on my countertop system....

Lastly, how much clearance do you have with the basket in? I was really interested in this with my build...it was a real PITA for me trimming the basket to fit.

Yeah, I thought about putting them at 10:30 and 1:30 (45 degrees either side towards the back) which would partially hide them... but this also isn't going against a wall or anything... it's going to be in the center of the kitchen, so it's a bit unavoidable to see them. Clearance under the basket is about 3 inches (way too much for small batches). I'm either going to have to create a custom basket out of the mesh or use something to displace the water. I don't even think modifying my basket (by trimming it so it slides down further, like you did) would help with my "nano" batches.

I'm also having trouble figuring out where to put the chillzilla in this whole setup, but I'm going to make a separate thread about that with voting (almost done)

Edit: https://www.homebrewtalk.com/f51/help-w-voting-best-place-put-chillzilla-flow-arrangement-186352/
 
What is the material those heating elements are made out of? I'm trying to source some 120v elements for a kettle, but I want to avoid zinc plating.

Also, why are you so intent on 1.5 gal batches?
 
What is the material those heating elements are made out of? I'm trying to source some 120v elements for a kettle, but I want to avoid zinc plating.

I don't know. They are made for water heaters and I got them from plumbing supply.

http://www.plumbingsupply.com/elements.html

EDIT: 1.5 gallon batches because I want to brew several batches in one day to tweak the ingredient amounts/timings/etc to "optimize" recipes. I live in an apartment so I'm rather space limited and can't brew four 5 gallon batches to do the same thing.
 
You can get the orings and lock nuts for the elements from Wayne at bargain fittings. I special ordered aluminum locknuts from him to avoid rusting on my elements, a little more costly ($12 each), but I think it is worth it. They act as an anode and prevent rusting. If you get the SS nuts the base of the elements will rust. If you don't have a problem with aluminum, I suggest it. If you want everything SS, go for it, just know the bases will rust.
 
Got some more of my equpiment today...


Pictured is sort of how I will set it up. The wire basket is one of the shelves from the cart flipped upside down. Should protect the table from the heat (might throw some insulation in there and/or insulation around the pot. To the right is where the chillzilla will go, but for now those are the SSRs. The guy included a note that said he threw in some extra for free! He gave me TWENTY SSRs for $30!!! Below that (bottom right) is the BCS-460 and temperature probe. To the left of that is the march pump, some SS wire (for "sewing" together the basket) and a step drill bit.

I'll probably have the kettle where it is. The chillzilla to the right of it... the march pump will be about where it is... and finally the control box (however I make it) will be in the drawer (which will be used like a shelf).

I will be using silicone tubing to connect everything... bummer, I know... not as aesthetic as SS pipe... but it's cheaper and I'm running out of funds. SS pipe and solenoid valves are both possible future upgrades.

I am having some issues though, if you see my electrical thread: https://www.homebrewtalk.com/f51/electric-wiring-help-186434/ With the electrical issues I'm having... this is being less and less automated since I'll have to manually switch the pump on.

EDIT: Probably going to put the March pump in the drawer and run it from there, so it's lower.
 
Got my chillzilla today:


Anyone have tips for cleaning the outside? Never cleaned brass before.

Got some nuts and washers yesterday. Wrong size though :( Ordered some new ones that should get here Monday (probably).

Also got my multimeter, so I'll start some of the wiring and messing with SSRs after a trip to home depot to pick up some supplies. I also plan on cutting the holes into the kettle this weekend.
 
Don't use brasso, except for at the very end. It works, but there's just WAY too much tarnish. Use barkeeper's friend, and it will clean up BIGTIME. Then put some brasso on to slow the oxidation.

Forgot to say, have a look at brewer's hardware. He makes beautiful SS diptubes with bulkhead fittings for good prices. It's a great store. :mug:
 
So didja get the screen in yet? I'm interested in seeing how well it worked using the soldering iron......
 
Unfortunately I didn't get a chance to work on it this weekend. I played tackle football on Saturday and messed up my leg, so I had to keep it elevated, etc and coupdnt really work on stuff. Should be fine to work on it this weekend.
 
I got some more parts today and this weekend (didn't take a pic, just some ball valves, T's, silicone tubing, etc) and I put in my "final" order to bargain fittings for some pieces I forgot.

So didja get the screen in yet? I'm interested in seeing how well it worked using the soldering iron......

Oh, and unfortunately I don't have a soldering iron... and since this is getting a bit expensive I'm probably going to JB weld it like you did.

I AM going to sew it together first... here is my first seam:

(front)


(back, against the steamer)


Some other photos are in my brew stuff album:
http://www.flickr.com/photos/martz/sets/72157624363961825/with/4816272221/
 
Dude, that ain't too shabby! Don't go with the JB weld; a soldering iron is ~$15...but I understand what it feels like to be tapped of every last dime on a build and get sick of buying all those extras. You could probably leave as is, but if you do need more structure, I would highly suggest waiting a pay period and splurging on a soldering iron. JB Weld is just too messy and you kind of have to pack it into the screen.
 
Dude, that ain't too shabby! Don't go with the JB weld; a soldering iron is ~$15...but I understand what it feels like to be tapped of every last dime on a build and get sick of buying all those extras. You could probably leave as is, but if you do need more structure, I would highly suggest waiting a pay period and splurging on a soldering iron. JB Weld is just too messy and you kind of have to pack it into the screen.

Haha, ok... maybe. I haven't read the stainless steel soldering thread yet, so maybe after my homework that I forgot about/is late (d'oh... stupid distance masters degree), I'll look into it.

I was thinking the stitching by itself might work... it's pretty sturdy...

But I will have extra SS mesh to mess with... hrm...
 
Update... Made a home depot run today... And picked up some stuff... Teflon tape, a dermel tool, gfci outlets, etc.

I picked up the dermal because I've decided I'm going to put all of my heating elements, dip tubes, temp probe, etc on one half of the kettle. On the other half I'm going extend the steamer down but cutting around the bottom of the steamer and folding it down. Since I'm lining it with SS mesh anyways, I'll just fill in the gap with that. This will get at least half of the previously lost space filled, which should help with my smaller batches. I'm sure pictures will help explain this, but I'm not to that point yet.

I did cut my first hole for the heating element... It went relatively smoothly, need to widen it a tad with the dremel. Progress!

:rockin:
 
I've got all the pieces installed into the kettle (2 heating elements, dip tube and temp sensor).

Today's work:


The outside:


As described earlier... I put everything in the front half of the brew kettle because the back half will contain the "extended" steamer. I'm going to cut around the back half of the circumference of the bottom of the (of the... of the... of the, yeah lots of those) steamer and bend it down. Then I'll cover the open space with mesh. I'll cut it with the dremel... slowly.

EDIT: I also bought some reflectix to wrap around the kettle

More pics here: http://www.flickr.com/photos/martz/sets/72157624363961825/

Cheers
:mug:
 
Nice. You are going to want to ground the elements. The best way I found, after several attempts, is to use a reducing washer like this one:

http://www.hardwareandtools.com/Thomas-Betts-WA143-2-1-1-4-Reducing-Washer-u437863.html

You can get them at HD or Lowe's very cheap. I drilled a small hole into it and soldered the ground lead through the hole. I went, from outside in, element, reducing washer, stock black rubber washer, kettle. I tried several different methods of grounding the element and found this one to be the best.

I was planning on grounding it. Could i ground it at one of the pre-drilled holes (at the heating element, temp probe, or dip tube) and use the contact between the washer/nut/whatever and the kettle to make the connection? That way I can avoid more holes.
 
I was planning on grounding it. Could i ground it at one of the pre-drilled holes (at the heating element, temp probe, or dip tube) and use the contact between the washer/nut/whatever and the kettle to make the connection? That way I can avoid more holes.

You can ground it just about anywhere. As long as the ground wire connects to some metal that ultimately is touching the liquid (meaning, there is an electrical path to the liquid), you are fine.
 
I just picked up another one of those 1500W ULWD elements for another build I am working on and man are they small! CAMCO changed them since my last purchase, they are much shorter now. The ones I use are about 7.5 inches. These smaller ones give a lot more flexibility for mounting. Pretty cool.
 
I was planning on grounding it. Could i ground it at one of the pre-drilled holes (at the heating element, temp probe, or dip tube) and use the contact between the washer/nut/whatever and the kettle to make the connection? That way I can avoid more holes.

Maybe I wasn't clear enough, I drilled a tiny tap hole in the washer, not the kettle. It was just to feed the ground wire through so I could then solder it. Even without solder, as long as it is wrapped into the hole, it is grounded because the washer contacts the element, which contacts the liquid.
 
Maybe I wasn't clear enough, I drilled a tiny tap hole in the washer, not the kettle. It was just to feed the ground wire through so I could then solder it. Even without solder, as long as it is wrapped into the hole, it is grounded because the washer contacts the element, which contacts the liquid.

Ah, yeah... THAT makes sense. I plan to. Probably doing the electrical stuff next weekend after I order some parts. But now for my progress (so far) this weekend:

First, I put together all the pipes and fittings using teflon tape:


Then I took the steamer outside and cut around half the lower perimeter:


And to check... I placed it in the pot:


Outside the pot with bend:


After dinner I will probably mess with the stainless steel mash/steamer setup and/or cover the outside of the pot in reflectix.

For the mesh I'm trying to figure out the best way to do it... should I leave it at an angle (like shown) or bend it down at a 90 degree angle til it hits the bottom? I would get more grain submerged doing the latter, so I'm leaning that way.
:rockin:
 
Back
Top