Electric burners - Any builders out there?

Homebrew Talk - Beer, Wine, Mead, & Cider Brewing Discussion Forum

Help Support Homebrew Talk - Beer, Wine, Mead, & Cider Brewing Discussion Forum:

This site may earn a commission from merchant affiliate links, including eBay, Amazon, and others.
Mine's the same as far as I have a 50A GFI in my subpanel. From there, I have a control panel with a DIN rail 30A breaker. The power cable runs from a 50A receptacle on the wall, through 50A inlet in the control panel and then immediately through the 30A DIN rail mounted breaker. That way, the whole setup can never draw more than 30A or the breaker in the panel will trip.
 
Bruin ale - what element are you using for your boil?

Is the 50GFI needed since you have the 30 amp breaker in your control box? My chaos scenario is wondering... what if your element element fails and you typically draw 26 amps, you would still have a risk of being shocked if say 1-2 amps (any number below 30) were leaking out somewhere and you came into contact with it. Right?
 
Hey walker, for your setup - you have a 50amp GFI on your subpanel, and how is your brewery control panel set up from there?

The power cord coming into my control panel is rated for 50A, and the first thing it connects to inside of the control panel is a power distribution block rated for 50A.

From the distro block the hot lines it go to a few places.

One hot wire feeds to a 15A breaker that is mounted on the hinged door of the control panel. From here it goes out to power all of my 120V devices (PID, pump, etc, etc). The entire door of the thing is low amp 120V items.

Back inside the belly of the box, both hot wires feed to small 25A breakers to form the start of the heater element electrical path. After these breakers, the lines go through a contactor (heavy duty mechanical relay that I use for manual ON/OFF switching of the element). One of them then goes to the SSR and then to the kettle's receptacle. The other hot line just goes straight to the receptacle.
 
I'm using a camco ULWD 5500W element. The 50A GFI breaker is there mostly for GFI protection and it's also needed as I had to have a circuit to tie the 50A dryer outlet to.

If the element fails, it's most likely going to fail open - meaning it won't be drawing any current. If it failed closed, it would basically be a power/ground short and would draw more than 30A and the breaker would trip. I think you're mixing up what GFI is for vs. what a breaker does.

A breaker or fuse are meant to protect wires and components. If you draw more current than you're wires were meant and there's no breaker to protect them, the wires could catch fire - so size them according to how much current the wires/components can handle.

A GFI is there to protect you, if current comes across the positive and doesn't return on the neutral/ground - the GFI will trip.
 
Bruin ale - what element are you using for your boil?

Is the 50GFI needed since you have the 30 amp breaker in your control box? My chaos scenario is wondering... what if your element element fails and you typically draw 26 amps, you would still have a risk of being shocked if say 1-2 amps (any number below 30) were leaking out somewhere and you came into contact with it. Right?

I know you asked Bruin, but I'll go ahead and give my own answer.

GFI is needed SOMEWHERE. The further back up the path towards the subpanel the better, because it will protect everything downstream of it.

Everything metal is grounded, too. My enclosure is metal and is connected to ground. The stainless kettle is also connected to ground.

If anything causes a hot line inside of my panel or on the kettle to come in contact with anything metal, then current will begin flow from the hot to the metal and then to ground, and the GFI will trip.
 
A GFI is there to protect you, if current comes across the positive and doesn't return on the neutral/ground - the GFI will trip.

Not quite. A GFI will allow current to flow on the neutral. What it won't allow is for current to "vanish" . It watches all current in and out of the system on the allowed wires (hot and neutral lines only... ground is not supposed to be carrying current.). If it ever sees that not all of the current going in is coming back out of the system, then it trips.
 
OK - thanks guys. I kinda want to get some of the final product schematic down, so I can show my bro in law. He gets the power upgrade, but doesn't fully understand the element bit and what I want to do. So now I can give him an example of where I am going (using your current set ups).

Much appreciated
 
Walker - you wouldn't happen to have a pic of how the PID is wired up would you? The bro in law wants to see how you have it, since he hasn't wired one up before.

No rush
 
Walker - you wouldn't happen to have a pic of how the PID is wired up would you? The bro in law wants to see how you have it, since he hasn't wired one up before.

No rush

I don't have a photo of it. It's pretty simple, though. 120V power connected via two screws on the back, temp probe connected via three other screws, and then the SSR control lines connected via two other screws.

I can draw you a schematic that is pretty damn easy to understand if you want. It will be pretty generic.
 
You can hold off for now (they don't show a picture of the connections on that site). He and I figured it would be pretty easy, but tough to tell without holding it in your hot little hand.
 
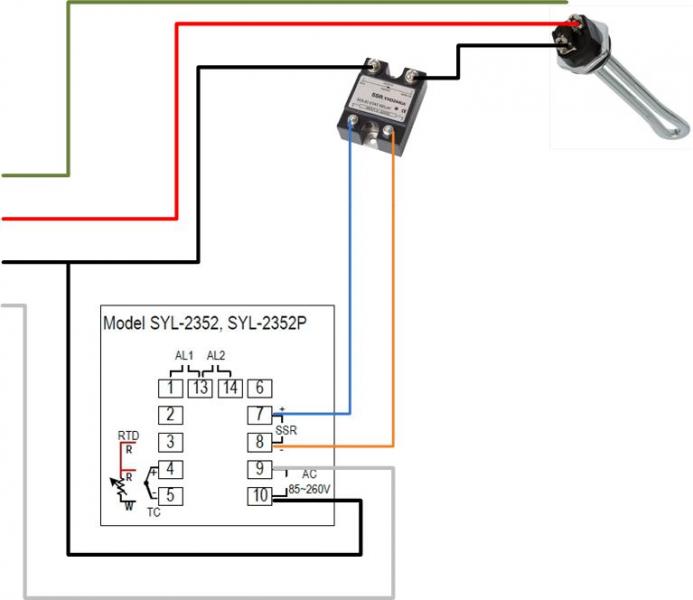
Here.

This is lacking a LOT of items that would make up the full system. It just shows you how power is connected to the PID, SSR, and heater element. The pic below for the PID was taken from the instruction manual for the Auber PID to show the terminals on the back of it.

Not shown are plugs, receptacles, manual power switches, temp probe connection to PID, etc.

The temp probe would connect to terminals 4 and 5 if it is a thermocouple. If it's an RTD, it connects to terminals 3, 4 and 5.

And, note that this is just one way of doing things. Some folks prefer to have an SSR on the red wire, too, controlled by the same PID and the same orange and blue wires I drew.

generic_PID_SSR.jpg
 
Very cool thanks walker - I am getting on the horn with him tonight, he went shopping online today so I might start ordering some stuff. I think I am going to go big.
 
I decided last night, I am going to go with the following, based on the go big advice.

100amp dual pole snap in Square D breaker (on main load panel)

Re-run the line (#2 aluminum direct bury (2 hots one neutral and one ground)

Buy a 12+ slot breaker (brand undecided yet - have a "Murray") subpanel in the garage but am going to go with cheapest price)
put in two dual pole 30amp GFI breakers, that will go to two 240 wall plugs (and my receptacle breakers)

Question - would you guys recommend getting a GFI subpanel, or just running with the GFI breakers? I have seen some $$ breakers for the 2pole GFI ($90-122 is the cheapest new I have found).

Walker, what rtd probe did you end up going with?
 
I prefer keeping the GFI in the subpanel and not a separate GFI only subpanel - I already have a separate brewery control panel, I didn't want yet a third panel that's just housing a breaker. I bought my 50A HOM (snap in squareD) GFI breaker on e-bay for $45. From these guys:

http://cgi.ebay.com/SQUARE-D-HOM250...uit_Breakers_Transformers&hash=item35af7171cb

Anyways, that sounds awesome - you could probably upgrade your brewery to 55G and still go all electric!

I don't even want to know the per foot cost of #2 wire.. #8 is ~$3 a foot a home depot. Not sure how long your run is, but at $5 or more a foot that's going to add up fast. It sounds awesome though, Tim Taylor would be proud.
 
Well luckily - the aluminum wire is much cheaper than the copper (my bro in law found it for 1.48/ft) I have 60-70 - so at HD prices I was crying. It will still run me about a $100, but copper prices are are 2-3 times that for #6 wire... If I am digging and retrenching.... I am only going to do it once!

Thanks for the Ebay link.

My only issue is that I want two 240 plugs for using them for electric heaters. I like the idea of building the brew panel. But the reality is, my wife would freak if she saw that beautiful thing. Especially jsut after buying 8 sacks of grain :)

This all won't happen overnight. My wife was already giving me hell for it! But I will at least get the wire in soon, then construct the rest as time allows (and when my wife is out of the house - ha). Hopefully get my buddy to toss in a little.

What's the fun of it if you don't have an ongoing project right?

EDIT:

Man that price on those breakers is making me thing I should go 50 amp.... haha
 
you could do alot with just a single 50A circuit. Run the big wire now and put a single 50A GFI and a 50A dryer plug and you can use that to power your brewery control panel. You pretty much will need some type of control panel, it doesn't need to be as elaborate as Kal's or some of the others on here - but you need at a minimum a PID and an SSR to control the heating element since you can't just let it rip full bore the whole time. There are a few toolbox builds on here that are pretty cool and more of a minimalist approach.
 
you could do alot with just a single 50A circuit. Run the big wire now and put a single 50A GFI and a 50A dryer plug and you can use that to power your brewery control panel. You pretty much will need some type of control panel, it doesn't need to be as elaborate as Kal's or some of the others on here - but you need at a minimum a PID and an SSR to control the heating element since you can't just let it rip full bore the whole time. There are a few toolbox builds on here that are pretty cool and more of a minimalist approach.

I would definitely be going for a minimalist approach to start. That is, putting in the power will be tool man taylor style. Then I will cool my jets and work on getting a boiler element only (with PID). After that I will work on making my brewery control panel.

So would this work?
2pole 100amp off main breaker

but the following breakers would be in the panel (15 lights), 15(outlets), 20 (garage door openers), 50 2pole gfi (brewer panel), 50 2pole gfi (240 wall socket)

Let me explain the last 50 GFI breaker. It would be used for a heater something like this (http://www.amazon.com/gp/product/B000IHK4ME/?tag=skimlinks_replacement-20) - though I haven't bought any heater yet. Based on that, would I be able to safely run heater off of a 50amp breaker? Or should that be on a 30 amp GFI, or is the GFI needed for a heater like that.

I was thinking of splitting the first line from the 50 amp into a junction box to a second 240 v outlet (so I could run 2 heaters if needed). The heaters would never be on at the same time as the brewing. The brewing would always take place outside.

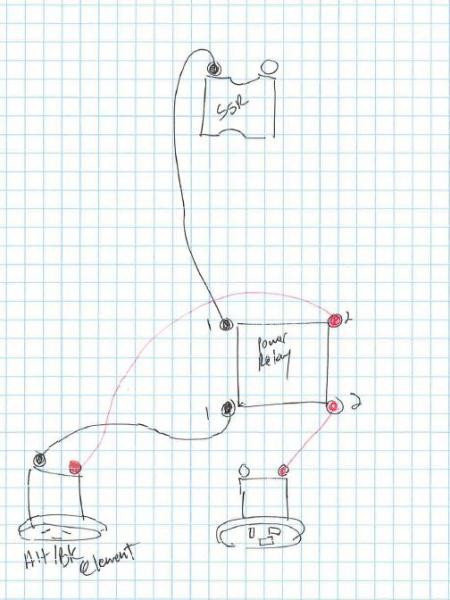
What do you think? (see attached)View attachment 21302
 

Attachments

  • Ghetto Drawing.jpg
    Ghetto Drawing.jpg
    51.8 KB · Views: 344
Last edited by a moderator:
Not sure if you need GFI for the electric heater, but it wouldn't hurt.
Your idea seems ok, if you want to possibly run 2 240V heaters I'd just install 2 240V outlets. You can easily design the brewery panel to plug into a 240V 50A receptacle.
 
Not sure if you need GFI for the electric heater, but it wouldn't hurt.
Your idea seems ok, if you want to possibly run 2 240V heaters I'd just install 2 240V outlets. You can easily design the brewery panel to plug into a 240V 50A receptacle.

I wasn't sure if I needed a GFI for it either, if I don't I will pass on it based on cost.

That is a good idea (plug in brew panel), especially since I am not ready to be fully automated, just looking to get the power done and an electric boil kettle to start. I could work on getting the wiring done, then once I am up to snuff with two 240's, design the box to plug into the 240.

I just wasn't sure if the 50 amp breakers were too high. But If I can get them cheaper than a 30 amp, that might make the decision on which box I am going to buy (QO square D). They have an 8 slot 100amp box that might work out for me ($34.97 in HD). It would leave me with a single breaker slot under the current set up, but I don't think that I have a foreseeable use for any more slots in the garage, so might be just right.
 
I just wasn't sure if the 50 amp breakers were too high. But If I can get them cheaper than a 30 amp, that might make the decision on which box I am going to buy (QO square D).

When I was shopping for mine, I was originally going to just put in 30A, but I did find that the 50A GFI breakers were easier to find and cheaper.

The reason? Spas.

A typical spa requires 50 or more amps, and you definitely want GFCI protection if you're going to sit in a large tub of electrically heated water, so I think they manufacture more of the 50A and larger (I've seen 70A ones) because of the spas.

In fact, the deal I got on ebay for my 50A GFCI breaker was because the person who was selling it had bought it with the intention of installing a spa at their house, but then changed their mind. I got their $150 breaker for $35 shipped.

:ban:
 
Ah that is good stuff!

I am pretty close to choosing all the hardware. I picked a heating element and bought a 100amp 2pole for the main breaker to see if it is the "right one"

The only think I am not sure about is those breakers on Ebay. They saw HOM250 (which I would assume is the home line square D), but they are blue in the pic, look like the QO (square D). I am going to ask the seller which they are to confirm. If they are QO I think I will scoop 2 up.

Thank god for Spas haha :mug:

Walker - my drawing doesn't quite stack up to your visio one, but I did my best with teh time I had ha!
 
FWIW on pricing for electrical work.
We charge the following:
- 200 amp meter/main and 40 circuit distribution upgrade: $2,900-$3,250 including permit.
- Sub-panel change (old to new): $1,000
- Install new sub panel (depends upon length of run and size): $1,500 - $2,500
- Standard hourly rate: $95/man hour; $120/man hour for AV; $380/hr design/engineering

Walker, nice score on the GFCI.....
 
FWIW on pricing for electrical work.
We charge the following:
- 200 amp meter/main and 40 circuit distribution upgrade: $2,900-$3,250 including permit.
- Sub-panel change (old to new): $1,000
- Install new sub panel (depends upon length of run and size): $1,500 - $2,500
- Standard hourly rate: $95/man hour; $120/man hour for AV; $380/hr design/engineering

Phew! I'm glad I just had to have a guy install a breaker and run 3 foot of wire to a new outlet (and I already had all of the materials). He spent less than an hour in my garage, and I spent about $100. Basically, just paid him for labor on a simple job.

Walker, nice score on the GFCI.....

Thanks. When I first looked at the price of them, I thought my project was going to be dead before it even began. I had a budget of $500 for the whole thing. Dropping $150 on the breaker would have surely killed me.
 
So basically, I should brew my brother in law several cases of beer?

Holy moley, if I didn't have his help I would be figuring it out myself.
 
He spent less than an hour in my garage, and I spent about $100. Basically, just paid him for labor on a simple job.

Another GREAT deal IMO. :rockin: We used to charge $350, minimum, for a service call. Now, it is $500 and I try to avoid them for my crew.

PS - you guys are on the right track ;)
 
Walker - I believe that you said this outright (but i can't find this within the thread).

Do you need an SSR or Temp probe if you are running the PID in manual mode for the boil only? MY current plan is the get the wiring set up, and get the PID and hook up to the element and run in manual mode at whatever percentage to get my boils taken care of. Down the road I will be adding things up into the herms (similar to what you have set up.

i.e. I am looking at the stuff I need from auberns to get the bare bones for my boil set up.

I never said you didn't need an SSR for manual mode PID operation, and I didn't *exactly* say you didn't need a temp probe.

If you want your PID to be in control of the element, you need an SSR. The SSR is the thing that handles the heavy load of the element. The PID is the thing that tells the SSR when to turn on and when to turn off.

Here's the deal with the temp probe, and (IMO) this is a slight design flaw in the PID. The PID will not operate without a temp probe connected to it. Period. The display will show "EEEE" to indicate an error. But, the reason I consider this a flaw in the design is that the temp probe, when in manual mode, is useless. The temp being read by the probe has no impact on what the PID does. The PID just turns the element on and off based on the setting you program in, and it doesn't matter if the temp probe is reading -100*F or +100*F or whatever.

So, the probe has to be connected to the PID, but the probe does not need to be installed in the kettle. You can just leave it sitting on the table or whatever.

Now... the other thing I said about boiling was based on earlier parts of this thread when you were considering using a 3000W element (and I am not sure what size element you are considering at this point.) Anyway, what I said was that 3000W is a really nice sized element for boiling 5 gallon batches, and you can literally get away with NO CONTROL at all. You could plug a 3000W element straight into the wall for 5 gallon batches and just let it run at full strength. No PID. No temp probe. No SSR. No control panel of any kind. Just plug and rip.

If you are going 3000W, you literally won't need anything at all from Auber to get an electric boil kettle in operation for 5 gallon batches. If you are going 5500W, then you probably will want the ability to dial down the boil strength, and that's when you need the SSR and the pulse width modulation that the PID offers in manual mode. And, because of the 'flaw' in the PID, you will also need a temp probe.
 
Ah crap.

I ordered a 5500watt one (I want to be able to do 10 gallon batches). For some reason I thought I could dodge buying a probe for now (thought I needed the SSR).

Ok, so it looks like I am still on the hook for most of that cost (was hoping to delay it).

Which temp probe and SSR did you end up going with for your set up. I might as well get the ssr and temp probe as well, or stare blankly at my PID.
 
Ah crap.

I ordered a 5500watt one. For some reason I thought I could dodge buying a probe for now (thought I needed the SSR).

Ok, so it looks like I am still on the hook for most of that cost (was hoping to delay it).

Which temp probe did you end up going with for your set up. I might as well get the ssr and temp probe as well.

Sounds like you've made "mistake #1".... buying things before you were completely done understanding and planning the system. :D

I planned, planned, and re-planned for about two months before I ever purchased a single thing, and I'm glad I did, because my system kept changing on me the more I thought about it.

This is the probe I personally use:
http://cgi.ebay.com/RTD-PT100-Tempe...092?pt=LH_DefaultDomain_0&hash=item3a53cc96fc

It's solid as hell and has 1/2" threads to screw into a pipe fitting.

I originally used a much cheaper ($5 or $6) probe that had a spring around the point where the cable attached to the probe for support. But, it ended up breaking on me and I had to replace it, so I went with the burly one that I could attach my own cable to easily. If my wiring ever causes me problems again, I can just put a new cable on it.
 
Ah crap.

I ordered a 5500watt one (I want to be able to do 10 gallon batches). For some reason I thought I could dodge buying a probe for now (thought I needed the SSR).

Ok, so it looks like I am still on the hook for most of that cost (was hoping to delay it).

Which temp probe and SSR did you end up going with for your set up. I might as well get the ssr and temp probe as well, or stare blankly at my PID.

Oh.. and the SSR I use was just whatever the cheapest 40A SSR+heatsink I could find on ebay. I spent $15 on the SSR+heatsink, shipped from China. A quick search for "40A SSR" on ebay turns up one for $8. And the "SSR heatsink" turns up one for $4.
 
Sounds like you've made "mistake #1".... buying things before you were completely done understanding and planning the system. :D

Guilty :drunk: - I thought that I should snarf up a couple of the things I knew I would have to buy... but like you said, I should only be buying the rewiring stuff for the house, not the controller hardware!
 
Eh.. once you've got a PID that's the majority of the cost. As Walker points out, the SSR is less than $10 and you can get a temp probe for $20 or so easily. The 5500W element may need some control, but it'll bring things to a boil much more quickly than the 3000W would. If you'd bought a 3000W element, you'd want to change it out eventually (especially since you say you want to step up to 10G). Better to buy what you ultimately want than to buy the smaller one and upgrade later.
 
Eh.. once you've got a PID that's the majority of the cost. As Walker points out, the SSR is less than $10 and you can get a temp probe for $20 or so easily. The 5500W element may need some control, but it'll bring things to a boil much more quickly than the 3000W would. If you'd bought a 3000W element, you'd want to change it out eventually (especially since you say you want to step up to 10G). Better to buy what you ultimately want than to buy the smaller one and upgrade later.

Yeah, I guess in my mind I was like... I know I need the option of ten gallon boils, get the 5500W and PID (paypal account racing) haha.

But I haven't even looked at the rest of the control panel, since I am only planning on doing the boil part right now, the automated Mash tun will likely be a winter project. Walker was right I didn't understand how the PID was wired.

My buddy and I plan on splitting batches for stuff we both like (arrogant bastard, etc.). This way we can brew one for each of us with half the effort.


EDIT:
Part collecting has started!

Have
1 x QO2100
1 x 8 slot QO breaker load station
1 x QO120
1 x QO230
1 x QO230GFI
1 x camco 5500 heating element
1 x PID
1 x 40amp SRS relay and heat sink
1 x RTD temp probe


Need:
90 feet of #2 aluminum wire
QO115
QO115
12/3 romex (roll)
2 x 240 plug in female
2 x 240 plug in male
Control box
1 amp fuses for PID
 
Hey Guys - hoping you can help me some more on this. I am looking for some guidance on my wiring control panel. Basically I have been looking through electric brewery but I am going to do a VERY dumbed down version.

My ultimate goal is a box running off one PID and SRS that I can manually plug and unplug from one function to the next.

Eventually I will likely do a herms, but for now I am looking to rig up a box that will be used for my BK and HLT. I am looking to use one PID in a contorl box with and SSR.

The plan is to have my BK and HLT with separate elements and cords. I will plug in one (say HLT) when I am using it, then unplug and plug in the other (say BK). I am not doing any fancy stuff, just what i need to get by.

So the plan is to have one box that can go from pot to pot by simply unpluging the cord and plugging in the next functioning element.

I am getting confused looking at electric brewery because I am not sure exactly what aspects of the electric panel I can omit given my more simplistic design idea.


1. Do I need two power relays as shown here (http://theelectricbrewery.com/control-panel-part-2?page=13) or can I use the one relay to wire to an on/off switch and then to the SSR? this would be a safety feature to keep the juice off the SSR independent of what the PID commands (I think)
2. I can remove the shunt since I am not using voltmeters right?
 
You can remove the shunt, the extra DC power supplies, the doorbell transoformers, the element select switch, the extra L6-30R plug, and yeah you only need a power-in contactor and a power out contactor. Actually, you don't even technically need a power-out contactor since he's using that to guarantee that both elements don't turn on at the same time. Just wire direct from the SSR to the plug.
 
So it would go from the power in (receptacle male plug) to power in relay to the SSR?

Is the relay the same thing as a contactor?
 
Back
Top