Danby DAR044

Homebrew Talk - Beer, Wine, Mead, & Cider Brewing Discussion Forum

Help Support Homebrew Talk - Beer, Wine, Mead, & Cider Brewing Discussion Forum:

This site may earn a commission from merchant affiliate links, including eBay, Amazon, and others.
Lots of posts on the boards here about this fridge, look in the DIY forum. I converted one a few months ago, easy build. One of the nice features of this fridge is that there are no coils on the rear half of the top so you can mount a tower without worry. The newer ones have the inside door panel glued in instead of screws, but there's info in the DIY forum regarding this: https://www.homebrewtalk.com/f51/kegerator-conversion-danby-dar440bl-98779/

Here's a good step-by-step, other than the door panel everything should be the same:
http://www.kegkits.com/kegerator4.htm
 
I bought a kegerator conversion kit and now need a fridge. Is this the best option on the market these days? I know that the Sanyo is no longer manufactured.
 
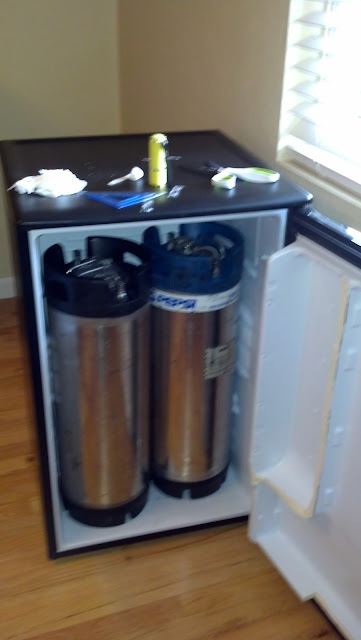
I picked up the Danby DAR044A2SLDD from Costco for $149 hoping to set it up with a twin tap tower. Based on some of the kegerator conversions I've seen online for similar Danby models I didn't expect much of a problem. I knew that I was going to have to modify the door.

Following the pictures in this post: BeerGuy2009's Danby Door Post I set to work with a dremel and a hacksaw to modify the door on my Danby.

2012-12-01_11-26-57_313.jpg


When I finished cutting away at the door I found that the door would still not close properly with both kegs inside. I was stumped for a bit until I realized that this model had the shelf supports molded into the sides of the refrigerator while the other models had support brackets that plugged into the back of the unit. The new molded shelf supports made it impossible to fit both corny kegs. I was going to have to remove those shelf supports.

2012-12-01_14-41-49_617.jpg


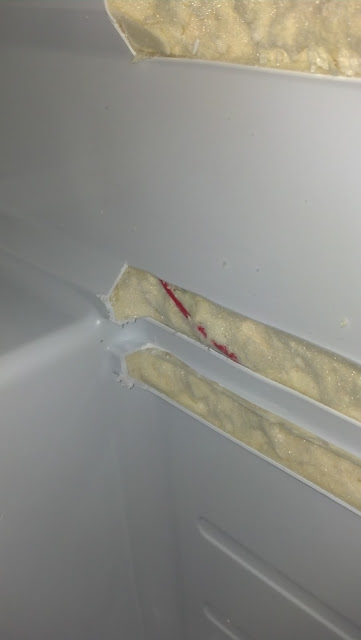
I used a razor/utility knife to cut away the plastic shelf supports. The left side was no problem; cutting the plastic with my knife was fairly easy. I ended up exposing some wiring while working away at the right side though and that made me proceed with great caution. I still don't know how I managed to not cut that red wire. :rockin:

2012-12-01_14-43-17_753.jpg


I used some foil tape to cover up all the exposed foam insulation after making all the necessary cuts and now I have the door sealing properly with both kegs inside.

2012-12-01_15-21-12_64.jpg


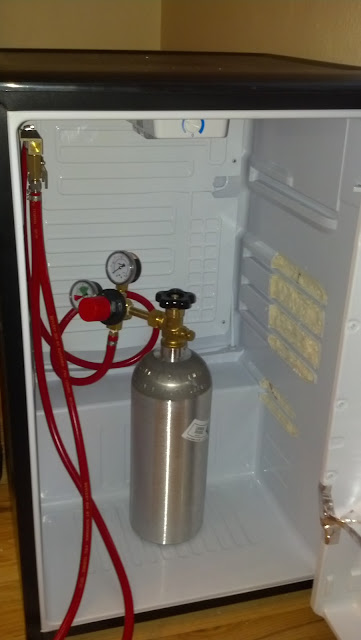
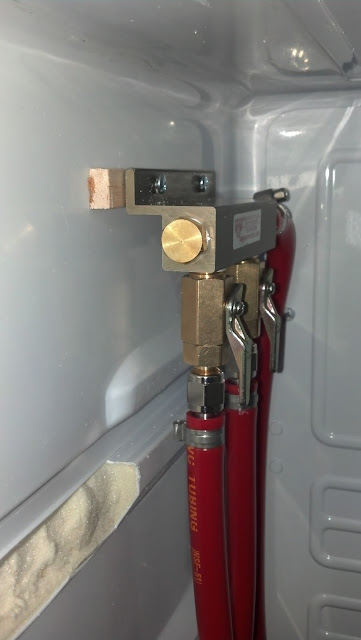
I've got the two kegs running off of a 5 lb tank via a manifold that is mounted inside the fridge.

2012-12-01_14-43-31_888.jpg


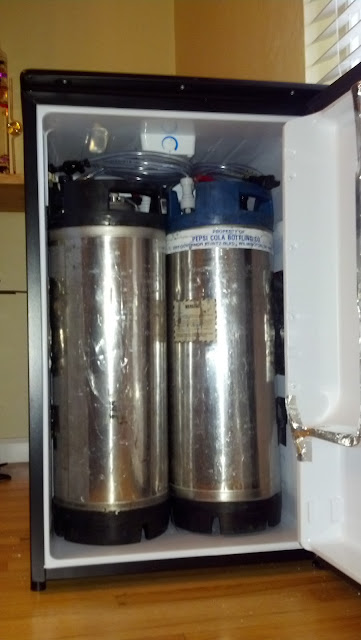
I plugged her in after getting everything back together and loaded up with the kegs and CO2 and there was no smoke. :mug: The compressor initially ran for 90 minutes and I was worried that I had cut a wire somewhere. But everything in the fridge has now cooled down to 38º F and the compressor only runs as required. The picnic taps will have to do until I get my tower and Perlick's installed. ;)

Don
 
Cool, thanks for posting that. I just saw this fridge at Costco and noticed that width wise, it will be tight because of those shelf supports. With care it looks like I can remove them, like you did.

Is it still working? Some people had problems with these fridges stopping after a couple months and having to return them.
 
I have a DAR440BL and can fit 2 ball lock kegs with no modifications other than taking the door plastic/shelves off. I did not cut anything, rather I removed the whole door shelf panel and replaced it with a piece of plexiglass. It fits 2 kegs great.
 
I just converted a Danby DAR044 and wanted to share. You don't need to cut out the shelving if you cut the door panel flat. The two cornies will fit, with one sitting a little more forward than the other.

I decided to make mine pretty, so I got a yard of vintage wallpaper and sandwiched it in between two sheets of plexi, and used that to replace the door panel I cut out. I caulked the plexi in place to be waterproof then finished it with some black electrical tape so the caulking is invisible.

I just have picnic taps for now, but I plan to install a walnut countertop and two separate axis single-tap towers. Today was my first day putting anything in a keg, so that was fun and exciting!

Edit: The two pieces of plexi were screwed together with four tiny harmonica screws from my husband's harmonica graveyard. The kegerator has therefore been hybridized with harmonica, so he wanted me to include that piece of information. :)

IMG_1752.jpg
 
I bought the danby from costco for 119$. I followed Obidon's method and minimally cut the door panel but then removed the shelf supports in the fridge. I used a 4.5" disc grinder for the whole thing and it worked great. Aluminum tape to seal up the foam.

The benefit of burning out the shelf supports is that you get more width so that you actually have a tiny gap all around both kegs to allow cold air to drift around the kegs. In addition, you keep more structure in the door for strength.

This fridge is pretty loud but is cheap and works great. Learn from my mistake, on the stat dial, clockwise is colder.
 
I cut my shelf supports off and covered the holes up with silver dictwork tape, the stuff the AC guys use to tape ducts together.
 
I just went to Costco and bought the Danby dar044a2sldd. I have a 10lb CO2 tank so I want to run the CO2 line out of the fridge. What is the best way to do this? When I unscrewed the drip tray I saw that in addition to the drip tray tube there was a cap that was caulked/glued on. I peeled it off carefully and inside the hole there is insulation.

What is this hole? Is it safe to run the CO2 line through it?

Edit: I've attached two pictures to show what I'm talking about. The one picture is from inside the fridge and shows the drip hole. The other picture is from OUTSIDE where I unscrewed the drip pan. The white circle is where I'm hoping to run the CO2 through.

20140313_151749_resized.jpg


20140313_151824_resized.jpg
 
I know this is an old thread, but does anyone use this as a ferm chamber? Looking for a unit that would fit a carboy without having to add a collar.
 
I know this is an old thread, but does anyone use this as a ferm chamber? Looking for a unit that would fit a carboy without having to add a collar.
I have used mine as a ferm chamber. The issue I had was that the bottom is not deep enough for probably any 5+ gallon fermenter. I placed the back of the fermenter on the molded shelf in the back and added an improvised stilt to hold the front at the same height. It was then too close to the top for a bubble airlock but a blowoff tube worked great. (with the blow-off container next to the stilt at the bottom below the fermenter)
 

Latest posts

Back
Top