KCBrewer's Garage Brewery

Homebrew Talk - Beer, Wine, Mead, & Cider Brewing Discussion Forum

Help Support Homebrew Talk - Beer, Wine, Mead, & Cider Brewing Discussion Forum:

This site may earn a commission from merchant affiliate links, including eBay, Amazon, and others.
I understand the concern. Basically it's like having 55° hot plate inside the fridge all the time and soaking the heat out of the fermentation side. I just thought that once the concrete inside each chamber got to temperature, it wouldn't really transfer the heat/cold that much.

I suppose I could let it run until each chamber gets to temp, maybe overnight to see if the concrete temp stabilizes, then time how long in between each chambers cycle. Then do the same with some insulation laid down. If it makes any significant difference I'll definitely go ahead with insulating. My electric bill is ridiculous as it is!

:mug:
 
The thing is though, it is the entire concrete floor acting as a heat sink, not just the small portion that is covered by the chamber; your unit should not be a match for the thermal mass of the entire concrete floor.

But as you said, test it and see; empirical data based on a specific situation is always best!


:mug:
 
That is awesome. For the grain, I see you probably have too much, but these airtight bucket lids are amazing...

http://www.amazon.com/dp/B001VBALBK/?tag=skimlinks_replacement-20

They have a ring that fits on any 12" diameter bucket and allows the spin top lid to seal it easily. I know they fit a 7 gallon bucket, you might be able to find more...
 
Last edited by a moderator:
The thing is though, it is the entire concrete floor acting as a heat sink, not just the small portion that is covered by the chamber; your unit should not be a match for the thermal mass of the entire concrete floor.

But as you said, test it and see; empirical data based on a specific situation is always best!


:mug:

I agree. We can only speculate (educated guess) that the concrete will act as a terrible insulator, but you don't know until you try it. Homebrewers make pretty good experimenters.
 
*subscribed*

I am also on the insulate the floor bandwagon. At the very least get a carpet or welcome mat from home depot/ lowes and put it down there (safer for your carboys too)
 
So, how has the concrete worked out?

Just noticed this reply. I actually haven't had time to complete it. I've got the front of it wrapped in galvanized metal and one door built and have gathered almost everything for the second door. I just need some hinges and couple more pieces of refrigerator door seal.

Taxes and other honey do's have taken a lot of my spare time lately, but I may get to work on it a bit tonight. I've been so wrapped up in other stuff that I've even got a Delirium clone, which I was really excited to brew, now sitting a week past the planned kegging date.

On the insulation, the more I thought about it, the more I think I will insulate the floor, at least on the fermentation side anway. I wasn't thinking about the carboys sitting on the concrete, which I'm sure will work as a huge heatsink. I think the refrigerated side will be fine though since the cornies have rubber bottoms.

Another reason I decided to go ahead and insulate is that I ended up running a 1x2 along the bottom for the door to seal against, where I was originally planning to just use a door sweep of some kind. The reason I was going to use the door sweep and didn't want to insulate the floor was so I would never have to lift a carboy. I could just slide them on the concrete. I suppose having to lift them up 1.5" isn't too big a deal though. ;)

I'll try to get it wrapped up and some more pics/info posted soon.

:mug:
 
I made some long overdue progress. Still not complete, but the list has shortened.

First, I installed the co2 tank and lines. It's a 20lb tank and I decided to run a line in from the back which allows me to fit one more cornie inside. I also went with a dual regualtor and have a 10' line on the outside at 30psi that will be used for sealing kegs before going into conditioning.

co2-dual.JPG


Inside

co2-lines.JPG


co2lines-2.JPG


Next I still needed to make a heat shield for the light bulb that protruded slightly up into the top. I used some galvanized sheet metal and formed this up, then siliconed the edges.

From the top

heatshield1.JPG


From inside

heatshield2.JPG


All sealed up. You'll notice I did not silicon it to the thermostat housing. This is so the thermostat and defrost timer can still be accessed.

heatshield3.JPG


Next was the doors. For these I used a standard 30" interior door slab. These are hollow and simply use carboard in a criss cross pattern to give rigidity. Here is a shot of the end of the door after cutting it down to size.

cutdoor1.JPG


Once I cut the door to size, I used a piece of 1x4 and crushed the carboard down to the bottom, packing it tight. Then I used layers of styrofoam to fill and insualte the door.

door-insulated.JPG


After that I cut a piece of scrap compressed wood to close the end, and wood glue and brads to secure it.

door-bottom.JPG
 
I lined the inside of the doors with the same white FRP paneling, then used refrigerator door seal and aluminum carpet thresholds to secure it.

Here is a side shot that shows how the seal is secured to the door. As you can see, the aluminum strip is screwed down and pinches the groove of the seal to hold it.

door-seal.JPG


Here is how it looks installed.

doorseal1.JPG


door11.JPG


And for the hinges I used interior door hinges and spray painted them with a rustoleum metallic finish. It matches much better in person than it looks like in the pictures. I plan to paint the exterior of the doors with the same paint rather than wrap them with metal.

hinges-1.JPG


hinges2.JPG


hinges3.JPG


And here are the doors installed for testing. (yes, doors are level, garage floor is not :))

doors-on-1.JPG


doors-on-2.JPG


Left to do is paint the doors, silicon everything, mount the draft tower and run the beer line, insulate the top, replace the thermostat with a digital one, and make/install the pieces to trigger the light switches. I have it on and running overnight just to see how it performs, but so far it's working great. I've got a batch of cream ale ready to keg so I'm holding off on that until this is done so I can put it to the test.
 
Wow, this looks great! Nice work KC. I'd be interested in some pics of how to dismantle the fridge so I can do something similar.
 
Thanks guys. I'll try to get some fridge disassembly pics soon. I do have another donor to take pics of, it's just a time thing. I'll get them up as soon as possible though.
 
Thanks guys. I'll try to get some fridge disassembly pics soon. I do have another donor to take pics of, it's just a time thing. I'll get them up as soon as possible though.

Awesome build man!!

I am going to dismantle a fridge asap is there anything I should look out for?

Cheers
 
Looking good. Where did you get the refrigerator door seals?

I got mine from other old refrigerators that had bad seals on the bottom. I just used the rest of the good pieces and cut them to size. You can buy it in rolls though. Just google it and you'll find plenty of choices.

Awesome build man!!

I am going to dismantle a fridge asap is there anything I should look out for?

Cheers

Just don't kink/break a refrigerant line. Make wide gradual bends where needed.

Would a minifridge successfully cool a 4x4x4 chamber to fermentation temps?

I haven't done that myself, but lots of others on here have, and I believe they were similar to that size with good results. The key is to put a fan inside the chamber to keep the air moving.
 
Subscribed also. Gutting a fridge opens a lot of potential regarding sizing.

This. I really want to see the how-to. I have a Frigidare that is never going to leave my basement in one piece but this would be a perfect use of the good parts as part of a lagering chamber.
 
this is dumb. When you realize it let me know and Ill come remove it for you. :)
 
I found a video on dismantling a fridge...the easy way:


Seriously though. I can't find an instruction video or site anywhere. Not to beat a dead horse, but i'll be patiently waiting for a pictorial demo as well :D
 
Last edited by a moderator:
I will see if I can come up with something for you all at work tomorrow if I'm not too busy. I was planning to make a short video and a pictoral, so I'll need a little free time to do it. But I promise I won't leave you all hanging.
 
I managed to make a quick video today of removing the cooling system. It only shows how to remove the cooling system, not the electrical side of things. If I get more time I'll try to add something that shows what all is needed to keep it frost free.

Hopefully this helps some of you.

 
Last edited by a moderator:
Awesome looking build!

I don't know if you ever figured out your grain storage but I use the big plastic garbage cans with a plastic drum liner. I have five cans and each will hold at least two sacks of grain. I waited for a sale and got them for about $10 each. I found the drum liners online somewhere. I think they are 4 mil and I haven't had to replace one yet after using for more than a year.
 
I managed to make a quick video today of removing the cooling system. It only shows how to remove the cooling system, not the electrical side of things. If I get more time I'll try to add something that shows what all is needed to keep it frost free.

Thanks! Definitely want to see the frost-free tips/tricks as well, but this is a great start.

Would this apply to a typical side-by-side fridge/freezer as well or is this limited to most top/bottom models? Do you know if newer top/bottom models also follow this assembly method that allows easy extraction?
 
Awesome looking build!

I don't know if you ever figured out your grain storage but I use the big plastic garbage cans with a plastic drum liner. I have five cans and each will hold at least two sacks of grain. I waited for a sale and got them for about $10 each. I found the drum liners online somewhere. I think they are 4 mil and I haven't had to replace one yet after using for more than a year.

I ended up going with the HD buckets for now. I wasn't happy about it, but due to the cost of vittles vaults and spring (bugs/mice) getting closer, I didn't have much choice.

BTW, the cheap HD buckets suck ass. Every one of the lids I have had to remove so far have cracked. POS, but keeps the pests out for now.

I need to come over and help. And by help I mean sit in the hot tub and drink your homebrew and watch the work progress.

I doubt it would go much like that ;), but I'm always open to meeting other brewers. I brew and que' nearly every weekend, so send me message if you ever want to.

Thanks! Definitely want to see the frost-free tips/tricks as well, but this is a great start.

Would this apply to a typical side-by-side fridge/freezer as well or is this limited to most top/bottom models? Do you know if newer top/bottom models also follow this assembly method that allows easy extraction?

I'm going to try to get a full page done and put it on my site (if I ever get time to actually put together all of my pages) that will cover everything from refrigeration to electrical.

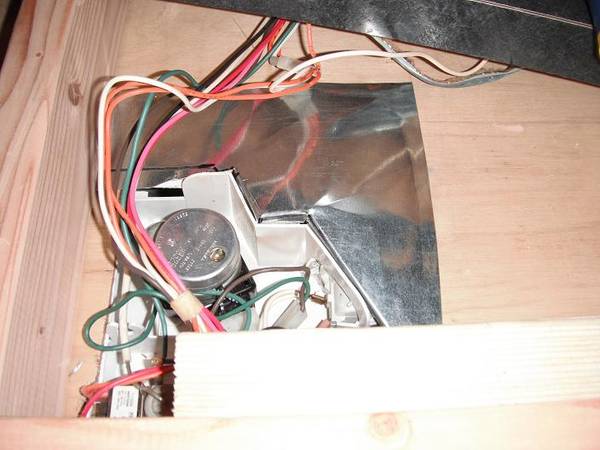
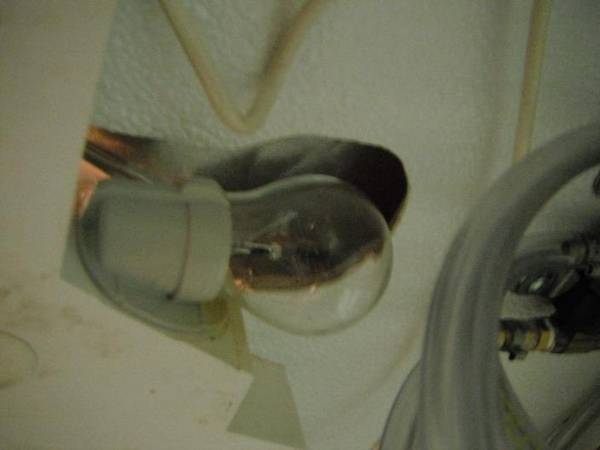
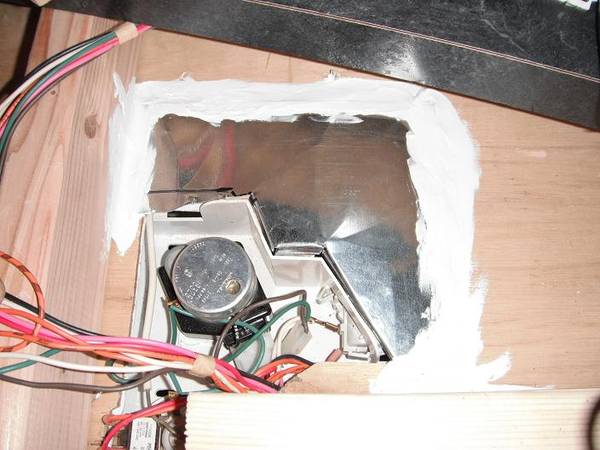
Briefly, it works like this: The defrost timer is set to kick on the defrost burner every 8-12 hours, which is mounted directly under the evaporator coil in the freezer. When the timer comes to the defrost period, it cuts power to the compressor/fan and if the bimetal sensor, which is mounted to the evaporator coil, is telling it that the coil is frozen, it kicks on the burner and thaws the coil. Then it returns to normal cooling mode.

As far as this being possible on side by sides or newer top mount freezer, I'm really not sure. I've repaired many of them, but the older ones are what I have the most experience with as far as completely disassembling.

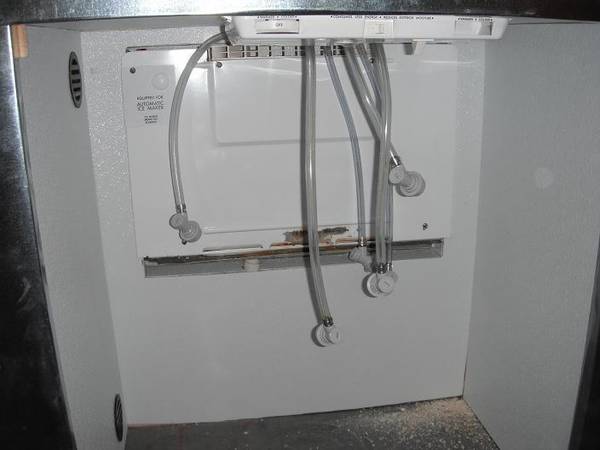
A lot of fridges have the condenser coil enclosed on the back or mounted underneath. The main thing to look for is how they installed the evaporator coil in the freezer, and if there is an opening that it can be removed easily without cutting the lines.

I'm sure with the right tools, any refrigerator could be cut open and used. This style just happens to be very simple, and was widely used since it was a lower end (cheap) model. You can probably find one similar on CL for cheap/free. Look for whirlpool or roper.
 

Latest posts

Back
Top