Brutus 20e Build

Homebrew Talk - Beer, Wine, Mead, & Cider Brewing Discussion Forum

Help Support Homebrew Talk - Beer, Wine, Mead, & Cider Brewing Discussion Forum:

This site may earn a commission from merchant affiliate links, including eBay, Amazon, and others.

CodeRage

Death by Magumba!
Joined
Aug 22, 2007
Messages
2,209
Reaction score
72
Location
Melbourne, Fl
I've been looking for a system to go all grain with and read about the Brutus 20 and really liked the CRDFM and 2 vessel concepts. So I want to give it a whirl with one exception, all electric.
http://www.alenuts.com/brutus20.htm for more info from the man himself

Here is the mash tun exterior
S5031141.jpg


The false bottom and spargearm. I will be replacing the sparge arm with a ring eventually.
S5031142.jpg


The Mash Tun heating element.
S5030988.jpg


The manifold to connect the Mash tun and boil kettle.
S5031145.jpg
 
All electric is a great idea for the brutus 20 build. I would think it would be a more efficient use of temp control. Good luck on the build. Are you building the stand similar to lonnie's?
 
I havent seen Lonnie's dedicated stand for a Brutus 20 so I am not sure.
However I am going to go old school and build my stand from 4x4s withvarious glue joints. Mostly blind mortis and tennons. AT least that is the plan, my mind is subject to frequent change.
 
Here's a pretty picture I made a while back that is helping me figure out how I'll build my 2-vessel system:

2-vessel_brewing.png


S
 
Virtuous,

Please clue me in on how you are doing this with electric? I have been planing on a Brutus 10, however if I can cut out a vessel and try something new I'm game to join ya. I currently have two PID temp controllers and SS probe thermocouples. So I'm half way there.

My main concern is are you running 2 heating elements of just 1? If so running 2 elements at 240v can be an issue with current circuit. I'm going to follow this thread closely and if I can help out by trying a few things I will.

(you smell, smell smell smell)
Thats what my wife thinks of me talking about brewing rather then spending time with her. I gotta appease her somehow and this is making her laugh! The little things I do to keep me brewing.
 
Hey squeeky,
Scoates diagram looks like a herms system, mine is a little simpiler.
I do have 2 heating elements, the one for the mash tun is 110v and the boil kettle is 240v. The mash tun element is in a copper heat exchanger so when the mash tun is recirculating the heat exchanger can be turned on to reach mash temps. The boil kettle has a 4500W 240v element mounted directly in the bottom of the keggle. I actually finished getting the element in the keggle this evening, Ill get some pics of it once it is cleaned up.

Side note- literally smoked my old B&D drill using a large unibit to cut the element hole. Got a new 7.8A 850rpm VSR DeWalt to replace it. :ban:

Edit: Sorry, I wasnt clear on how I was providing power. I am using 110 from the recepticle/lighting ciruit for the house and the water heater 50A 240v Circuit. going to set the Water heater up with a plug so I can unplug it and plug in the brew rig.
 
I'm planning on doing mine with only 1 element (the black/red (off/on) thing at the bottom of the kettle in my diagram).

Though mine will be HERMS, not RIMS.

S
 
Here is a picture of the return manifold plumbed in.
S5031149.jpg


Ill clean up my solder joints some other time.

I am having a hard time finding some non PT 4x4s
 
I lied... I am picking up metal today to weld the brew rig together. Havent had a reason to weld anything lately and I am kind of jonsen so there yah have it. I also have some steel diamond plate I pulled off of a trailer I can use for decking.
 
Got the casters on and threw up the Boil Keggle and MLT to see how everything fit.
S5031156.jpg

and a picture inside of the boil keggle with the 4500W element.
S5031159.jpg
 
Virtuous, I am a few steps a head of you with my build and I'd laike to share some of my experiences to see if they help you.

I am using a heat exchanger just like yours but I used PVC. In use here are some of my observations.

1. I started with my thermowell at the output of the mash tun just like Lonnie did on the brutus. Seemed to work good when using just water. I noticed a 3 or 4 degree overshoot in temps but figured it was manageable.

2. When I brewed my first beer this way, I realized some errors in my thinking. On my first brew session, the first time the controller called for heat, it stayed on until the bottom of the mash reached 152 and shut off, then I watched in horror as my perfect 152 degree mash kept rising all the way to 168 degrees even though the element was off.

3. After that brew session, I switched my thermowell to the output of the heat exchanger and brewed some water. In this mode, the mash will never overshoot, but your heat up times will be extremely slow for step rises. This is due to the output of the heat exchanger being controlled. This is really evident when you turn the flow down to where it needs to be during the mash. The element turns on heats the volume of water in the exchanger to the set temp in a matter of seconds and then shuts off until the water flow exchanges the heated water with cooler water.

4. My solution for raising temps is to add a T at the output of the tun with a 1/4 compression fitting and an electronic thermometer. This way I can turn the controller up to say 200 for a temp rise and monitor the output of the mash tun. When I get within 10 degrees or so at the bottom of the tun, I know to reset the controller to my exact temp.

not exactly the hands free system I was going for. Let me know how yours works out when you get to testing.

I think the brutus works a little better because the heat under the mash tun heats the water going to the top of mash, plus the heat can rise up through the mash which makes it a bit more uniform, where we are heating only from the top and trying to force the heat down through the mash.

Linc
 
Virtuous said:
With any luck I may be brewing with this thing at the end of the month.

Just read up on the Brutus 20. Looks like a neat idea, and talk about a small footprint, only two vessels needed! Be sure to post your results with the new rig.
 
I tried this technique a while back. I think it's a good way to go for someone who wants a compact brewery with a small footprint.

https://www.homebrewtalk.com/showthread.php?t=47424

Note: I decided not to set up my brewery like this. Instead I built a single tier 3 vessel stand. I use QD's for switching around how the pump is being used. Seems to work very well and I didn't have to build a complex/expensive manifold (although yours looks great, Virtuous!).
 
Thanks Sparky, did you ever get to try it again to determine your efficiency?

I just ordered some solid state relays, 3 position selector switchs, and a few panel illuminators yesterday.
SSRs
http://web1.automationdirect.com/ad...ys_-z-_Timers/Solid-State_Relays/AD-SSR225-DC

May order two of these tomorrow for control. Yeah they are more expensive than the ebay deals but these offer a modbus interface which is tits.
http://web1.automationdirect.com/ad...SL4848_-z-_PM_-z-_TC_-z-_PC_Series)/SL4848-CV
 
No, I never did. I've never had great efficiency, no matter what technique I use. I think the 2 vessel system can only hurt a little though.
 
I'm a big fan of this system. I would think it would have wide appeal for new all grain brewers seeking a compact system, provided they have not been exposed to too much efficiency gobbledygook. It's hard for me to believe that even 10-20% efficiency degradation from standard, amounts to any significant change in anyone's lifestyle. That's my opinion of course, and I understand that I am in the minority.
 
You must be talking about me Korndog ;-) I feel like I've been an efficiency nazi or something lately but it's only because I find enjoyment in maximizing efficiency. It's like a game. I look at the brutus 20 concept as a quasi-no-sparge. A year ago, I might say that getting 60% efficiency is fine and dandy but when you look at today's malt prices, even in bulk... it's just not good enough. On a mid gravity 10 gallon batch, I use about 21lbs of malt @ 90% efficiency. Getting 60% instead would require about 7 pounds more malt. OK, it's not the end of the world, you're right.

I do like the smaller footprint. If it were a feature I really needed, I'd probably go with an 4500watt element based instant hot water system instead of an HLT.

Lol Bobby - I totally understand that it's part of the fun and certainly a challenge to gain a few points here and there. I just think there might be a whole lot of guys (like me) who would enjoy brewing this way.

Tivia: How many batches does it take to pay for third kettle, sparging rig, and PH meter? :)

KD
 
Sorry to dig up an old thread, how were you planning on attaching the heat exchanger to the MLT?
 
So, life has been a bit busy... With the new addition to the family, school, and work I've had little time to devote to brewing and the rig. For Father's day SWMBO asked, "what do you need to finish the brewery?" Uhh... not much.... How about you finish that and we get started finishing the man cave. Sweet!

So, I pulled out the welder tonight and got back to work. Got most of the control panel from put together and rand out of wire. Oh well, I am motivated and ready to get it running.

Jcdillin: Only 6 months late but, the heat exchanger is plumbed between the false bottom pick up and the intake of the march pump.

I have a goal, and that is to have water circulating through the thing this weekend.
 
Saturday was brew rig day.
The control panel structure is finished. I borrowed the idea of a collapsing control panel from some one on here. The name escapes me but, who ever you are thank you for the inspiration :D
Built a small structure to raise the MLT heat exchanger above the march pump.
I made a new sparge ring and it turned out much better than I expected. Finished up the last few bits of plumbing and cleaned it up some.
Recirculating the mash tun was a success. The heat exchanger worked well and got the water nice and hot.
Need to fix some leaks in the boil kettle.... :(

Ill post some pics later tonight.
 
I see this has crested 5k reads, so some one must be reading it... :D

Fixed the leaks enough to test the thing. Funny thing is I went back to my original bulk head design and had zero issues.

As promised here are some pics of it cross circulating with both elements on. I ran the elements at 110V so there output was 1/4 of their rating. Still managed to get things nice and hot.

I believe I will replace the breaker for the range with a 50 amp GFCI and then bounce a 240v drop into the back room and set it up for an indoor brewery. Curious to hear what SWMBO thinks about it.

With control panel extended.
S5032977.jpg


S5032979.jpg


Under the skirt
S5032978.jpg


Boil Kettle
S5032975.jpg


MLT
S5032980.jpg


Time to polish up the plumbing, clean up and paint the rig, and wait for my PIDs :)
 
With a hard plumbed rig like this, how difficult will it to clean after brewing? Can you remove the kettles from there?
 
Looks great! Why did you place the RIMS before the pump (i.e., on the suction side)? Has this given you any issues?
Thanks!
To be honest. I didn't know any better.I figured pushing and pulling wort the heat exchanger didn't make much difference. The main reason I did it is so there would be no restriction by the pump to prohibit the heat exchanger from filling. Perhaps just being over paranoid of dry firing it. That and for some strange reason I am OCD about symmetry. So cumulatively, thats how I ended up with final design.

Havent had any problems as of yet. When ever I have had a priming issue I just open the dump valve for a second and all is good.
 
Painted the stand today.
I used Rustoleums hammered copper over 2 coats of primer. Doesn't look very hammered to me. I was thinking the contrast between the texture of the polished copper and the paint would be interesting. I am not sure what I did wrong but the only places it looks hammered is when the paint was so thick it was a nat's ass away from running.
Doesn't look bad though, Id says it more or less around +/- 17 SRM :drunk:.
S5033003.jpg
 
scoats
I am having trouble understanding your step 3 Sparge
You are pumping hot water 160-180 f from the HLT to the Mash Tun..
Ok and then you pump out the wart back out of the Mash Tun and into the HLT but you still have hot water in it???
is that correct
 
That's how the brutus20 is designed. Once the "sparge" starts, it actually turns the mash and sparge water into one homogeneous mass of sugar water. It's like a no-sparge system. After sugar equilibrium is reached, the wort is separated from the grain by discontinuing the pumping from the BK to the MLT leaving all wort in the BK.

You could also think of it this way. It's the same as taking all your sparge water and dumping into the MLT at the end of the mash, stirring it up, and draining the wort out.

Bottom line, this is saving one vessel by paying in lauter efficiency.
 
Would there be other factors at work too? Does the PH alter much? How does one vaurlauf? Don't more tannins leech out into the final wort?

WW
 
I'd think pH is probably less of a concern compared to fly sparging.

If you wanted to vorlauf, you'd have to accomplish that before you start the back-and-fourth sparge. I think Lonnie Mac had each vessel continuously recirculating before he sparged. The return from the pump was in the lids and he just swaps the lids.

Why do you suppose more tannins are extracted in this technique? Probably less of a concern since you're absolutely NOT oversparging.
 
Thanks for chiming in Lil' Sparky. You know more than I do about the finer points of the process, that's for sure.

The mash tun is constantly recirculating, pulling through the false bottom, through the heat exchanger and then out the sparge ring. so it is constantly vaurlauffing, until you cross circulate the two.

The efficiency issue, I may just put a little extra water in the boil kettle and dump that to a bucket before the sparge starts. after the cross circulation is complete, Ill move everything over to the boil kettle and do a small batch sparge. We'll see

While I am waiting for the paint on the rig to harden up I went ahead and installed 2 ceiling fans in the man cave. Slowly coming together.
 
S5033012.jpg

S5033013.jpg


Painted and polished.
I used a fine 3" finishing pad to put random flat spots in the copper. To kind of kid it that had wrought appearance. Turned out well but the pictures don't do it justice.
 
Some initial testing showed that getting the mash and boil tuns up in temp took a tremendous amount of time. Granted, the boil kettle is running at 1/4 power it took hours to achieve a pitiful boil. Putting a lid over the top made a marked improvement, same could be said for the mash tun.
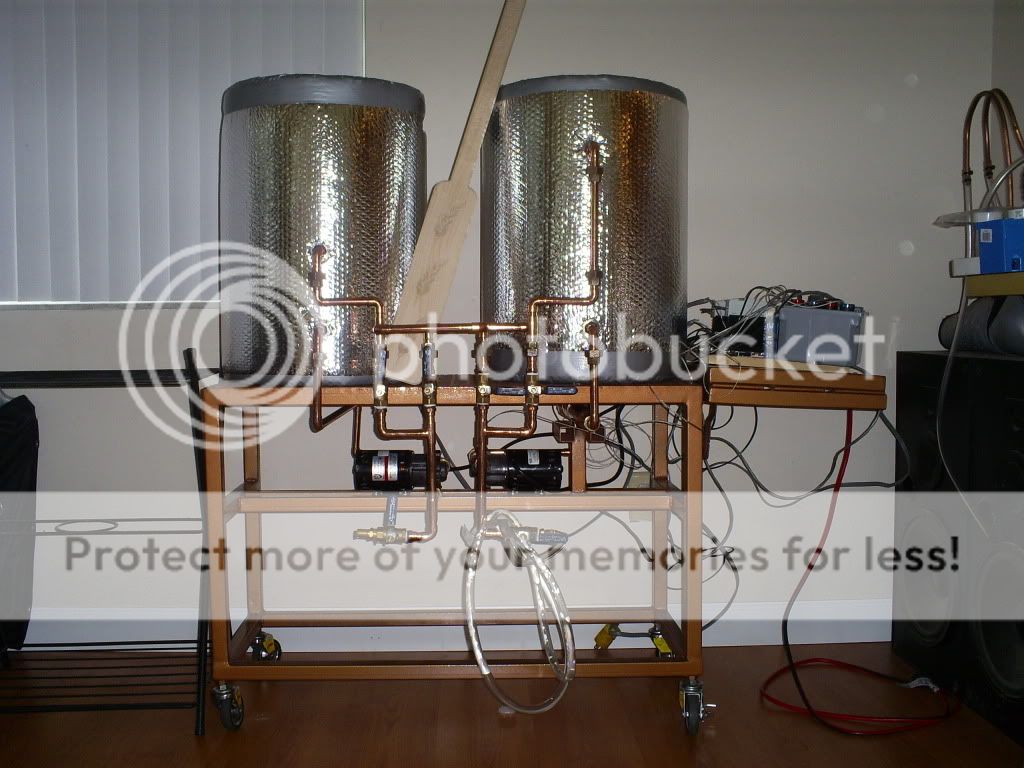
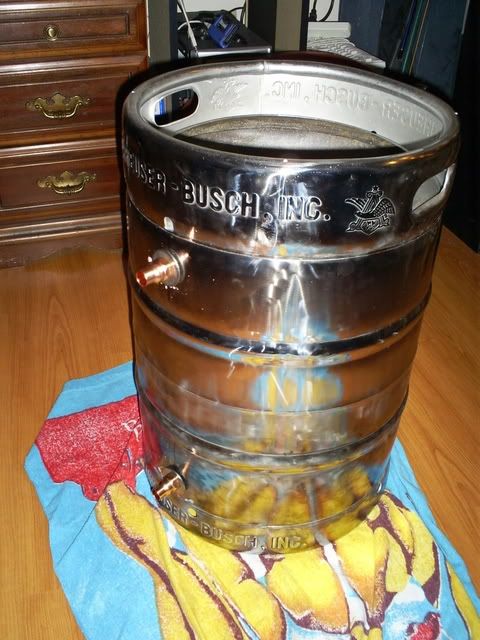
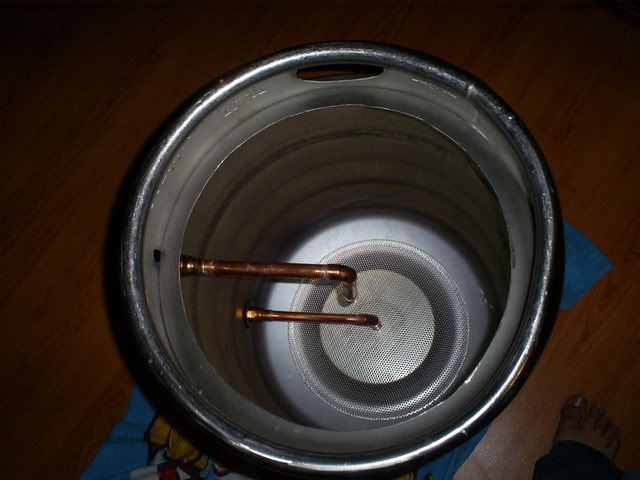
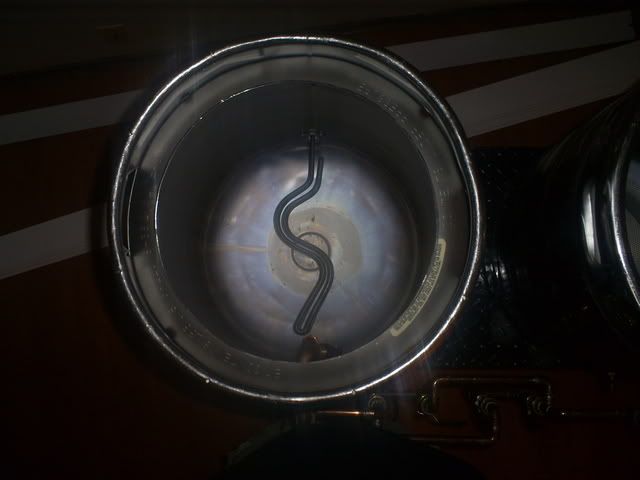
I purchased a 4'x25" of reflectix insulation and wrapped the tuns twice on the sides and bottom. It isn't as nice as polished stainless but it saves a lot of energy, so vanity looses this time. Maybe I will have them rhino lined down the road. After wrapping and using the reflectix for a lid the mash tun performed superbly. From 100 deg tap water to 155 in about an hour. Then from 155 to 165 in 20 minutes. I am pretty happy with it. The only concer I have is that around 155 deg the march pump lost it's prime and temps dropped fast. I think the HEX blew some steam through it and it stuck. turned the pump off and opened the valve some more and it was happy.

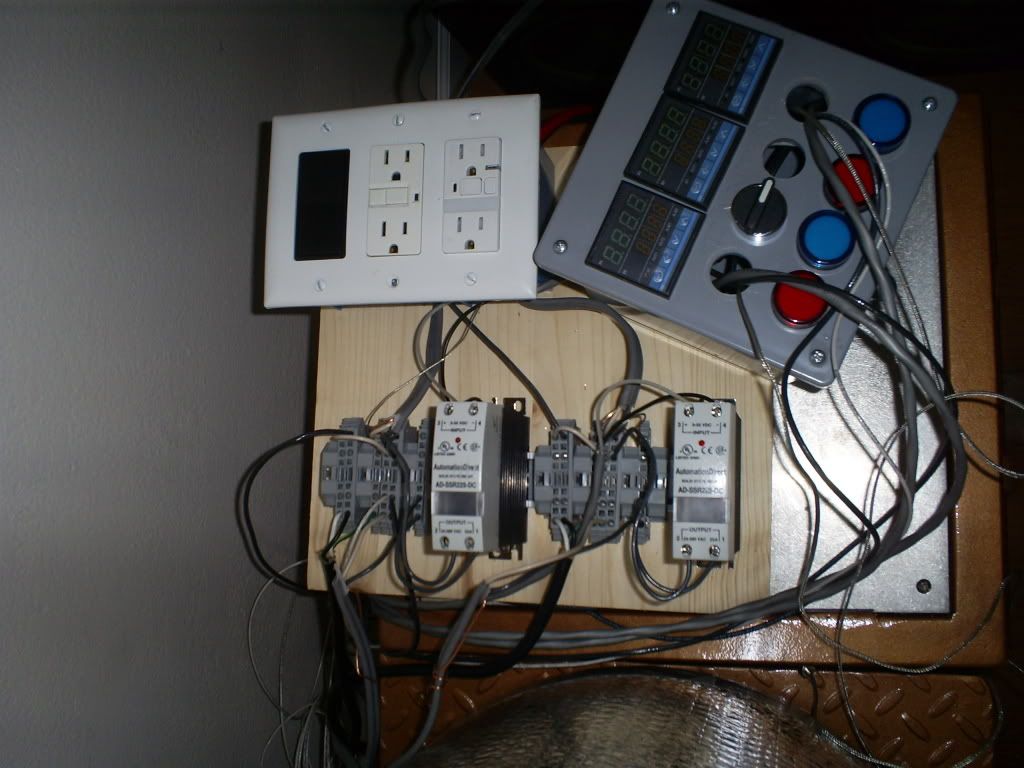
The PID controllers came in and I am not happy with them. They serve their purpose but there is much to be desired. I've used RTKs before and saw CD101's on ebay and bought 3. 1 for the boil kettle, 1 for the heat exchanger output, and one to monitor mash tun temps. It was actually cheaper to get a third PID than a panel meter for the thermocouple.
Any how, the PID instructions are horrid. Probably one of the best specimens of engrish. It would have been a good laugh if it wasn't so frustrating. Any how, the instructions from RTK's website for the CB100 series explains everything. Finally they read in Fahrenheit versus Celsius.
Their output is Pulsed and not PWM, there is no manual setting either, but they do achieve the setpoint and maintain it.
I do have a real issue with them though, when you set the PID to Stop it still tturns the control output on and off. Not cool at all. So when draining the kettle I must change the setpoints to 0 to keep from dry firing the elements. Not happy about this at all. So, I am going to buy 2 Auber PIDs as soon as my budget permits it. These are usable and function, Im just not happy. Ill probably put them in the classifieds for dirt cheap. They will work great for a cooling chamber though. As the second output is a relay and turns on for cooling.

The HOAs I bought off of ebay were JUUUUUUNK. The cheap 22mm three positioned maintained switches with the metallic looking base are made out of paper thin crap metal. Look at them wrong and they shatter into useless heaps. Avoid at all cost and buy from automation direct. Of the four switches I bought, all broke but the 4th was still quasi usable.

The only thing I am happy with from ebay are the 22mm led panel indicators. They are bright and serve their purpose well.

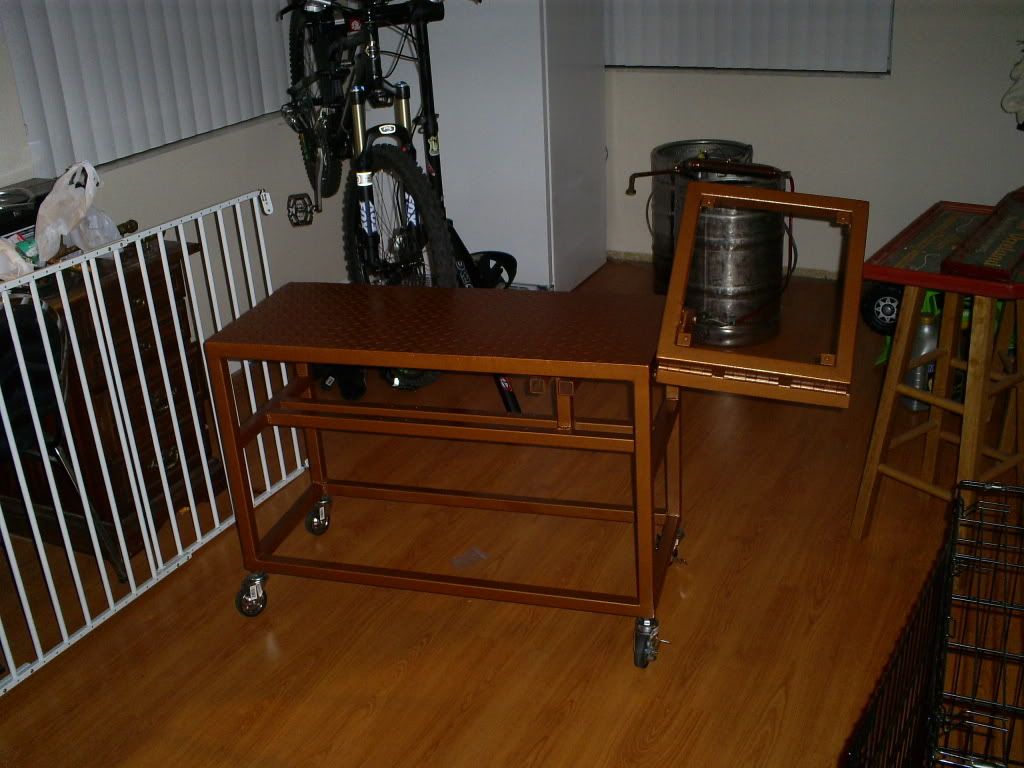
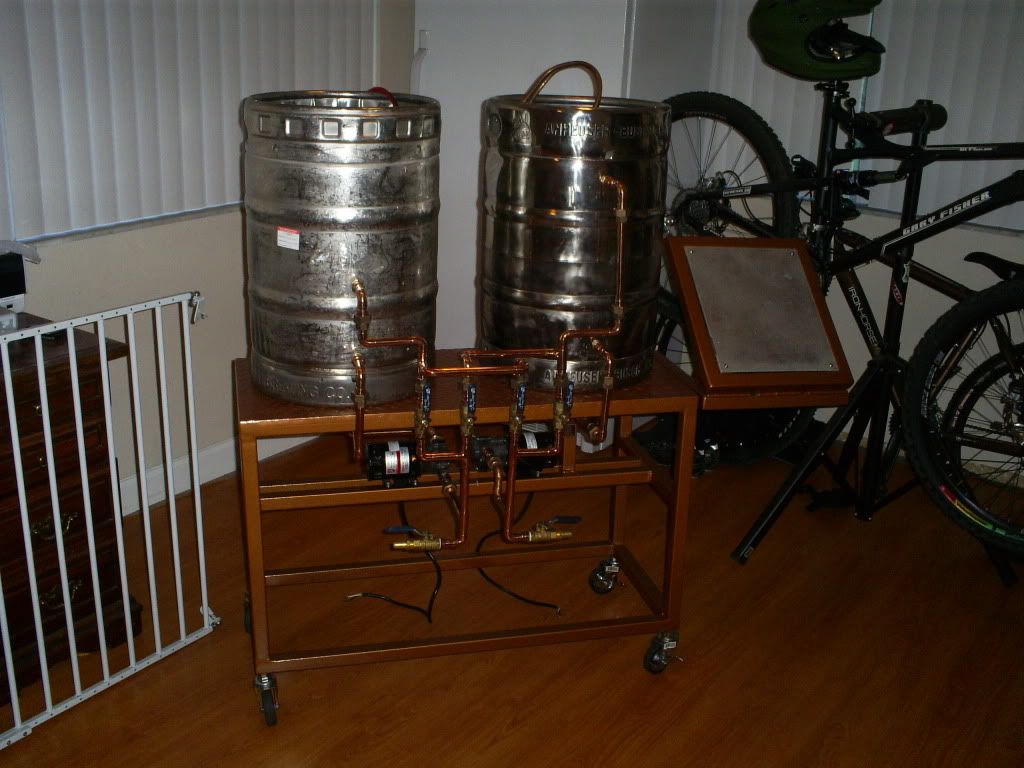
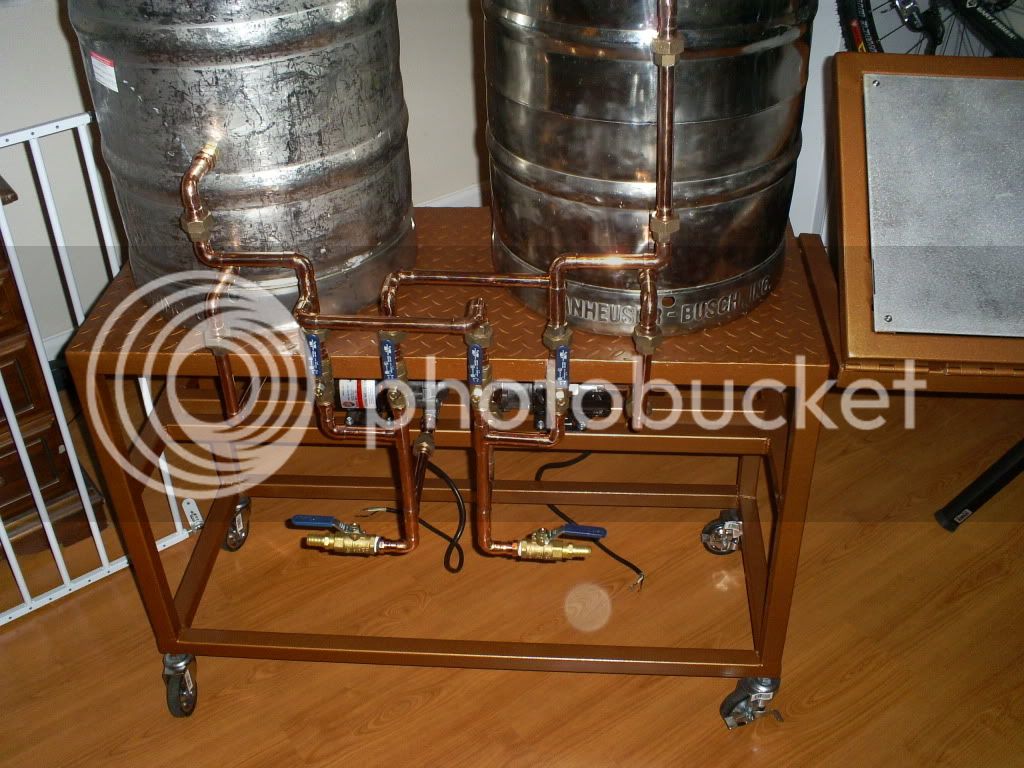
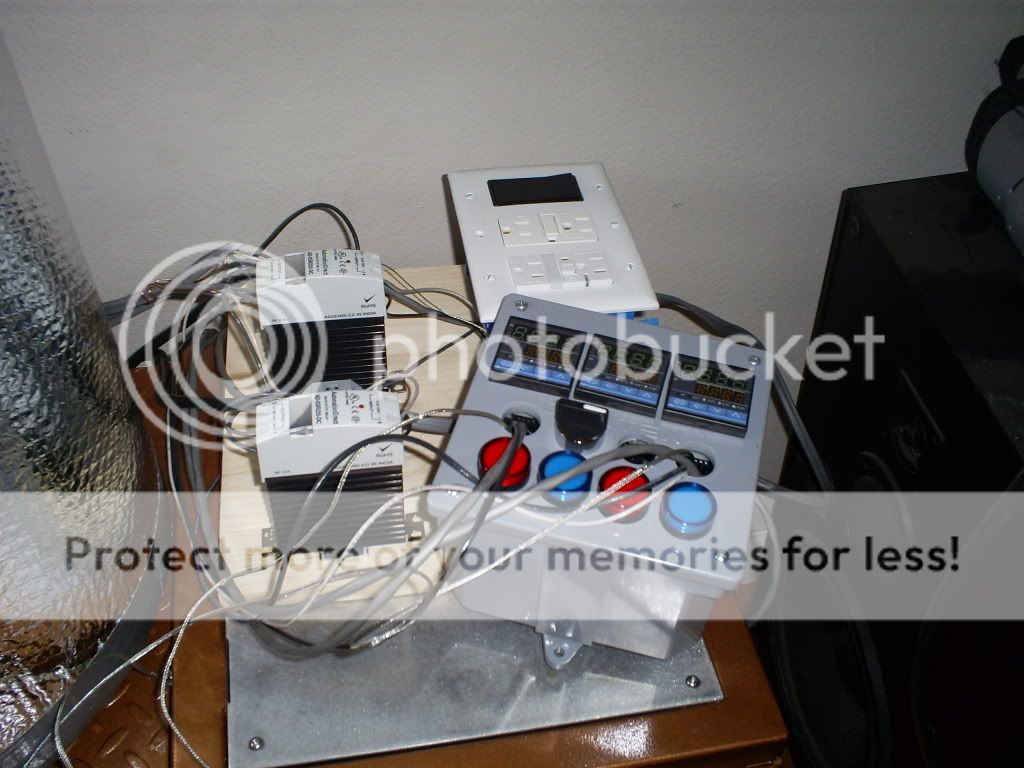
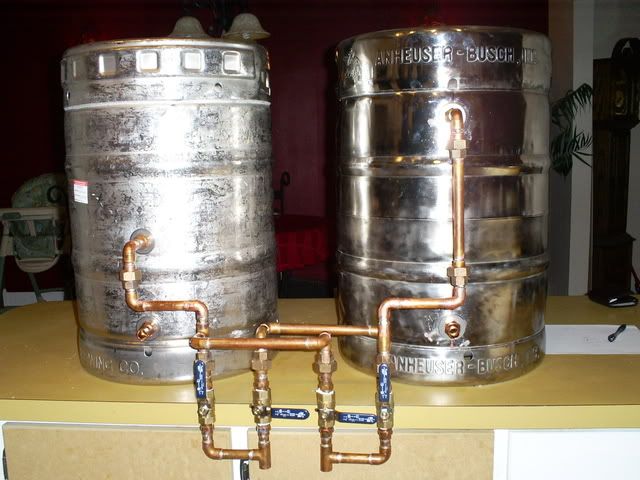
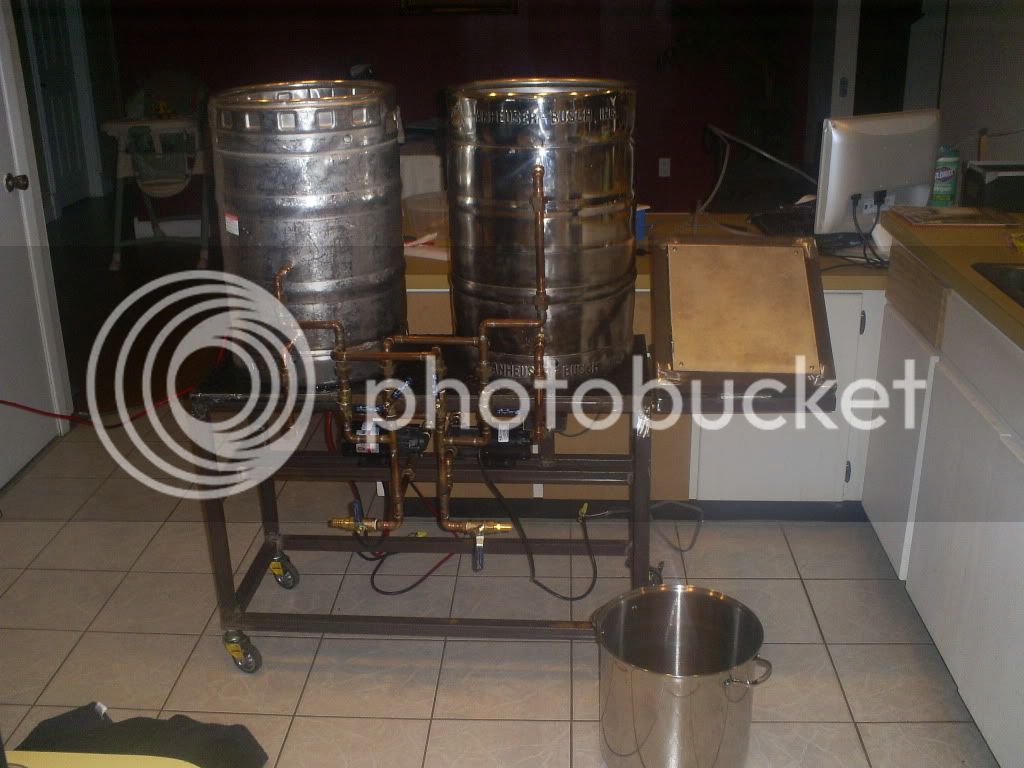
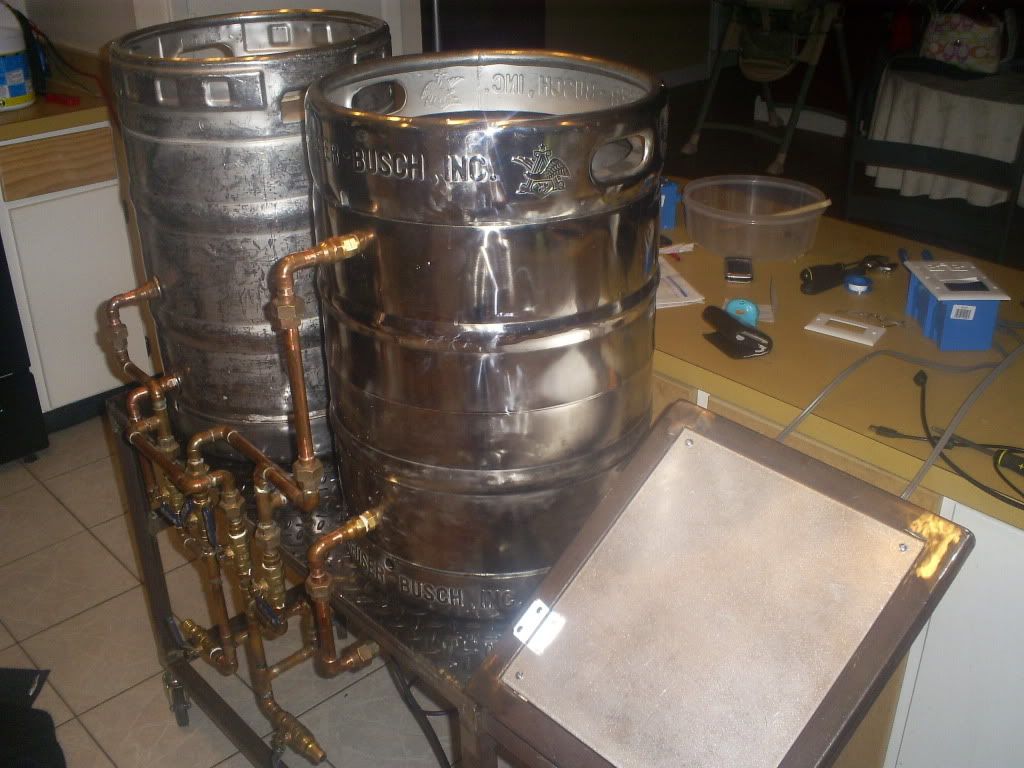
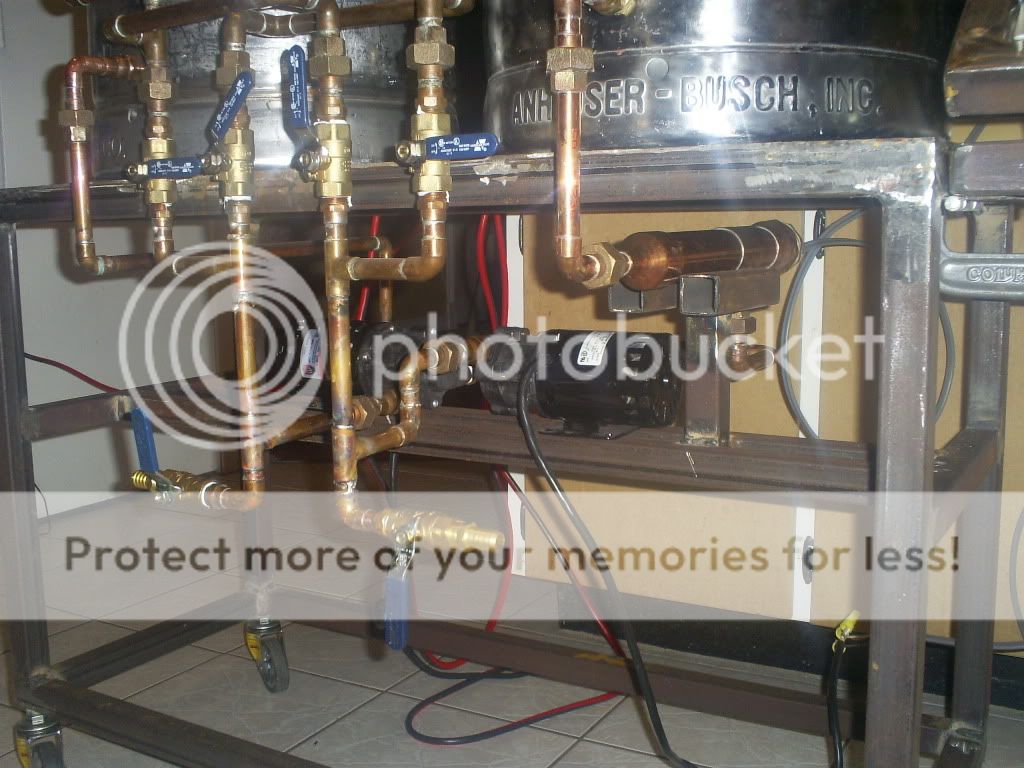
Here is everything in the test configuration.
S5033132.jpg

S5033130.jpg

S5033131.jpg


I am going to run a dedicated 240v from the dryer outlet with a 30 amp gfci for the boil kettle element. Everything else 110 will use a wall outlet with gfci protection. Really wanted to use a single 240v 3+1 drop but I have to run 100 feet of new cable to the range and then another 30 feet to the brewery. Not down with the expense or attic crawl right now. Looks like I may be breaking this puppy in and popping my AG cherry on some Ed Worts Haus Pale Ale next week after finals. /crosses fingers.
 
Back
Top