My Weldless Build Using Strut

Homebrew Talk - Beer, Wine, Mead, & Cider Brewing Discussion Forum

Help Support Homebrew Talk - Beer, Wine, Mead, & Cider Brewing Discussion Forum:

This site may earn a commission from merchant affiliate links, including eBay, Amazon, and others.
Just a heads up to everyone. This Sunday we are going to assemble and take pics of the process regarding the use of the unistrut. So if you have any questions let us know and we will try to answer during the construction day.

Awesome! Can't wait to see it posted. That will help a lot for those who see this and other threads with it shown but not actually built. Pretty simple, but some people just like seeing it done, and with youtube and vimeo it's so easy.
 
Cut all my pieces this weekend and just waiting for the nuts to come in the mail to put it all together. For those of you who aren't sure what to use to cut the strut, go to Menards, or whatever hardware store you prefer, and rent their chop saw. Cost $10 for four hours and it cuts through like butter.

2013-01-12_13-54-18_475.jpg


2013-01-12_12-39-55_475.jpg


2013-01-12_15-39-19_63.jpg


View of the brew rig from the side with the control panel extended out
sideview.jpg


View of the brew rig from the front with the control panel folded in.
frontview.jpg
 
LiquidFlame said:
Cut all my pieces this weekend and just waiting for the nuts to come in the mail to put it all together. For those of you who aren't sure what to use to cut the strut, go to Menards, or whatever hardware store you prefer, and rent their chop saw. Cost $10 for four hours and it cuts through like butter.

What was the cost per foot ?
 
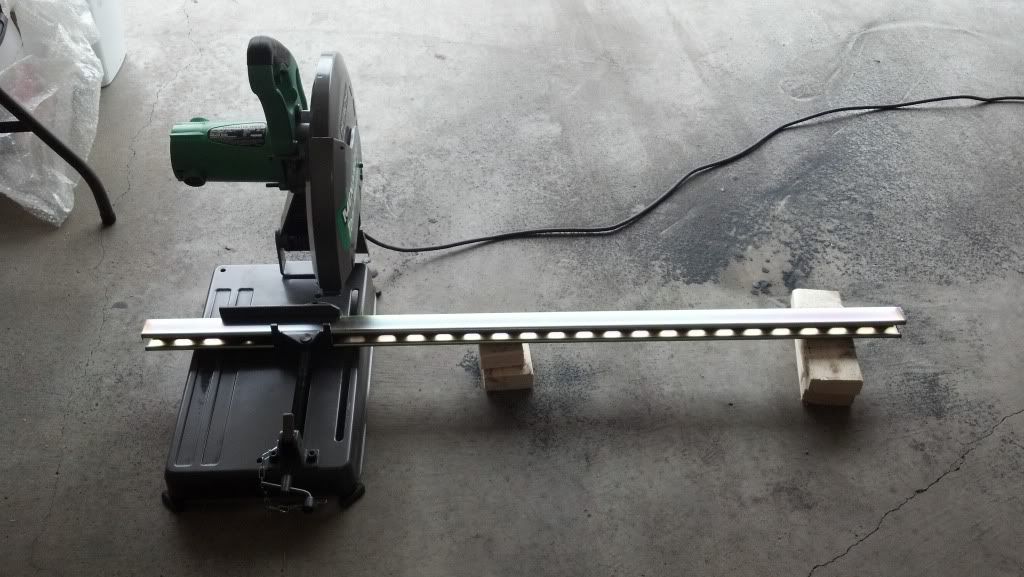
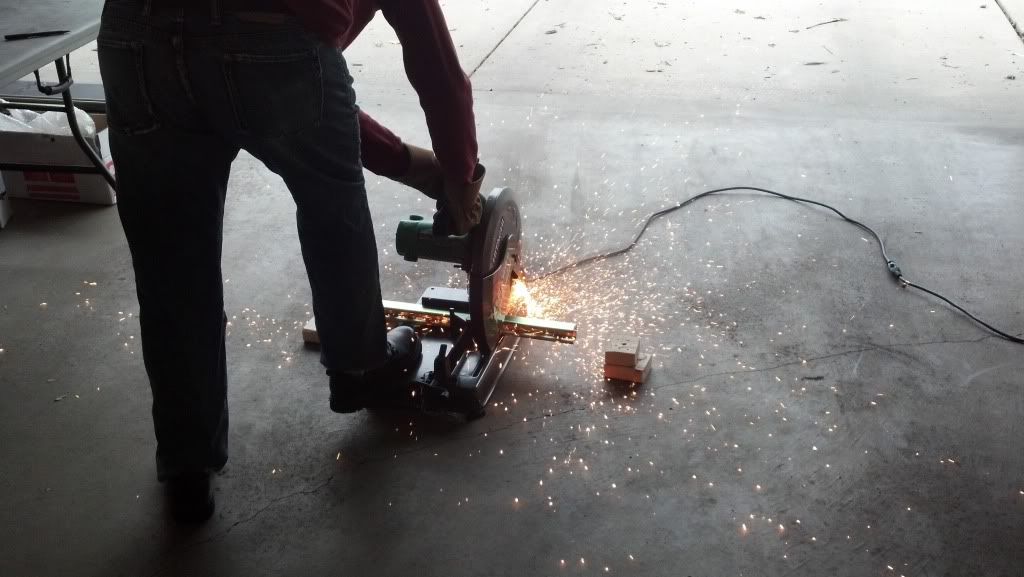
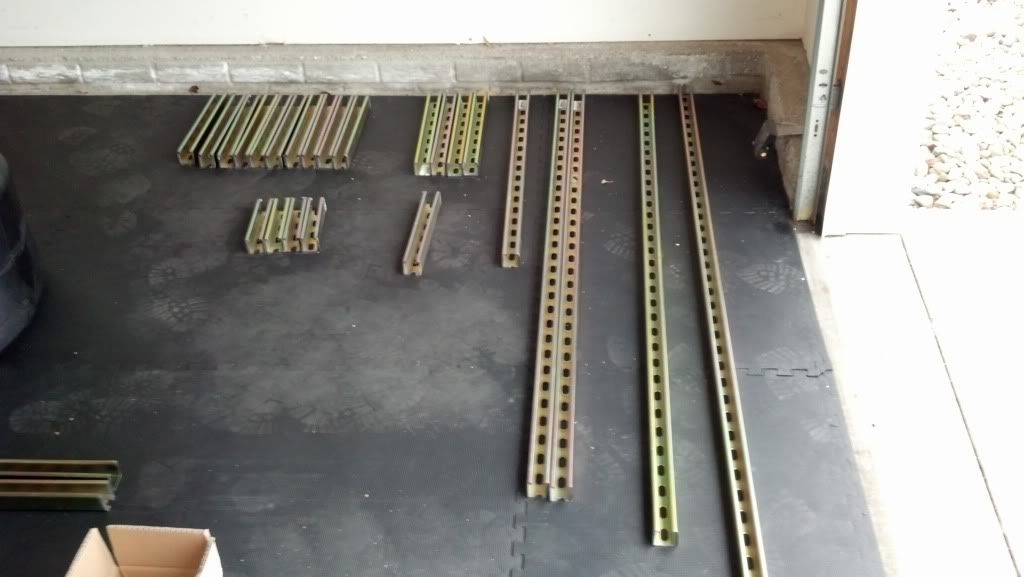
Well Sunday was our funday and we ended up cutting 7 of the 10' 12ga. strut sections and assembled everything.

We rented a chop saw for the weekend and if you do, do yourself a favor and go to HD/Lowes and pick up their Dewalt saw blade specifically for stainless steel. There is even a picture of strut on the blade, we bought two of them and they cut through all 32 cuts with out losing even a 1/2" on the blade. Those generic grinding blades suck and you will spend more then you want as you blow through those.

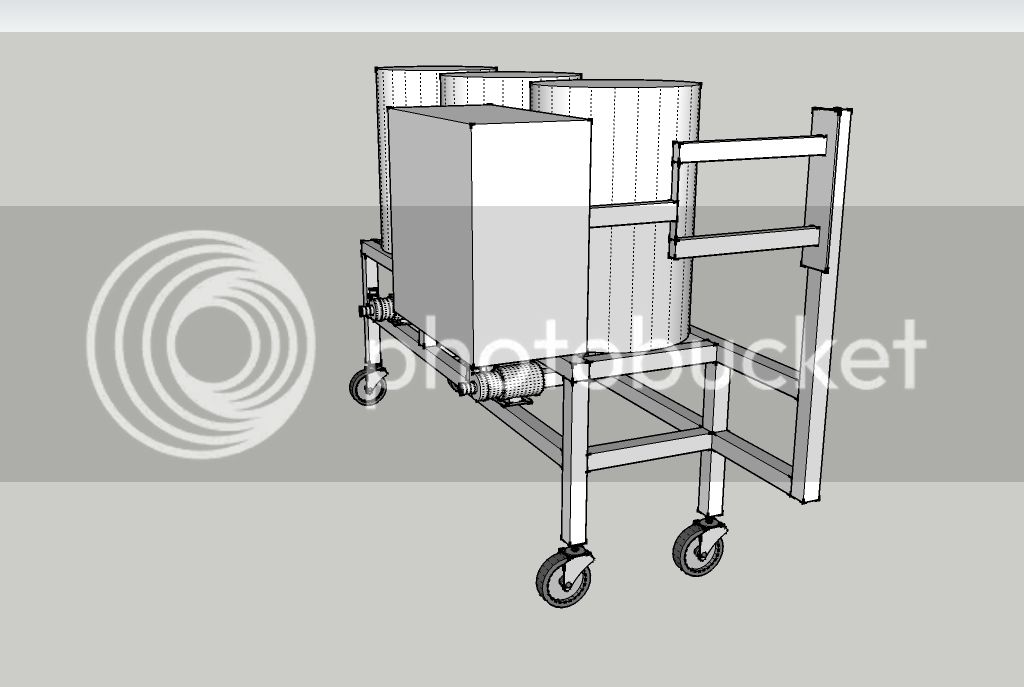
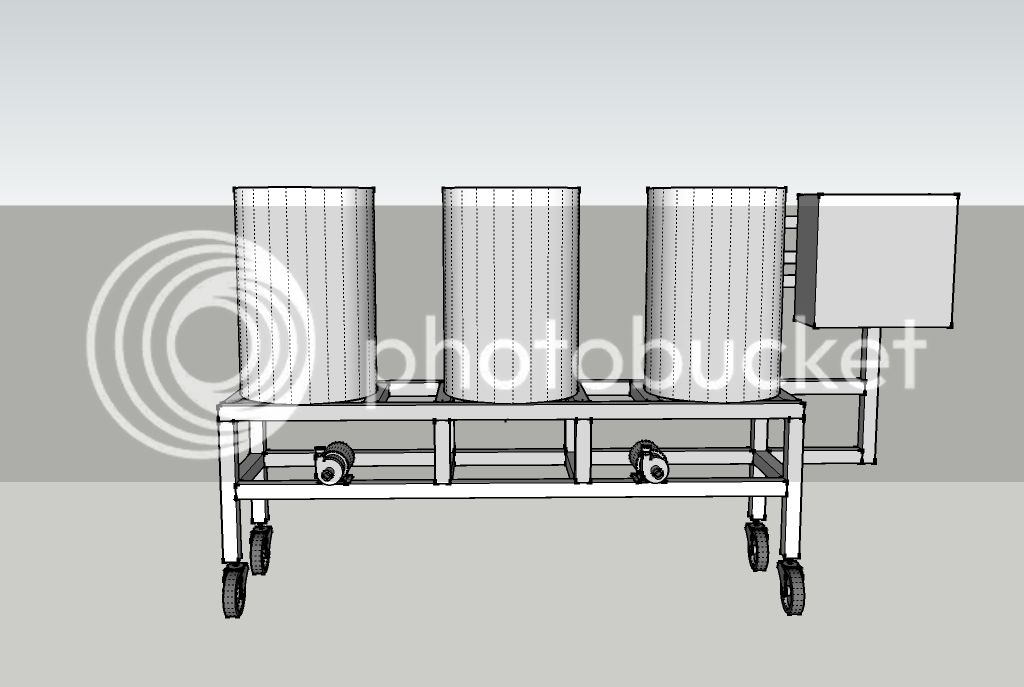
For the stand we are using natural gas that I recently had installed professionally. Something about a denied homeowners claim made me not want to do it myself. Right now we only have one of the burners hooked up and we used a 23 tip jet burner. I know a lot of people find them difficult or a pain, but honestly we are controlling the gas flow with a gate valve and a ball valve as a shut off. It has worked like a charm so far so we ordered another one from Amazon for $24. It is more heat then we need on a keggle system... so I guess we will have to start doing larger batches :rockin:

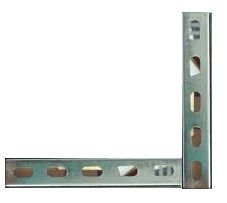
I have a parts list also included in the pictures, and we had to do a HD trip to pick up a few brackets for extra supports we made after the initial build. But if you go by my plans everything on the parts list will be enough.

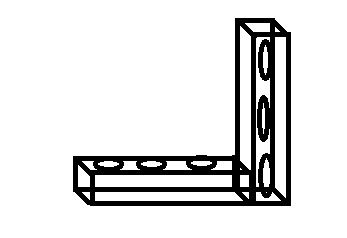
For the plans I used Google Sketch Up which is a free program also.

We didn't run in to any "gotchas" or injure ourselves which was great and to cap it off we celebrated by doing a "wet" run of the system and enjoyed a Hopslam which is finally being released.

Enjoy and feel free to ask if you have any questions.


Here is a link to the full album if you want to check it out.


http://imgur.com/a/kRltd/all

DSC_4223.jpg


DSC_4256.jpg


DSC_4272.jpg


DSC_4282.jpg


DSC_4293.jpg
 
Wow, great planning a really nice looking stand! Good tip on the chop saw and Dewalt blade. I'm sure they are way better than the POS China blade I used. I didn't have nearly as many cuts either. So you went all stainless? Are you posting video? I thought about filming it too, but the strut is so intuitive it was hard to make instructional video on something that was so easy to do.

No on to more important things. I've been dying to get some Hopslam. Want to trade for anything? PM me if you have some bottles you'd ship for trade.

Awesome post. That gas rail looks very familiar ;)
 
No video unfortunately. I am kicking myself for at least not making a bunch of short vids of the assembly. When I went to rent the saw they were pushing those cheap china blades big time and I am glad I didnt use them.
I did go all stainless steel on the stand, just the thought of building something that could hold... say... 55 gallon batches was exciting. You could seriously park your car on this thing and it wouldn't budge.

I may be able to get my hands on some Hopslam if I go to the store this week. I may have to get some YuengLing from you. Not available here in Michigan unfortunately.
 
LiquidFlame said:
Bought mine from Menards, they come in 10ft sections for $18.97. I used 5, with a some left over.

Cool, thanks, also where did you get your burners, it looks like the inlet is on the center rather the the side, easier to plum and no need to mount the burner to the frame.
 
Cool, thanks, also where did you get your burners, it looks like the inlet is on the center rather the the side, easier to plum and no need to mount the burner to the frame.

I'm not using burners, my system is electric. I think what your seeing in my diagram are my Chugger pumps.
 
LiquidFlame said:
I'm not using burners, my system is electric. I think what your seeing in my diagram are my Chugger pumps.

Yeah my bad, it was the OP that has an LP setup.
 
To JonesSoda: Can you provide a little more detail to just how you mounted your burner? Nice looking stand you've got there!
 
To JonesSoda: Can you provide a little more detail to just how you mounted your burner? Nice looking stand you've got there!

We used some 12 ga. copper ground wire and just wound it around a few times and pulled it all tight. It is kind of an odd rig but it will hold it pretty well. I will be looking for a more "permanent" solution as always.
 
I did go all stainless steel on the stand, just the thought of building something that could hold... say... 55 gallon batches was exciting. You could seriously park your car on this thing and it wouldn't budge.

Where did you order the stainless from? I've seen huge swings in pricing. Are all the brackets/screws stainless as well?
 
gifty74 said:
Got the Auber PID hooked up and wired into a vintage 6"x6" control panel I scarfed off an old piece of equipment at work.

Where did you get your burners?
 
Where did you order the stainless from. I've seen hug swings in pricing. Are all the brackets/screws stainless as well?

On my image album linked in my big post I have a breakdown of the parts, their origin and cost.
 
I would like to find a 90-degree curved channel for a hoist/trolley system. From my searches, this is not an accessory offered. WHY!? I can imagine a track on the ceiling to hoist/transfer my carboys from here to there with no lifting. A 45 and 90 section would make it easy. Maybe someone out there can bend them??? Let me know if so....
 
Yes - I saw that, but the list says galvanized. I was interested in SS.

I am sure you can find some straight out of the box SS at an electrical supply house. All I had available locally was the galv. SS. I know it tacked on a few bucks but I expect this beast to last us quite some time. I tried to special order SS from Lowes but they do not carry the 1 5/8" x 1 5/8" square nationally and in fact it was a nightmare to get to the point where they realized they don't. Try your local supply place or if you are lucky maybe a you are by a Grainger or something close to it.
 
Where did you get your burners?

I got my burners off ebay a few years ago. They are a little different in that they're bottom inlet, versus the side inlet you see on many of them today. They are 10-tip and I think are the sweet spot for heating keggles. You can throttle them nicely for a direct fired mash system like mine, and crank them wide open for some major heat to get up to boiling. Very versatile burner.
 
I've seen those 10 tip burners and have always been impressed wth their flexibility. I got the 23 tips dirt cheap and with a gate valve can throttle them quite well too. Either way I say flame on!
 
I was going to go the unitsrut route also since I have enough to build a rig laying around but I started pricing the fittings spring nuts and bolts and it ended up being more money than just buying my steel tubing and welding my rig up

For that connection you will have to use a 90 degree bracket and drill a hole for the bolt to go through then put a spring nut sideways in the strut that would be the easiest way

Was really hoping not to have to drill. Would that require any kind of special bit?
 
No just a standard bit you will have to mark the spot then drill using a bit large enough for the bolt to go through. I looked through catalogs of unitsrut fittings and couldn't find any that don't require being in the channel or the pre slotted holes
 
Even with the fittings above there are angles that run into solid walls of the strut you might give one a try it looks like you could get at least one bolt in on each piece without drilling but I'm not sure how sturdy it would be if its not to your liking you could drill the rest of the holes out
 
That fitting listed above is perfect I've never seen those before and you wouldn't have to drill with those. I don't think it goes between the strut but it will wrap around the corner to fit in the channel and have an L bracket to hold the other connecting piece
 
Has anyone thought about painting theirs with high temperature paints, like stove paint? Those paints don't work for anything that's in direct contact with a flame, but obviously nobody's building theirs so that the strut has direct flame contact. I was looking at some of these high temperature paints, and they have tolerance to 1200F, which should be more than sufficient in this application.
 
Has anyone thought about painting theirs with high temperature paints, like stove paint? Those paints don't work for anything that's in direct contact with a flame, but obviously nobody's building theirs so that the strut has direct flame contact. I was looking at some of these high temperature paints, and they have tolerance to 1200F, which should be more than sufficient in this application.

You can paint but you have to use a certain type of paint. Check out post #40.

People are using strut with gas systems.
 
Thanks for all the great info in this thread! Awesome stuff!

I'm looking at building one, myself. I would like to use a pair of BG-14 burners; one for the HLT and one for the BK. This rig would allow easy hard plumbing of both gas and water on board with connects to the supplies.

Question: Have any of you used these Banjo Burners and, if so, how are you mounting them? Can you share a picture or two, please?
 

Latest posts

Back
Top