Collecting parts for EBrew build

Homebrew Talk - Beer, Wine, Mead, & Cider Brewing Discussion Forum

Help Support Homebrew Talk - Beer, Wine, Mead, & Cider Brewing Discussion Forum:

This site may earn a commission from merchant affiliate links, including eBay, Amazon, and others.

vaheel

Well-Known Member
Joined
Mar 9, 2011
Messages
70
Reaction score
0
Location
Wise
I plan on using this box for my basic ebrew build that will consist of 1 PID controlling two elements (one at a time) with a main power switch, e-stop, and two pumps (using only one for now). The box for the control panel (inside dimensions are 12x10x5) is shown below. I would like to start ordering pieces this week. Will I need a Din rail for this back plate? I am hoping that P-J will see this and suggest a wiring diagram.
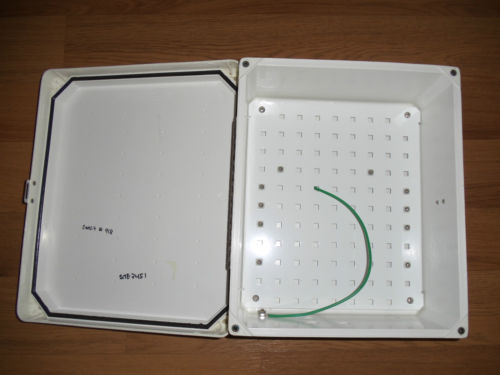
control panel box.jpg
 
i would have a breaker for each pump and sure you could use a din rail style mount for that. as far as the e stop p-j has a great diagram that uses the GFCI function to trip the circuit without using a contactor.
 
You do realize the auber pid is nearly 5" long. Is there enough room for it to fit?
 
P-J,

Thank you for taking time to do this. It it greatly appreciated!
 
I am doing an almost identical build now, sort of a simplified version of Kal's. I was planning on using 2 elements/2 PIDs but otherwise pretty much the same set up as you. I thought about doing 1 PID, but unless I am missing something (which is very possible) you will still need 2 SSRs/heatsinks, so I figured another PID was about $40, and will allow continuous monitoring of temps even when not firing the element. So it will save me the trouble/expense of putting regular thermometers in the HLT/BK, so it might actually be cheaper.

Please keep us posted on your progress.

Actually you only need one SSR with the setup PJ showed above. Also since you pretty much always run your boil kettle in manual mode you would not see boil kettle temperature anyways.

One other added bonus is you don't need a probe in the boil kettle, because like I said above your running the boil in manual. Unless your planning on do back to back batches where you would run the HTL and BK at the same time there really is no need for 2 PIDS, SSR's and RTD's. Overall it saves close to $100 and really does not limit functionality. The only thing you might sacrifice is a bit of bling.
 
You could go even cheaper and just have one switch and outlet for the BK and HLT. Just turn off the switch, unplug the HLT and plug in the BK. This would also decrease (but not eliminate) your risk of dry firing an element.
 
P-J,

Would the wiring change much if I were to add two lights showing which element was powered up?


This should work for your setup.
Click on the image to see a fulscale diagram printable on Tabloid paper (11" x 17")

 
I did a similar build as what you are attempting, including having 2 lights to show which elements are on. I also added a 240v LED to show when the control panel was powered up, and I used two contactors to completely shut off power to each element when the switch was off.
Here's my build thread:

https://www.homebrewtalk.com/f170/my-two-5500-watt-element-1-pid-ssr-build-281085/

Its based on a PJ diagram, I just modified it a bit - I've got about 10 brews under my belt with it and I love it. I've also since added a HERMs coil to the HLT - you can see that in my website link in my signature.
 
P-J,

Would the wiring change much if I were to add two lights showing which element was powered up?
Not at all. Just add your 120V indicator lights to the switch #1 outputs and then wired to the neutral.

ie: Switch #1 terminal #4 to a 120V indicator light and the other side of the light to neutral bus. This indicates that the HLT is selected.

Switch #1 terminal #6 to a 120V indicator light and the otherside of the light to neutral bus. This indicates that the Boil is selected.

Hope this helps.
 
Yes, it does help-thanks!

ANy need for a contactor that was mentioned in the post above?


Not at all. Just add your 120V indicator lights to the switch #1 outputs and then wired to the neutral.

ie: Switch #1 terminal #4 to a 120V indicator light and the other side of the light to neutral bus. This indicates that the HLT is selected.

Switch #1 terminal #6 to a 120V indicator light and the otherside of the light to neutral bus. This indicates that the Boil is selected.

Hope this helps.
 
vaheel,

No need for contactors. Plus I don't think you would have enough room in your controller box.

I decided to update the diagram showing the 120V indicator light wiring.

As always - Click on the image to see a fullscale diagram printable on Tabloid paper (11" x 17")

 
P-J,

Thanks again! I very much appreciate it and will post some pics later on.
 
vaheel, I'm doing the same thing. Here's a picture of my panel. It's not wired or anything yet. I'm still in the collecting parts phase.
298993_2016208248427_1340472632_31875796_1983891360_n.jpg
 
Thats a nice control panel. What is the size of the box?


vaheel, I'm doing the same thing. Here's a picture of my panel. It's not wired or anything yet. I'm still in the collecting parts phase.
298993_2016208248427_1340472632_31875796_1983891360_n.jpg
 
Thanks! I can't remember the dimensions. I want to say 12x12x6 or maybe 15x15x6. I'll have to measure when I get home. It's a junction box from home depot.
 
P-J,

I would like to get your thoughts on this panel with the external elements. Moving the outlets outisde of the panel would give me a little more room. What are your thoughts?

https://www.homebrewtalk.com/f51/new-control-panel-156988/

Thanks again!
I think you will have plenty of room in your panel to do the setup that you want to do. There will not be that much "stuff" inside & I believe it will all fit easily with a little layout planning. You most certainly need to mount your SSR heatsink outside the box. I'd strongly recommend this one External Mount Heat Sink for 40A SSR from Auber Instruments. It will install easily, neatly and take up very little room.

I think that if you go the route of the link, you will end up with a fixed & permanent setup.

If you'd like to talk it out, please let me know.

P-J
 
P-J,

Thanks again for your advice. I am planning on using the external heatsink and am looking forward to the challenge of the build.
 
Vaheel, did you ever finish this build? It is exactly what I have been looking for

Sent from my VS980 4G using Home Brew mobile app
 
Back
Top