Soldering Stainless steel

Homebrew Talk - Beer, Wine, Mead, & Cider Brewing Discussion Forum

Help Support Homebrew Talk - Beer, Wine, Mead, & Cider Brewing Discussion Forum:

This site may earn a commission from merchant affiliate links, including eBay, Amazon, and others.
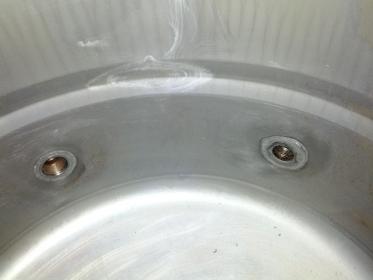
I was careful,and only added the "Harris Stay-Clean Flux" to the face of the nut. And to the keg.
But used the solder in the link.. What i did was,Cut a loop to match the diameter of the nut..A tad smaller actually.
Because the solder is thick.. I just placed the nut on top of looped solder,then applied heat. The thick solder filled all
the gaps caused by the curved keg and flat washer.
http://www.homedepot.com/h_d1/N-5yc...word=silver+solder&storeId=10051#.UDFyu6BD6So
 
how hard would it be to use the keg tool on a 1" half coupling for a heating element from bargain fittings? Since it is for an element you do not really need a full. Since it is a half coupling the coupler wont be sticking out as far therefore the majority of the element would be sticking in the pot without as much in the coupler

i did this on my HLT and my BK. half coupler for each element. :mug:
 
got everything at Bargain Fittings if i recall correctly. half couplers in 1" for the heating elements, half couplers in 1/2" for the sight glasses and thermometers, 1/2" full couplers for the dip tubes/ball valves.

never assume that two fittings are the same OD just because they're both 1/2". the half couplers were slightly larger than the full couplers, so i had to make sure and not pull the tool quite as deep for the full couplers. otherwise bang with hammer until they're tight again :drunk:

my MLT all pressed.
527153_4487885954441_1337151017_n.jpg


my HLT with pressed 1" fitting ready for solder. i marked the OUTSIDE of the half coupler so i didn't accidentally pull it through backwards. :)
417219_4487887914490_873783208_n.jpg


my 5500 watt LWD element in the new fitting
403972_4487890234548_707472241_n.jpg


HLT and BK. decided to go with wide box instead of tall box orientation, but this pic showed both options.
417274_4448662653883_960228336_n.jpg
 
being a pretty good pipe swetter and a solder expert on electronics, i decided to try this method on one of my keggles as an experiment after reading this hole thread and looking at vids and pics (i made the conclusion it might be doable but was sceptical). ok so i made the dimple tool and dimpled the keg. that turned out good. unfortunatly i wanted to put a half coupler in instead of a full coupler. but the half coupler O.D. is slightly bigger than the full and it got stuck inside the large coupler on the demple tool and it came out of the keg with lots of coaxing stuck inside the demple tool coupler. i had to punch it out of the tool. so i tried again but this time i didnt push it in flush so it wouldnt stick inside the tool and i tapped it gently into place after that. i did the sanding and pre fluxing etc. just like the video on this thread. i used the map gas and made the ring of solder etc. but the solder barely flowed on one half of the coupler and was an epic failure on the other half. i tried to get the other side to flow with more flux and cleaning etc. but did not get a full ring of solder around the coupler. So now im stuck making a decision of either taking it out all together and trying again or just cleaning the thing up and welding it in like all my other fittings. not sure what went wrong on this whole experiment but it cost me for the tool making and the supplies to do this and im sitting with a useless keggle now until i fix it. So if you try this be very cautious. i feel it is a hit and miss at best. stainless just dont like to be soldered to very much in my opinion and it is a weak connection between the solder and stainless at best. Ive looked at the pics on this thread carefully and the solder just doesnt look like a good sweat connection. the solder just dont wet up on the stainless like other solderable metals. I'd be more apt to try the brazing technique if i was someone thinking of doing this and havent tried yet or at least find a friend with a wire feed or tig welder. this is just my opinion. being an engineer i naturally have that inquisitive mind and want to experiment with stuff. and i have to say this experiment failed. i might try it again but this time i am going to try sandblasting the area and the coupler first for best bondability. if that works ill let everyone know.
 
stainless just dont like to be soldered to very much in my opinion and it is a weak connection between the solder and stainless at best. Ive looked at the pics on this thread carefully and the solder just doesnt look like a good sweat connection. the solder just dont wet up on the stainless like other solderable metals.

In my experience, stainless is only slightly more difficult to solder than copper. It takes good technique and the appropriate flux. Liberal use of the shift key is also recommended.
 
... Liberal use of the shift key is also recommended.

Carriage return as well.

From my recollection of reading every post in this thread a few months ago, it seems most people that used map gas (especially the old 'real' map gas) didn't have success with this technique.

Standard blue bottle propane seems to work the best. I'm not sure why, maybe the higher temp of the map burns off the flux before the pieces are warm enough to draw the solder?

Having sweat plenty of copper, my keggle couplers don't look as good with wicking of solder through the joint but they've held fast thus far.

Finally, if you had a bad attempt the best bet is to pull all off and start fresh. Heat it up, pull it all out, and wipe off with a wet rag. Trying to rework a bad joint usually just makes for a mess and swearing.
 
Round Two!

So I took the joint apart and I cleaned up the coupler and decided to do a pre-tin experiment on the coupler. I used my bench grinder on it to make sure I had a clean
surface with no residue left from the sweating attempt and ensured I didn't overheat it or discolor it. Then I used the acetone on it afterwards and put it in a vice using
the proper flux on it and torch and tinned the hole edge of the coupler.

It looked pretty good when finished after doing a quick cleanup on it. So I decide to see how well the solder took to the stainless. I hit it with the torch to see if the
solder would stay wetted to the stainless. I only used enough heat to melt the solder (it only took a couple of seconds) and it repelled away from the stainless.
So I concluded that if you want to remove solder from your stainless fitting etc. just hit it with a little heat and the solder will repell right off it.

So in conclusion, solder don't stick to stainless. Unless someone can prove it to me, I will not believe it. And by the way thaught this was a forum not an english class
people.
 
You mean the plethura of photos showing successfully soldered fittings in this thread aren't enough proof for you?

I have three kegs now with soldered fittings and have even soldered washers on to the cut off tops to make lids. Not to mention I've now made multiple soldered kegs for friends. They are all holding just fine.
Not sure what the problem is that you're having, but it certainly does work.
 
Round Two!

So I took the joint apart and I cleaned up the coupler and decided to do a pre-tin experiment on the coupler. I used my bench grinder on it to make sure I had a clean
surface with no residue left from the sweating attempt and ensured I didn't overheat it or discolor it. Then I used the acetone on it afterwards and put it in a vice using
the proper flux on it and torch and tinned the hole edge of the coupler.

It looked pretty good when finished after doing a quick cleanup on it. So I decide to see how well the solder took to the stainless. I hit it with the torch to see if the
solder would stay wetted to the stainless. I only used enough heat to melt the solder (it only took a couple of seconds) and it repelled away from the stainless.
So I concluded that if you want to remove solder from your stainless fitting etc. just hit it with a little heat and the solder will repel right off it.

So in conclusion, solder don't stick to stainless. Unless someone can prove it to me, I will not believe it. And by the way thought this was a forum not an English class
people.

Your process is flawed or the products you are using are not the correct type recommended for soldering stainless. There are many here that have successfully soldered stainless couplers to their kegs, myself included.
 
allclene, were you using the liquid flux or paste? Some of what you described matched the results BobbyM found when he tried the paste flux. Despite what the label says, the paste flux will not work.
 
THIS is the proper flux to use. There may be others that work but this is what I used for my fittings and they are solid as a rock.
 
I am getting ready to do this soon and was thinking about MAP vs propane. Just guessing but could it be possible that MAP being hotter could cause the solder to melt too fast on one side of the coupler, while the other side not in contact with the flame does not get to temp fast enough. With propane it takes longer to get to temp and therefore has more time for the heat to even out through the coupler and the kettle wall.
 
I used the liquid flux in the home depot kit mentioned in this thread.
I will drop the dime and buy the other flux and try a test sweating again.

I looked at all the pictures on this thread and I have to tell you, they don't
look like they show any wetting up onto the stainless. One picture looked
good though but most didn't.

If you have a picture of the solder wetted to the stainless, show it for me
please.
 
OK pulled trigger flux ordered. Should I use the propane or map on this test when the flux arrives?
 
OK pulled trigger flux ordered. Should I use the propane or map on this test when the flux arrives?

I used Mapp but that was because it's what I had on hand. I kept the heat at the end of the coupler (the end furthest away from the keg) because I figured it would heat the thinner stainless by convection. I had a puddle of flux on the inside of my dimple and a ring of solder inside of that. Once I could see the solder wick through my dimple on the outside I removed the heat and let everything cool for 5 mintues or so.

I also roughed everything up pretty well with emery cloth before pulling the couplers through, I think that is a key part of this process.
 
I used the liquid flux in the home depot kit mentioned in this thread.
I will drop the dime and buy the other flux and try a test sweating again.

I looked at all the pictures on this thread and I have to tell you, they don't
look like they show any wetting up onto the stainless. One picture looked
good though but most didn't.

If you have a picture of the solder wetted to the stainless, show it for me
please.

I'll attempt to get a picture of one of my fittings soldered to the kettle, but I don't know that my camera will give a decent picture up that close. If I can get a decent pic I'll post it up for you.
 
Even if every person in the thread has a terrible cold joint, the result more often than not is a workable non leaking kettle.

ForumRunner_20120827_082127.jpg

I machined my half coupling down on a bench grinder to fit right inside the divot. This gives more surface area for bonding if you're having problems.
 

Attachments

  • ForumRunner_20120827_082232.jpg
    ForumRunner_20120827_082232.jpg
    9.5 KB · Views: 607
Starman, that is a very sweet grind job. So that fit right into your dimple nicely?
 
I used the liquid flux in the home depot kit mentioned in this thread.
I will drop the dime and buy the other flux and try a test sweating again.

I looked at all the pictures on this thread and I have to tell you, they don't
look like they show any wetting up onto the stainless. One picture looked
good though but most didn't.


If you have a picture of the solder wetted to the stainless, show it for me
please.

What is wrong with this? SOLID joint and ZERO leaking. I could not be happier with this joint because I could do it myself and didn't need a highly skilled TIG welder do the job for me.
attachment.php
 
What is wrong with this? SOLID joint and ZERO leaking. I could not be happier with this joint because I could do it myself and didn't need a highly skilled TIG welder do the job for me.
attachment.php
Your image does not show as the link requires us to log into your site to see it.

Oh well.
 
rekoob said:
Starman,
whooo... like it. how long did that take you to grind down?

Once I figured out my psuedo lathe, it wasn't that bad. Maybe 20 - 30 mins of actual grinding/cooling. I put a 1/4" - 1/2" bushing on the spindle of an old grinder and threaded the coupler on that. It was crude but allowed me to spin it down evenly.


ForumRunner_20120827_224547.jpg


ForumRunner_20120827_224640.jpg


It fits pretty flush. Here's a before solder pic dry fit. My previous post the half coupler is on the right.
 
Once I figured out my psuedo lathe, it wasn't that bad. Maybe 20 - 30 mins of actual grinding/cooling. I put a 1/4" - 1/2" bushing on the spindle of an old grinder and threaded the coupler on that. It was crude but allowed me to spin it down evenly.

It fits pretty flush. Here's a before solder pic dry fit. My previous post the half coupler is on the right.

Awesome job!
 
allclene said:
I used the liquid flux in the home depot kit mentioned in this thread.
I will drop the dime and buy the other flux and try a test sweating again.

I looked at all the pictures on this thread and I have to tell you, they don't
look like they show any wetting up onto the stainless. One picture looked
good though but most didn't.

If you have a picture of the solder wetted to the stainless, show it for me
please.

You have at least 100 people on HBT with successful and robust solder jobs and everyone is crazy because YOU had trouble doing it? Confused.
 
Bobby_M said:
You have at least 100 people on HBT with successful and robust solder jobs and everyone is crazy because YOU had trouble doing it? Confused.

I didnt have trouble doing it. I just could not get a good mechanical bond. Show me a joint you did that you took apart and proved there was wetting on the stainless and I'll eat my words. I want to see solder adheared to the stainless.
 
nobody is using this method for the mechanical bond. that's why you pull the dimple and then pull the coupler through the dimple. the press fit is the mechanical bond. they're using it for liquid tight seal.
 
allclene said:
I didnt have trouble doing it. I just could not get a good mechanical bond. Show me a joint you did that you took apart and proved there was wetting on the stainless and I'll eat my words. I want to see solder adheared to the stainless.

I'm confused also. I have picked up my kegs by the fittings that I soldered in (empty obviously). I had zero fear of the bond that I got from the solder breaking. If you need a picture of that, I'd be happy to take one. I'm not sure what you're doing wrong, but I can assure you that plenty of people are getting great bonds using this method. Unless you're using different flux, solder, not cleaning your surfaces enough, or just flat out overheating it, you should be getting good solder bonding also.
 
It works, and works well. I have soldered electronics for most of my life and I can tell you for sure you will get wetting through the complete joint if you are using the right flux and cleaning your joint prior to. Many of us have had our couplers in place and being used for a very long time without any issues at all. Like Krazydave I pick my kegs up by the coupler/valve all the time, heck even screwing down my valve when I put it in the coupler, with a lot of force to get it in position I wanted, the joint held without issue. Use the right flux and you will be happy with your results.
Good luck.
 
heck even screwing down my valve when I put it in the coupler, with a lot of force to get it in position I wanted, the joint held without issue.

I had not really thought about this before but do you guys usually fit your valves to the coupler, "dry-fit" it to mark the top or whatever, so when you solder it in place and eventually attach the valve, the handle is on top? I had not thought that far ahead but Rekoob's quote above made me think of it.
 
I had not really thought about this before but do you guys usually fit your valves to the coupler, "dry-fit" it to mark the top or whatever, so when you solder it in place and eventually attach the valve, the handle is on top? I had not thought that far ahead but Rekoob's quote above made me think of it.

I just stuck all my couplers in and then tweeked on the valve/sight glass/dip tubes/etc... to get it in place. I put in 9 or 10 couplers and didn't worry about it, every item I attached I lined up where I wanted it, inside and out without any leaks or anything breaking loose.
 
OK...here is what Palmer, an "expert" in the field of metals has to say...

SOLDERING
Stainless steel can also be soldered or brazed to itself or to brass or copper, with good results. taken from the link below...
http://morebeer.com/brewingtechniques/library/backissues/issue2.6/palmer.html

from wikipedia...
Palmer is from Midland, Michigan and attended Michigan Technological University. He graduated with a degree in Metallurgical Engineering in 1987.[2] John worked in the space program at a failure analysis lab in Irvine, California, and he has helped design, build, and inspect hardware that is currently flying on the International Space Station.http://en.wikipedia.org/wiki/John_J._Palmer

i'd imagine one common expression he never hears at work, "we're not building rockets here", well, yes in fact they are :)
 
Surface area is important of course and that's why we go through the trouble of flaring holes, turning down flats on couplings, or whatever. That's why I really like the welding spuds for one-sided ports. Even a face-soldered locknut is better than a edge-fillet joint on a half coupling.
 
Enjoyed your video Bobby M. OK ill eat my words! I do have that flux coming, I ordered it the other day.
I will try again when it gets here and hopefully get the bond you got. Thanks again.
 
One of the most frustrating parts of doing this is the fine line between getting the materials hot enough but NOT burning the flux off. I start by heating as far from the joint as possible and then when the solder starts flowing, I'll move the heat directly to the joint area. Don't be afraid to squirt some flux on again if you burn the original stuff.

Scuff/sand the surfaces, wipe residue off with solvent, flux if the surface will be hidden, heat, solder.
 
Back
Top