Rope Hauler

Homebrew Talk - Beer, Wine, Mead, & Cider Brewing Discussion Forum

Help Support Homebrew Talk - Beer, Wine, Mead, & Cider Brewing Discussion Forum:

This site may earn a commission from merchant affiliate links, including eBay, Amazon, and others.

Chenslee

Well-Known Member
Joined
Sep 27, 2010
Messages
70
Reaction score
2
Location
Beaumont, TX
IMG_2441.JPG


Put this together tonight. I hope it works!
 
I know mine works.
5031811919
picture is supposed to show up here
I bet the rope hauler does too.
I have started a tome describing how I made mine and plan to post it some time.
 
Yeah, I did a bit of research and milk crates were mentioned. Honestly, I haven't seen a real milk crate that was for sale or otherwise in over 10 years. They are like keggles, you aren't really supposed to have them, right? I like the ropes because I can move it without bending over to much.

I got inspired on this blog:http://stormdrane.blogspot.com/ He's got tons of sweet paracord knots and holders and stuff.

I think what I have is a 6.5 acid carboy, then again, it has the date 1976 on the bottom.

I've got this fermenter in my garage now with the top open, I'm going for a tap water lambic.
 
I know mine works.
5031811919
picture is supposed to show up here
I bet the rope hauler does too.
I have started a tome describing how I made mine and plan to post it some time.

I poked around on flickr a little. Perhaps this helps?
5031811919_b40d08610a.jpg

Your rope carrier looks good. By the way, are those homegrown hops in the carboy? Do they stay out of the siphon when racking, or do you have a filter or something?
 
Hey thanks Quaffer. That does look better than my attempt. Those are indeed homegrown hops picked a couple days earlier. No problem with them when racking. I didn't use anything special to filter them just the plastic job at the end of the racking cane. When they are whole they behave themselves nicely.

And, Um, no S&M background just some mountaineering.

One square knot, 12 bowlines, and two double fisherman knots, some cord and tubing for handles. Or you can check office supply stores for imitation milk crates.
 
So, I'm no boy scout but would like to make something similar. I'm familiar with square knots and bowlines but could anyone post a tutorial?

I've also thought of trying to clone the Brew Hauler using webbing. I know it's cheap to purchase at a fabric store, but I don't have a sewing machine.
 
Here is a description of how I made mine. Pictures would be helpful I know, but for now I can't post them.

I used cord that was slightly thicker than parachute cord that I picked up at Harbor Freight, (22 feet needed). I bought some vinyl tubing at Lowes (10 inches needed) or you could shorten your siphon hose or cut up a retired one.

Cut one piece of cord 13 feet, and two pieces 45 inches each. You can make them longer and leave yourself longer tails to work with and cut of the extra later (or not if it adds character).

Thread two 5 inch pieces of tubing on the long cord to make handles for a much more comfortable lift of a full carboy.

Take the long cord and tie the ends together with a square knot. The tails should be 18 or 19 inches long and (here is where pictures would really help) run the center of the cord that makes the loop through the middle of the knot. You then have two loops each with the tubing threaded on for handles and two tails. Said another way make the first overhand part of the knot place the center point of the cord on it then finish the square knot with the second overhand part. Tighten the knot and make the two loops the same size by sliding the right amount of cord through the square not. This part will be the bottom, vertical strands, and handles. For want of a better name I will refer to this as the base piece.

Lay the base piece on the floor with the loops one on the left and one on the right and one tail toward your and one away from you. Take one of the other pieces of cord (which I will call circumference pieces) and tie it into the six strands coming out of the square knot using bowline knots 9 inches from the center square knot. To make the bowlines pinch the radial strand and give it a 3/4 twist then run the circumference cord up through the loop created around the back of the radial strand and back down through the loop. Leave 6 inches of tail on the first knot of the circumference piece. Space the knots making the vertical strands 5 inches apart.
Repeat the process with second circumference piece 7 inches from the lower ring just tied.
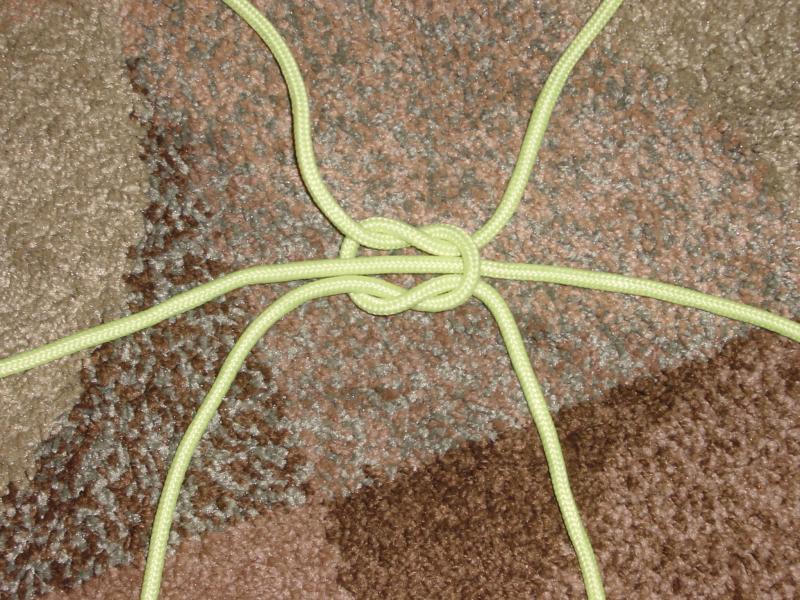
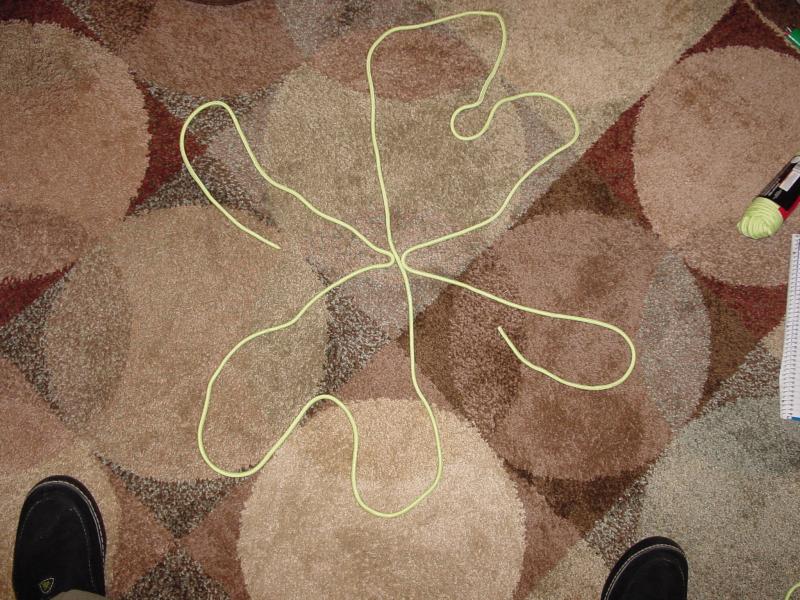
Finish by using a double fisherman’s knot to tie the circumference piece tails together. Six inches of tail is not much to work with so you could cut these pieces long and trim the excess after finishing the knots. I like to tie the circumference pieces on so that the double fisherman’s knots are between the strands that make up the handle one on either side of the carboy.

The first time you put your carrier on a carboy it will be quite tight so it is a little easier to first slip it on over the neck end instead of the bottom to take advantage of the taper to stretch and cinch the knots. I found this easier than riding the carboy like a mechanical bull.

Post a picture if you are successful making one.
 
Thanks for posting these instructions. I feel like I understand the majority of it but still have a bunch of questions, mostly regarding clarification.

Take the long cord and tie the ends together with a square knot. The tails should be 18 or 19 inches long and (here is where pictures would really help) run the center of the cord that makes the loop through the middle of the knot. You then have two loops each with the tubing threaded on for handles and two tails. Said another way make the first overhand part of the knot place the center point of the cord on it then finish the square knot with the second overhand part. Tighten the knot and make the two loops the same size by sliding the right amount of cord through the square not. This part will be the bottom, vertical strands, and handles. For want of a better name I will refer to this as the base piece.

Which parts are the bottom, vertical strands, and handles? Is the square knot (with the loop through it) the bottom? And are the strands forming the three loops (2 handles and center loop, therefore 6 strands total) the vertical strands? And how long should the 2 handle loops be? I'm guessing that the center loop and 2 handle loops should be equivalent in size.

Lay the base piece on the floor with the loops one on the left and one on the right and one tail toward your and one away from you. Take one of the other pieces of cord (which I will call circumference pieces) and tie it into the six strands coming out of the square knot using bowline knots 9 inches from the center square knot. To make the bowlines pinch the radial strand and give it a 3/4 twist then run the circumference cord up through the loop created around the back of the radial strand and back down through the loop. Leave 6 inches of tail on the first knot of the circumference piece. Space the knots making the vertical strands 5 inches apart.
Repeat the process with second circumference piece 7 inches from the lower ring just tied.

Which loop/strand is the "radial strand"? And this is where I'm confused again as to which strand is a vertical strand. If the tails are the vertical strands, do they ever get tied together later?

I think I understand the bowlines you're making with the circumference strands. I'm used to making a bowline knot from one piece of rope but it sounds like it's necessary to make the bowline with two pieces of rope: the loop is formed by one of the base piece strands and the rest of the bowline is made by the circumference strand. Is this correct?
 
I posted drawings and pictures on flickr that should help. The photoset is called "Tying a Carboy Carrier" http://www.flickr.com/photos/66523932@N00/sets/72157626693278181/

Once you tie the square knot it should have two loops and two tails. The tails should be 19 inches and the loops when pulled out should both be 27 inches from the knot to the place where the cord turns around goes 27 inches back to the knot.

In the finished product the carboy sits centered on this square knot. All six of the strands "radiating" out of this knot are vertical strands. Two pairs happen to form loops that make the handle. The two tails of the square knot each each tie into the two circumference pieces so they end at the bowline in the top circumference piece.

The picture should answer most of your questions.
The square knot is smack dab in the center of the bottom.
The base piece is tied with two loops and two longish tails.
The two loops should be about 54 inches around for a 5-gal carboy and should be adjusted to equal length so the handles are the same height when you pick up the full carboy. Trust me its awkward otherwise.
Radial strands and vertical strands are the same thing. English composition is not my strong suit but you figure that out along with what I meant.
The vertical tails from the square knot are not tied together. The tails of the circumference pieces do tie together to complete the loop around the carboy.
The circumference pieces are tied to the base piece using bowlines, so yes, you are tying two different pieces together rather than the traditional use of the knot.

Keep asking questions if I am still confusing you.

DSC00021.jpg


DSC00020.jpg
 
You, sir, are my hero. Your pics and further explanations completely explained everything. My weekend project will now be to bind all of my carboys with cord to carry. Too bad my Apfelwein is already in my 6.5g carboy otherwise I'd wrap that one too.
 
This is freaking SWEET... don't have a clue what the heck you said in your insturctions but SWEET none the less.
I actually get most of it, I need to get some line and give this a try.
Thanks for the info.
 
I added a few pictures to the Filckr set to show the bowline and double fishermans's knots.

I tied about a dozen of these and got to where I could whip one out in 30-40 minutes. I planned to get rich selling them on ebay and retire to the Bahamas or at least partly cover the cost of some copper tube but got exactly zero bids both times I tried it. Now I have some great gifts for friends that brew or prizes for brew club gatherings.

To make one of these for a 3 gallon carboy use 11 1/2 feet of cord for the base piece. 43" long circumference pieces. The tails on the base square knot should be 16 inches. The first circumference ring is tied 7 inches from the square knot, 4 1/2 inches between vertical strands, with 6 inches of tail hanging off of the first and sixth bowlines. The second circumference ring is tied 6 inches up from the lower ring just tied.

I have not done one for a 6 gallon carboy. I would guess that the base piece would need to be a foot longer and the circumference pieces 3 to 6 inches longer. Tie the square knot with tails 20ish inches long. Tie the bottom ring on maybe 11 inches from the center square knot and the top ring up 7 inches from the bottom ring.
 
I added a few pictures to the Filckr set to show the bowline and double fishermans's knots.

The bowline knot that you're referring to is also called a sheet bend knot, I discovered. Does it matter if you form the loop with the radial/vertical strand or the circumference strand in terms of stability or strength? I made the loop using the circumference strand for each bowline/sheet bend knot whereas you made it using the radial/vertical strand. The pics are definitely helpful too so keep it up.

I just made one of these carriers successfully using parachute cord for a 5-gal carboy. Because I figured I wouldn't be as adept as you, I made the long cord 14' long and the two circumference pieces 50" long. 50" for the two circumference pieces was just barely enough for me.

For the long cord, I wish that I'd made it longer so the tails were longer in the end to tie together. Rather than have the tails end at the top circumference piece, I think it'd be a good idea to have them tie together around the neck of the carboy. This would help hold the carrier around the carboy when not in use and would serve as another vertical supporting strand.

Thanks for a great project. I'm sure this'll get a lot more attention once people catch on. I know I'll be making a few more.

Edit: Just made two more and it's definitely easier to make the loop for the bowline/sheet bend knots using aphid rancher's method. 50" for the circumference pieces was more than plenty now. I did make the longest cord 15' 5" long so I could wrap the tails around the neck of the carboy and tie them together. And don't forget to put tubing on at the beginning for handles! I forgot on one of them...but don't feel like taking it apart.
 
Its just my opinion but I would think that since the main stress on the knot is top to bottom the knot stress will be more on the cord and less on the knot if you twist the loop for the bowline/sheet bend on the vertical piece and "chase" with the circumference piece. The loop will consume more of the cord length so take this into account if you go the other way. I did not bother strapping the carboy in with the tails since the center of mass of the carboy (and wort or beer) is below the top ring. When I was playing with the design I made sure that none of the holes were big enough for the carboy to slip through. Once the cord stretches a bit and the knots tighten you can take the carrier off and put it on easily but I leave it on all the time even when I wash my carboy since it helps keep the wet glass from rolling or slipping.
 
Its just my opinion but I would think that since the main stress on the knot is top to bottom the knot stress will be more on the cord and less on the knot if you twist the loop for the bowline/sheet bend on the vertical piece and "chase" with the circumference piece. The loop will consume more of the cord length so take this into account if you go the other way.

Yeah, I agree. I'm going to remake my first one later today. Then I'll have to make two more: 7 gallon and 2.5 gallon carboys. I'll report back on dimensions when I get a chance.
 
In a question from people actually using these, how many bottles will one hold?

I can't speak to these but I picked up a set of 6 of the Sterilite File Crates from Walmart for $24. They hold just over a case, about 25 bottles. They're not as durable as a real milk crate, but I've been able to stack them and fill them with bottles and they hold fine (for now, at least).
 
The bowline knot that you're referring to is also called a sheet bend knot, I discovered.

FWIW, a bowline is NOT the same as a sheet bend. a bowline is used to make a loop using a single loose end, a sheet bend is is used to connect two loose ends. the know aphid rancher is using is a sheet bend.
bowline
sheet bend
 
Just make my rope hauler:

p6020188.jpg


Thanks to aphid_rancher for great tips!!
 
I really like this! I bought some nylon and built a couple carboy haulers, but this rope seems much simpler and more elegant. I just need to get my mind around the instructions and the knots.
 
Thread resurrection.

Anyone have pic by pic instructions on the ones with the tubing handles? I'm not good with worded instructions. I saw the bottom instruction, but am still confused.
 
They are not really turn by turn visual instructions but pictures of the knots and drawings that look like I made them with an etch-a-sketch are still on Flickr "Tying a Carboy Hauler" photo set. http://www.flickr.com/photos/66523932@N00/sets/72157626693278181/

In hindsight I see a couple of places it could be improved and the main piece missing is to show where to tie the "circumference" pieces. Maybe this will help.

1) Cut your pieces to length. It is not a bad idea to cut them longer than needed.
2) Put the tubing that will be your handles on the long cord.
3) Tie the bottom square knot. Put your carboy on the square knot and hold the handles up so the cord lays against the side of the carboy. If you have four hands fold the tails up as well. Visualize the finished product by imagining the two shorter cords tied around the carboy to each of the strands you are holding up.
4) Mark the six cords 9 inches from the square knot so you can see where the knots go
5) Tie the first of the shorter "circumference" cords to the six strands where you marked them. Leave 5 inches of the circumference cord (the shorter piece) between knots. Put your carboy or some object on the square knot and pull the handles up again to see how the cord wraps around and forms something of a basket.
6) Mark the six strands of the long cord 7 inches from the knots just tied.
7) Tie the second circumference cord to the marks like the first one.
8) Close the cords around the circumference that you just tied by tying their ends together with the double fisherman's knot.
9) Wrestle your carboy in and adjust the knots as needed (with the carboy out)

If you get stuck I can try to answer questions.
 
It just occurred to me that it might work to make a carboy hauler with a new basketball net. Tie the bottom closed securely then do something to tie the top closed around the top of the carboy with some handles tied in. I would love to here about it if someone tries it.
 
It just occurred to me that it might work to make a carboy hauler with a new basketball net. Tie the bottom closed securely then do something to tie the top closed around the top of the carboy with some handles tied in. I would love to here about it if someone tries it.

Might be too springy, I like your idea.
 
I appreciate this link, I assumed the only way to get milk crates was to steal them.

Do milk crates give enough space between the handles and your carboy that you can get your hand in there?

I have 6 gallon carboys.

Bought some from the Container Store a few years back -
I've had 5-gallon carboys for years, so my batches end up being coser to 4.5 gal when finished.
The Container Store dairy crates are plenty strong and fairly priced. You may want to check "retail-me-not" for coupon codes - perhaps find free shipping.
5 gallon carboys fit just fine, including space for fingers. 6 gallon carboys will fit (11.5 inches, crates are 12 inches inside) but that might be snug for fingers...
 

Latest posts

Back
Top