Counterflow Chiller Tutorial

Homebrew Talk - Beer, Wine, Mead, & Cider Brewing Discussion Forum

Help Support Homebrew Talk - Beer, Wine, Mead, & Cider Brewing Discussion Forum:

This site may earn a commission from merchant affiliate links, including eBay, Amazon, and others.
Bobby, Just wanted to say thanks and give the thread a bump. I finally got around to building one and it kicks the IC's ass. I'm down to one bag of ice, anf 7 gallons of water to chill 5 gallons in about 10 minutes.

Now I have to figure out how to valve it into the rig ;)
 
Bobby, thanks for the great tutorial. I just built mine today. I got all the parts for xmas, gave my wife the parts list. I'm sure the guy at HD thought she was nuts. They had a hard time figuring out what size hose clamps I needed, he kept telling her they wouldn't work on the copper, I'm sure he never thought I might be cutting the hose. I guess I should've given her a picture of the finished product.
Of course, I cant post without asking a question. I use two 5gal pots to boil right now because I haven't gotten a chance to cut the top of my keg or buy a propane burner. Anyways, if I'm gravity feeding my cfc can I pour from one pot into the other as it starts to get low or would that cause oxidation problems? Only one of my pots has a spigot in it.
 
Thanks for the tip Bobby. If I put the second pot in an ice bath while the first pot drained through the CFC (5 mins or so) would that be better or worse for oxidation? I know it would be safer to pour because it would probably be down below 150 degrees.
 
I tested mine today. I cooled 3 gallons of boiling vinegar water in 7 minutes through the spigot on my pot. My cooling water was 48 degrees and I ran it at about 3/4 gallon/minute. my cooled "wort" came out at 66 degrees. Cant wait to use this thing for real.
 
I am in the process of upgrading my whole brewery. Last summer I built a single tier stand and increased my inventories of ingredients.

The next step is to complete a number of processes at which point the brewery will be compete. (Ah, except for replacements and upgrades. I have a large garage to be converted to become dedicated brewery space.)

Anyway, this CFC is an addition I have desired for some time.

I will be ordering the copper tubing soon and need to know which 3/8" tubing to get.

I may order it from here: http://coppertubingsales.com/copper_tubing_prices.php

Is it the Air conditioning, Type K or type L that I will need?

Thanks
 
Has anyone done something similar to this
http://www.forrestwhitesides.com/node/44
in lieu of a buying a $25 Thrumometer?
I was thinking of putting something similar on my CFC when I build it next week.
I am going to leave a couple extra inches of 3/8" copper sticking out from the "out" end of the chiller and just stick the thermometer to the 3/8" line.
Has anyone tried this or think it will work?
I know it won't be real accurate but can give me a pretty good idea for only $3

I am building this out of my old 60' immersion chiller. I will make a second CFC if anyone is interested in buying it.
 
Since you're likely to go to a 1/2" ID piece of tubing on the output, I could see using a 4" piece of 5/8" OD copper pipe on the output that you can attach the LCD thermo to. My hesitation would be a limited temp range as sometimes I chill to 45F for lagers.
 
homebrewquestion.jpg
 
The 1/2" tee, as it is labeled in the package is actually 5/8" ID.

The "what size is this" is 1/2" rigid copper pipe/tubing which is 5/8" OD.

The reducer is labeled 1/2" to 1/4" which is also confusing because it's actually 5/8" ID to 3/8" ID.
 
I have a 1/2 Tee and 1/2 to 3/8 reducer. I couldn't find a 5/8th copper coupler, so I'm going to try touching the tee and reducer and soldering them together. Is this foolish?
 
I have a 1/2 Tee and 1/2 to 3/8 reducer. I couldn't find a 5/8th copper coupler, so I'm going to try touching the tee and reducer and soldering them together. Is this foolish?

I think you may be a little confused. Or maybe it's just me. :drunk:

You don't need a "5/8 copper coupler". Just 1/2" copper tubing.

And, if I understand you correctly, you want to solder the reducer to the tee without the 1/2" tubing to connect them? That won't work well, as you have nothing to support the joint.

Also, you said you have a 1/2 to 3/8 reducer. You need a 1/2 to 1/4 reducer.
 
It's probably me, I'm confused too.

When I was at the hardware store I went with the 1/2" to 3/8th reducer because the 3/8th portion allowed the 3/8th inch pipe to slide on through. Naturally I thought that would mean a 1/2" pipe could go through the 1/2" side of the reducer. However it couldn't. Their edges butted heads. I'm guessing this is what OD and ID are all about. So If I bought the wrong kind wouldn't my only real option be to inverse op's setup a bit and connect the 1/2" tee to to the 1/2" side of the reducer by using a 5/8th inch pipe?

Sorry for the cluster **** of madness. Copper adds up.
 
All copper sweat fitting are rated based on the tubing's nominal inside diameter. A tee fitting labeled 1/2" actually has an inside diameter of 5/8" because the tubing it is made for has an outside diameter of 5/8" but a "nominal" inside diameter of 1/2" (therefore it is called 1/2" tubing).

Where it gets confusing is when you buy soft copper refrigeration tubing. THAT tubing is rated by it's actual outside diameter. So, in this project where we're mixing soft 3/8" OD tubing with copper sweat fittings, we're mixing apples and oranges. The fact that 3/8" OD tubing has a nominal ID of 1/4", we need it's fitting to be called 1/4".

The piece that connects a 1/2" tee to any other 1/2" fitting is just a short piece of 1/2" rigid copper tubing or 5/8" OD soft copper.
 
just a quick question . . . how do i make a copper racking cane? And better yet, how do i create the siphon that will pull the 210F wort through the racking cane and into the CFC? I am going to purchase/build one soon and I don't have the $$ to buy a new kettle with a spigot so I have to work with what I have.
 
There are a couple of ways to build a racking cane, it all depends on what type of system you have.
I made my racking cane out of 3/8" copper and bent it over the top of my boil kettle so it does not fall in.
Be careful when you bend the soft copper as it will kink easily, bend it over a small coffee can or use a spring bender.
Then I attached 3/8" inside diameter silicone tubing to the racking cane and to my CFC with hose clamps.
You could make this a rigid connection between the cane and CFC with copper, but I like the flexibility of the silicone tubing.
I also bent the bottom of the racking cane back up so it sits off the bottom of the kettle a few inches to not pick up as much of the settlings.
You will probably need some sort of screen on the bottom of the racking cane to prevent in-taking the hops. There are numerous designs for this as well, but something like this would work.
http://farm4.static.flickr.com/3390/3476102663_91443a46aa.jpg
 
ok, sounds good. but I still don't know how to actually START the siphon. Do I just put the racking cane into the kettle while it is still boiling and then it will automatically push the fluid up through the cane and that will start the siphon? should I fill the CFC with sanitized solution and then connect the racking cane and then begin letting the sanitized solution pour out into a bucket and then this will cause a siphon to begin pulling the wort out of the kettle?

Sorry, I'm not technically inclined haha
 
Bobby,

First off, thanks the idea. I, however, suck at soldering... As such, I tried to follow your alternate method which used barbs and compression fittings, but I must be missing something cause the copper isn't going all the way through the compression fitting. Can you help?
 
Nevermind... I just took my parts back to Home Depot. Got my $120 back for the torch, striker, copper, hose, and other parts and ordered a $69.99 counterflow chiller from AHS. Can't even believe that they are doing it at this price.

Here it is: http://www.austinhomebrew.com/product_info.php?products_id=10458

They even have the entrance/exit pieces, if you aren't able to do the soldering/plumbing part yourself.

Here it is: http://www.austinhomebrew.com/product_info.php?products_id=10644

Either way, it's cheaper to buy from them, rather than make it yourself. $70 for a Counterflow and $30 for the fittings necessary for one... Both are a GREAT DEAL!

Spend your money wisely and get the CFC from AHS. If you want to put one together, at least buy the entrance/exit fittings that are already put together. It will save you time, and as you all know.... Time is MONEY!
 
I don't think I have even $40 into mine. Having soldering tools/skills already will definitely help you save some dough on these. I wouldn't necessarily count the cost of the tools solely as an expense of the chiller. You're going to use them for other things in the future, and soldering is a good skill to have. Just like I wouldn't count the cost of my wrenches into the cost of changing a belt on my truck. If I had, my old 74' Plymouth Fury III cost me a fortune!
 
I built one of these a few weeks ago

cfc.jpg


it was my first time soldering so it is a bit rough and actually had some leaks where the last joints were between the reducer and the 3/8 soft copper. oh well, still was fun and sure i will get better at soldering with practice.

i know the question has been asked a couple of times and i read the entire thread, but it still seemed a little unclear to me. As far as getting the wort from the brew kettle to the cfc, what would you need to do with the 3/8 copper to allow for a qd or barb or whatever? I have a keggle with a ball valve and plan to gravity feed the wort to the cfc. i love the idea of using qds but I am not sure if I need to get a compression fitting to attach the male qd to the cfc's wort in or if there is a solder fitting that would work better.

also, a little off topic, but are you guys sourcing your qds from mcmaster carr? so far my keg uses all stainless steel parts and I kind of want to keep it that way, what kind of qd would i look for? I have a 1/2" barb on the ball valve right now from bargainfittings.com.

thanks for the awesome diy, it was fun to build and i will be building another one with the left over copper and hose to sell to one of my buddies.
 
I am half way through building mine (also my first time soldering). Just waiting on the soft copper to deliver. I used another 1/2" to 1/4" reducing coupling, about an inch of 1/2" straight pipe then a 1/2" threaded fitting. This enables me to use my PFD QD's.

Wort in...
cfcconnection1.jpg


Wort out (0-100f thermometer attached)...
cfcconnection2.jpg


The second one I am making will be the conventional one featured on this thread. PM me if you are interested in it.
 
I scrolled through the first 11 pages searching for an answer to this question:

Which 3/8" tubing is best used, Refrigeration Service Tube, Type K, or, Type L?

Thanks Bobby for the project details.
 
I scrolled through the first 11 pages searching for an answer to this question:

Which 3/8" tubing is best used, Refrigeration Service Tube, Type K, or, Type L?

Thanks Bobby for the project details.

It was answered in post #287, but under a slightly different name. I believe you want refrigeration line.
 
I agree that soldering copper is a great skill and easy to learn. On my first soldering job around the house I practiced a bit, then piped in an whole new bathroom. Only had one leak the whole time and you can tell when you do it if there is a problem. I love being able to solder pipe. It's easy and gives me a lot of flexibility to do things the way I want.

I'm almost done setting up my indoor electric brewery. One of the main components is a a built in hose and water line for filling my HLT, cleaning, and counterflow chiller. Had to tee into my water lines to do it. Piece of cake. I have the exact setup I want now.

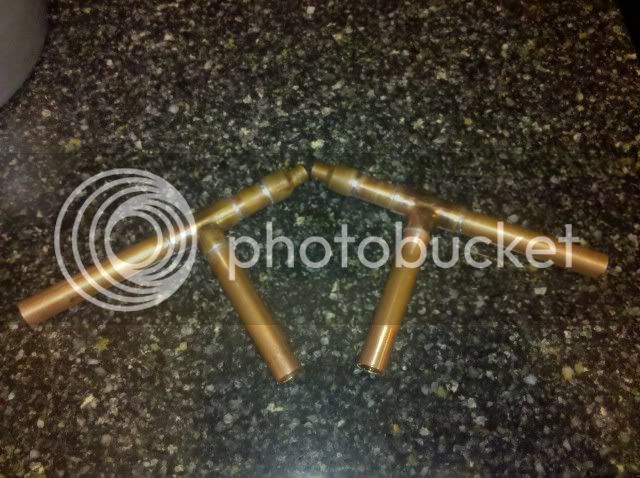
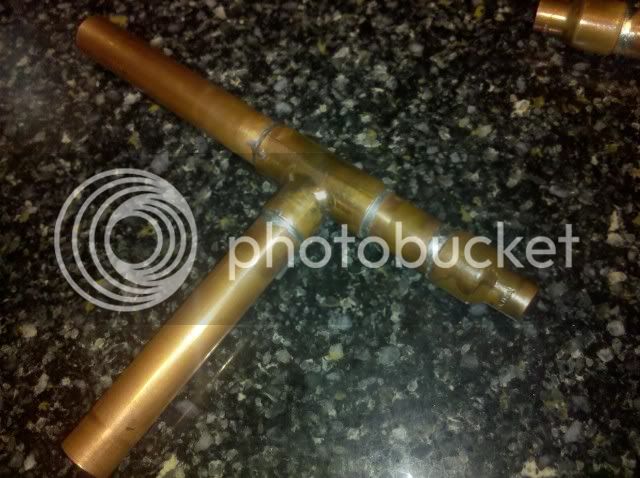
I just built a chiller following Bobby's tutorial. Straightening the copper was the only challenging part, as I used my old IC to make the CFC. The soldering was simple. While you got a nice deal on the chiller, consider picking up a torch and playing around with it. I think it's a great skill.

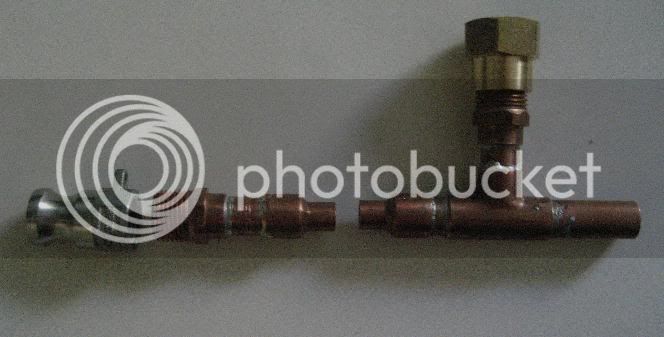
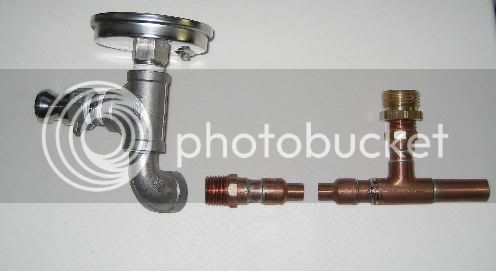
Oh, and if you do want to make a CFC, don't buy their exit pieces for $30. That's outrageous. You can buy everything you need for about $10-$12 and solder it together. A half inch tee costs about 76 cents these days.

Thanks to Bobby and others for their great tutorial.
 
Just did a test run with mine using boiling water.

Faucet water temp - 73
Wort out (valve fully open) 86
Wort out (valve half open) 76

Not bad for a first trial run.
 
Thanks for the tutorial, Bobby_M. The hose and copper lengths available were both 50' so I made 2 and I'm selling the second one in Classifieds.

The nub inside the reducer would've stumped me if the tutorial hadn't mentioned it.
 
For anyone having trouble finding the 1/2" x 1/4" reducing coupler at Lowes, they are packaged individually (at least at my Lowes).

1-2to1-4reducer.jpg


John
 
HD didn't have the 1/2x1/4 reducers, but lowes had the ones pictured above, I haven't cut my hose up yet, but i got 20' of 3/8" OD copper and a 25' hose.

how much 3/8" copper does every one have sticking out of the tee, seems some people have a good 2' and others a few inches. is there a reason for one or the other?


here are my pics, first time using my torch to solder.
IMG_20101116_190504.jpg
IMG_20101116_190519.jpg


I was pretty happy it was nothing like soldering tiny ass playstation wires together. when PS1 came out i soldered the mod chip in them and sold them so you could play ripped games ;)

filled with water and to test for leaks and i don't believe I have any ;)

-=jason=-
 

Latest posts

Back
Top