Instructions for improving your Mr. Beer Keg

Homebrew Talk - Beer, Wine, Mead, & Cider Brewing Discussion Forum

Help Support Homebrew Talk - Beer, Wine, Mead, & Cider Brewing Discussion Forum:

This site may earn a commission from merchant affiliate links, including eBay, Amazon, and others.

iamjonsharp

Well-Known Member
Joined
Oct 18, 2006
Messages
576
Reaction score
21
Location
Cincinnati, OH
If you use Mr. Beer Kegs, this may be helpful:

Improving your Mr. Beer Keg
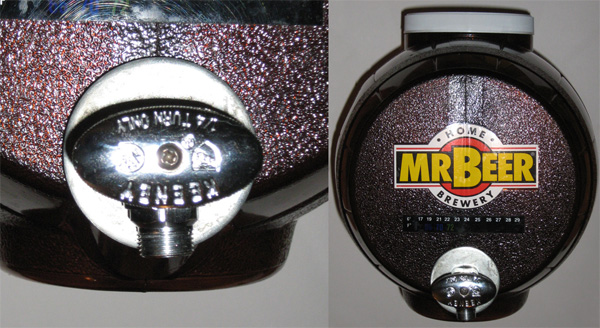
photo01.jpg

Let’s face it. The spigot on the Mr. Beer Keg is at best, weak sauce. Just look at it. We can easily do better than this. There is no on/off valve, there is no way to attach racking tubing or a bottle filler, and it lets out a pithy drizzle that oxygenates your beer. For about five bucks, you can get a much improved valve. For about fifteen bucks, you can get two valves (especially handy if you have 2 Mr. Beer Kegs), racking tubing, and a bottle filler.

Your New Valve
First things first. A new valve. And a washer. Reuse the original Mr. Beer rubber washer. And that’s about it. Done. Easy!
• Quarter turn angle valve 5/8” OD x 3/8” OD
• Washer with 13/16” ID
• Original Mr. Beer rubber washer.
photo02.jpg

I got this Keeney 2622DS quarter turn angle valve (http://www.keeneymfg.com/CAD/2622DS.pdf) from Lowes for five bucks. It comes with compression nuts and ferrules (as seen in the above right hand photo). You won’t need the ferrules. You will need the 5/8” compression nut for the valve. You will need the 3/8” compression nut if you want to attach racking tubing or a bottle filler.
photo03.jpg

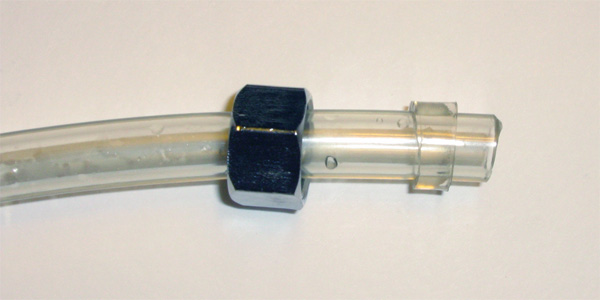
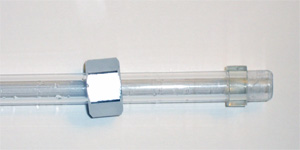
The advantage to using the Keeney 2266DS, is that the outer dimension of the opening is 13/16” (5/8” is the inner dimension of the compression nut). The washer and Mr. Beer rubber washer will fit snuggly in the opening. Assemble the valve, washer, rubber washer, and compression nut as seen in the photos above. The wall of the Mr. Beer keg will fit between the rubber washer and the compression nut.
Now simply attach the valve snuggly to your Mr. Beer keg, by hand.
photo04.jpg

There you have it. A much improved valve. Hooray! But why stop there?
 
Attaching a bottle filler and racking tubing
Now all we need is two types of vinyl tubing and a bottle filler. And we’ll use the 3/8” compression nut from our valve. A bottle filler goes for about two or three bucks from a Homebrew Supply Store, and tubing is less than fifty cents a foot at Lowes.
• 3 to 4 feet of 3/8” OD (outer dimension), ¼” ID (inner dimension) clear vinyl tubing
• ½ inch of 7/16” OD, 5/16 ID clear vinyl tubing, cut into two quarter inch pieces
• Bottle filler, 3/8” OD
Let’s start with the racking tubing. Slide the 3/8” compression nut over the smaller tubing (3/8” OD, ¼” ID), with the threads facing the end of the tubing. Cut ¼” of the larger tubing (7/16” OD, 5/16” ID) and insert it over the smaller tubing, sliding the larger tubing about ¼” inch past the edge of the smaller tubing. It should fit nice and tight:
photo05.jpg

Now simply screw the racking tubing on tightly to your valve. The quarter inch of larger tubing will create a seal between the compression nut, valve, and smaller tubing.
photo06.jpg

You can now rack your beer from your Mr. Beer Keg to your bottling bucket (such as an additional Mr. Beer Keg, or 3 to 5 gallon plastic pail).

Now onto the bottle filler. Attaching the bottle filler is the exact same process as the racking tubing, using the 3/8” compression nut and quarter inch of larger tubing, as seen in the photo below.
photo07.jpg

Now screw the bottle filler tightly to your valve and bottle away!
photo08.jpg

I recommend against the Mr. Beer method of priming the beer by adding a small amount of sugar to each bottle. The results typically end up with some bottles over carbonated and others under carbonated. Rather, I recommend boiling the appropriate amount of sugar in a small amount of water, adding it to a bottling bucket or separate Mr. Beer Keg, and then racking your beer into the bucket or keg for bottling. If you do not have a separate bucket or additional keg, carefully stir the cooled sugar water solution into your Mr. Beer Keg and proceed with bottling, trying not to disturb any of the trub. If some of the trub is disturbed, simply wait a half an hour or so for the trub to settle and then bottle.

Cheers,

Jon
 
Thanks Jon for putting this information together. I am looking forward to modifying my three Mr. Beers. I sent you a question in email, but I will go ahead and reask it here. Since, some other Mr. Beer owner may have the same question:

What do you consider to be all the advantages of using a bottling keg? Only thing I can see is stirring in the sugar. To you normally tilt your Primary Mr. Beer keg to get all you can out of it when moving the beer to the bottling bucket. On only ask this because I know it stirs up a small amount of trub when you tilt it.
 
I clicked on this thread with the hopes of seeing some explosives in action. ;)

Kudos on your helpfulness youarejonsharp.
 
Thanks Jon for putting this information together. I am looking forward to modifying my three Mr. Beers. I sent you a question in email, but I will go ahead and reask it here. Since, some other Mr. Beer owner may have the same question:

What do you consider to be all the advantages of using a bottling keg? Only thing I can see is stirring in the sugar. To you normally tilt your Primary Mr. Beer keg to get all you can out of it when moving the beer to the bottling bucket. On only ask this because I know it stirs up a small amount of trub when you tilt it.

The major advantage is you can easily eliminate most the trub from getting in your beer by racking it into a bottling bucket. I've never bottled straight from a Mr. Beer Keg with trub still in the bottom, but it seems like it would get tricky near the end of bottling to tilt the keg while filling the bottle and successfully keeping the trub from being disturbed.

I recommend finding a cheap food grade 3 or 5 gallon pail, drilling a 13/16" hole near the bottom, and inserting the valve and bottle filler. This should be cheaper than an additional Mr. Beer Keg, and you can use the extra Mr. Beer Keg for more beer. You'll also need some silicone o-rings with 3/4 to 13/16" ID to seal the valve (you can find them in Lowes also in the plumbing section). You can also use the pail to sanitize bottles.

Or even easier, buy a bottling bucket predrilled hole and spigot, and attach the bottle filler to the spigot with 5/16" ID hose.

Likewise, if you don't want to bother with these extra steps, if you carefully stir in the sugar water solution and carefully fill the last few bottles, you should still end up with good results.
 
Thanks for this info, Jon. I registered here just to ask a question.

Does the large washer get in the way of the nut on the bottling wand? My Lowe's does not have that part number for the angle valve. It DOES make a difference because on the part number I have, the washer has nowhere to rest, causing the washer to lean and not allowing the gasket an even pressured seal.

So I found an alternative at Home Depot but the washer rests against the nut as well (on one of the hex sides). It would appear that if I try to tighten while this is attached to the keg, it wouldn't turn.

Any ideas?

Thanks
Mike

With the valves I have, there is enough space so that the nut to the bottling wand does not interfere with the large washer.

After hearing your problem, my first idea for a fix would be to find a different washer. The washers I use are much larger than necessary, but have the right size inner dimension.

A smaller outer diameter washer that doesn't interfere with the nut to the bottling wand would work. If you can't find a washer that would work, you could try modifying the existing washer, by hacksawing or dremeling off the outer portion of the washer that interferes.

Lastly, will the valve seal properly to the Mr. Beer Keg if you simply omit the washer? If so, this may be the easiest fix (assuming that the nut for the bottling wand won't now interfere with the Mr. Beer rubber washer).

Cheers,

:mug:
 
Hey,

I was reading your post and purchased the valve you talked about at Lowe's. However, I was also looking for the washer there that you mentioned and a few employees said they don't have that size. Do you have any advice? They said that is a rare size lol
 
Hey,

I was reading your post and purchased the valve you talked about at Lowe's. However, I was also looking for the washer there that you mentioned and a few employees said they don't have that size. Do you have any advice? They said that is a rare size lol

Hmm, don't remember if the 13/16" sizing is based on measuring with a ruler or if that's the actual size specified at Lowe's. Did you try to see if any washers at Lowe's would fit snuggly over the valve?

If not, a washer with a bit larger opening may still work, if its still smaller than the outer dimension of the rubber washer. A washer with a bit smaller opening would work if you dremeled the opening to fit. If you are still having trouble, PM me your address and I can ship you one, I've got some extra.

:mug:
 
I didn't actually buy a washer since I thought only the 13/16 would work but considering I'm using the rubber washer is this washer essential?
 
I didn't actually buy a washer since I thought only the 13/16 would work but considering I'm using the rubber washer is this washer essential?

Attach the valve with just the rubber washer and nut to the Mr. Beer keg, fill up the keg with water, and let it sit overnight to see if it leaks any.

I'm thinking the rubber washer is going to need something rigid to butt up against so it doesn't bend and so you get a good seal, though.

You can always go back to Lowes with the valve and find a washer that will fit. Also, I noticed that a nickel fits into the inner dimension of the metal washer perfectly.
 
I'm going to have to try that in 3 weeks when my first batch is done but I appreciate your help hopefully I can figure something out
 
i have 2 mr beer 2 gallon kegs. i've been thinking about using it for secondary fermentation. is there any reason why I can't add priming sugar to the 2nd keg and do my carbonating in there and just put the keg in the fridge (after 1-2 weeks), and serve out of the actual keg itself?
 
i have 2 mr beer 2 gallon kegs. i've been thinking about using it for secondary fermentation. is there any reason why I can't add priming sugar to the 2nd keg and do my carbonating in there and just put the keg in the fridge (after 1-2 weeks), and serve out of the actual keg itself?

Other than Mister Beer kegs are specifically designed to not seal, thus attempting to carbonate in a Mister Beer keg is guaranteed to fail, no reason at all...

Cheers! ;)
 
Old post...I know. Was wondering if I could ferment in this if I improved or sealed off the valve? I would drill a hole in the top cap for an airlock. If this is possible, what is the height of one of these? My idea is to try lagering in this as it appears to be less than 10 inches high so it may fit in my fridge. Thanks!
 
They are designed to ferment in and the top is designed to release pressure without an airlock.


Research it a bit more.
 
Fully assembled the Mr Beer keg is just under 10" in height.

These "kegs" are actually designed for fermenting - you don't need to do any modifications like punching holes anywhere. The neck of the keg is designed to not make a complete seal with the lid, thus allowing CO2 to escape (which is one reason why you can't carbonate in one). And while the original spigot is less than ideal, it works...

Cheers!
 
Thanks to you both for the reply.
Makes sense.
I guess I went through a lot of trouble with my UTZ pretzel container...I sanded down the rim of the container to attempt to make it seal only to then drill an airlock hole. duh. Still new to this so I like the security of the bubbling airlock though I know it is not an indication of fermentation failure if it is not.

BTW, the UTZ pretzel container is available at Sams and is just under 2 gallons if anyone is interested.
 
Back
Top