My method for sealing a heatstick

Homebrew Talk - Beer, Wine, Mead, & Cider Brewing Discussion Forum

Help Support Homebrew Talk - Beer, Wine, Mead, & Cider Brewing Discussion Forum:

This site may earn a commission from merchant affiliate links, including eBay, Amazon, and others.

Gritsak

Well-Known Member
Joined
Aug 15, 2009
Messages
611
Reaction score
20
I've never been particularly fond of the acetone/JB weld pour into the drainpipe method for sealing off a heatstick element. While JB weld does dry extremely hard, in my experience it doesn't bond well to the surface of the pipe. There's no "give" with JB weld, so if there's any expansion, the bond will break and water/wort could easily leak in. So, i've come up with the following solution that i've had great success with.

First step is to get a 1" pvc coupling. This fits perfectly around the base of the element and just BARELY shoves into the end of the pipe.

Should look like this:

Generic-429-012-rw-5216-206.jpg


Next trim the isulation around the end of the wire and expose an inch or so of the three wires. Cut the ground (green) flush to the end of the section so the two power wires are exposted. Attach these to the heating element and slip the pvc coupling over the wire. Tape the coupling to the chrome hex nut portion of the element so no JB weld seeps through. Fill up the coupling with JB weld and let cure overnight. It should look like this once you're done:

2000450136_medium.jpg


(Note- this is an older picture, my current build had a taller coupling that wasn't completely filled with JB weld)

Because the end of the drainpipe expands to accept the 1" coupling at the end, you can't simply shove the entire thing in there. So mark off around 3/4" on the pvc coupling like this:

2000454004_large.jpg


Then cut around with a dremel. Also cut out so sections towards the wire to make removing the piece easier:

2000454005_large.jpg


Take a flat-head screwdriver and insert it into the long cut and twist- the pcv piece should pop right off. You'll end up with something like this once you clean it up:

2000454006_large.jpg


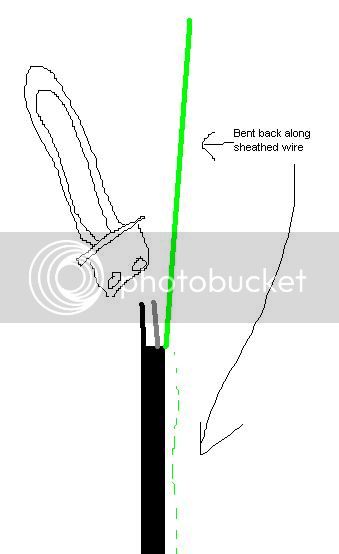
Since you still need to attach the ground, mock fit the element and mark off where you want to attach the ground. I always do it at the top so it's easy access. Then splice into the wire and pull out a section of ground (green) wire. remember, pull out the end going TOWARDS the plug!

2000454007_large.jpg


Sandpaper the section of pvc and inside the end of the pipe. I use DAP 08641 sealant to finish up the job. You DON"T need much. Just run a medium size bead around the inside of the end of the pipe and slide in the element/pvc. Put on the rubber gasket that came with the heating element. Theno run some silicone around the outside where the hex portion of the element contacts the pipe. Should look like this:

2000454008_large.jpg


Add a small amount of silicone to the threads on the pipe, then screw on the 1.5 to 1.25" slip joint reducer nut. Tighten it down.

2000454009_large.jpg


Pray you sliced the wire at the correct height and tighten down the ground. Let it cure overnight.

There is absolutely no JB weld or silicone visible from the outside of the heatstick. There are several barriers to keep water out: the rubber o-ring, the sealed threads, and the sealed pvc coupling into the pipe. Last line of defense is the completely encapsulated wiring on the heating element.

Well that's it. Hopefully this makes sense and will help out. Any suggestions would be welcomed. I don't claim this to be the best solution in the world, but it doesn't require any particular skill and all parts are readily available at lowes.
 
It looks great, but is there any concern about the silicone being toxic or anything? I'm not implying it is, just want to be safe.
 
It is safe. The spec sheet on DAP's website lists that no first aid is needed if it is swallowed. It's FDA aproved for food contact after it's cured for 48hrs . Others have called the DAP 1800 number and the representative said it was food safe. Homebrewer's have been using this silicone for awhile--i found out about it after searching around.
 
I hate to bring up more controversy than is necessary, but I have been told by the people at DAP (using the 1-888...) number on their products, that they do not have any silicone products that are food safe for prolonged contact, only intermittent contact. I found this out because I couldn't find the same DAP product you had so bought another one, called, and asked. I was told to look at Dow-corning products, but have since found a GE product (from Mcmaster)that i think is food safe. It may be possible that the person I talked to had no clue what she was talking about though.

Thanks for your method though, Gritsak. I had wanted to build a heatstick for a while, but was never confident in other methods. I was confident with yours.

Thanks for the info. There's seems to be quite a bit of contradictory info about the DAP sealant. I'm going to read the package thoroughly next time i'm at Menard's. Until there is 100% confirmation on the DAP stuff, it might be better to order something that clearly states it is safe for constant contact.

For the time being i'm not too worried. There should be very little silicone in actual contact with the wort if it's sealed properly. I made 15+ batches with my first heatstick and i'm not dead, yet:D
 
For the time being i'm not too worried. There should be very little silicone in actual contact with the wort if it's sealed properly. I made 15+ batches with my first heatstick and i'm not dead, yet:D

I agree. If it doesn't kill the fish, it shouldn't kill us I would think. They're smaller, so it would take a lot less. thanks again
 
So i went to Menards today and read the label on the DAP 100% silicone again. It does specifically state that the product is safe for food contact once it's cured. It doesn't say whether it's incidental or prolonged contact, but if it were only approved for incidental you'd think it would spell that out clearly. The info provided is different depending on the size of the containers. e.g. the hand held tube doesn't say anything about food, but the large one that uses a caulk gun does. It's all the same stuff inside though.
 
Ok I have a stupid questions, what type of pipe are you using to run the cord up through? Also what is the benefit then just using the coupling and JB Weld? It's hard to tell from the photo but I assume the ground wire is ran outside of the pipe and connected directly to the kettle.
 
Ok I have a stupid questions, what type of pipe are you using to run the cord up through? Also what is the benefit then just using the coupling and JB Weld? It's hard to tell from the photo but I assume the ground wire is ran outside of the pipe and connected directly to the kettle.

I should have prefaced this thread by saying these instructions aren't designed for building a heatstick in its entirety. Here are the general instructions i used to build my heatstick:

http://www.cedarcreeknetworks.com/heatstick.htm

But obviously i used a 90 degree pipe and used my described method for sealing. Ground is on the pipe, not the kettle. The benefit of using a coupling is it provides a reliable seal.
 
yeah I was in a rush looking for ways to mount elements to keggle. Now I realize it says heatsticks, my bad
 
Mmm I like the pvc coupling idea.. I've seen people use rubber or tape to make a border so they can fill it with jbweld.. My question is on the ground.. What do you think about leaving the ground wire a lot longer, bending it back up the power cable to ground at the top of the tube? The end could still be sealed and you wouldn't have to splice? Is there a reason that wouldn't work with your setup?
 
Mmm I like the pvc coupling idea.. I've seen people use rubber or tape to make a border so they can fill it with jbweld.. My question is on the ground.. What do you think about leaving the ground wire a lot longer, bending it back up the power cable to ground at the top of the tube? The end could still be sealed and you wouldn't have to splice? Is there a reason that wouldn't work with your setup?

If i'm following you correctly, your saying to take the ground from the end of the cord (where it connects to the heating element) and run it up the length of the pipe to the top, where you ground it?

I don't really like that idea because you would have to cut into the insulation the entire length of the cord, up to the point where you ground it. Most of the cords i've seen have the wires inside spiraling around each other, so that would be a mess IMO. It's really easy to splice into the cord..takes like 5min to do correctly.

I guess you could extend the ground with another piece of wire, or cut back 6-10" of the cord, but leave the ground in tact. Either of those would work fine i suppose.
 
Was thinking something like this... Stripping them long, but cutting back all but the ground. Bending the ground tight back along the sheathed wire. Leaving the bend in the ground in the jbweld so the wire end is still enclosed.

wire.jpg
 
Yeah I don't see any reason why that wouldn't work. Just be sure to give yourself enough lead to make it to the grounding point. Once you put everything together with the silicone, there's no going back.
 
Great post Gritsak! Thanks for the info.

I'm going to attempt building one this weekend.

I PM'ed you with a question.
 
I made 2 a couple of days ago and wow it really is easier than it looks. I used a 1" pvc coupler over the element connections, filled it 3/4ths full with jb weld (used full package). After it dried I cut off 90% of the coupler, leaving a ring around the base of the element and a big block of jbweld hehe.. Nice seal. I had stripped my wires like above and ran the ground up to the end of the metal drain pipe, fanning it over the lip so when the plastic drain peice went over, it pinched it to the metal. Used the washer that came with the element as the silicone ones I ordered were just too thick to get a good seal. I used aquarium food grade silicone on the threads and sealed her up. No visible silicone or jbweld! Also used a chrome plated nut instead of the galvanized one that came with the pipe. Lowes had the 1 1/2 to 1 1/4 slip nuts. Nice fit!

Letting them dry another day then will test em out.

Thanks again for the tips!
 
Two questions:

(1) Do you need to thin the JB Weld with acetone to pour it into the coupling? I've never worked with JB Weld, and I don't know if it's too thick to pour at all.

(2) If I'm using a 1500W 120V heating element on a 15A outlet can I use a 14 gauge electrical cord? In CodeRage's "Electrical Primer" he says 14 gauge max current is 15 Amp. Will I be ok? If I'm doing the math correctly: 1500W/120V=12.5A.

No expert but...

I thinned it a hair, like 1 tsp nail polish remover to help. I mixed it, spooned it into a syringe (sp?) and squeezed it into the coupler. it was a workout, but it works.

2. I used 14guage because its rated at 1875 watts, also yes 12.5a, and including cable lengths I couldnt see needing 12g. Obviously 12 is better, but so would 10 etc.. The only thing I read is that it might stress your circuit a bit as you will be running it at like 80% continuous load. But that will be breaker load. I still decided on 2 1500watters and will just replace a breaker if it goes. Cheap and doesnt hurt anyway.

Just make sure you use em on a gfci protected circuit. I'll post pics of the sticks and control box later tonight if I get free time.
 
I've never used anything to thin the JB weld, but that's just because i've never really thought of it at the time. It's certainly possible to do it without though, i just use a popsickle stick or something to "scoop" big blobs of JB weld into the coupler. Gravity will make it level out and allow it to fill in all the nooks and crannies.
 
I've never used anything to thin the JB weld, but that's just because i've never really thought of it at the time. It's certainly possible to do it without though, i just use a popsickle stick or something to "scoop" big blobs of JB weld into the coupler. Gravity will make it level out and allow it to fill in all the nooks and crannies.

Correct gravity did level it all out. I just used the syringe to make sure I got it all down inside the coupler around the base. I lifted the coupler a bit and let a small bit get under the bottom to seal the coupler to the element base. seemed to work well.

Acetone is what JBweld recommends to thin. (nail polish remover)
 
I thought I'd let everyone know the mistake I made while making my heatstick.

I mixed 1 tablespoon of acetone into the JB Weld instead of 1 teaspoon.

It's been just over 24 hours and it's still not set. I'm going to wait it out, and I'll let you know if/when it does set.

I saw another thread where a guy did the same thing and his did harden. So, I'm hopeful.
 
Yea it should still harden from what I read. Even with 1 tsp mine took longer than the directions, but did set.
 
The only thing I read is that it might stress your circuit a bit as you will be running it at like 80% continuous load. But that will be breaker load. I still decided on 2 1500watters and will just replace a breaker if it goes.

The 80% continuous load rule is for electricians sizing dedicated hard-wired circuits to appliances like water heaters, stoves, etc. It does not apply to plugged outlets.

210.23 Permissible Loads.
In no case shall the load exceed the branch-circuit ampere rating. An individual branch circuit shall be permitted to supply any load for which it is rated.

If you think about it, this makes sense. It would be absurd to expect a homeowner to do the amperage math on a circuit every time they wanted to plug in their vacuum to verify they weren't exceeding 80%.

Circuit breakers are designed to deliver 100% of their rating 24 hours a day, every day. If one doesn't, it's defective.
 
The 80% continuous load rule is for electricians sizing dedicated hard-wired circuits to appliances like water heaters, stoves, etc. It does not apply to plugged outlets.


If you think about it, this makes sense. It would be absurd to expect a homeowner to do the amperage math on a circuit every time they wanted to plug in their vacuum to verify they weren't exceeding 80%.

Circuit breakers are designed to deliver 100% of their rating 24 hours a day, every day. If one doesn't, it's defective.

Awesome info! Made me feel better about it.

The reason I stayed with 14guage and went 1500 watts is that I figured if I can plug in my 1500 watt space heater and run it for 4 hours with no issues the heatstick should be fine. That thing has a little cord too.
 
Well, it's been over 48 hours and it's still not hard. I'll probably let it go for a few more days just to see what happens.
 
Acetone should evaporate, mmm. Maybe up the temperature for a bit? Heard jbweld sets a lot faster in heat.
 
It's finally starting to harden. I'm wondering if I should be worried about using it since it took about so long to harden.

I did look back at the bottle of fingernail polish I used. On the front in big lettering it says "100% Acetone", but on the back it lists acetone and denatonium benzoate. I know that it's a buttering agent, and it's probably just a trace. But I'm wondering if it could have a reaction with JB Weld. I'm going to contact JB Weld and see what they say.
 
My first heatstick I used nail polish remover to thin the J-B, it took over a week to harden. When I tested it kept tripping the GFCI. I took the stick apart & the J-B Weld was still soft in the center. I then rebuilt the stick without the thinner, it has worked fine for 2 months.
 
It's finally starting to harden. I'm wondering if I should be worried about using it since it took about so long to harden.

I did look back at the bottle of fingernail polish I used. On the front in big lettering it says "100% Acetone", but on the back it lists acetone and denatonium benzoate. I know that it's a buttering agent, and it's probably just a trace. But I'm wondering if it could have a reaction with JB Weld. I'm going to contact JB Weld and see what they say.

The nail polish remover I used had about 12 ingredients... Don't like the idea about the soft center listed below, but it seems if you let it sit long enough, or heat it enough it should harden still. Might as well try before testing or rebuilding.
 
I called JB Weld, and they suggested that I removed the JB Weld and start over if I can. But they thought it would eventually harden. I'll probably check it again this weekend and see where it is.
 
Well, the JB Weld had "hardened", so I cut away the excess/top part of the coupling and the JB Weld basically crumbled away. I guess the excess acetone weakened the JB Weld.

I'm going to try it again without the acetone.
 
At least it came off and you can redo right? I was concerned with wasting the element and piping.

Good luck! And remember teaspoon or less! not TB =)
 
Well, the JB Weld had "hardened", so I cut away the excess/top part of the coupling and the JB Weld basically crumbled away. I guess the excess acetone weakened the JB Weld.

I'm going to try it again without the acetone.

I'm wondering if the nail polish remover additives hosed you. I've used 100% acetone per J-B Weld's directions (1 tsp. of acetone or lacquer thinner per 2 oz. (1 full package) of mixed product) numerous times and never had a problem.
 
Have you considered potting the wires in silicone instead of the epoxy? Very nice job, the 90 degree bend is great for heating wort in a plastic mash tun.
 

Latest posts

Back
Top