brewstand building tips

Homebrew Talk - Beer, Wine, Mead, & Cider Brewing Discussion Forum

Help Support Homebrew Talk - Beer, Wine, Mead, & Cider Brewing Discussion Forum:

This site may earn a commission from merchant affiliate links, including eBay, Amazon, and others.

nyer

Well-Known Member
Joined
Dec 18, 2007
Messages
941
Reaction score
32
Location
Merritt Island
I'm finally close to building a stand. I have been planning and replanning because I'm the kind of person that wants it perfect the first time. I hate building something and then finding out I wished I did something different.
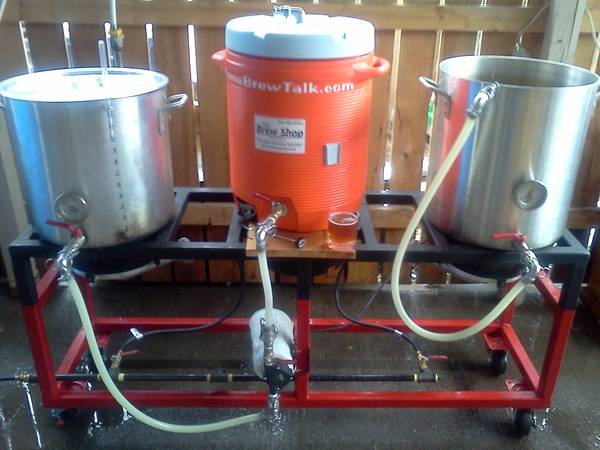
It looks like I'm going with a 2 tier system with 1 pump and 2 burners to start. I am going to copy the sabco brewmagic stand design except it's going to be lower so that I can easily see and reach the hlt and mashtun. I'm using a keggle for the hlt and boil kettle and a 10 gallon round cooler for the mlt. I'm eventually going to upgrade to an electric hlt with herms or rims and eventually an electric boil kettle. For now, I'm going with burners to get things startedwithout spending a fortune all at once.

For all of you who have built your own stands, is there anything you wish you did different? Is there anything about your stand that you think is a must have?
 
I'm in the process of doing the same type of stand. I'm putting in the provisions (heat shield and mounting) where my future third burner will be, which is under my MLT. If you plan on eventually having a third burner I would build that in that way you only have to hook up the burner once you have it.

Also it can be a bit overwhelming purchasing everything for your stand. I suggest making a list of all your material, parts etc... and price everything out. My cost is at about 1K right now and that's for materials. Luckily the welding is being done for free.

Hope this helps.
 
I would begin with the end in mind. It sounds like you would like to someday have a single tier stand. I would build that stand and modify it to a 2 tier somehow. Either weld something that can be removed later or maybe something less permanent. I have a very similar set up with the cooler MLT and I built my stand so I can easily convert to a direct fire tun if I want by simply bolting in one more burner.

Not sure if you have been here but this is the build that I followed. Yankee did a great job.

https://www.homebrewtalk.com/f51/welding-101-fun-brutus-build-164749/

In the very end I plan on being all electric so I only need 2 burners for now. I also plan to be able to weld on an additional piece if I ever wanted it to be a single tier.
 
ensure you've taken into account all of your hardware, casters, etc into total measurements.

if you have the technology (chop saw) make all your corner cuts at 45 degrees so there is no open ends.

build your top and bottom "frames" and then attach the legs sandwiched between them.

draw up some plans, think, measure twice/cut once.
 
I may be changing my mind again. In order to keep everything low the boil kettle would have to be almost on the ground. I want to avoid bending over as much as I want to avoid a step to get into the mlt and hlt. I have a bad lower back and at the end of a brewday I'm in pain. Maybe a single tier and 2 pumps is the only way to go. I was hpoing to keep cost down by eliminating a pump and fittings.
 
I may be changing my mind again. In order to keep everything low the boil kettle would have to be almost on the ground. I want to avoid bending over as much as I want to avoid a step to get into the mlt and hlt. I have a bad lower back and at the end of a brewday I'm in pain. Maybe a single tier and 2 pumps is the only way to go. I was hpoing to keep cost down by eliminating a pump and fittings.

I have a single tier and one pump. It forces me to batch sparge but so what?

I did build the stand with the idea of adding a second pump but my system works fine for now and I'm content at the moment. I can spend more money later if I want.

Brewstand_at_Work.jpg
 
+1. what do you really NEED a second pump for? i love my single tier single pump setup. would be nice to re-circ the HLT water while i HERMS but i survive. :)

i set my system up and the only thing i lift all brew-day is scoops of grain into the MLT and carrying the vessel to the fermenting fridge.
 
+1. what do you really NEED a second pump for? i love my single tier single pump setup. would be nice to re-circ the HLT water while i HERMS but i survive. :)

i set my system up and the only thing i lift all brew-day is scoops of grain into the MLT and carrying the vessel to the fermenting fridge.

What no 12 oz curls?
 
I started with single level and one pump, Added 2nd pump later.

Tips I learned:

Make so everything can be stripped, upgrades are easier.

I would add leveling legs, to mine.

Pumps go as low as possible. And add cover. Simple bent acrylic works great.

I used CAD to design mine. Allowed me to cut all pieces, prep, then do fab work. Saved tons of that wasted "thinking" time while in shop.

I used cheap BBQ paint. And still like it. I can touch up as needed.

I did not angle cut corners, I used plastic plugs, but They are far enough away that they don't melt.

Integrate hose storage if you use silicone tubing.

KISS
 
I have a single tier and one pump. It forces me to batch sparge but so what?

I did build the stand with the idea of adding a second pump but my system works fine for now and I'm content at the moment. I can spend more money later if I want.

Brewstand_at_Work.jpg

Do you have any issues with the plastic cooler getting too hot from the burners next to it? I have been trying to figure out how much distance I need between each pot. I was planning on making the total length of the stand 60 inches. Is that enough length?

For some reason I really wanted to try fly sparging. I currently batch sparge and really don't need to change, I wanted to have the ability to do both though. I could always add a second pump later. I also wanted room under the stand to store a shopvac and generator. I have too much crap in my garage and can't afford to lose the floor space so I need to have storage under the stand.
 
I started with single level and one pump, Added 2nd pump later.

Tips I learned:

Make so everything can be stripped, upgrades are easier.

I would add leveling legs, to mine.

Pumps go as low as possible. And add cover. Simple bent acrylic works great.

I used CAD to design mine. Allowed me to cut all pieces, prep, then do fab work. Saved tons of that wasted "thinking" time while in shop.

I used cheap BBQ paint. And still like it. I can touch up as needed.

I did not angle cut corners, I used plastic plugs, but They are far enough away that they don't melt.

Integrate hose storage if you use silicone tubing.

KISS

Do you have any problems pumping your mash into your boil kettle? I thought I read somewhere that it was difficult to do becuase the pump runs dry and then you have to worry about priming again.
 
Do you have any issues with the plastic cooler getting too hot from the burners next to it? I have been trying to figure out how much distance I need between each pot. I was planning on making the total length of the stand 60 inches. Is that enough length?

If I turn the heat up to much yeah it got hot once. Keep the flames under the HLT and no problem. I do use that board under the cooler as the frame does get hot.

I followed these plans so I guess mine is 62 inches long. Yeah, that's what I said.

001-4.jpg
 
I just measured and can go up to 68 inches wide. maybe I'll plan to do that so I can keep some distance between the cooler and the burners.
 
I built mine as a single with one pump. For now, I just batch sparge, but it would be very easy to add a second. Same idea with my hlt and mlt. At present, they are both unheated igloos but I could convert to additional burners or electric with easy mods to the stand. That was why I used angle over tube because it woul make additions and changes easier. Overall, I guess that my advice would be to either go big and build your dream system from the ground up, or build a less specific more modular stand with expansion in mind. I built my rig with everything except the MLT (I carried that over from my old setup) for almost exactly $500.
 
I'm definately doing a single tier and I'm just about ready to start buying material. I thought of one more question, what width are you guys using for the top of the stand? I see bendbrewer went with 16 1/2 to the outside. Is that enough for a 16" wide keg? Is there any reason to make it wider?
 
Wow the steel is cheaper than I thought, I stopped at a fabrication/steel shop a few miles from my house and the 1 1/2" 14 gauge is only $1.09 a foot and the 2" is only
$1.60. They will make all of the cuts for me too. It's only between $40-$60 for all the steel depending on what size I get.
 
will they charge you for the cuts? cut costs add up (but they will prolly make some super purdy square and 45 degree cuts).

if they won't charge you to cut... go for it!!
 
I know my supplier charges $1 per cut... According to Lonnie Mac's cut sheet that'll be 18 cuts. So to only add $18 is worth it for nice square cuts!
 
I know my supplier charges $1 per cut... According to Lonnie Mac's cut sheet that'll be 18 cuts. So to only add $18 is worth it for nice square cuts!

mine wanted like $3/cut so i put a cutting disc on my miter saw and went for it. they came out pretty good, but for $1/cut they would have done it for sure. :)
 
I didn't ask how much they charge for cuts. I have gotten things at this place before and most of the time if they cut me a small piece of something they give it to me for free. They are really cool there. I'll gladly pay them for perfect cuts because it makes the welding so much easier. Making accurate cuts without a metal saw is hard and time consuming.
 
I just ordered all of the tubing and without cuts it comes to a whopping $32.42. The guy that helped me used to be my neighbor so I'm thinking the cuts might be free, they were going to cut it while I waited too. I didn't have time to wait so they said it will be ready for pickup by tomorrow. I figured I had to order it and wait a week or so, I may have this thing together by this weekend!
 
Back
Top