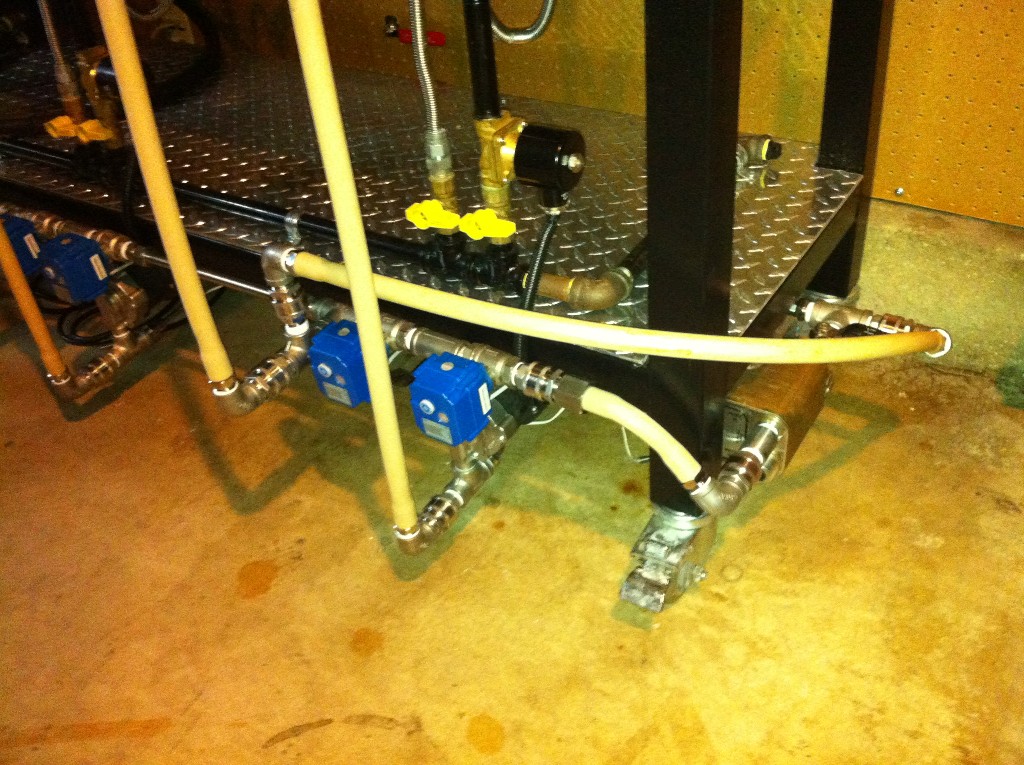
Single Tier, 3 Pump, BCS-462, Automated Rig

Homebrew Talk - Beer, Wine, Mead, & Cider Brewing Discussion Forum

Help Support Homebrew Talk - Beer, Wine, Mead, & Cider Brewing Discussion Forum:

This site may earn a commission from merchant affiliate links, including eBay, Amazon, and others.
allclene said:
Was looking at your rig very nice! have one question, I noticed you have your pump inputs on the bottom. Do you have a problem with priming that way? do you think it would work if the pumps were turned 180 degrees?

That is how march says to set up the pumps. However, I am currently fighting with some priming issues.... I've built a nearly identical rig
 
That is how march says to set up the pumps. However, I am currently fighting with some priming issues.... I've built a nearly identical rig

I have been looking at other threads throughout this forum and it looks like people are puting the inlet up or sideways so it will prime by gravity through the pump. that's why I ask you. I am building a rig similur to yours and i was gonna put the pumps the other way.
 
The suggested orientation is inlet down. That allows the air to rise and escape from the head.

If you have posted pics in a build thread, point me there as there are other issues that come into play and I might be able to spot something. I've built a few stands and wrestled with priming issues a lot in the past.

(Please don't post your build pics in this thread).
 
I'm sure there are successful installations using the pump head in all 4 available orientations. The orientation of the head is only 1 variable in the puzzle. Other variables include distance of pump under kettle, hose lengths, hose routing (draping, straight vertical, horizontal, etc.), hose diameters, fitting diameters, number of elbows, vertical pumping distance to return to kettle, fittings on the return/exit side, etc, etc, etc. Very few installations are the same, so each person has to deal with different variables that may affect their priming.

Here's a thread from Walter at March where the topic of orientation comes up several times. He always suggests having the outlet at the top if at all possible.
https://www.homebrewtalk.com/f11/qu...swered-factory-210199/index2.html#post2819788
 
Thanks for the input. I am building my new rig now and am cloning yours somewhat hope you don't mind. I'm using an allen bradley plc and labview for the software though. And I'm taking your advise and putting the pumps inlet down.
 
Do you mind describing your cleaning process after your brew day please?

I dump my grain via the tippy dump and clean the kettle off the rig. I also clean the BK off the rig.

For the plumbing, I progressively open valves and flush water through the whole system. I have a water shutoff valve with a QD attached to it that I put on the first disconnect on the left. I start by disconnecting all hoses from the kettles, but leaving them connected to the bottom rail and just laying on the cement.

I then start progressively opening valves from left to right. I flush each line about 30 seconds (at full water pressure - probably 40+ PSI). After the line is flushed, I attach it back to the kettle and shut the kettle valve so that water can't flow into the kettle. I then open the next valve and flush again. This causes water to only flow to the next open hose so I can progressively flush each line, one at a time. I also remove my chiller and flush it both forwards and backwards with water. This process takes 5-6 minutes total.

I then leave all valves open for storage and hang all my hoses on the wall of the garage.

After about 6 brew sessions, I do a PBW mix in the HLT, recirc, then move it to the MLT, recirc, then to the BK and recirc.
 
There is no adjustment to the solenoid valves, but I have manual valves on them as well. I set the flame level with the manual valves and then the solenoids just cycle on and off at that level.

Jon, I have these same burners and have yet to get them installed on a rig (in planning stages). I've been reading a lot that on NG they like to run pretty much wide open (to get the venturi effect and proper burn) or slightly throttled down. My concern on my direct fired mash plan is that inability to throttle them down much is going to be too hot and I'll have scorching problems. The best for a direct fire recirc setup on the MT is a nice low flame that can gradually heat the wort under the FB as it is being recirculated. Have you had any of these issues? Are you able to throttle down the burner under the MT to your satisfaction?
 
Jon, I have these same burners and have yet to get them installed on a rig (in planning stages). I've been reading a lot that on NG they like to run pretty much wide open (to get the venturi effect and proper burn) or slightly throttled down. My concern on my direct fired mash plan is that inability to throttle them down much is going to be too hot and I'll have scorching problems. The best for a direct fire recirc setup on the MT is a nice low flame that can gradually heat the wort under the FB as it is being recirculated. Have you had any of these issues? Are you able to throttle down the burner under the MT to your satisfaction?

I run the burner on the MT wide open when heating the strike water and then throttle it back down after I mash in. I have no issues running it lower during the recirc.

If you forget to throttle it down after heating the strike water though, you will get some quick spikes in the temp. Because my system is BCS controlled, I have what I call a "Mash in rest" for 5 minutes. This stops the burner and pump once it's at strike temp so that I can mash in. At the expiration of the 5 minute timer, it triggers an audible alarm to alert me to the fact that it is going to resume heating & recirculating. At this point I set my liquid flow rate returning to the kettle and I drop the flame very low (I just estimate where the gas valve needs to be because it takes a while after mash in before it needs to re-fire for any additional heat).
 
I run the burner on the MT wide open when heating the strike water and then throttle it back down after I mash in. I have no issues running it lower during the recirc.

Sounds good. So when you throttle it down you don't have any issues with getting an orange flame (which I've read is improper burn)? The tips still burn blue, just at a lower rate? The other issue I've seen on a friend's rig is that he senses temp on the inlet back to the MT (at the end of the recirc channel), and when he fires it heats the wort up very quickly that is flowing through the recirc channel (because it's pulling the wort from right above the flame). This causes the temp probe to read up in the 160's very quickly, and hence trigger the solenoid to shut off the flame. How do you keep from getting this quick spike, and properly control the temp throughout the MT? With direct fire it seems tough to get heat into the system because the probe sees a big spike as soon as the flame is turned on.
 
The other issue I've seen on a friend's rig is that he senses temp on the inlet back to the MT (at the end of the recirc channel), and when he fires it heats the wort up very quickly that is flowing through the recirc channel (because it's pulling the wort from right above the flame). This causes the temp probe to read up in the 160's very quickly, and hence trigger the solenoid to shut off the flame. How do you keep from getting this quick spike, and properly control the temp throughout the MT? With direct fire it seems tough to get heat into the system because the probe sees a big spike as soon as the flame is turned on.

+1 I was going to ask JonW this exact same question.
 
Yes, my flame is a bit orange/yellow at times, but it isn't anything real bad and doesn't leave a huge black mess on the kettle.

I think the key to avoiding the temp spikes is a good recirculation rate. If the flame is low and the recirc rate is quick enough, you don't overheat the wort. On my Blichman's, I can open the recirc valve almost full to recirc (at least with a 2 row based recipe), but I usually keep it about half open.
 
Thanks, JonW. I'll keep experimenting. So far I'm still using manual control, so it's a bit of a different situation. I'm not convinced it is a problem, but I have noticed that the wort coming out of the return port is quite a lot hotter than the rest of it due to the pickup being right on the kettle bottom. As with anything, it just requires some getting to know your system.
 
I'm going to be using these same burners, and getting my manifold put together this week. I was just wondering what's the optimum height from the kettle for these burners? I've seen anywhere from 10" to 4" from the bottom of the pot. I'm going to be using keggles as my pots.
 
I think my burners are around 4-5" from the kettles. However, there really is no 1 height that is perfect for them because there are other factors that affect performance. Things like stand design (top shelf configuration), venting, gas pressure, etc. all play a little role in determining your height. My suggestion is to design your manifold in such a way that you can swap out the vertical riser nipples to different heights to test what works best in your configuration.
 
I think my burners are around 4-5" from the kettles. However, there really is no 1 height that is perfect for them because there are other factors that affect performance. Things like stand design (top shelf configuration), venting, gas pressure, etc. all play a little role in determining your height. My suggestion is to design your manifold in such a way that you can swap out the vertical riser nipples to different heights to test what works best in your configuration.

+1, on this. I designed my stand with a lot of inspiration from Jon's and have had the same experience with the vertical height. I'm at 4.5" below my keggles, and 6" below my flat bottom pot. That works great for me for now. When I build my last keggle, I plan to swap out the vertical riser on that last one to bring it up a 2".
 
Here is a question to anybody using an electric bbq igniter.

I am using the 3 probe igniter on my rig that I am building. It is controlled via Arduino -> Shift register -> Relay -> Igniter. The problem is that when the igniter is sparking, the power surge that it creates makes the shift registers go all wonky and lose their output status. Since the valves are also connected to the shift registers, this creates quite a problem. In testing, I connected it to a battery and the problem persisted which proves that the surge is on the output, not the input of the igniter. My next attempted fix will be to somehow electrically isolate the burners from the rest of the power system, since currently they are at 0V with ground. Not going to be easy since they are screwed to metal brackets that are screwed to the frame which is screwed to my control box, which is screwed to my power supply.

Anybody have any thoughts/suggestions/input of any kind? Much appreciated.

2nd question: why does Google Chrome think that 'igniter' isn't a word?? :/
 
So I took my 10-tip burner last night and mocked up a manifold to test for flame control. I have 1/2" hose coming out of the house feeding my manifold (soon to be on my rig). That goes through and in-line regulator (Maxitrol 325-3) and then onto the burner. With the ball valve after the regulator I got slightly better control than without it, but the regulator didn't add as much control as I thought. I could not get the flame very low without it turning pretty yellow (poor burn). I'm thinking what I might do is take out some tips (maybe down to 6?) and plug the holes with a simple 1/4"-20 bolt. You guys thoughts?
 
gifty74 said:
So I took my 10-tip burner last night and mocked up a manifold to test for flame control. I have 1/2" hose coming out of the house feeding my manifold (soon to be on my rig). That goes through and in-line regulator (Maxitrol 325-3) and then onto the burner. With the ball valve after the regulator I got slightly better control than without it, but the regulator didn't add as much control as I thought. I could not get the flame very low without it turning pretty yellow (poor burn). I'm thinking what I might do is take out some tips (maybe down to 6?) and plug the holes with a simple 1/4"-20 bolt. You guys thoughts?

Do a search on this forum for burner problems. There's a thread that shows issues like this and someone refered them to a website that explains to you how to solve most of the problems involved in setting up your burners. It's very informative and will most likely solve your issue.
 
Sorry couldn't remember thread did a check it is "23 jet burner problems" glance through that thread it'll help you out. Lots of good info on seting burner right.
 
Yes, I've been searching the forums for quite some time on how to set up these wok-style burners on natural gas. I've read through that thread, and there is good info, but it's mostly people having issues with the 32 or 23 tip burners, plugging jets, etc. I have a 10 tip which I thought was easier to control, and sufficient for 5 and 10 gal batches. The only thing I do not have hooked up yet is my Honeywell 8200 standing pilot with safety shutoff valve. That is supposed to have some pretty good control by being able to adjust the built-in regulator. I was trying the in-line regulator (at a 2psi set pressure, non adjustable) thinking it would give me more control than just running the NG line straight to the burner uninhibited. It really didn't do that. I read on other threads that even on the burner for the boil kettle, where you want a lot of heat to get to boil, and then back down the flame, you want to use a set in-line regulator with a ball valve after to fine tune the flame. My Honeywell should do a good job of keeping a nice low flame on my direct fired MT.
 
If you are using natural gas instead of propane, you have to change the orifice to natural gas type. Also if you are using gas from your house there is no need for a regulator use the line straight in. It is already regulated to a low psi. The other question will be if you have a low presure or high presure burner. If it is high presure, it won't work on house gas line. Psi not high enough from gas meter. So you might want to go to propane so you can have more control over it. Hope that helps you.
 
Beautiful rig !

I'm trying to figure out the flow path for all situations.

When you are sanitizing the chiller by pumping boiling wort through it, how do you get the wort back into the brew kettle ?

I understand that the pump under that kettle will get the wort into the manifold and then into the chiller, but how does it get from the chiller outlet back into the kettle ?

Thanks

Go back to page 1 and look at the first pic. It is an updated one that is a little different from some of the others on that page. It shows a return loop coming off the chiller on the right and coming back and teeing to the kettle return. When the valve to the left of the BK pump is closed and the one to the right is open, it forces the flow to the chiller and back to the return.

Here's a close up of the return loop:
Chiller_Recirc_3.jpg
 
Go back to page 1 and look at the first pic. It is an updated one that is a little different from some of the others on that page. It shows a return loop coming off the chiller on the right and coming back and teeing to the kettle return. When the valve to the left of the BK pump is closed and the one to the right is open, it forces the flow to the chiller and back to the return.

Thanks ! That inlet (the loop back inlet) is there in the first picture but not in any of the rest. I missed it in that picture. That is a very neat and tidy way of doing it.

Do your QCs seal when they aren't connected ? If not, what closes that connector when the chiller loop back isn't connected into the system ? Do you have a cap for it or is there a valve in there somewhere ?

No the QD's don't seal when disconnected. Any of the QD's that have that feature usually end up getting plugged up.

There are no caps to the system. When setting up for a brew day, all hoses are connected to the system. I don't disconnect any hose during the brew day. The only exception to that is I disconnect the BK return line (vertical one) and drop it into my fermenter (Sanke keg on rollers) when chilling.
 
No the QD's don't seal when disconnected. Any of the QD's that have that feature usually end up getting plugged up.

I agree !

There are no caps to the system. When setting up for a brew day, all hoses are connected to the system. I don't disconnect any hose during the brew day. The only exception to that is I disconnect the BK return line (vertical one) and drop it into my fermenter (Sanke keg on rollers) when chilling.

OK, that makes sense. And its a nice way to do it.

Sorry if you have explained this somewhere else.

I really appreciate the time you've put into this thread. Kudos. :mug::mug::mug:
 
2 more questions if you don't mind.

#1, theoretical question. Do the pumps block flow if they aren't running ? If you were (not saying that you want to) pumping hot water from the HLT to the cooler, does it seep past the MLT pump if it isn't running ? If you had the MLT outlet valve open, would it push water into the mash through the pump or would the pump stop it ?

#2, I love the way you mounted all the controls stuff under the aluminum checkerplate. However, what happens if something stops working while you are brewing ? Can you lift the checkerplate up to see what is going on or do you need to remove the kettles and flip the stand upside down to get at things ?

#3, if you had to do it again, would you change anything ? Do you ever worry about kicking a pump and breaking a pump head ?

Thanks in advance !
 
Sorry, you said 2 questions, but you listed 3 - you're now over your limit! ;)


#1, theoretical question. Do the pumps block flow if they aren't running ? If you were (not saying that you want to) pumping hot water from the HLT to the cooler, does it seep past the MLT pump if it isn't running ? If you had the MLT outlet valve open, would it push water into the mash through the pump or would the pump stop it ?
The pumps do not block flow. Don't know what you mean by the cooler... Say I wanted to pump from the HLT to the BK? Yes I can do this but I would manually close the input and output valves on the MLT kettle so that the liquid would flow through the header and not go to the HLT.

#2, I love the way you mounted all the controls stuff under the aluminum checkerplate. However, what happens if something stops working while you are brewing ? Can you lift the checkerplate up to see what is going on or do you need to remove the kettles and flip the stand upside down to get at things ?
There is room to reach underneath if needed. I once had a solenoid coil fry during a brew day on the BK gas valve. I reached under and unplugged one from one of the other gas valves, plugged it into the BK gas port and mounted it to the BK valve. Other than that, I've never had an issue. Worst case, I figure I'll just slide a kettle to a different burner location if something gets messed up. My BCS is currently located in a panel on the wall, so I can always check and test things there also. At some point, I'm going to move the BCS to a mount under the stand though.


#3, if you had to do it again, would you change anything ? Do you ever worry about kicking a pump and breaking a pump head ?
All 3 of my heads are SS now, so no, I don't worry about that at all. I have changed a few things since the initial design, like adding the tippy dump, electronic ignition, SS QD's and moving the gas rail to the front. Other than that, the only things I've thought about changing would be to have an all SS stand so that there are no paint/powder coat issues and I also like how quiet the BG14 burners are. However, I do like the smaller footprint of the wok burners and they are not as difficult to get dialed in like the BG14 ones are, so I haven't gone there.
 
Sorry, you said 2 questions, but you listed 3 - you're now over your limit! ;)
I owe you one ! Thanks for the answers.

I really appreciate your comment on making the stand from SS. I bought the SS tubing for my stand last week and I fussed over spending the extra $$$ on it for quite a while. Reading what you wrote makes me glad I did.

I guess I should upgrade to SS pump heads as well.
 
I love your setup and am planning on building a stand similar to yours, what gauge 2" square tubing did you use?
 
I love how clean and simple the manifold on your brew rig is. But I'm worried about getting it clean after brewing and sterilizing it prior to the next brew.

The November issue of BYO has an interesting article about where bacteria can hide in a brewing system and what it takes to get it sterilized. Threaded fittings and ball valves are the main culprits to hiding bacteria and getting them sterilized involves 15 minutes at 85F or heating with dry heat in an oven.

What has your experience been with cleaning your system ? Have you ever felt the need to take the valves apart and clean them ?
 
brewman ! said:
I love how clean and simple the manifold on your brew rig is. But I'm worried about getting it clean after brewing and sterilizing it prior to the next brew.

The November issue of BYO has an interesting article about where bacteria can hide in a brewing system and what it takes to get it sterilized. Threaded fittings and ball valves are the main culprits to hiding bacteria and getting them sterilized involves 15 minutes at 85F or heating with dry heat in an oven.

What has your experience been with cleaning your system ? Have you ever felt the need to take the valves apart and clean them ?

Wort gets boiled on the hot side.
 
Wort gets boiled on the hot side.

I agree. But does pumping boiling wort through that manifold get every nook and cranny sterilized ? I am particularly concerned about the fluid that might build up behind the seals of the ball valves.

What if some of that germ infested fluid seeped out from behind the valve seals during pump out ? Or what if you adjusted the valve during pump out to get a cooler wort temp and a bit of fluid that was previously hidden behind the seals seeped out into the wort ? It wouldn't take much to infect wort.

Another potential source of contaminants is scratches in the pump head, but they are more likely to get exposed to cleaning solutions and be sterilized by boiling wort.
 
It really is a work of art. All you need now is some French guy yelling "no flash photography!" at the tourists ;)
 
Wort gets boiled on the hot side.
Agreed!

I agree. But does pumping boiling wort through that manifold get every nook and cranny sterilized ? I am particularly concerned about the fluid that might build up behind the seals of the ball valves.
I don't pump boiling wort through the whole manifold, only the BK return and chiller loop. Wort also doesn't really build up behind the ball valves.

At the end of a brew day, I progressively open each ball valve and flush the lines out with a garden hose attached. Running high pressure water through it does a pretty good job at flushing it. I also leave all valves open when I disconnect the rig so they can dry out. On the next brew day, I just attach the hoses and go. After about 3 or 4 brew days, I run PBW through the whole system.

What if some of that germ infested fluid seeped out from behind the valve seals during pump out ? Or what if you adjusted the valve during pump out to get a cooler wort temp and a bit of fluid that was previously hidden behind the seals seeped out into the wort ? It wouldn't take much to infect wort.
The last part of the boil will sterilize the pump, kettle return and chiller loop. When running into the fermenter, all plumbing will have been sterilized by the boiling wort. Even if there was some small bit of wort hiding behind the ball when I adjust it, it will already have been heated to 212'ish for several minutes (surface temps of the ball valves are very high).

Another potential source of contaminants is scratches in the pump head, but they are more likely to get exposed to cleaning solutions and be sterilized by boiling wort.
You're really getting too paranoid about these germ issues! Good sanitation and running the boiling wort through any of your end-process equipment will result in a germ free wort.

In addition, if you pitch proper quantities of yeast and have proper temperatures, you will get fermentation starting within 24 hours. Once you start to get alcohol present, it makes it very diffficult for any germs to multiply and take hold.
 
JonW said:
You're really getting too paranoid about these germ issues! Good sanitation and running the boiling wort through any of your end-process equipment will result in a germ free wort.


I agree with you. I am building a simular rig to yours and i plan on running a cleaning cycle through it of boiling water to clean out and sterilize after cooking. Then rinse with clean water and dry out with valves open. That should be plenty to keep germs out. I feel he is a little germaphobic and overboard with his concerns.
 
Back
Top