ebay aquarium temp controller build

Homebrew Talk - Beer, Wine, Mead, & Cider Brewing Discussion Forum

Help Support Homebrew Talk - Beer, Wine, Mead, & Cider Brewing Discussion Forum:

This site may earn a commission from merchant affiliate links, including eBay, Amazon, and others.
I got 2 of these 2 months ago. They were $18.00 at the time, and free shipping with a $25.00+ order total.

STC-1000

A search for "STC-1000" on Amazon should bring you numerous options. Beware, some may add shipping or be sent from overseas.

Perfect, thanks everyone. Time to order and get started! Starting off with a wee-heavy!
 
Last edited by a moderator:
Confirmed working, thanks for the help guys!

I added the lamps back in on the drawing, have not connected them yet since the STC is in use right now, but the revised diagram is below. My question is the combined lead (black line), should it go to port 2 as shown or port 1?

So far I am finding that the temperature is too low. The STC turns on the fridge when it hits the upper threshold I set and the fridge cools so fast that even after it shuts off the temp keeps lowering. I am saving some electricity bill but need to tweak the settings/thresholds/window a bit. I wanted a temp between 60-65 but when it kicks in at 65 it keeps getting down to around 55-56 before starting back up. Any good threads about the settings?
Your probe needs some thermal mass to work with. My mini-fridge conversion didn't work properly until I taped the probe directly to the side of a full carboy, and taped a patch of double foil-sided, bubble wrap insulation over it.

With the probe in the air, I was cycling between the heater and compressor; same when I tried dropping it into a 1-quart tea kettle of water. But with the probe taped to the carboy and insulated from the air, the temperature usually overshoots the set temp by .1*C.


Example: I'm fermenting a saison right now. My heater kicked in a few minutes ago, when the STC-1000 display had dropped to 25.5*C. It shut off at 26.0*C, and the temperature stopped rising at 26.1*C. Now it's flashing back and forth between 26.1 and 26.0...
 
[...]I added the lamps back in on the drawing, have not connected them yet since the STC is in use right now, but the revised diagram is below. My question is the combined lead (black line), should it go to port 2 as shown or port 1?[...]

The lamp wiring as shown is correct, the common node wants to be connected to the neutral line...

Cheers!
 
So I got my temp controller today and it was missing one of the orange tabs used to secure it. I am assuming that is a specialty piece that I cant pick up at radio shack. Any thoughts other than sending it back for another one?
 
So I got my temp controller today and it was missing one of the orange tabs used to secure it. I am assuming that is a specialty piece that I cant pick up at radio shack. Any thoughts other than sending it back for another one?

Rats!

First, contact the seller. Maybe they can send you the missing tab, or remediate (giving you a discount). I know contacting sellers on Amazon is hit and, more often, miss.

On the other hand, once installed, a bead of hot glue will hold it in place too.

The unit may have been a return for whatever reason. So check if you see any signs of use. Like the way the probe wire is coiled and tied, missing plastic foil from the face etc.

When you're committed to keep it, you should test it to make sure it works, before building it in a box and gluing it down.

I'll try contacting them. Also glad you mentioned to test it first. I was so frustrated by the missing tab that didn't even cross my mind.
 
So I got my temp controller today and it was missing one of the orange tabs used to secure it. I am assuming that is a specialty piece that I cant pick up at radio shack. Any thoughts other than sending it back for another one?

I agree with Islandlizard. Contact the seller first. I had one shipped from Hong Kong that the cold relay wouldn't work. I shot them an email describing the problem, and they sent me a new unit free of charge, and I kept the old one, that I now use for the temp readings only. Worth a shot.
 
I agree with Islandlizard. Contact the seller first. I had one shipped from Hong Kong that the cold relay wouldn't work. I shot them an email describing the problem, and they sent me a new unit free of charge, and I kept the old one, that I now use for the temp readings only. Worth a shot.

Unfortunately I contacted the seller and they are having me mail back the one without the clip.

ALSO, has anyone actually included a 10Amp fuse in their set up shown from this DIY Instructable? http://nordeastbrewersalliance.file...age_temp_controller_creation_instructions.pdf

I went to radioshack and of course they had no idea what type of 10amp fuse to use and neither did I.
 
The Amazon STC-1000s are still below $20 (although I can't find them for $18 any more). Be careful to get the 110V model if you are in the USA. The Elitech is the one I have.
 
Unfortunately I contacted the seller and they are having me mail back the one without the clip.

ALSO, has anyone actually included a 10Amp fuse in their set up shown from this DIY Instructable? http://nordeastbrewersalliance.file...age_temp_controller_creation_instructions.pdf

I went to radioshack and of course they had no idea what type of 10amp fuse to use and neither did I.

That's terrible, unless they pick up the shipping. Please post the name of that seller so we can avoid them.

Make sure the unit works before gluing or modifying it in any way.

There is no need for a fuse as long as you are not going to load the controller with more than 10A (= 1100 Watt @110V). So plugging in a 1500W space heater will certainly fry your STC-1000.

If you must, in a pinch you could use an "inline fuse," which you'd insert into the live (black) lead of your feed cable, inside the box. IMO it is unnecessary.

I bought it through Amazon from a seller called "Brainy Trade." They did cover shipping but still I was hoping to have this completed BEFORE I finished my wee-heavy which is fermenting in my chest freezer chest with a single stage temp controller...outside...in the car port. SO far it hasn't dipped below 61 degrees which is perfect but I don't want to take any chances.
 
The temp gods are with you there in NC. We dropped to high 40s last night. You can keep an eye on the inside temperature of that freezer and if you see it is dropping, unplug the controller and just add a jolt of heat, or put something warm inside.

How long has it been in there? Maybe it's about done, and time to condition indoors for a week.

I just dropped yeast in Saturday night. Hopefully it will be done soon.
 
That's terrible, unless they pick up the shipping. Please post the name of that seller so we can avoid them.

Make sure the unit works before gluing or modifying it in any way.

There is no need for a fuse as long as you are not going to load the controller with more than 10A (= 1100 Watt @110V). So plugging in a 1500W space heater will certainly fry your STC-1000.

If you must, in a pinch you could use an "inline fuse," which you'd insert into the live (black) lead of your feed cable, inside the box. IMO it is unnecessary.

So...back to this point. I see a brew at heater that is 120Volts. Will that not work?
 
Well, let me first amend myself. The AC voltage from your sockets is about 120V, not 110, so use that 120V number.

The brew heater you have in mind is one of those belts or flexible pads? They are 120V and typically 20-40 Watts or so. You could power 20 or more of those all at the same time if you wish. 20 x 40W = 800W. You got 1200W to give (120V x 10A). So that will work fine.

Your freezer or fridge will not pull more than 4 amps probably, so you got the cool side covered too. When it turns on it may peak at 10-12 amps for a short fraction of a second. That's normal and the STC can handle that spike fine.

It is a brewmat shown here. http://www.amazon.com/dp/B00EZSH010/?tag=skimlinks_replacement-20

Electrical work is so foreign to me.
 
Last edited by a moderator:
It is a brewmat shown here. http://www.amazon.com/dp/B00EZSH010/?tag=skimlinks_replacement-20

Electrical work is so foreign to me.

That's a new one to me. I guess you put your fermentor on top of it.

I was thinking more along these lines, although I have no experience with either:
FermWrap-Heater or
Brew-Belt

I use a heating pad and wrap it around my carboy. If it's outside the fridge (like saisons), I wrap several layers of bubble wrap around the carboy and a thick dark towel. That keeps things warm.
 
Last edited by a moderator:
That's a new one to me. I guess you put your fermentor on top of it.

I was thinking more along these lines, although I have no experience with either:
FermWrap-Heater or
Brew-Belt

I use a heating pad and wrap it around my carboy. If it's outside the fridge (like saisons), I wrap several layers of bubble wrap around the carboy and a thick dark towel. That keeps things warm.

You are correct. The reason I went with the heating pad is because currently I have the temp probe affixed (yeah, duct tape) to the outside of the fermenting bucket and I thought the ferm-wrap would effect the temp too much since it would be on top of the temp probe. This way the heat comes from the bottom. Is that the right train of thought?
 
Last edited by a moderator:
Here's another thread on heating with pads. They are not convinced unless the pads are in direct contact with the vessels. Most fridge fermentation chambers use a bigger capacity radiant heating source. 40 Watts may be enough, or not, depending on many factors. 20W is definitely smallish.

fermwrap-flexwatt-heating
 
Actually the smaller 20 watt works fine for what we are doing. It runs longer, but doesn't tend to overshoot like a larger wattage one might. A 5 gallon static liquid mass doesn't change temp one way or the other very rapidly.
 
The temp gods are with you there in NC. We dropped to high 40s last night. You can keep an eye on the inside temperature of that freezer and if you see it is dropping, unplug the controller and just add a jolt of heat, or put something warm inside.

How long has it been in there? Maybe it's about done, and time to condition indoors for a week.

Well it happened. Last night with fermentation still pumping it dropped into the low 30's and the temp gauge reads 38F for the wort (and the blowoff tube water had a nice crisp layer of ice crystals.) Since the OG was 1.91 I am GUESSING it still has some more fermenting to do. Should I just swap out to the secondary, or slosh the bucket (closed still) to take the yeast out of suspension and see what happens?
 
Well it happened. Last night with fermentation still pumping it dropped into the low 30's and the temp gauge reads 38F for the wort (and the blowoff tube water had a nice crisp layer of ice crystals.) Since the OG was 1.91 I am GUESSING it still has some more fermenting to do. Should I just swap out to the secondary, or slosh the bucket (closed still) to take the yeast out of suspension and see what happens?

Damn, it was cold last night!
I thought I mentioned to keep an eye on the temps. :D You need to warm it up, and the quicker the better. In a pinch, you could try a small space heater inside the freezer. Even if you set that at half or minimum power and its thermostat to a low temp you still need to check very periodically that everything is A-OK. You don't want to melt or burn anything. You may need to go a little higher than your target temp to get things moving again. Then bring it back.

Do not rack to secondary, you need all the yeast to help ferment that beer out.

You can swirl the bucket around a bit, carefully, to bring more yeast into suspension (rousing) but do not open it, or you lose the CO2 blanket protecting your beer from oxidation.

Your OG was 1.091? Holy cow!

Yeah, it is a Skullsplitter clone and my efficiency was WAY higher than normal.
I DID keep an eye on the temp! It was a perfect 61 when I went to bed at 10pm and my weather app said it wouldn't get below 45 which was normal for the past few nights.....nope.....35. Joy. Got it warming up now in the house and checking it every 10 minutes til it gets to 60F.

Skullsplitter...you can say that again. :D
You definitely want to keep the fermentation temps low or you're making fuel.

The weatherman is always right, today.

It may take a while for the yeast to resume. Hopefully it didn't go dormant after that chilly adventure outside. My recent caramel amber went down to 38 degrees the first night in the fridge. After that cold episode, it took over 2 days to finally start "visible" fermentation (bubbles in carboy airlock). I was about to pitch new yeast that evening. In your case it will be harder to see since you have a bucket, and they are not known for tight seals on the lid.

Just in case you haven't stumbled upon it, here is a sister thread on the STC-1000 builds. Interesting reading too, mostly on enclosures.

Perfect, I moved it indoors and am keeping a close eye on it. I filled two 6gal buckets with hot water and placed it on either side of it. What do you think about a warm bath? I could fill the bathtub up with 65-70 degree water to speed up the process. Or is that too risky, I already pictured multiple disaster scenarios.
 
Yes, warm bath is good. A plastic (rubbermaid) tote 1/4 filled with warmish water will do too. Water will exchange its temps much faster than air. You should aim for 65 in the end of this ordeal to help the yeast get busy again, with a little rousing couple times a day. Then once it resumes, bring it down to 60 slowly.
 
Yes, warm bath is good. A plastic (rubbermaid) tote 1/4 filled with warmish water will do too. Water will exchange its temps much faster than air. You should aim for 65 in the end of this ordeal to help the yeast get busy again, with a little rousing couple times a day. Then once it resumes, bring it down to 60 slowly.

Crisis averted...for now. got it back up to 65 then down to 60 and fermentation is going crazy again. Thanks for the advice.
 
Oh good! The center of the bucket must have been warmer than the 38 you measured on the outside. Try to keep it at 60 for a while, in your tub or tote, to get everything solidly stabilized before you put it back in the fridge. These swamp coolers are a good heat sink and very useful, given the right attention.
 
Christmas just came 2 months early so the rest of my brews for the year can have temp control. Now I have to get the rest of my parts together for the controler (I think I have a cigar box for the enclosure), add a section to the top of my ferm box for ice bottles to run with a computer fan, and pick up an extra hot pad. I love my wife!
 
Yretsof said:
So what are you guys using for a heat source? I am sure it has been covered, but I'm too lazy to read 383 pages.

I (and many others I've read on here) made the "light bulb in a paint can" heater. See how here:
http://brewstands.com/fermentation-heater.html

I've seen some just use a terrarium type heating bulb (no light, so no paint can needed), or also a ferm-wrap or other similar heating pad around the carboy/bucket.
The only downside I've found from the paint can is that it started a rust ring around the bottom on my chest freezer, from the condensation. I've since just kept it on a cloth rag, instead of the floor of the freezer.

I too noticed the paint can rusting, I wonder if some black rustolium paint on the can would prevent this from happening.

-=Jason=-
 
So what are you guys using for a heat source? I am sure it has been covered, but I'm too lazy to read 383 pages.

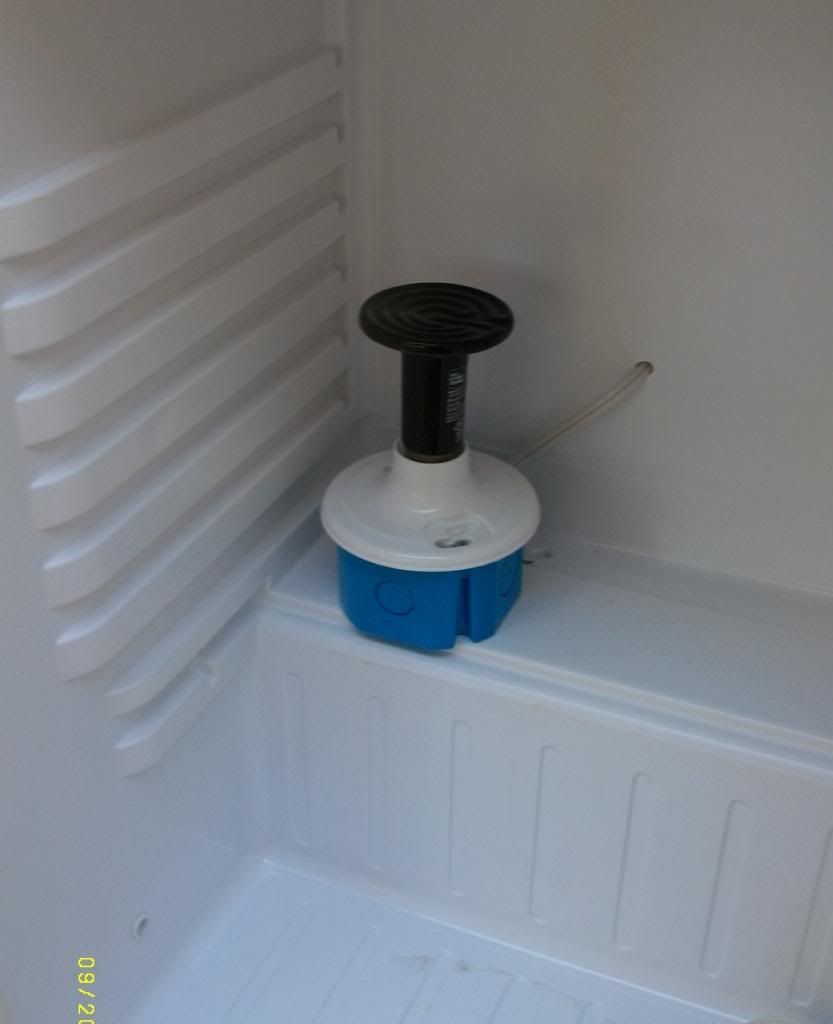
I went with a 60 watt ceramic heating element; the kind that are used in terrariums and reptile cages. They cost about $15.00, and fit into a standard light socket.


The pic was taken right after I installed it. Eventually I ran the wire for the STC-1000 temp probe through the same hole in the back, then squeezed some silicone into the hole.

Important: the mini fridge I converted doesn't have any coils outside on the back to transfer heat, which means they're built into the fridge body itself. So before I got brave enough to drill any holes, I ran the fridge for a while. The sides got warm on the outside but the back didn't. That told me where the coils are - and more importantly, where they aren't. :)
 
So what are you guys using for a heat source? I am sure it has been covered, but I'm too lazy to read 383 pages.

I am using a brewmat for my heat source. I do have a fairly small freezer though so It is kicking out enough heat to keep everything going. My freezer is out in our carport and it got down to 34 the other night and it kept the temp at 60 even all night.

http://www.midwestsupplies.com/home-brew-heat-panel.html
 
Threw one of these together this evening, the temperatures are dipping up here in Michigan and I've got an Ale in the primary that was getting a little chilly. Here's the result!

stc1000_01.jpg


stc1000_02.jpg


stc1000_03.jpg


stc1000_04.jpg


stc1000_05.jpg


stc1000_06.jpg


stc1000_07.jpg


stc1000_08.jpg
 
Threw one of these together this evening, the temperatures are dipping up here in Michigan and I've got an Ale in the primary that was getting a little chilly. Here's the result!

I LOVE the way you have yours set up. I just might have to do it like that. I did mine with the controller and outlet on top and its kinda annoying. Bravo sir.
 
I LOVE the way you have yours set up. I just might have to do it like that. I did mine with the controller and outlet on top and its kinda annoying. Bravo sir.

Yeah, I love it that way too. It's a professional looking set-top box now.

The other configuration I can see if you'd be hanging it on a wall. The plugs and wires coming down from the bottom, the STC on the front (top of box).

How is the heat mat working for you? I'm about to get one of those. Would you put it on the bottom (with carboys on top) or affix it to the side of the fridge? I'm afraid the weight could cause problems. You know how things are made NOT to last nowadays.
 
Thanks for the compliments!

With regards to the heat mat, it puts out 17w (a bit low). My plan is to essentially use it as a cheap fermwrap, using two elastic bands and wrapping it long ways around the circumference of the 6.5gal Primary Bucket.

I bought another gasket for the thermowell and intend to drill another hole in the lid and slip the well through the top. This should give me a nice airtight seal, but position the sensor about halfway into the actual beer in the bucket.

I'll take a picture when I get that done, haven't been down to Adventures in Homebrewing to get another sacrificial lid. Don't want to leave it open while I drill and prep the current one!:D

Where did you get your thermowell and gasket? Does that work well? I just have mine taped to the outside of my bucket with a thick bunch of paper towels to insulate it. I like the thermowell idea.
 
Back
Top