
FuzzeWuzze
I Love DIY
Updated Build Info @ http://fuzzelogicbrewing.blogspot.com
So, after making this project i figure i would spend a bit of time documenting the process incase any one else was interested. It uses an Arduino and an ethernet shield to push data to the COSM service which is free, they handle all of the data and graphing for you automatically.
At the end of this project you will have a project that should output the data to COSM and be capable of creating graphs like this real time COSM graph of my Fermentation and Ambient temperatures. COSM is a very powerful tool for free, you can use it to get real time data of your temperatures anywhere you have internet access, and can even set up triggers to tweet/email you when certain things happen. For example i have it setup to email me if my fermentation temperatures ever get less than the yeast im using or too hot, which allows me to fix the problem ASAP. Also side note, it should tweet/email me should my house catch fire and the ambient gets > 110 lol, or if i leave my door open or something and it gets < 50F.
Note: This is REAL time, the image is built by COSM when you request it. The image you are seeing is what my setup is reading as of when you loaded this web page and the image loaded. If you reload the page it will give you a new graph with the updated data. The graphs are currently showing the last 24 hour period.
This is the feed you can also view
https://cosm.com/feeds/83208


Equipment Needed
A good place to get the UNO and Wiznet Ethernet shield is DealExtreme, for those not familiar with it, they produce cheap chinese knockoffs off stuff. But because Arduino is an open source project revolving around a single chip, there should be no fear in buying from them. The only downside is it can take upwards of 3-4+ weeks from ordering to get your products in the US. Take that into consideration, you can get the Uno and Wiznet Ethernet shield from other outlets, but at a much higher cost. Some people may be against the idea of supporting Chinese manufacturing, or just dont want to wait over a month to get everything...just make sure you get the Wiznet 5100 and not another Ethernet shield or the code here wont work.
Arduino UNO - $15.20

http://dx.com/p/arduino-uno-rev3-development-board-120464
Wiznet 5100 Ethernet Shield - $13.99

http://dx.com/p/ethernet-shield-with-wiznet-w5100-ethernet-chip-tf-slot-118061
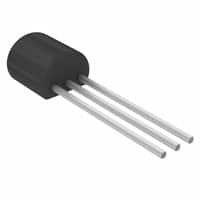
2 x Maxim DS18B20+ Temperature Sensors - ~$4.50 each.
You can find these at sites like Digikey or other electronics stores online, hunt around and you can find them at decent rates. I bought a bundle of 10 off Ebay for $20 dollars.
Wire
I bought some cheap 4 wire flexible thermostat wire from Lowes for 33c/foot. Its nice and thin and will fit down a thermowell but yet remain flexible...you can use any wiring you want as long as it will fit in your thermowell.
Thermowell - $14
You can use any you want, just make sure its not too long to fit into your bucket or carboy but to get a fair ways into your wort when its at the 5G marker.
http://www.brewershardware.com/16-Stainless-Steel-Thermowell.html
2x 4.7k Resistors - Cheap?
The DS18B20's require that you have a 4.7k resistor between the Data and Power pins in order to function.
5V Power supply - $1-2 dollars at any Goodwill/Salvation army, free if you have extra wall warts laying around that are 5V.
Phone charger USB connectors work as well, such as the standard one that comes with the iPhone or the Android versions

The USB connectors allow you to plug right into the USB port of the Arduino to get power. Otherwise for the 5v connector you need to plug in the jack, or cut the supply and solder it directly into the 5V and Ground connections on the Arduino, this allows you to pass their voltage regulator which IMO gets too hot for my liking.
Build
Start by wiring up the DS18B0's to your length of Thermostat or other wiring.
You need to wire your 4.7k resistor across the Data and Gnd pins, i usually do this at the end of the wire that goes into the arduino. A few inches above where im going to be plugging into the Arduino i strip/melt with soldering iron the wire jacket on both wires and solder the resistor between them.
Because the DS18B20's use OneWire, you need to ensure that both of your 'sensor cables' are soldered together in some fashion. The Gnd to Gnd, Power to Power, and Data to data. I found just twisting the two ends together with a third piece of wire(thats going to plug into the Arduino) and soldering them together worked quite well. You could probably even get away with cable twist connectors if your wire gauge is thick enough. Once you have the cables with sensors on them, its a good idea to somehow protect the DS18B20 leads so they dont touch. I found using a bit of hot glue works great, not to mention if you coat the sensor itself in a small layer of hot glue you can essentially make it water proof. Just dont put so much on you cant get it into your thermowell!
Install the Arduino development software off of their site, and connect your arduino via the supplied USB cable to your computer and make sure it all gets detected and installed properly.
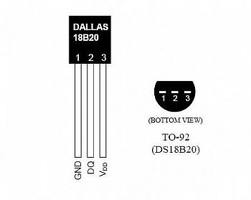
Hook your probe(s) up as follows to the Arduino
DS18B20 - Arduino
Data(Pin 2) - Digital Pin 3
Power(Pin 3) - 5V
Ground(Pin 1) - GND
Now close the Arduino software and download the Onewire Library here
http://www.hacktronics.com/code/OneWire.zip
And the DallasTemperature Library
http://www.hacktronics.com/code/DallasTemperature.zip
And the COSM Client
https://github.com/cosm/cosm-arduino/archive/master.zip
Extract these into the Arduino/Libraries folder..so you should have a Arduino/Libraries/OneWire, etc.
Next open the arduino software, in the settings make sure you set the Serial port the Uno USB drivers installed onto(Check device manager) and the device type to the Arduino UNO.
Copy and paste this code into the window
Save it, and wth your Arduino all plugged in with sensors and lit up, hit upload and make sure that it gets uploaded properly with no compile errors.
When it is complete, from the dropdown menu in the Arduino software select the Serial Monitor option. A new window will pop up and within a second or two it should print some text containing the Address's for any Sensors that are plugged in. If it pops up and shows no addresses, your sensors are not plugged in properly. Ensure all connections on both sides are right, use a Multimeter to help debug if you have one. Because the DS18B20's leads are so small it can be a pain to get them soldered without briding between leads.
Write down the addresses it gives you, these are the addresses you need to use in the later program for it to address your sensors on the onewire bus.
Next create a new program in arduino, and paste in this
I think the code is pretty easy to read and straight forward
First replace your Device Addresses with the ones i have in my code, you can add more sensors if you wish as well.
Next make an account on COSM and when logged on COSM create a Feed, in your Keys section(top right) you should be given an API Key, place that in the COSMKey variable
Next i dont think its necessary but not a bad idea, when the ethernet plugged into the arduino and linked, log into your router and find the mac address of your Wiznet module. It should be fine to use my MAC address, but using your own wouldnt hurt if you knew how.
Next name your Sensors, mine are just Ambient and FermSensor1, these names will be pushed to COSM automatically with your data so you dont need to make them within the COSM webpage. Dont use spaces, and some special characters might not work so stick to basic
Finally on this line
CosmFeed feed(<INSERT FEED HERE>, datastreams, 2);
Replace your Feed Number, and the last number is how many feeds you are pushing. So if you are using more than 2 sensors increase this number.
That should be everything! Save it and upload it and make sure it compiles, fix any errors you have or ask here if you have no clue what your doing.
You can check the Serial Monitor to see if its reading your probes properly, if it is you should be seeing data on your COSM feed!
If you are not seeing data, use the Debug area(Top right menu) on COSM. It will show you how many requests they are getting from you. By default this code should have about 20 updates per minute which is well under their maximum of 100. 5 Seconds is already way fast for updates
Thats it! Feel free to post questions here if you have any ill do my best to help!
So, after making this project i figure i would spend a bit of time documenting the process incase any one else was interested. It uses an Arduino and an ethernet shield to push data to the COSM service which is free, they handle all of the data and graphing for you automatically.
At the end of this project you will have a project that should output the data to COSM and be capable of creating graphs like this real time COSM graph of my Fermentation and Ambient temperatures. COSM is a very powerful tool for free, you can use it to get real time data of your temperatures anywhere you have internet access, and can even set up triggers to tweet/email you when certain things happen. For example i have it setup to email me if my fermentation temperatures ever get less than the yeast im using or too hot, which allows me to fix the problem ASAP. Also side note, it should tweet/email me should my house catch fire and the ambient gets > 110 lol, or if i leave my door open or something and it gets < 50F.
Note: This is REAL time, the image is built by COSM when you request it. The image you are seeing is what my setup is reading as of when you loaded this web page and the image loaded. If you reload the page it will give you a new graph with the updated data. The graphs are currently showing the last 24 hour period.
This is the feed you can also view
https://cosm.com/feeds/83208
Equipment Needed
- Arduino Uno
- Wiznet 5100 Ethernet Shield
- 2 x DS18B20 Temperature Sensors
- Wire
- Solder
- 2 x 4.7K Resistors
- 5V Power Supply OR SmartPhone USB Wall Charger(come with most smart phones now)
A good place to get the UNO and Wiznet Ethernet shield is DealExtreme, for those not familiar with it, they produce cheap chinese knockoffs off stuff. But because Arduino is an open source project revolving around a single chip, there should be no fear in buying from them. The only downside is it can take upwards of 3-4+ weeks from ordering to get your products in the US. Take that into consideration, you can get the Uno and Wiznet Ethernet shield from other outlets, but at a much higher cost. Some people may be against the idea of supporting Chinese manufacturing, or just dont want to wait over a month to get everything...just make sure you get the Wiznet 5100 and not another Ethernet shield or the code here wont work.
Arduino UNO - $15.20
http://dx.com/p/arduino-uno-rev3-development-board-120464
Wiznet 5100 Ethernet Shield - $13.99
http://dx.com/p/ethernet-shield-with-wiznet-w5100-ethernet-chip-tf-slot-118061
2 x Maxim DS18B20+ Temperature Sensors - ~$4.50 each.
You can find these at sites like Digikey or other electronics stores online, hunt around and you can find them at decent rates. I bought a bundle of 10 off Ebay for $20 dollars.
Wire
I bought some cheap 4 wire flexible thermostat wire from Lowes for 33c/foot. Its nice and thin and will fit down a thermowell but yet remain flexible...you can use any wiring you want as long as it will fit in your thermowell.
Thermowell - $14
You can use any you want, just make sure its not too long to fit into your bucket or carboy but to get a fair ways into your wort when its at the 5G marker.
http://www.brewershardware.com/16-Stainless-Steel-Thermowell.html
2x 4.7k Resistors - Cheap?
The DS18B20's require that you have a 4.7k resistor between the Data and Power pins in order to function.
5V Power supply - $1-2 dollars at any Goodwill/Salvation army, free if you have extra wall warts laying around that are 5V.
Phone charger USB connectors work as well, such as the standard one that comes with the iPhone or the Android versions
The USB connectors allow you to plug right into the USB port of the Arduino to get power. Otherwise for the 5v connector you need to plug in the jack, or cut the supply and solder it directly into the 5V and Ground connections on the Arduino, this allows you to pass their voltage regulator which IMO gets too hot for my liking.
Build
Start by wiring up the DS18B0's to your length of Thermostat or other wiring.
You need to wire your 4.7k resistor across the Data and Gnd pins, i usually do this at the end of the wire that goes into the arduino. A few inches above where im going to be plugging into the Arduino i strip/melt with soldering iron the wire jacket on both wires and solder the resistor between them.
Because the DS18B20's use OneWire, you need to ensure that both of your 'sensor cables' are soldered together in some fashion. The Gnd to Gnd, Power to Power, and Data to data. I found just twisting the two ends together with a third piece of wire(thats going to plug into the Arduino) and soldering them together worked quite well. You could probably even get away with cable twist connectors if your wire gauge is thick enough. Once you have the cables with sensors on them, its a good idea to somehow protect the DS18B20 leads so they dont touch. I found using a bit of hot glue works great, not to mention if you coat the sensor itself in a small layer of hot glue you can essentially make it water proof. Just dont put so much on you cant get it into your thermowell!
Install the Arduino development software off of their site, and connect your arduino via the supplied USB cable to your computer and make sure it all gets detected and installed properly.
Hook your probe(s) up as follows to the Arduino
DS18B20 - Arduino
Data(Pin 2) - Digital Pin 3
Power(Pin 3) - 5V
Ground(Pin 1) - GND
Now close the Arduino software and download the Onewire Library here
http://www.hacktronics.com/code/OneWire.zip
And the DallasTemperature Library
http://www.hacktronics.com/code/DallasTemperature.zip
And the COSM Client
https://github.com/cosm/cosm-arduino/archive/master.zip
Extract these into the Arduino/Libraries folder..so you should have a Arduino/Libraries/OneWire, etc.
Next open the arduino software, in the settings make sure you set the Serial port the Uno USB drivers installed onto(Check device manager) and the device type to the Arduino UNO.
Copy and paste this code into the window
Code:
// This sketch looks for 1-wire devices and
// prints their addresses (serial number) to
// the UART, in a format that is useful in Arduino sketches
// Tutorial:
// http://www.hacktronics.com/Tutorials/arduino-1-wire-address-finder.html

#include <OneWire.h>

OneWire  ds(3);  // Connect your 1-wire device to pin 3

void setup(void) {
  Serial.begin(9600);
  discoverOneWireDevices();
}

void discoverOneWireDevices(void) {
  byte i;
  byte present = 0;
  byte data[12];
  byte addr[8];

  Serial.print("Looking for 1-Wire devices...\n\r");
  while(ds.search(addr)) {
    Serial.print("\n\rFound \'1-Wire\' device with address:\n\r");
    for( i = 0; i < 8; i++) {
      Serial.print("0x");
      if (addr[i] < 16) {
        Serial.print('0');
      }
      Serial.print(addr[i], HEX);
      if (i < 7) {
        Serial.print(", ");
      }
    }
    if ( OneWire::crc8( addr, 7) != addr[7]) {
        Serial.print("CRC is not valid!\n");
        return;
    }
  }
  Serial.print("\n\r\n\rThat's it.\r\n");
  ds.reset_search();
  return;
}

void loop(void) {
  // nothing to see here
}
Save it, and wth your Arduino all plugged in with sensors and lit up, hit upload and make sure that it gets uploaded properly with no compile errors.
When it is complete, from the dropdown menu in the Arduino software select the Serial Monitor option. A new window will pop up and within a second or two it should print some text containing the Address's for any Sensors that are plugged in. If it pops up and shows no addresses, your sensors are not plugged in properly. Ensure all connections on both sides are right, use a Multimeter to help debug if you have one. Because the DS18B20's leads are so small it can be a pain to get them soldered without briding between leads.
Write down the addresses it gives you, these are the addresses you need to use in the later program for it to address your sensors on the onewire bus.
Next create a new program in arduino, and paste in this
Code:
#include <Cosm.h>
#include <CosmClient.h>
#include <CosmDatastream.h>
#include <CosmFeed.h>
#include <CountingStream.h>

#include <b64.h>
#include <HttpClient.h>

#include <OneWire.h>
#include <DallasTemperature.h>
#include <SPI.h>
#include <Ethernet.h>

//Defines for DS18B20
#define ONE_WIRE_BUS 3
OneWire oneWire(ONE_WIRE_BUS);
DallasTemperature sensors(&oneWire);
DeviceAddress Sensor1 = {
0x28, 0xA9, 0x31, 0x98, 0x03, 0x00, 0x00, 0x84};
DeviceAddress Sensor2 = {
0x28, 0xA8, 0xE5, 0x97, 0x03, 0x00, 0x00, 0x68};
//End Defines for DS18B20

//Defines for COSM Ethernet
char cosmKey[] = "ENTER YOUR COSM KEY HERE";
byte mac[] = {
  0x00, 0x1D, 0x0D, 0x2C, 0x55, 0x3D};

EthernetClient client;
CosmClient cosmclient(client);

//End Defines for COSM Ethernet
double s1 = 0;
double s2 = 0;


#define MYDELAY 5000
char sensor1Id[] = "FermSensor1";
char sensor2Id[] = "Ambient";

CosmDatastream datastreams[] = {
  CosmDatastream(sensor1Id, strlen(sensor1Id), DATASTREAM_FLOAT),
  CosmDatastream(sensor2Id, strlen(sensor2Id), DATASTREAM_FLOAT)};

CosmFeed feed(<INSERT FEED ID HERE>, datastreams, 2);

void setup(void)
{
  // start serial port
  Serial.begin(9600);
  SetupSensors();

  while (Ethernet.begin(mac) != 1)
  {
    Serial.println("Error getting IP address via DHCP, trying again...");
    delay(15000);
  }
}

void SetupSensors()
{
  sensors.begin();
  // set the resolution to 10 bit (good enough?)
  sensors.setResolution(Sensor1, 12);
  sensors.setResolution(Sensor2, 12);
}


float getTemperature(DeviceAddress deviceAddress)
{
  //Get temperature, convert to Fahrenheit, and return
  return DallasTemperature::toFahrenheit(sensors.getTempC(deviceAddress));
}

void loop(void)
{
  SensorLoopAndSend();
}


void SensorLoopAndSend()
{
  sensors.requestTemperatures();
  s1 = getTemperature(Sensor1);
  s2 = getTemperature(Sensor2);
  Serial.print("S1: ");
  Serial.println(s1);
  Serial.print("S2: ");
  Serial.println(s2);
  datastreams[0].setFloat(s1);
  datastreams[1].setFloat(s2);
  int ret = cosmclient.put(feed, cosmKey);
  delay(MYDELAY);
}
I think the code is pretty easy to read and straight forward
First replace your Device Addresses with the ones i have in my code, you can add more sensors if you wish as well.
Next make an account on COSM and when logged on COSM create a Feed, in your Keys section(top right) you should be given an API Key, place that in the COSMKey variable
Next i dont think its necessary but not a bad idea, when the ethernet plugged into the arduino and linked, log into your router and find the mac address of your Wiznet module. It should be fine to use my MAC address, but using your own wouldnt hurt if you knew how.
Next name your Sensors, mine are just Ambient and FermSensor1, these names will be pushed to COSM automatically with your data so you dont need to make them within the COSM webpage. Dont use spaces, and some special characters might not work so stick to basic
Finally on this line
CosmFeed feed(<INSERT FEED HERE>, datastreams, 2);
Replace your Feed Number, and the last number is how many feeds you are pushing. So if you are using more than 2 sensors increase this number.
That should be everything! Save it and upload it and make sure it compiles, fix any errors you have or ask here if you have no clue what your doing.
You can check the Serial Monitor to see if its reading your probes properly, if it is you should be seeing data on your COSM feed!
If you are not seeing data, use the Debug area(Top right menu) on COSM. It will show you how many requests they are getting from you. By default this code should have about 20 updates per minute which is well under their maximum of 100. 5 Seconds is already way fast for updates
Thats it! Feel free to post questions here if you have any ill do my best to help!
") but I was looking for the bare minimum to do it to just see temperatures and not have to host my own webserver and have to worry about maintaining that whole thing
but I was looking for the bare minimum to do it to just see temperatures and not have to host my own webserver and have to worry about maintaining that whole thing 


