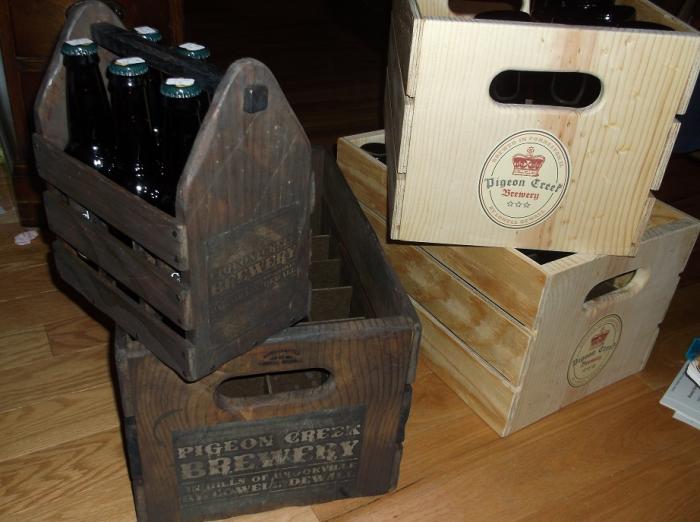
DIY Wooden Beer Bottle Crate

Homebrew Talk - Beer, Wine, Mead, & Cider Brewing Discussion Forum

Help Support Homebrew Talk - Beer, Wine, Mead, & Cider Brewing Discussion Forum:

This site may earn a commission from merchant affiliate links, including eBay, Amazon, and others.

Jeepninja

Well-Known Member
Joined
Jan 24, 2011
Messages
49
Reaction score
3
Location
Keene
I play for the scenario paintball team Pub Crawling and with a name like that we know our way around a pint or two.

I looked for plans to make wooden bottle crates to hold beer and couldn't really find what I was after. So I incorporated a few of the best ideas that met my needs from all of them and this is what I came up with.

These crates are super simple to make and very cheap as well. It only takes about $20 and 2-3 hours to make two of them. So probably only $10 and 1-2 hours if you're lazy. The majority of my time was spent taking pictures of the process though. And I'm not exactly a great woodworker or anything. So I'm sure someone with half a clue could make them faster/better.

I put up instructions on instructables and hope to get around to draw out detailed plans soon.

http://www.instructables.com/id/Wooden-Beer-Bottle-Crate/

Enjoy!

DSC_1393.jpg
 
Looks good. I've been keeping mine in the basement in cardboard boxes. It's a little damp in the basement so the cardboard is starting to go. I was thinking about making some wooden boxes like these. maybe in a 24 bottle option.
 
Nice work. I'd only modify it slightly. I'd put a rabbit on the short sides, and another dado groove on the inside faces of your long pieces. This way it all inter locks, gets you a nice strong joint, and more glue face. Plus you won't need the screws!

Only other thing was making your dividers. Batch up the same length pieces, and tape them together. That way when you make your cuts, they are the same cuts for all like sized pieces. A) cuts down on your time, B) ensures the cuts are all in the same place.

Nice looking job!
 
those look great, i can imagine that in my slightly damp basement they would need a layer of waterproofing varnish. It would be nice to have a bunch of those full of beers and wines to age long term, a cool thing to pull out of the dusty dark recesses of your booze storage area.
 
Nice work. I'm getting ready to make a bunch of cases myself now that the weather has turned to crap and I can play in the wood shop instead of on the tractor mowing grass. All the cardboard cases only last so long. A few years ago, I made cases for my bombers. Now it's time for 16 oz flip top and 12 oz cases.
 
Do bombers fit? I've been thinking about building some crates like this for beers/ciders that I put in 16-22 oz bottles.
 
Nice work. I'd only modify it slightly. I'd put a rabbit on the short sides, and another dado groove on the inside faces of your long pieces. This way it all inter locks, gets you a nice strong joint, and more glue face. Plus you won't need the screws!

Only other thing was making your dividers. Batch up the same length pieces, and tape them together. That way when you make your cuts, they are the same cuts for all like sized pieces. A) cuts down on your time, B) ensures the cuts are all in the same place.

Nice looking job!

That's a really good idea on the rabbits! I tried doing finger joints but that required far more skill and precision that I was capable of. So I opted for easy to assemble.

I did try cutting the dividers all at the same time. The biggest issue I ran into was that the angle of attack on the dado blade meant that the dividers on the bottom of the stack would be cut deeper than the dividers on the top. If I had removed the insert plate I might have been able to put the blade up all the way and gotten more of a straight on cut. I opted for the simple way out. I am considering counter sinking some screws and using wood plugs. We'll see.
 
Looks good. I've been keeping mine in the basement in cardboard boxes. It's a little damp in the basement so the cardboard is starting to go. I was thinking about making some wooden boxes like these. maybe in a 24 bottle option.

I was having that same problem. The carboard just never holds up more than a few weeks. I thought about doing 24 bottles ones but opted for the easier to move 12 bottle versions.
 
OK you inspired me. I used the 12" pine for the ends and used some 1" x 4" cedar I had in the shop for the sides. I also went for 24 instead of 12. Thanks for the great instructions!

abeercases1.jpg


abeercases2.jpg
 
OK you inspired me. I used the 12" pine for the ends and used some 1" x 4" cedar I had in the shop for the sides. I also went for 24 instead of 12. Thanks for the great instructions!

Those are NICE!

I like the open sides.

Incidentally my plans made the front page of Instructables, seems the editors liked it.
 
I got so much positive feedback that I entered it into the Epilog Laser contest!

http://www.instructables.com/contest/epilog4/?show=ENTRIES

Please vote for me! If you Vote for me and if I win I can burn/melt things!

I'm working on detailed plans right now. I'm also going to try my hand at the rabbet idea as well as making some 24 packs.

To those who asked about bombers or larger bottles, these plans won't fit a bottle that size. You'd have to scale it up a bit to do that. You could also use Big Jim's idea of two planks instead of buying a larger/more expensive board.
 
Actually, I wonder if I could get any decent wood out of the pallets we use at work. We always have a stack that aren't good enough to ship parts with.
 
Nice, but where are the hand cut dovetails? ;)

I actually did a test box trying dado cut finger joints. It required far too much precision for my very meager wood working skills. I believe that a router with a dovetail jig is a far better way to make them.

I was looking for quick, simple, easy and cheap. Dovetails, especially hand cut ones are none of those things for me.

I'm lucky I even kept all my fingers and didn't get a splinter.
 
Actually, I wonder if I could get any decent wood out of the pallets we use at work. We always have a stack that aren't good enough to ship parts with.

I really wanted to use reclaimed pallet lumber like that, but we didn't have any at work. I also tried to split up some old deck boards but ripping boards on a table saw with a wobbly fence was no fun either. If I had a bandsaw it would be a different story... or even a planer because then I could plane them down to width.
 
I did try cutting the dividers all at the same time. The biggest issue I ran into was that the angle of attack on the dado blade meant that the dividers on the bottom of the stack would be cut deeper than the dividers on the top. If I had removed the insert plate I might have been able to put the blade up all the way and gotten more of a straight on cut.
I'm not following, how did you cut your dado's? You didn't have these standing up against a fence on your miter gauge? It should have been a simple/easy through cut.
 
I'm not following, how did you cut your dado's? You didn't have these standing up against a fence on your miter gauge? It should have been a simple/easy through cut.

No they were laying down. I tried to do them standing up but couldn't get the blade high enough. Laying down, removing the table saw blade insert, or using a zero clearance insert were my only options.... I opted for laying the dividers down.

Cutting them all at once in one pass standing up is far more efficient than what I did.

ahhhh, make sense now. How tall were your dividers? I figured you wouldn't need them so tall that an 8" dado couldn't handle it. Really just need them to hold each bottle in it's own "space", since the wood is blocking all the light. And you should be able to get a throat plate for your dado set. Obviously not a ZCI, but should handle the job. If you're worried about tearout, you can screw a piece of scrap to your miter gauge. Same concept as a follow block on a router table.
 
ahhhh, make sense now. How tall were your dividers? I figured you wouldn't need them so tall that an 8" dado couldn't handle it. Really just need them to hold each bottle in it's own "space", since the wood is blocking all the light. And you should be able to get a throat plate for your dado set. Obviously not a ZCI, but should handle the job. If you're worried about tearout, you can screw a piece of scrap to your miter gauge. Same concept as a follow block on a router table.

That certainly sounds like the correct way to do it. I am admittedly a hack. Also I didn't have either a ZCI or a throat plate for this particular Dado set. The table saw is a hand me down and has been in the family for about 30 years. I just got it and this was my first project on it. I'm still trying to square it up and level the table.
 
No worries! Do you have a router table? A trick to making ZCI on the cheap is to double tape a piece of MDF/BB plywood to your current throat plate. Then flush trim bit to the throat plate. Then put the ZCI in it's place, run a clamp over the top of the ZCI, and slowly raise your blade up into it. That all said, you probably can find a dado throat plate for you TS. Check out woodcraft, or probably amazon. As long as you know your model number you'd be surprised at how little things have changed in the past 50 years!

And now knowing this is your first project, even more impressed! Cheers!
 
Wow. Those cases are beautiful guys. Impressive.

I've made some wooden cases but they are more for functionality than aesthetics. Frankly, they are ugly, but they definitely get the job done. I have no woodworking skills or storage space. All I had was some plywood from a friend, a power drill, and a circular saw.

I made 3 smaller cases that hold 24 12-oz bottles each. For the dividers on those, I just re-used 4 six-pack holders.

I also made 2 larger cases that hold 20 22-oz bottles each. For the dividers on these, I just used cardboard that I cut up roughly with a box cutter and puzzled together.

7219-crate-holds-20-22-oz-bottles-little-bit-leeway-other-sizes.jpg

7220-just-used-cardboard-make-dividers.jpg


I decided to also post a picture of the cheap and easy shelving that I made for storage. Wife and I live in a really small 2-bedroom townhome and we have basically zero storage. I've transformed the guest room closet into my beer storage, complete with beer mini-fridge. I was doing the thing where I had them all in cardboard cases stacked in the closet, but then I could never access the beer without taking everything out just to get one beer. These cases slide easily in and out of the shelving so I can just get one or two beers out and to supply the beer fridge.

7218-closet-crates-shelves.jpg
 
Very nicely done; I made a boxjoint jig, and will use that on the corners, which should look really cool, and be super strong. I'd think pine would need to be fairly thick, 5/8" or better to avoid risk of splitting. I might use 3/8 to 1/2" plywood (more stable w/ varied humidity and strong grain both directions), or glued up hardwood scraps. Where did you get that rope? Great idea that avoids LIGHT that other slot style handles allow to leak in.
Mark

The rope is just a plain hemp rope. Should be available from any hardware store. I got a router last year and have been trying different projects with it (just finished trimming a newly installed window with curly fiddleback maple). Dovetails are my next challenge to tackle.
 
Built 4 of these this past weekend in a 24 bottle version, I'm really happy with them, just wanted to say thanks for the inspiration!

Only made a slight change: I glued a piece of 1/4" dowel to the lid to use as a handle rather than drilling a hole.

Crates.JPG
 
Built 4 of these this past weekend in a 24 bottle version, I'm really happy with them, just wanted to say thanks for the inspiration!

Only made a slight change: I glued a piece of 1/4" dowel to the lid to use as a handle rather than drilling a hole.

Do you remember the measurements for the 24 bottle version?
 
Do you remember the measurements for the 24 bottle version?

Long board: 18-1/2 x 11-3/4
Short board: 11-1/4 x 11-3/4
Bottom panel: 17-3/8 x 11-5/8
Top panel: 17-3/4 x 11-5/8
Groove inset: 1/2 (dado starts at 1/2" from edge of board)

Internal separators (long): 16-15/16 x 4-1/2
Internal separators (short): 11-3/16 x 4-1/2
 
Do bombers fit? I've been thinking about building some crates like this for beers/ciders that I put in 16-22 oz bottles.

This is exactly what I was thinking! Might need some updated specs. My stepdad just moved about a mile away from me and is an incredible woodworker, so I'm about to get motivated and learn. This gives me something very functional for my life to learn on!
 
Back
Top