BLING BLING Electric HERMS Conversion

Homebrew Talk - Beer, Wine, Mead, & Cider Brewing Discussion Forum

Help Support Homebrew Talk - Beer, Wine, Mead, & Cider Brewing Discussion Forum:

This site may earn a commission from merchant affiliate links, including eBay, Amazon, and others.
stupid question I'm sure, is there any concern of the element scorching the wort since it's in direct contact during the boil?

I am using an ULTRA low watt density element in the BK... it is a Ripple 5500W element. It is only about 50W/sq in.
 
These ULWD 5500W/240V Ripple elements are a ***** to find too it seems. I can't seem to find any place that'll ship to Canada!

Kal
 
Oh, Canada... OH CANADA...

I will buy you one and deliver it when I fly up to Canada again... then again, you will have to pay for my services ;)
 
pol,
is there a pic of the inside of the control panel on this thread?
i would like to see how you situated everything.

DSCN0979.jpg


NOTE: I rotated the 120VAC outlets 90 degrees... the UPPER RIGHT is where the 30A Dryer Outlet is situated (not shown here)
 
Pol -

What's the difference between an SSR and SSRD? My understanding is that an SSRD contains two independed SSRs in one chassis. Could you control two heating elements using the same SSR or is it more to kill both legs of the 240?

Reason I ask is that I'm a bit confused on the electrical aspect. Say I have a heating element in my HLT (240V 5500w) and want to control it via an SSR. But when the SSR is off - I don't want any power going to the element. Will a standard SSR do that? Or is there always 1 hot to the element even if the SSR is off? I guess another way of asking the same question, if I use a standard SSR and it's off - will the heating element still be partially heating? Sorry for such a newbie questions.

An SSRD is two SSR's in one package. It's used to kill both legs of the 240V to ensure that the element isn't getting any power if case something goes wrong and you short something out by mistake.

Pol's element isn't heating with a single SSR and the circuit is cut, it's just that the element is still 'active' or hot.

Kal
 
Pol's element isn't heating with a single SSR and the circuit is cut, it's just that the element is still 'active' or hot.

The DPST is used to completely cut the power. That's how mine is done, as well. If the switches are one, I treat it just like it's live. I don't directly put my hand in there, etc., I use a spoon. It's grounded and GFCI protected, but I don't take any chances if the switch is on. If the switch is off, then treat it a little less paranoid. I have lockable switches and also set my PID's to manual 0% when I'm cleaning because I still have power to my rig for pumps when I'm cleaning and the PID's are on the same circuit.
 
An SSRD is two SSR's in one package. It's used to kill both legs of the 240V to ensure that the element isn't getting any power if case something goes wrong and you short something out by mistake.

Pol's element isn't heating with a single SSR and the circuit is cut, it's just that the element is still 'active' or hot.

Kal

I have DPST that cuts power to BOTH legs, it is covered in this thread. The DPST sends power OUT to the SSR and to the OUTLET. Cheaper than an SSRD... by a long shot. Also, it allows me to turn off the element no matter what the PID is commanding.
 
Pol -

What's the difference between an SSR and SSRD? My understanding is that an SSRD contains two independed SSRs in one chassis. Could you control two heating elements using the same SSR or is it more to kill both legs of the 240?

Reason I ask is that I'm a bit confused on the electrical aspect. Say I have a heating element in my HLT (240V 5500w) and want to control it via an SSR. But when the SSR is off - I don't want any power going to the element. Will a standard SSR do that? Or is there always 1 hot to the element even if the SSR is off? I guess another way of asking the same question, if I use a standard SSR and it's off - will the heating element still be partially heating? Sorry for such a newbie questions.

The SSR will only cut ONE leg. Your element will not be heating, but there will still be current at the element.
I decided to use a 30A DPST switch to cut BOTH hots for this reason. Also, the DPST switch allows me to cut power to the element no matter what my PID is commanding. As stated in this thread, the DPST switch cuts power to the SSR and it cuts the other leg that goes directly to the outlet.
It is much cheaper than buying an SSRD AND it allows you to cut power to the element NO MATTER what the PID commands.

By doing this I can leave my PID powered, simply TURN OFF my element 100% dead with the DPST switch and use the PID to monitor cooling when I am chilling the wort.

Many of these questions are answered previously in this thread.
 
Thanks, it all makes sense now. Just wanted to make sure the element was not heating. I'm planning on using the DPST switches as well.
 
Thanks, it all makes sense now. Just wanted to make sure the element was not heating. I'm planning on using the DPST switches as well.

It is a good idea I think. I can power up my panel, the PID is alive, but there is no concern about the element heating until I want it to. Then I flip the switch. I got the switch for like $10 or so... been playing with this thing on and off... I love it. No more connecting and disconnecting plugs to turn things on and off!
 
I have DPST that cuts power to BOTH legs, it is covered in this thread. The DPST sends power OUT to the SSR and to the OUTLET. Cheaper than an SSRD... by a long shot. Also, it allows me to turn off the element no matter what the PID is commanding.
Yes of course. A switch like this is a great idea. I'll be doing the same. The difference however is that when the PID is turning the SSR on/off to fire the element, even when the PID isn't sending a signal to the SSR the element will still 'see' one leg (120V). During this time you'll have that switch ON of course since you'll be brewing.

It's 100% a safety issue. Most people don't worry about it but I just wanted to still point it out as others have done the same.

An SSRD makes 100% sure that when the PID tells the element to be OFF, it's completely OFF on both legs. You don't have to know to flick a switch to make sure that there is no power being fed to the element. You should unplug the entire assembly completely from the wall whenever you work on it too of course, but an SSRD just give you that 'correctness' that truly nothing is being fed to the element when the PID says the element should be off.

I don't plan on using an SSRD myself (just an SSR) but it's important to point out the difference I think.

Kal

Not that I'm going to, but is it feasible to use two SSRs in configuration to achieve the same thing? Seeing that you can get a 40A SSR for $19 and a 40A SSRD runs $100 - would be a good solution if it works for those of us that want to be uber safe.
 
It's 100% a safety issue.

Well...
<slight sarcasm>
We are boiling water/wort in a big metal pot, with 240V going right into the side of said pot while often putting various things (metal spoons, fingers, etc.) into the pot. Let's face it, we are all in the running for a Darwin award.
</sarcasm>

The whole one leg vs two, SSR vs SSRD argument always makes me chuckle because everyone talks about the "safety" issue. I've heard some folks say they will only use mechanical relays for safety reasons, as well.

With a DPST it's easy. Switch "on" - don't mess with the element or anything.

(Sorry, the whole SSRD "safety" argument just gets on my nerves. It generally comes up at least once in an electric brewing thread.)
 
I personally trust myself to turn OFF a DPST switch more than I trust that my PID is correctly configured to NOT turn the element on when I dont want it on. Personally.
 
Not that I'm going to, but is it feasible to use two SSRs in configuration to achieve the same thing? Seeing that you can get a 40A SSR for $19 and a 40A SSRD runs $100 - would be a good solution if it works for those of us that want to be uber safe.

Yup. Works fine. Need two heat sinks too. As I said most people don't bother. I won't either, but again it needs to be pointed out that it's probably the "right" way to do things (regardless of how crazy it is to do what we do :)).

Kal
 
Dont try stuffing anymore components into this box... in fact I would recommend getting the 12x12x8 junction box to build THIS control panel. It is not necessary, but the wiring and such gets really crowded in there. There is no more than .5"-1" of space between these components, so be prepared to test your dexterity building this one.
It looks small, clean and sexy, but it is a bowl of spaghetti inside.

Pol
 
Any hardware store. Lowes, Home Depot, Menards... etc. The larger boxes start at about $33... this one was still $23

Some may be wondering how I mounted my SSR and heatsink.... here is how.

Due to the size of this box, and my desire to allow air to pass around the heatsink I mounted it externally while the SSR is internally mounted.

I measured and cut a rectangular hole that would accomodate the base of the SSR through the back of the box. Taking into consideration the footprint of the heatsink as well. The hole was cut with a jigsaw and the heatsink was epoxied to the back of the box centered on the SSR hole. I then ran a small bead of caulk around the edges of the heat sink to make it nice and neat as well as seal out the elements. INSIDE the box I then wired my SSR and mounted it to the heat sink through the hole that I had cut into the back of the box. This allows for a nice clean install inside, and allows the heatsink ample air flow to help cool the SSR.
 
Any hardware store. Lowes, Home Depot, Menards... etc. The larger boxes start at about $33... this one was still $23
Thanks. Strange, but here they only seem to have boxes up to about 12" square. Maybe special order is required...

Some may be wondering how I mounted my SSR and heatsink.... here is how.
I was wondering that myself after I saw this picture:

DSCN0987-1.jpg


I don't see any bolts extending to the outside of the box to hold the sockets in place. What am I missing?

Kal
 
You are missing the bolts, there are none to hold them in. This box is SO small and compact that the flanges were cut off the outlets almost entirely. The outlets are affixed using dots of JB Stik on the edges. It holds them solid as a rock... if I ever need to remove the outlets (dunno why I would now) I can use my Dremel and grind it off.
Not only is there NOT room for outlet mounting flanges, there is also NO ROOM for outlet cover plates as you can see. The holes were cut precisely to fit the face of the outlets, epoxied in place, then sealed with caulk. Compact and clean.

The largest box at Lowes was 12x12x6.... mine is 8x8x4.
 
OK. I get it. You mentioned that one of the lessons learned was for everyone else to use a larger box. I would really recommend that. Use a larger box that doesn't require modification to the parts and lets them use them mount them using bolts.

This would give people room for some weatherproof outlet and switch covers (only ~$2 each) too:

pACE2-982824reg.jpg


5121-0.jpg


I've been perusing ebay and larger Johnson or Lee metal NEMA enclosed boxes (16x16x8 or 20x24x8 for example) start pretty cheap too. Another option.

Kal
 
Using a larger box would be good for most ppl. I intentionally went small... but if you want to NOT modify components, you need a much larger box.

Nothing will protect an outlet from getting water in it after the cover is open and a plug is installed though.
 
The other advantage of a bigger electrical enclosure (I didn't want to say advantage of a bigger box:D) is heat dissipation. I am in the process of deciding whether to add a fan to my enclosure. I have used it for about two years and have never noticed the enclosure even being warm. My enclosure is metal and 20" X 16" x 8". But I have two 40 amp SSRs controlling two 4500 watt elements. I have doubled my batch size so my SSRs will be more continuously "on". I used to boil on 65% power and now I boil on 85-90% power. I found this link on the Hoffman website that states that heat dissipation is primarily dependent on the surface area of the enclosure:

http://www.hoffmanonline.com/stream_document.aspx?rRID=16169&pRID=16168

POL: I would carefully monitor the temp of your enclosure. It could get quite warm and it is plastic.
 
Prediction for 2009: Pol's next project

Convert keg into HLT and add a 240 VAC element than can be plugged into his new electrical system. He can use the PID for control, heat his water much faster and do 10 gallon batches...

You photo documentation and initiation of discussion has been great for the board!
 
I have had a few test runs and the enclosure has stayed cool to the touch. I have boiled water for an hour or so and the enclosure remains cool. The external heat sink gets warm to the touch, but that is all.

The box is a NEMA junction box, the "plastic" is extremely heavy duty. I personally dont have any concerns about the one SSR creating too much heat seeing as though it has a large external heat sink.

I know I say this EVERY YEAR... but I think my system is complete. Right now I have the ultimate in process temperature control. I am LP free! I have switches to turn components ON and OFF instead of unplugging outlets around copious ammounts of water.

I have thought MANY times about doing 10 gallon batches, but I won't, it is my personality. I like MANY different types of beer, and I LOVE to brew... but you have to realize that I am away from home for half the month, never even returning to sleep... so it takes me at least 6 weeks to kick a keg. This means that I will get to brew (8) brews each year... if I start brewing 10 gallon batches, that limits me to (4) types of beer each year. Considering that I brew three seasonals alone... you can see where I am going with this. If I knew of people near me that had draft systems, I would gladly brew and fill some kegs for them, but I just cannot consume enough.

I love the 5 gallon batches, when the keg is gone, I am ready for something new. I also want to experiment with more than (1) new brew each year, so 10 gallon batches are not for me. I will however be doubling my number of taps on my kegerator this summer.
 
Man thats a sweet setup, thanks for sharing. I saved the thread to my favorites dont really all understand it yet as i just sort of skimmedover it but being in an apt i have enough room would be great to set something up to do full boils inside so im definatly gonna refernce this when i get that stage of setup. Thanks again.
 
POL: I hear what you're saying, but when I started building my system I also could not see going larger than 5 gallons.
My last batch was 35 gallons. My system grew when I had 3 kids in college and they would bring several friends home for the weekend. It was like having a plague of locusts - kegs would blow dry left and right. I have also acquired a couple of brew partners along the way...
Anyhow, even if you don't choose to go to 10 gallon batches, you could easily do it with the capabilities of your current system.
 
Oh, true true... the 10 gallon capability is there. My kids will be in college in 13 and 19 years... so I suppose I have ample time to upgrade my HLT to accomodate that ;)

It has come a long way from (2) 5 gallon coolers sitting on my countertop in the old house, heating water on the stove top. My main goal was affordability and repeatability. I am pleased with the morphing of the brew beast.
 
Man thats a sweet setup, thanks for sharing. I saved the thread to my favorites dont really all understand it yet as i just sort of skimmedover it but being in an apt i have enough room would be great to set something up to do full boils inside so im definatly gonna refernce this when i get that stage of setup. Thanks again.

If you can use a dryer outlet or something of that nature in the apartment, youd be golden, otherwise, you will need to find a source for your 240VAC.
 
I have thought MANY times about doing 10 gallon batches, but I won't, it is my personality. I like MANY different types of beer, and I LOVE to brew...
Easy solution: Throw more parties/have more drunkard friends. (Works for me). ;)

Kal
 
My friends and I are all pilots, hard to organize parties.....
 
well I decided to go electric for my HLT and boil kettle today (Was planning on natural gas since it was right nearby as well, but I'm building this in my basement so electric has less chance of burning down the house)

I've read both of the threads on this subject (both really long!) and will be setting up a similar system. I'm going to buy one PID/SSR combination and add a heat sink/fan from an old pentium 2 processor.

I plan on having the thermocouple in the HLT only as the boil kettle can be controlled in manual mode, then I can just switch which element is plugged in to the back of the box when I switch over to boil from bringing the HLT up to temp. This option was mentioned in the previous loooong thread.

Anyway I have been looking through differnt PIDs and trying to find out how you actually set one on manual? The specs on these things are really difficult to read sometimes. What setting am I changing to be able to set the percentage? I don't have a PID in my hands yet so it may be obvious when I do get one...

Also do you power your PID with the same 240V line as the element, or did you use just one leg of it? Did you run more than the one #10 wire to your control box?

I'll also try to get pictures of my setup when in progress/done I plan on using a rubber covered miller keg with the top cut out for either the boil kettle or the HLT. Both will have the 5500 watt 240V element that Pol used.

Thank you so much for this write Pol, it will make it so much easier for me to put something together.

Looking at this auction
http://cgi.ebay.com/PID-Temperature-Controller-Fah-Celsius-40A-SSR_W0QQitemZ200294956655QQcmdZViewItemQQptZBI_Automation_Components?hash=item200294956655&_trksid=p3286.c0.m14&_trkparms=72%3A1205|66%3A2|65%3A12|39%3A1|240%3A1318|301%3A1|293%3A1|294%3A50
 
Anyway I have been looking through differnt PIDs and trying to find out how you actually set one on manual?

I've only used the Auber PID's and it's very easy to set to manual mode, just press the A/M button. I think I had to change an option in the setup to do that, but it is all in the manual. I guessing (?) others may be similar.

As for heatsinks, Auber at least sells a heatsink that was made for their SSR's and just needs ambient air, no fan necessary. I don't work for Auber, just a very satisfied customer.
 
well I decided to go electric for my HLT and boil kettle today (Was planning on natural gas since it was right nearby as well, but I'm building this in my basement so electric has less chance of burning down the house)

I've read both of the threads on this subject (both really long!) and will be setting up a similar system. I'm going to buy one PID/SSR combination and add a heat sink/fan from an old pentium 2 processor.

I plan on having the thermocouple in the HLT only as the boil kettle can be controlled in manual mode, then I can just switch which element is plugged in to the back of the box when I switch over to boil from bringing the HLT up to temp. This option was mentioned in the previous loooong thread.

Anyway I have been looking through differnt PIDs and trying to find out how you actually set one on manual? The specs on these things are really difficult to read sometimes. What setting am I changing to be able to set the percentage? I don't have a PID in my hands yet so it may be obvious when I do get one...

Also do you power your PID with the same 240V line as the element, or did you use just one leg of it? Did you run more than the one #10 wire to your control box?

I'll also try to get pictures of my setup when in progress/done I plan on using a rubber covered miller keg with the top cut out for either the boil kettle or the HLT. Both will have the 5500 watt 240V element that Pol used.

Thank you so much for this write Pol, it will make it so much easier for me to put something together.

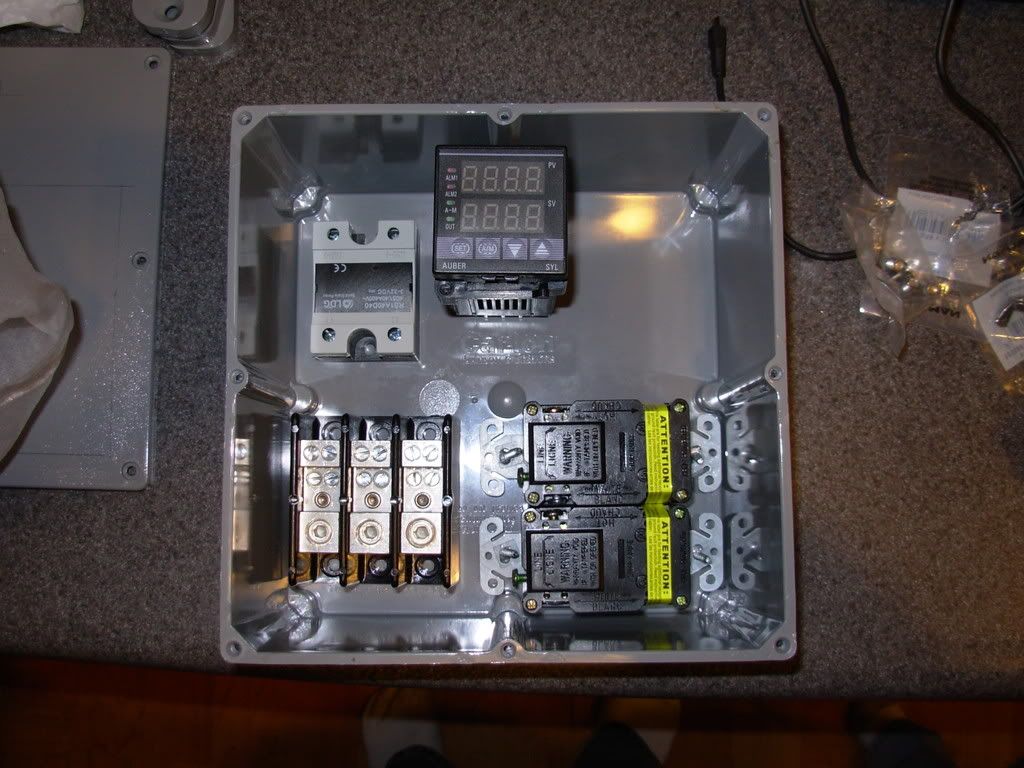
Auber is great, I posted a thread on them previously, HIGHLY recommend doing business with them for PIDS and SSRs. My heat sink works wonderfully and does not need a fan, it runs pretty cool with ambient air.

Manual mode is easy to set... there is one parameter that you will need to change in the PID that I have listed in my parts list, to activate the manual option. Once that is done, you can simply toggle between AUTO and MANUAL with the touch of ONE button. When you are in manual mode, the SV will be your percentage... if you need help, I can help you through it. I spent an hour in my garage playing with parameters when I set mine up.

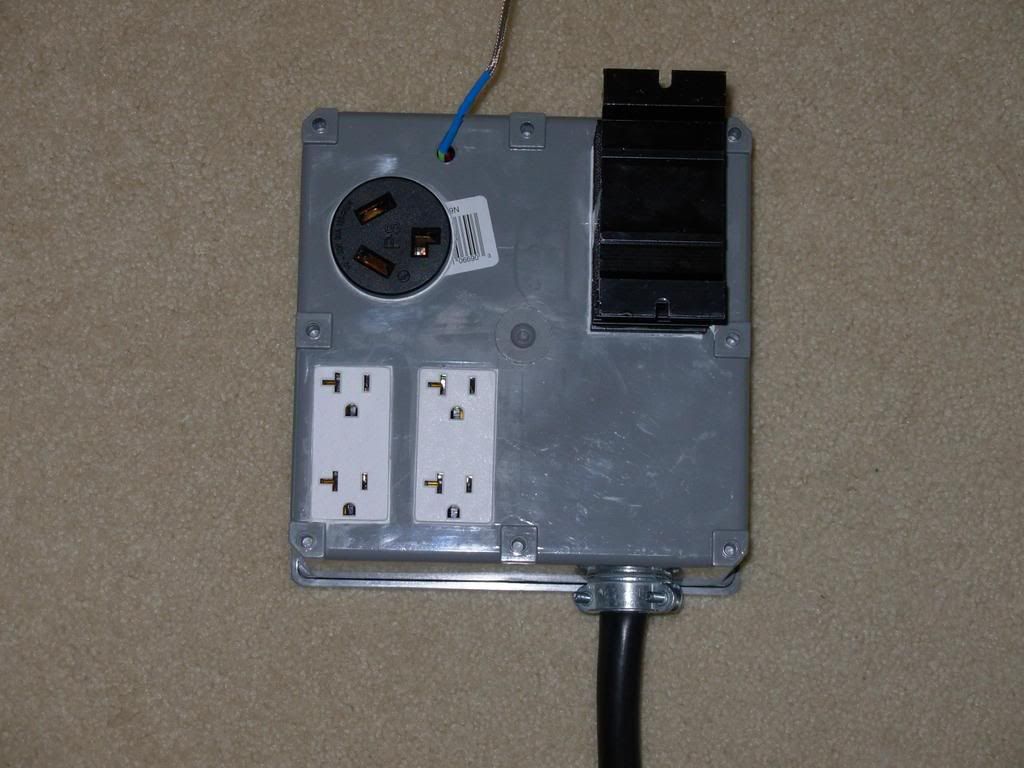
I ran ONE 240VAC line... 6/2 8/2 range cord to the control box. That is 4 wires... neutral and ground are 8AWG and the hots are 6AWG. I used ONE leg to power the PID with 14AWG wire. The PID has one HOT and one NEUTRAL. I used a simple ditribution block as seen in some pics, to split the hots, and neutral. I have a separate (7) terminal grounding bar in the box as well. EVERYTHING is grounded that can be... switches, outlets etc.

I can boil 7.5 gallons from 70F pretty quickly... reaching a boil after the sparge will be a piece of cake.

ALSO, someone questioned my useage of the 1/4" long thermocouple in my keggle, noting that it may not have a very accurate reading. Well, when I boil it reads 210F... so that sounds pretty accurate. Also, when I am chilling the wort, I stir periodically anyway to keep the wort circulating around the chiller. The small thermocouple works precisely as I predicted and desired. There is no difficulty in measuring the temp in the BK accurately.
 
What kind of times are you getting from mash to mash out temps and are you recylcling at mash out temps for a period of time before transfering to your kettle or are you just fly sparging at mash out temps straight to your kettle?
 
When the mash is complete, I dial in 175F on the HLT... I let it recirculate for 15-20 minutes. Once that time has passed, the mash is about 168F, the HLT is 175F. I then begin the sparge.
 
POL:
Why did you put the thermocouple in the BK? Did you do it to measure your chilling with an IC?
I will answer that. The PID needs the circuit complete, even for manual mode. In most PIDs the thermocouple or RTD is a requirement for proper operation. I think that this might be due to the fact that even in manual mode the PID has to use all the same equipment. That is that there is not different control circuit for manual. It may not matter if it is in a liquid or not, or even used to monitor temp. while in manual mode, but if you have to have a thermocouple anyway, why not put it in a useful place? On the same note: My PID's will register an error and not operate without the thermocouple wired in, even in manual mode. I will admit that I have not tried operating manual mode without a temperature monitor for my BCS-460 yet so I have no data for ya there. S.:mug:
 
Back
Top