Counterflow Chiller Tutorial

Homebrew Talk - Beer, Wine, Mead, & Cider Brewing Discussion Forum

Help Support Homebrew Talk - Beer, Wine, Mead, & Cider Brewing Discussion Forum:

This site may earn a commission from merchant affiliate links, including eBay, Amazon, and others.
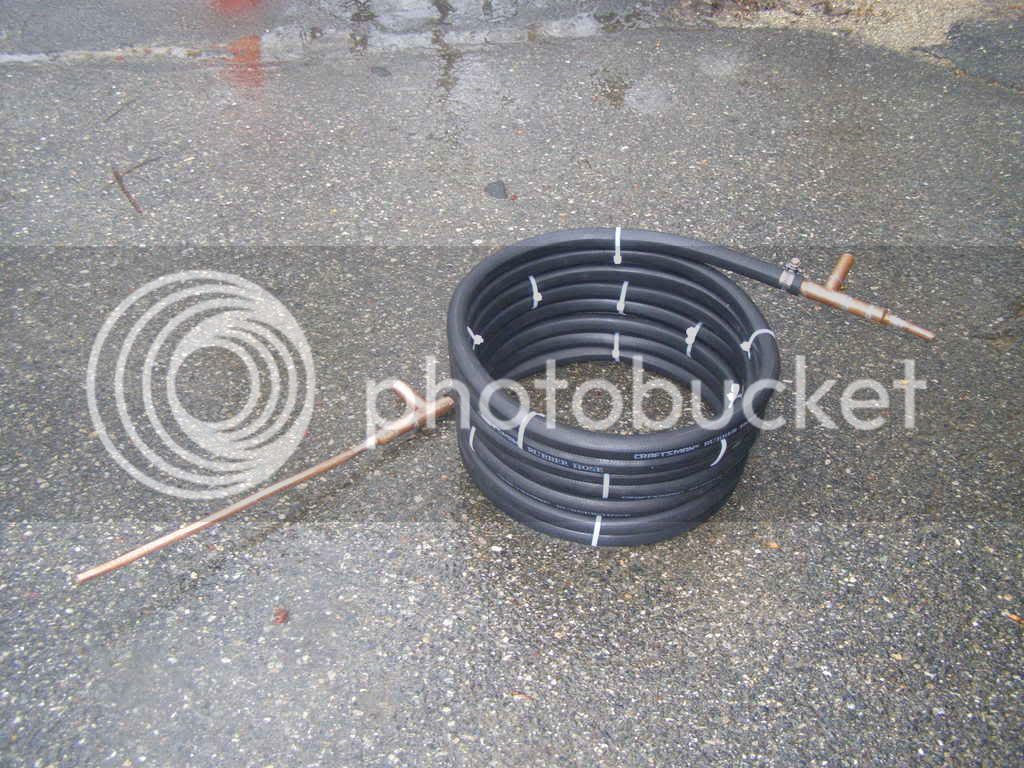
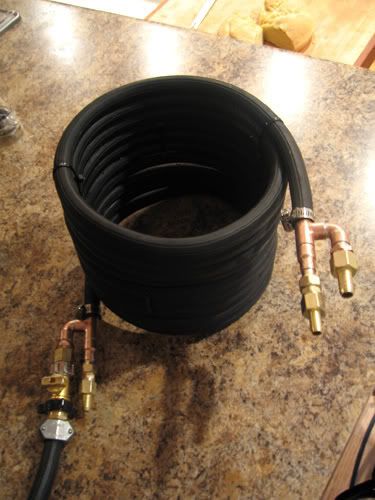
I have gross tons of copper laying around the house from various past projects; I think I'll build a CFC. My question--in true n00b form--is this: when gravity feeding a CFC, does it require merely one pass to reduce to pitching temps? Does one need to pour from a collection bucket back into the kettle and send it through for a second pass?
 
Bobby M: I'd assume the change in temperature is dependent on the length of tubing in the CFC, with matching the coolant's temperature being the maximum potential. I brought the image of the Chillzilla into photoshop and figured approximately 14 feet of tubing in the chiller. I have 50 ft. at my disposal. Logically, after a certain length, extra tubing becomes superfluous and a waste of money for little effect on temperature change. What length of tubing would you suggest I use for my DIY chiller?
 
I'll tell you this much, I pump at 3-4 gpm through 25' and get within 5' of the coolant. If you are gravity draining, I believe you could go shorter, since the wort spends more time in the chiller.
 
Bobby_M said:
I'd stick with 25. It's a little overkill for a gravity drain, but you'll be glad if you ever buy a pump.
and i bet you will, I think a pump was one of the greatest additions to my brewery. I'd recommend that anybody using a cfc, eventually get a good pump.
 
kinison_fan said:
Nice tutorial Bobby, and great timing- I've got all the stuff sitting on my workbench to put mine together tommorow. I bought my 50' copper tubing (3/8) from coppertubingsales.com (it was $44-47 delivered).
The other thing is I bought a cheap vinyl hose, but may hold off and get a rubber hose instead.

Another thought for those that don't have the torch-borrow one from a neighbor, or get the neighbor to soldier it up for you in exchange for a few homebrews.

I built my CFC using a design identical to Bobby's except I went the cheap vinyl hose route.
Well, ten years later, its still going strong, although I would probably use a better grade of hose if I were to do it over again today.

BTW, very nice tutorial, Bobby.
 
Those 1/2" to 1/4" reducers are a PITA to find... none at home depot, lowes, or the local plumbing supply house... I used an end cap and drilled it out...
 
I was somewhat surprised to find that they didn't have them as well... Only place I found them was mcmaster, but I really wanted to get this beast built. I'll post pic's on the process once I'm done.
 
Mine didn't have any. I used a 1/2 to 3/8 and a 3/8 to 1/4. Four more solders and $2 more. Whatever.
 
Another option for the reducer's is to use the 1/2" hard copper from the 3 way, solder in soft refridgeration grade 1/2" copper inside that, and then soft 3/8" in that. There is a little bit of a gap, but a nice touch of solder will work. I decided just to use 1/2 endcaps with holes drilled in the center.
 
Thanks for the info Bobby, I found 50' of copper tubing at HD today for $56 so I went ahead and made the CFC per your instructions which were easy to follow. I could not find the 1/2" to 1/4" reducer so I just took some 1/2" end caps and drilled them out with a 3/8" bit and it was a perfect fit. The hardest part of the whole thing was getting the thing coiled back up all by myself. With this and the brand new Thermos turkey fryer I just picked up at a garage sale for $25 its been a productive weekend.

Thanks for the info Bobby.


cfc.jpg
 
man, and here I thought I was going to be cool and be the first to make one outta the Goodyear hose, oh well. I kinda cheated a bit Bobby, but I still used most of your idea, and did some blinging too. I'm going to post these in both of your threads, only because it's your fault I have this picture :) (and I'm using some ideas from your keezer YT vids too)

cfc_and_shiney.jpeg
 
The CFC kicks ass. I had to put the water stream on as low as it would go and the wort came out at around 78 degrees. I did a test run before hand and had the faucet cranked and the boiling water was coming out at around 63.

Thanks Bobby.
 
I have a 50' 1/2" IC that I have been considering converting. How hard would it be to convert this??

Would I need to get 3/4" hose? Is 1/2" Copper tubing too big for a CFC? Also, would I have to straighten out the copper before slipping the hose on?

Thanks.
 
bigben said:
I have a 50' 1/2" IC that I have been considering converting. How hard would it be to convert this??

Would I need to get 3/4" hose? Is 1/2" Copper tubing too big for a CFC? Also, would I have to straighten out the copper before slipping the hose on?

Thanks.

I'd consider selling that IC and making a CFC from scratch. You will have to straighten the coil first and it's likely already too stiff from the slight bending it's already been through. 3/8" x 20-25' is ideal in my opinion but I'm sure the 1/2" would be fine with 3/4" hose. You'll need to upgrade the end TEEs to 3/4" also and the reducers would be 3/4" to 3/8" if they have them.
 
bigben said:
ok....anyone wanna build me a 25' CFC and trade a 50' IC? :)


You can straighten the IC you have. I just converted a 25' IC to a CFC with no issues. I did have to cut the bends out and could only use the coils, but I had no problems straightening out the coils or wrapping the CFC when I was done.
 
Yea, I dove in. I cut mine last night.

The only issue with mine is that it's 1/2" copper tubing...not 3/8" like everyone uses. So I will probably make it at least 30 feet...or maybe the whole 50', since more wort will be flowing through at any given time. Not sure yet. And I will have to find the proper fittings.

I have also thought about making a hybrid chiller. I just have to coil the tubing up very tightly and I'm not sure I can do it without messing up the tubing.... How big of a diameter can you get PVC Pipe and end caps in?
 
I put my converted IC to CFC into service this past weekend and it worked better than I could have imagined. My tap water (well) is still nice and cool and I was able to throttle back the flow of my cooling water to a trickle and still came out with wort at about 70* using gravity feed. Me like.:rockin:
 
You don't want to try getting 1/2" into a diameter smaller than about 6" and PVC larger than that is really hard to come by cheaply. Why not use 3/4" vinyl tubing as the outer jacket for a CFC?
 
Bobby_M said:
You don't want to try getting 1/2" into a diameter smaller than about 6" and PVC larger than that is really hard to come by cheaply. Why not use 3/4" vinyl tubing as the outer jacket for a CFC?
I may do that bobby, but then I have the task of straightening out this huge coil.

If I did a CFC with 1/2" OD Inner tubing tho, would it need to be longer than a CFC made with 3/8" OD Inner tubing? Or would the larger amount of cooling water negate the presence of more hot wort? This is assuming that I don't have any flow control on the CFC output, and the wort is flowing as fast as it can.

One more thing...I would need 3/4" ID tubing right?
 
Well, after all my 'hybrid' chiller talk...I think I'm just gonna make a CFC with my 1/2" IC. I already starting unrolling it. It seems pretty easy to straighten it out.

I'll probably go with the Cheyco method tho, and not use solder, cuz Im a noob. Also I guess I will try 3/4" ID Tubing for the outer hose.
 
Ben - Pipe soldering is super easy... 20 dollars in equipment and a few spare pieces of copper for practice and you will be golden. The only pointer for homebrewers as far as pipe soldering goes is that lead-free solder does not mesh as easily, so use gravity to help pull the solder into the gap. Watch the video that Bobby posted on the OP. Its as simple as that!

Also, make sure you get food safe solder flux as well!
 
I don't have photo's yet, but I made a CFC yesterday and this thread made it So easy. I had never sweated copper before, and by the last pice I was doing Really well. It really is just a matter of having the copper hot enough.
I got 50ft of 3/8 od ref.grade from coppertubngsales.com for like 36 bucks, and bent the other 25 feet into a IM for when I do PM on the stove top. I almost went with a 30 foot CFC, but two chillers are better than one.....
Thanks Bobby- I would have Never attempted this without the tutorial. I was grinning like a 5 year old on at thier own birthday party when I hooked it up and tested it all out.
Oh- also, I never Did find 1/2 inch to 3/8 reducers- so I just drilled 3/8 in holes into 1/2 end caps. It was easy!
 
Cool man.. Hey, I would have come over to supervise for a couple beers. For anyone else looking for them, note that the reducers will actually be labeled 1/2 to 1/4" reducing couplings. The actual ID of the coupling will be 5/8" and 3/8".
 
. For anyone else looking for them, note that the reducers will actually be labeled 1/2 to 1/4" reducing couplings. The actual ID of the coupling will be 5/8" and 3/8".

In that case, they Did have the reducers. Dang it. No worries, punching a hole in the 1/2 inch end caps was effective. If I could change one thing about the entire construction session, it would have been to add a practive session with the sweating- so that Every piece looked neat and clean- the first time. Not that it's ugly.
 
i had a real hard time getting the 3/8" soft copper through the 1/2" to 1/4" reducer....but after struggling finally got it through. now my buddy wants me to make a cfc for him.

any tips on getting the 3/8" soft copper through the reduce more effectively?
 
You have to drill out the center stop with a 3/8" drill bit. It helps to solder it onto the 1/2" tubing first to give you something to hold onto.


In an unrelated note, I have some more substantial data on the performance of a 25' counterflow. I paid close attention when I brewed this weekend.

At full wort flow (no restriction on the march pump) and full coolant flow, the wort comes out about 2 degrees F warmer than the coolant. Water was 63F and the wort came out 65ish.

If I restrict the wort flow to half (or at least the ball valve on the output of the March pump was at half) and run the coolant at full, the wort coming out EQUALS the coolant temp or 63F. If I had to guess, the wort flow here would be close to a wort wizard venturi pump speed. If you are only gravity draining, you'd get the same performance while throttling your coolant back a bit.

One thing I didn't record was how much coolant I used but I'll try to remember for next batch.
 
This brings up a thought I had that I was gonna start a thread with-
Now when you say coolant, your just refering to the water, correct? I have seen systems around here that use serious stuff in IM chillers. Secondly, have you (or anyone else) ever tried to do anything functional with the water once it has been through the CF chiller? Using it as clean-up water is an obvious option- but I was wondering if just hooking the exit end up to a hose and a sprinkler would be bad. A little warmer than city water typically is when you water your lawn, but after some time spent flying through the air- I can't see how it would be too hot.

In most all cases, the coolant is tap water. As for reuse of the cooling water, it can be used for anything that you would normally use warm water for, cleanup, washing your car, showering............
 
I've even heard of collecting it back into your HLT for your NEXT batch in the same day but in that case, your outer jacket better be a hose meant for potable water and not an ordinary garden hose. I suspect this would be better reserved for a plate chiller.

You can also run it into your washing machine for a load of whites.
 
Just wanted to says thanks Bobby_M just followed your design yesterday;

counterflow_chiller.jpg


It was easy to put together following this post..I individual fluxed and soldered each joint. I tried prefluxing the hole copper assembly to solder it in one shot. Didn't work had to take apart, clean and flux/solder each joint separately.

When I was wrapping the counterflow around a 5 Gallon bucket I thought why not put it in the bucket for easy carrying;

counterflow_chiller_hybrid_handle.jpg


Just wondered if anyone has connected there counterflow directly to there boil kettle using 1/2 threaded to 3/8 compression filtting;

counterflow_chiller_connected_to_kettle.jpg


Cheers
BeerCanuck
 

Latest posts

Back
Top