You are using an out of date browser. It may not display this or other websites correctly.
You should upgrade or use an alternative browser.
You should upgrade or use an alternative browser.
Show us your sculpture or brew rig
- Thread starter Onescalerguy
- Start date

Help Support Homebrew Talk - Beer, Wine, Mead, & Cider Brewing Discussion Forum:
This site may earn a commission from merchant affiliate
links, including eBay, Amazon, and others.
![IMG_20131208_112723[1].jpg](https://cdn.homebrewtalk.com/data/attach/138/138890-IMG-20131208-112723-1-.jpg "IMG_20131208_112723[1].jpg")
Hours. And best not done indoors...
https://www.homebrewtalk.com/f11/polishing-your-keg-more-than-clever-euphemism-54025/
Cheers!
https://www.homebrewtalk.com/f11/polishing-your-keg-more-than-clever-euphemism-54025/
Cheers!
coreythomas5
Active Member
- Joined
- Dec 25, 2013
- Messages
- 27
- Reaction score
- 5
First brew on the new stand and new pump this Sunday. 


EmDubeu
Well-Known Member
- Joined
- Feb 21, 2013
- Messages
- 239
- Reaction score
- 46
Here's the new rendering (it's missing the casters for some reason).
The long vertical bar is for mounting a Pot Filling Faucet on. This faucet will fill the HLT and MT with water.
Each of the burners will have a stainless steel cover with an 11 inch diameter hole cut into it. This will prevent the heat from the burners from washing up the keggle. These covers are removable to wash and access the top of the burner.
The chugger pumps will have splash guards on them to prevent any liquids from dripping on the pumps. The pumps can be moved forward or backward to accommodate a horizontal or vertical pump head installation.
The control box will be mounted on the left side. This will control the HLT temperature for the HERMS and also turn on/off pumps and accessories.
So here's the best things. All the stainless steel will be purchased at cost from my buddy's company. We will pay one of his builders to laser cut all the parts and press all the angles (he takes cash and beer as payment). I'll be posting images of the build progress as it's made.


EmDubeu
Well-Known Member
- Joined
- Feb 21, 2013
- Messages
- 239
- Reaction score
- 46
Can't remember if I posted this up here or not! So just in case:
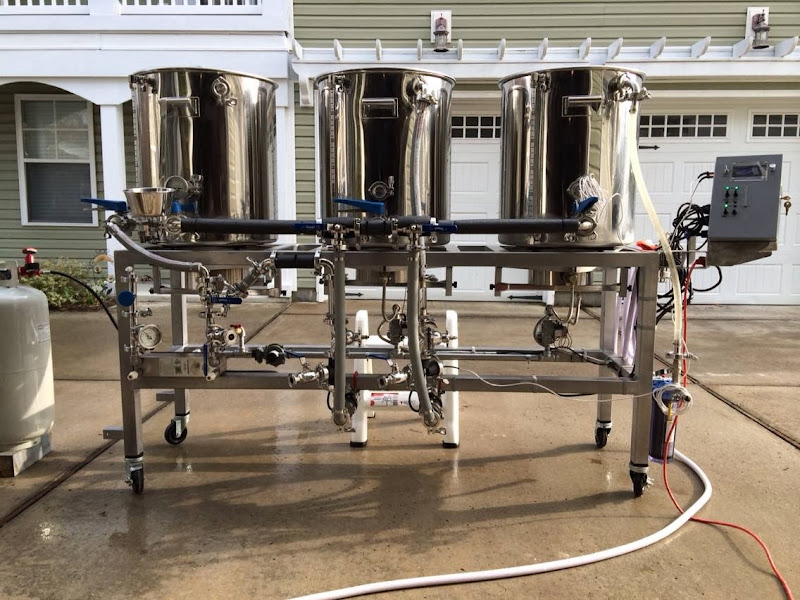
30 gallon direct-fired RIMS with Brewtroller. All kettles interconnected via hard pipe and 3 way valves control the direction of flow. All soft tubing is 3/4" ID chlorobutyl brewery hose. Ceramic coated 1" steel tube stand, combination high and low pressure propane, 30-plate chiller, inline aeration. Last mod will be hard plumbing the water into the end of the main rail instead of direct to the HLT. This also gives me a CIP entry/exit point.
I'm in the process of designing my brew stand, which is similar to yours. My mechanical engineer friend and I could benefit by seeing some more images of your brew stand. Did you design/build it yourself?
Mike
I'm in the process of designing my brew stand, which is similar to yours. My mechanical engineer friend and I could benefit by seeing some more images of your brew stand. Did you design/build it yourself?
Mike
Yep sure did - contact me via PM and I'll help however I can.
Here's the new rendering (it's missing the casters for some reason).
The long vertical bar is for mounting a Pot Filling Faucet on. This faucet will fill the HLT and MT with water.
Each of the burners will have a stainless steel cover with an 11 inch diameter hole cut into it. This will prevent the heat from the burners from washing up the keggle. These covers are removable to wash and access the top of the burner.
The chugger pumps will have splash guards on them to prevent any liquids from dripping on the pumps. The pumps can be moved forward or backward to accommodate a horizontal or vertical pump head installation.
The control box will be mounted on the left side. This will control the HLT temperature for the HERMS and also turn on/off pumps and accessories.
So here's the best things. All the stainless steel will be purchased at cost from my buddy's company. We will pay one of his builders to laser cut all the parts and press all the angles (he takes cash and beer as payment). I'll be posting images of the build progress as it's made.
Two quick comments for you:
1) You may want to consider making the burner height adjustable. I designed this into my stand and have taken advantage of it several times. You just don't know for sure where those burners need to be and it gives you no flexibility if you need to make a change later that involves where the kettles will be.
2) I'd recommend elevating the kettles off your stand somehow. You don't want to trap that heat and it'll stop the stand from getting super-heated. Those burners need room to breath.
Good luck!
2)
EmDubeu
Well-Known Member
- Joined
- Feb 21, 2013
- Messages
- 239
- Reaction score
- 46
Two quick comments for you:
1) You may want to consider making the burner height adjustable. I designed this into my stand and have taken advantage of it several times. You just don't know for sure where those burners need to be and it gives you no flexibility if you need to make a change later that involves where the kettles will be.
2) I'd recommend elevating the kettles off your stand somehow. You don't want to trap that heat and it'll stop the stand from getting super-heated. Those burners need room to breath.
Good luck!
2)
I like your idea about the adjustable burners. I'll engineer some slots for the burner to adjust up or down. My original measurements of the distance between the burner and the kettle was based upon my blichmann burner. The burner is at 2 3/4 inches away from the kettle.
I'm torn about elevating the kettles off the stand, per your suggestion. I'm really trying to keep the heat from the burner washing up on all my valves and element cable. With my burner covers that I've designed, the heat will dissipate around and outside the brewstand. I understand this may heat up the stand...
wilconrad
Well-Known Member
I'm torn about elevating the kettles off the stand, per your suggestion. I'm really trying to keep the heat from the burner washing up on all my valves and element cable. With my burner covers that I've designed, the heat will dissipate around and outside the brewstand. I understand this may heat up the stand...
I was concerned about the effects of heat wash in my setup as well, and initially tried to build my stand similar to yours with a closed connection to the kettles, but found that the flame wouldn't behave (would wash way outside of the burner) and the kettles wouldn't heat effectively. I ended up elevating the kettles using 3/4" square stainless bar stock and now the burners work as intended. I added a 16ga stainless windscreen to direct the heat up to the kettle, then allow it to wash out the 3/4 gap created by the bar stock. This works well, and the heat flowing up the sides of the kettles is minimal (I could hold my hand in the heat wash without issue).
Nice thing about your design is that you can add some spacers to elevate your kettles pretty easily, so no stress there. I would encourage you to consider incorporating a windscreen into your design, though, to focus all that heat right where you want it.
EmDubeu
Well-Known Member
- Joined
- Feb 21, 2013
- Messages
- 239
- Reaction score
- 46
I was concerned about the effects of heat wash in my setup as well, and initially tried to build my stand similar to yours with a closed connection to the kettles, but found that the flame wouldn't behave (would wash way outside of the burner) and the kettles wouldn't heat effectively. I ended up elevating the kettles using 3/4" square stainless bar stock and now the burners work as intended. I added a 16ga stainless windscreen to direct the heat up to the kettle, then allow it to wash out the 3/4 gap created by the bar stock. This works well, and the heat flowing up the sides of the kettles is minimal (I could hold my hand in the heat wash without issue).
Nice thing about your design is that you can add some spacers to elevate your kettles pretty easily, so no stress there. I would encourage you to consider incorporating a windscreen into your design, though, to focus all that heat right where you want it.
Is the purpose of the windshield simply to block any wind, thus directing the heat/flame up? I brew in my garage where there is no wind, so do I really need a windshield?
wilconrad
Well-Known Member
Is the purpose of the windshield simply to block any wind, thus directing the heat/flame up? I brew in my garage where there is no wind, so do I really need a windshield?
No, I just call it a windscreen because that seems to be the accepted nomenclature. Wind is rarely actually an issue as I'm a garage brewer as well. The main purpose of this feature on my setup is to direct the heat to the bottom of the kettle and prevent it from washing out around the kettle rather than heat it. There's still enough of a gap for the burner to "breath", but the windscreen ensures more heat ends up where I want it. It has the side benefit of keeping the heat wash from being excessive, which could damage cables, etc.
EmDubeu
Well-Known Member
- Joined
- Feb 21, 2013
- Messages
- 239
- Reaction score
- 46
No, I just call it a windscreen because that seems to be the accepted nomenclature. Wind is rarely actually an issue as I'm a garage brewer as well. The main purpose of this feature on my setup is to direct the heat to the bottom of the kettle and prevent it from washing out around the kettle rather than heat it. There's still enough of a gap for the burner to "breath", but the windscreen ensures more heat ends up where I want it. It has the side benefit of keeping the heat wash from being excessive, which could damage cables, etc.
Thank you for your input,wilconrad and others. I have ran the suggestions through my head and I'm now convinced I should add a "Windshield". I'll add this to my design model as a removable part. That way I have the option to use it or not.
Designing the part to fit the burner and my brackets, as well as laser cutting and rolling it, won't be that difficult either.
I'll post my new design as soon as I've modeled it. Also, my plan is to have this entire brew stand built by the end of January. I'll post the final version once it's done.
Cheers!
wilconrad
Well-Known Member
Awesome, looking forward to seeing how it turns out! Enjoy the build!
I suggest starting your own build thread, as this thread is for showing off rigs...
Cheers!
Cheers!
EmDubeu
Well-Known Member
- Joined
- Feb 21, 2013
- Messages
- 239
- Reaction score
- 46
I suggest starting your own build thread, as this thread is for showing off rigs...
Cheers!
Got it.
supercarbuilder
Well-Known Member
.jpg")
supercarbuilder
Well-Known Member
.jpg")
.jpg")
wilconrad
Well-Known Member
That's awesome, nice work!
ssgross
Well-Known Member
My first, non dress rehearsal, brew day after completing the project.
Propane burners sit atop a layer each of felt pad, mdf, large ceramic tile. I took temp readings throughout and was very surprised at how well the tile worked. I don't even need the felt and mdf, except to protect the wood top.
wood top is coated with latex based wood finish (clear gloss). any spills wipe off easily with no effects to the wood.
The control box holds a BCS462. Contrary to what seems to be popular, the empty spot on the bottom is not for a placard, but for a few more switches when I expand to include some automated valves and float sensors.
My first, non dress rehearsal, brew day after completing the project.
Propane burners sit atop a layer each of felt pad, mdf, large ceramic tile. I took temp readings throughout and was very surprised at how well the tile worked. I don't even need the felt and mdf, except to protect the wood top.
wood top is coated with latex based wood finish (clear gloss). any spills wipe off easily with no effects to the wood.
The control box holds a BCS462. Contrary to what seems to be popular, the empty spot on the bottom is not for a placard, but for a few more switches when I expand to include some automated valves and float sensors.
Whats the IP rating of those switches? I would be cautious about using my control panel as a beer table... at least put a coaster down

Seriously though nice build!
ssgross
Well-Known Member
the pint is just for scale The enclosure, all switches, lights, and connections are water and air tight. The PID displays have a rubber gasket under the cover. I had some rubber orings left over from when I replaced the ones on my pumps that fit perfect!
The enclosure, all switches, lights, and connections are water and air tight. The PID displays have a rubber gasket under the cover. I had some rubber orings left over from when I replaced the ones on my pumps that fit perfect!

iijakii
Well-Known Member
In flippy-flops? Brave man!
Rivenin
Well-Known Member
- Joined
- Dec 13, 2010
- Messages
- 3,258
- Reaction score
- 342
But there is always that moment when the grinder catches on something and jerks... and slices off a toe... haha.
happened to me once almost, was grinding some exhaust pipe on the garage floor, the grinder jumped and cut through about 3" of the top of my shoe... scary as hell...
happened to me once almost, was grinding some exhaust pipe on the garage floor, the grinder jumped and cut through about 3" of the top of my shoe... scary as hell...
Huaco
Well-Known Member
Man, grinders aren't anything to take lightly. My last job there was a guy grinding with a large grinder. It jumped on him and before he knew it his testicles were gushing blood!
Man, grinders aren't anything to take lightly. My last job there was a guy grinding with a large grinder. It jumped on him and before he knew it his testicles were gushing blood!
I just threw up a little in my mouth!
kickflip_mj
Well-Known Member
- Joined
- Jan 8, 2008
- Messages
- 1,116
- Reaction score
- 120
think twice before working in the shop in sandles. My brewstand fell on my big toe when I was in vans..Thought i was going to lose it. Nothing like drilling through the nail.
Stealthcruiser
Well-Known Member
It jumped on him and before he knew it his testicles were gushing blood!
I think I went to school with her............
Huaco
Well-Known Member
I think I went to school with her............
Err. Don't you mean "it".
Bwahahaha


sloanfamilydsm
Well-Known Member
My BrewTree's maiden voyage!
Needs some modifications, but a successful brew day.

Needs some modifications, but a successful brew day.

^Classic brew pic man. 100% homebrewer right there. Something that just makes sense about a spartan, gravity rig.


oldstyle69
Well-Known Member
You have any issues with propane in the basement? Or steam up into your floor boards?
oldstyle69 said:You have any issues with propane in the basement? Or steam up into your floor boards?
Running of my houses natural gas, and there's a giant vent hood (air/moisture tight) with a hydroponics vortex fan venting gases and moisture. Nobody upstairs could smell the boiling wort.
Similar threads
- Replies
- 4
- Views
- 699
- Replies
- 2
- Views
- 1K