How to: Build The BEST Mash Tun from a Beverage Cooler

Homebrew Talk - Beer, Wine, Mead, & Cider Brewing Discussion Forum

Help Support Homebrew Talk - Beer, Wine, Mead, & Cider Brewing Discussion Forum:

This site may earn a commission from merchant affiliate links, including eBay, Amazon, and others.

crazyworld

Well-Known Member
Joined
Jan 10, 2011
Messages
131
Reaction score
19
Location
Rocky Point
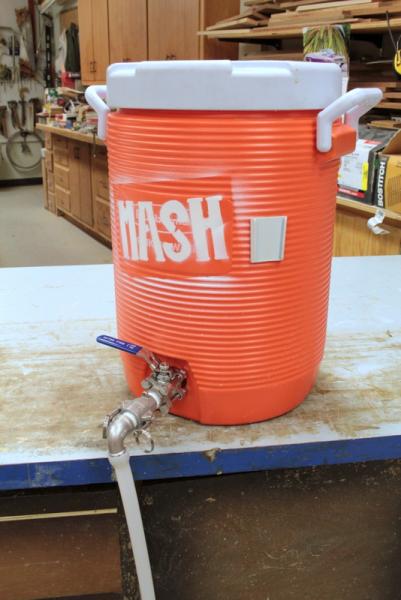
Hey guys. Got another one for you. Check out my latest project.

Not only did I build a KILLER mash tun, my friend and I shot a video on how to make one yourself.

Video:


Description:
In this video I show you how to build your own beverage cooler mash/lauter tun for homebrewing your own beer. You can use any type of cooler for this project, but your hardware will vary.

I chose to do a 5 gallon mash tun because I had one lying around but this is really as small as you would want to go for a 5 gallon batch of beer. Most people choose something in the 20qt (5 gal) to 50qt (12.5 gal) range. The larger end will accommodate larger gravity beers and most 10 gallon batches.

My rig, besides the mash tun itself, uses all stainless steel components as well as all silicone gaskets and tubing. DO NOT use conduit locknuts, parts labeled only as "steel," or anything galvanized. These items are plated in zinc which will readily dissolve in the (slightly) acidic wort and can cause toxicity. Brass is generally regarded as fine for the laybrewer although the biggest concern here is the lead content. Look for "lead-free" brass which will have no more than 0.25% lead. Otherwise, soak all brass parts in two parts of white vinegar and one part of hydrogen peroxide for no more than 5 minutes to remove surface lead. If you're still concerned, just go stainless. Yes, stainless steel parts are expensive, but they will last a lifetime!

My fittings are 1/2" NPT while 3/8" are probably more common as they are cheaper and can be found locally more easily. Understand that the hardware requirements will vary and your options for assembly are endless. I highly suggest you plan your build before you go shopping and plan on making a run to the hardware store when things don't work out. When I went to order my parts, they were out of FNPT hose barbs so I was forced to buy a coupler and use a MNPT hose barb instead. It's common with a 2 piece ball valve to need to shim it away from the cooler with another locknut or washers if your handle cannot fully close. These can be made of whatever material you wish as they will not touch the liquid.

Be sure to use an NPS (straight threaded) locknut as I did if you wish to thread it all the way onto the pipe nipple (heads up, very few places will have them). Also, you can save here by not using a barb on the inside and putting the braid directly over the inside of the nipple. However, I chose to use the barb to remove the braid for easy removal for cleaning and drying (no need to remove the hose clamp). The barb was only $4 (although I did have to spend another $3.50 for the coupler in my scenario) so I'm not losing sleep over it.

Be sure to test for leaks when I recommend you do as you'll only waste time later if you run into one. If you do encounter a leak, make sure you've wrapped the half of the pipe nipple that threads into the ball valve. I also wrapped the center of the nipple to ensure a smooth, tight surface for the gasket to hug up against. If you don't have a flat surface for the gasket to sit, pack your threads with Teflon tape until you do. Lastly, make sure you're putting enough compression on the gasket. I found it's unnecessary to bend the washer to conform it to the side of the cooler so long as your gasket is thick enough and you have good compression on it.

I used an awl to help get the silicone tubing on the elbow. This stuff is thick so don't worry too much about gouging it. Once it's on there, I don't plan on taking mine off.


And because I know you guys would go nuts if I didn't post it...

Supplies and prices:

All metal parts are 316 stainless steel and ½” NPT unless specified otherwise. All prices include NYS tax where applicable. All quantities are (1) unless otherwise specified.

14.95 Ball valve – 3 piece
3.50 Coupler
4.00 5/8” outlet hose barb
4.75 90 degree street elbow
3.92 “F” camlock adapter
5.62 “B” camlock coupler
7.17 3ft – ½” ID x ¾” OD silicone tubing
2.49 1 ½” pipe nipple (304 SS)
1.99 ¾” ID x 1 ½” OD silicone gasket
3.75 NPS locknut (304 SS)
1.99 15/16” ID x 1 ½” OD washer (304 SS)
9.65 ¾” female NPT x 18” SS water heater connector
1.95 9/16” x 1 ¼” SS hose clamp
10.00 5 gallon Rubbermaid beverage cooler (used)
xx.xx Teflon tape & spray paint
$74.73 TOTAL

The way I look at it, I have an AWESOME mash tun that I can upgrade whenever I want and take the parts with me. Plus, those parts will last me a LIFETIME of brewing.

Thoughts? Comments?

Nick
mash tun (small).jpg
 
Last edited by a moderator:
Save a few $ you don't need the pipe nipple on the inside or the elbow on the outside.

Go with the 10 gallon cooler if you can. You would be very hard pressed to fill it for a 5 gallon brew. You will make beers that will totally fill the 5 gallon cooler.

Other than that it looks like my 10 gallon except I went brass and have no disconnects.
 
I wouldn't use a used cooler. I am sure it's fine but would weird me out. $48 for a 10 gallon Amazon seems well worth it (just bought a second today for an HLT). Love the MASH on there. Going to do that for my tun and HLT.
 
The instructions and video may be very good but as a rule I don't consume things deemed to be THE BEST by the creator of said thing. More flies with honey and stuff.


Bobby, As far as I am concerned, if you were to put "THE BEST" on your products it would be no lie! :D

:off: sorry for the hijack! :off:
 
The "BEST" mash tun from a beverage cooler would be 10 gallons and have a HBT sticker on it....

Yeah it would. If I only had a HBT sticker for the kegerator ...

And guys I know 5 gallons is small; I thought I made that clear in the video/description, no? It's what I had. I'll be doing some thick mashes and perhaps double sparging but eventually I plan on upgrading so no big deal.

Yes, I'm totally tooting my own horn here Bobby but I really just meant best on youtube. :) I'll be the one consuming what comes out of this thank you very much :cross:

Ravenshead said:
If you wave your braid at me in person, I'll tie a knot in it and step on it.

Hahaha, I wouldn't blame you.

kh54s10 said:
Save a few $ you don't need the pipe nipple on the inside or the elbow on the outside.

Not sure what you're talking about here as I obviously must have the pipe nipple on the inside. If you meant hose barb, then yes, I really could have just taken the barb and therefore the coupling off and put the screen right over the nipple (don't know why more people don't do this). Like I said, the options are endless, this is just what I decided to show but I appreciate you pointing out where you can save. As for the elbow, I just wanted it :D (plus I'll probably end up needing one in the future if I decide to build something single tier or something that uses pumps).
 
John Palmers book "How to Brew" has a whole section on this...

I know it does, and it's a great book, but not everyone has it hence the video which ANYONE can watch whenever they want. Plus, isn't a video easier to understand than some black and white diagrams and text?
 
Save a few $ you don't need the pipe nipple on the inside or the elbow on the outside.

Not sure what you're talking about here as I obviously must have the pipe nipple on the inside. If you meant hose barb, then yes, I really could have just taken the barb and therefore the coupling off and put the screen right over the nipple (don't know why more people don't do this). Like I said, the options are endless, this is just what I decided to show but I appreciate you pointing out where you can save. As for the elbow, I just wanted it :D (plus I'll probably end up needing one in the future if I decide to build something single tier or something that uses pumps).

The hose barb is what I meant. 2 reasons, first is it might be constricting the flow, second the Water heater supply line has an ID large enough to go straight on the nipple. I guess the elbow might work well, I just run my tubing to the BK in a gentle curve.

As you said lots of options. I opted for Northern Brewers brass cooler valve kit because after pricing out the individual parts, guessing if some of them were the right ones, it was only a few dollars more for the kit. I didn't have to figure out which parts. I did use the water heater supply line for the braid.
 
The hose barb is what I meant. 2 reasons, first is it might be constricting the flow, second the Water heater supply line has an ID large enough to go straight on the nipple.

Two reasons for keeping it. Like I mentioned, in the parts/supplies list, the hose barb is a 5/8" outlet which is just under 1/2" in actual diameter which we have to remember that the silicone hose is 1/2" ID. If it's the bottleneck in the system, its pretty close to being the only one by about .05" ... I can live with that. It's a really high flow system all together.

The other reason I remember now why I decided to make sure I included a hose barb on the inside was for easy removal of the screen. I wanted to be able to make sure I could easily remove my SS braid for easy cleaning and drying and not messing with any hose clamps (disconnects seemed like wayyy overkill here). The barb was $4 so I'm losing sleep over it.
 
How does a false bottom compare to using a hose?

The reason I stayed away from false bottoms is I've read that the heat will overtime warp the plastic on the cooler and the fit won't be the same anymore so I just stayed away from them.

Plus when I move to a larger vessel, using the braid gives me the option of not having to find a new way to lauter thus making my false bottom useless. Same theory goes for not using a pipe manifold.
 
Plus did I mention the braid was like nine bucks!?!

Also, it suits the way I plan on sparging (batch). John Palmer has a great breakdown of different approaches to lautering and their best uses in his book How to Brew.

Cheers,
Nick
 
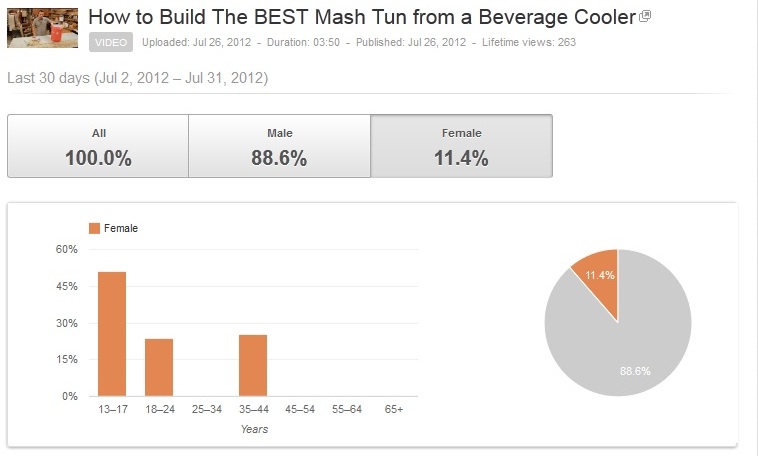
Can I just say... look at this picture!

What are you all letting your little girls do?!? I'm going to predict an influx of female brewers in the next 10 years :mug:

female demo mash tun vid small.jpg
 
Doing my first all grain now! It's a Cascade SMaSH Blonde Ale with American 2-row I came up with with the help of BeerSmith. Just want a light, easy drinking summer beer on tap. Can't wait to see how it comes out! I'll check back in with updates with how the lautering and sparging goes as well as the rest of the boil!
 
Hit my temps perfectly. Lautering went STUPID fast with this thing and I had to double sparge to get the volume I needed. The second sparge was only 2 or 3 quarts worth. Ground my own grains and no stuck sparge here even when I opened it wide up. Estimated OG was 1.050 (at 72% eff) and I hit 1.047 ... I'm happy with that.
 
I pump out of my cooler mash tun so I was worried with crushing the braid. To solve this I inserted a compression spring into the braid to make it more rigid.

http://www.mcmaster.com/#catalog/118/1223/=iqw13h

Not a bad idea. Much better than galvanized (assuming you didn't use that option). However, even though you are pumping, I still don't think it's necessary as you would need a significant amount of force to completely collapse the braid. Even if it slightly collapsed, as long as it was large enough to begin with, it's still going to be filtering and continue to flow.

I think the collapsing braid is more myth than anything else which poses the question: has anyone ever had a braid collapse on them so much so that it significantly slow/stopped their lauter?
 
Brewers tend to be kind of competitive (hence the reason we have so many brewing competitions) so I think you're catching a bit of crap because you declared it "the best". Regardless, I think it's a great video. I think there are lots of newer brewers and/or brewers considering the jump to all-grain that will really appreciate it. I've seen a lot of posts where people seem to get stumped trying to follow diagrams and such. A picture is worth a thousand words and a well done video is worth even more.
 
I think the collapsing braid is more myth than anything else which poses the question: has anyone ever had a braid collapse on them so much so that it significantly slow/stopped their lauter?

I used a braid for years. I used a very similar setup, but instead of having one straight piece of braid, I had a T attached to the bulkhead so my braid went in a loop. I used zip ties instead of those hose clamps, too, as I've seen too many of those 'stainless' clamps covered in rust, and don't really trust them all that much.

I got about 92% efficiency fly sparging, but I found that I was having to replace the thing after about 8-10 uses. Not a big deal seing as the braid itself was less than $8, but I definitely DID need to replace it. I found that over time my efficiency would drop some (on beers I brew frequently), and I would get weird stuck sparges seemingly out of nowhere (on all barley beers, running slowly). I'm not particularly concerned with WHAT my efficiency is, just that it stays the same so I know what I'm working with.

Finally...last year, on a trip to the hardware store to pick up a new braid—thinking about just how great those pointy cut strands on the braid feel when they're slicing up your fingers—I decided to throw together a copper manifold from a couple short straight pieces, 4 elbows, and a T (I have a rectangle with an arm that comes back across for collection) all of which cost me >$15, and dropped my efficiency down to ~86%. I've been thoroughly happy with the new setup, and have had fewer problems with changing efficiencies and maintenance.

I wish I'd thought of trying a spring in the braid, but at the same time, it's been pretty nice not ever having to worry about smashing my false bottom when I stir the mash.
 
Brewers tend to be kind of competitive (hence the reason we have so many brewing competitions) so I think you're catching a bit of crap because you declared it "the best". Regardless, I think it's a great video. I think there are lots of newer brewers and/or brewers considering the jump to all-grain that will really appreciate it. I've seen a lot of posts where people seem to get stumped trying to follow diagrams and such. A picture is worth a thousand words and a well done video is worth even more.

To be perfectly fair, I think you may be right there and if I could change my wording now I might (I did for the video link in my signature shortly after posting it). I understand the connotation of putting "the best" on anything that I created and I'm not trying to come off as a pompous ass who's trying to up-sell his own video with marketing-hype style wording.

HOWEVER, find me a better, more CONCISE and PRECISE video with all the tips and facts included and I'll be happy to rescind my title. Better yet, if you think you can do it, go ahead and make one. If it's all about competition, light em up.

I understand, I'm young blood around here and I'm not trying to bite the hand that feeds me or stir up ****, I'm just trying to help budding brewers who are right on my tail avoid costly miscalculations and mistakes by steering them in the right direction before they get started.

A lot of thought, research and planning goes into making something like this and I'm glad most of you seem to appreciate the efforts. All the information I've culminated from this forum has been invaluable and the video wouldn't be the same without all of YOUR help, so thanks.

I'm also not perfect so if you think there's a mistake or something I could have done better, tell me about it. If it seems I've glanced over something or could have done something differently, ask about it; there's probably a good reason why I excluded it or did things differently in the video. If it's something new or improved, this is the perfect place to put that information where all can see it.

This forum is for learning and growing faster than we would ever be able to on our own. If we can share our information better, more concisely and more clearly, we will sooner grow as a community.


Thanks for the kind words microbusbrewery.
 
I used a braid for years. I used a very similar setup, but instead of having one straight piece of braid, I had a T attached to the bulkhead so my braid went in a loop. I used zip ties instead of those hose clamps, too, as I've seen too many of those 'stainless' clamps covered in rust, and don't really trust them all that much.

I got about 92% efficiency fly sparging, but I found that I was having to replace the thing after about 8-10 uses. Not a big deal seing as the braid itself was less than $8, but I definitely DID need to replace it. I found that over time my efficiency would drop some (on beers I brew frequently), and I would get weird stuck sparges seemingly out of nowhere (on all barley beers, running slowly). I'm not particularly concerned with WHAT my efficiency is, just that it stays the same so I know what I'm working with.

Finally...last year, on a trip to the hardware store to pick up a new braid—thinking about just how great those pointy cut strands on the braid feel when they're slicing up your fingers—I decided to throw together a copper manifold from a couple short straight pieces, 4 elbows, and a T (I have a rectangle with an arm that comes back across for collection) all of which cost me >$15, and dropped my efficiency down to ~86%. I've been thoroughly happy with the new setup, and have had fewer problems with changing efficiencies and maintenance.

I wish I'd thought of trying a spring in the braid, but at the same time, it's been pretty nice not ever having to worry about smashing my false bottom when I stir the mash.

A few points here...

First off, my hose clamp is specifically labeled "all stainless" although I know it's a common issue that some are only mostly stainless. I really don't think mine will but if starts rusting out, there'll be hell to pay. :p

Did you notice your braid was getting worn and mangled or you only noticed dropped eff?

I chose not to do a manifold for a few reasons (although it's certainly and option once you know why I didn't choose it). It's not as beginner friendly as the braid for a couple reasons. You have to have the means to cut the copper, then come the billion questions about soldering the copper, which fittings to use to connect it to the T, etc. You'll also need to drill or cut holes which just doesn't sound like a lot of fun to me either to be honest.

The braid is a simple as cut, remove tube, bend, and hose clamp which uses 3 fairly to very common hand tools. Plus you've got lots of options to use tools you already have (which I haven't mentioned before). You can cut the braid with a hacksaw like I suggested, or if you have large enough tin snips or a small enough braid, use those. Better yet? Try a dremel or an air powered cut-off wheel for a super fast cut. Gotta tighten down that hose clamp? If you don't have a socket set, you just might have a 1/4" nut driver laying around and if you don't have that, grab the trusty ol' flathead screwdriver and jab your hand a few times getting that sucker tightened down. No big deal.

For me, I wanted the versatility to move to a bigger AND/OR different shaped vessel. I might get a KILLER deal on a new cooler but all savings could be lost if I had to go out and build a new filter. Once you figure out where you stand and get used to the equipment, you can decide if a copper or CPVC manifold is better for you and you can tailor your equipment to your brewing style and habits. For someone who is new and lost in a world with so many options for a MLT and just wants to build the damn thing, this should put them on the right foot.

Oh and as for the using the T to create a round braid, it's a great idea and I considered doing that only after my parts arrived and decided I was not going to spend the extra money on shipping (had a PITA finding SS locally, plus I was using the biggest, baddest fittings I could get). It might be better if I was sparging differently but for batch sparging, I figured either straight or round braid, it really wouldn't matter, again, I wanted the flexibility for a different size/shape cooler, and finally, I'll save money on fittings (hell, I'm probably just going to hose clamp the thing to the nipple and ditch the hose barb and coupling on my current setup in a week anyways). :D
 
Yeah, man...I'm with you entirely on the lack of tools. I have a hacksaw, a screwdriver and a couple pairs of pliers.

I agree, the stainless braid is a great way to get going on a MLT, and that's usually the route I recommend for people (I work at the local homebrew shop) to get going at first. I do recommend the T setup, still, though. I bought the T at one of the local chain hardware stores pretty cheap—it's brass, but I don't think that there should be too much a problem with extracting lead from brass at the lower temps faced in the mash. I think that the idea for me is more maximizing the collection point, and thus minimizing dead space. In lieu of a loop, I'd suggest running a piece of wire (copper would be the easiest) inside the (probably have to use a longer piece) braid to make it cover a greater portion of the base of the tun—this is definitely something that could grow with you—snaking across the bottom of a rectangular cooler gives great efficiency—but I'm just not a fan of the straight line through the middle.

The biggest issues I had with the braid were the efficiency dropping over time, crushing under large grist bills, messing up the actual braid while stirring (widening parts, narrowing others) and accidentally stirring it way up off the bottom. That last one was likely more a problem specific to using a loop vs. a straight line, but the others will likely still apply.

Getting back to tools, though: my copper manifold is held together using friction and teflon tape! All the slits were cut using the same hacksaw I used to use to cut the ends on the stainless braid. It took me a while (and quite a few beers) to get though cutting all the slits, but the thing is solid as can be, and I don't ever have to worry about messing it up when I stir my mash. I connect to the barb on the bulkhead using a piece of 3/8 tubing. I'll confirm that the cutting of the slits is in no way fun.

At any rate, whether your video really shows the best mash tun or not, it's still a great and informative resource, and definitely something I've pointed a handful of my customers toward......albeit with the suggestion of making a loop and not using the fancy cam-locks :D
 
Yeah the camlocks are a bit of a fancy touch. However with my current setup, I need to pour my hot water into my tun and then raise the tun back up for sparging; it is INVALUABLE to me to be able to quickly pop the silicone hose on or off so it's not sitting on the garage floor while I do this and thus keeping me from having to deal with hose clamps or rotating the fitting coiling the house out of the way. Plus I expect I'll need/want them in the future especially if I ever decide to pump things and want hoses. I'm keepin mine :) but agreed, definitely not necessary.

Nick
 
No problem. I posted it to the youtube video in the description but I never put it here. I purchased parts from each of the below suppliers. Shop around, you may be able to find everything you need for your project from one or two of them which will save on shipping. Also try to shop locally if you can find someone who stocks stainless near you, although I ran in to difficulties.

Suppliers:
http://www.proflowdynamics.com (click "Camlocks for Homebrewers")
http://www.bargainfittings.com
http://www.brewhardware.com


Supplies and prices:

All metal parts are 316 stainless steel and ½" NPT unless specified otherwise. All prices include NYS tax where applicable. All quantities are (1) unless otherwise specified.

14.95 Ball valve -- 3 piece
3.50 Coupler
4.00 5/8" outlet hose barb
4.75 90 degree street elbow
3.92 "F" camlock adapter
5.62 "B" camlock coupler
7.17 3ft -- ½" ID x ¾" OD silicone tubing
2.49 1 ½" pipe nipple (304 SS)
1.99 ¾" ID x 1 ½" OD silicone gasket
3.75 NPS locknut (304 SS)
1.99 15/16" ID x 1 ½" OD washer (304 SS)
9.65 ¾" female NPT x 18" SS water heater connector
1.95 9/16" x 1 ¼" SS hose clamp
10.00 5 gallon Rubbermaid beverage cooler (used)
xx.xx Teflon tape & spray paint
$74.73 TOTAL
 
I give the video props, I hope it'll bring new brewers into all grain or beer brewing in general. I wish the series success and I'll watch 'em!

I, of course, have my bias about the consistency and long term viability of a copper manifold. But not everyone has the tools or the skills to craft one in an afternoon, so it's good that there's another way that requires minimal common tools. "Best" is a relative term...the worst of my all grain batches still beats the best extract beer I ever brewed, hands down.

So whatever get's 'em hooked into "real brewing" is good with me.
 
Yeah the camlocks are a bit of a fancy touch. However with my current setup, I need to pour my hot water into my tun and then raise the tun back up for sparging; it is INVALUABLE to me to be able to quickly pop the silicone hose on or off so it's not sitting on the garage floor while I do this and thus keeping me from having to deal with hose clamps or rotating the fitting coiling the house out of the way. Plus I expect I'll need/want them in the future especially if I ever decide to pump things and want hoses. I'm keepin mine :) but agreed, definitely not necessary.

Nick

I've started putting camlocks on everything.

Everything. I'm almost embarrassed to say it, but even the hose bibs and garden hoses are starting to get them.
 
Far and away the best video on the topic that I have seen. (check out the "takesomeadvice" guy if you want to rage) Anyone with a problem with the words "The Best" might need to rethink marketing on youtube.
 
Back
Top