Counterflow Chiller Tutorial

Homebrew Talk - Beer, Wine, Mead, & Cider Brewing Discussion Forum

Help Support Homebrew Talk - Beer, Wine, Mead, & Cider Brewing Discussion Forum:

This site may earn a commission from merchant affiliate links, including eBay, Amazon, and others.
We rolled out 2 25 foot lengths and put in hose. Then catch the end in corney keg handle. Roll keg across floor and coil that way, 1 man operation! I will post pictures when I get my expensive camera back from shop, this sucks.
 
I was actually thinking about this sort of thing today. My question is this: what kind of hops are you guys using? How are you filtering the hops when you drain from the kettle?

I've been using an IC, with a braid in my kettle, but I've noticed that I'm getting some scorching in the area around the braid. It hasn't affected the taste of my beers yet, but I'm still looking to upgrade things.

I'm using a Sanke keg for my boil kettle and it has a "Bazooka T-Screen" in the bottom. Works great as I use whole hops for most of my brews. When I DO use pellet hops I simply place them in a hop bag in the kettle. As far as scorching goes, my T-Screen is held up off the bottom of the kettle about 1cm. This is enough height to keep the wort and hops from getting trapped under the screen and scorching.

DSCF0157.JPG
 
I may have missed this answer earlier BUT....

How do these things connect to the brew pot? I know my brew pot has a ball valve, but how does the copper tubing stay secured on end of ball valve?


Am I missing something?
 
There are a few options. I think most people use a barb on the ball valve output and use some high-temp tubing to connect to the "wort in" side of the CFC... i think thats the easiest option and the most flexible...
 
img025.jpg

I made this manifold. Click around other photos to see the bottom with the holes. http://i388.photobucket.com/albums/oo329/Nikolausxx/img025.jpg With the chiller and gravity feed it will drain the kettle to the little ring at bottom. I hope this works, have only done test runs with water. I plan on using a hop sack, at least first run so that all I have to worry about clogging me is trub.
 
I got some 1/2"x1/4" reducers at Lowes, and they don't want to fit over the 3/8" soft copper tubing. I could probably force it, but I don't want to deform the soft copper.

Has anyone else had difficulty getting the soft copper to fit through the reducer?
 
I got some 1/2"x1/4" reducers at Lowes, and they don't want to fit over the 3/8" soft copper tubing. I could probably force it, but I don't want to deform the soft copper.

Has anyone else had difficulty getting the soft copper to fit through the reducer?

Yep, this is a known issue. There is a "stop" inside the reducer that you'll need to drill out with a 3/8" bit. It's still a tight fit, but if you lube up the soft copper tubing with flux it will go on with a little force.
 
I had to drill mine out too. I did a lot of testing with water, to see if this will work with gravity. And if my homade hop strainer manifold works, it will! I will let you know, tomarow night im brewing a stout. Update, the manifold I made worked great with the chiller. I drilled 30 1/8 inch holes in it. I used a hop bag, had no issues with cloging of the manifold. The chiller worked great with my cold tap water about 1/2 open, chilled wort to about 66-68. Took it about 15 minutes to drain of 5.5 gallons gravity.
 
Is anyone interested in the the original chiller in this thread? It's got 10 batches on it but it's working great. I'll run boiling oxyclean through it and blow it out before shipping. Make me an offer.

I caught an amazing deal on a huge plate chiller so it's just going to sit around.
 
Read through this today art work with my first 10G batch coming up next week and only have a 25ft IC. I was just going to do what I could with it. Then I started thinking, Why can't uncoil it and make it into a CFC. Then not 3 posts after that i saw people saying the same thing and doing it. Woohoo. Gonna see what I can't do with it this weekend. Would love to tonight but New Years party at our house tomorrow and house is a mess. Hopefully I can get this done this weekend. I want a CFC soo back. If I can offset the cost with not having to buy 25ft of copper, plus I have a big peice of 1/2" , just hose, t's, and couplings. woohoo. I was also worried about needing a pump. But now I see you can do it with gravity. Plus 10 more!
 
Well Got my 25' IC straightened out lsat night. Made a jig of 2 2x4 peices with a 3/8 hole a pushed the coil through. PITA but more uniform and easier on the coil then just unbending.

I'm now on a search for hose. No HD close to me. I have LOWES. They have a SWAN Profressional Series Premium Rubber 50' hose on sale for 24.98. It says it's rated up to 160°. Is this going to be enough?

You can use any hose, but I chose a black rubber hose just like in the tutorial because I liked the look. Since the hot stuff is in the copper, and that is surrounded by the coolant water you don't have to get a special hose rated for high temp. I did buy a 50' hose for about the price you mentioned, but I was also building two of these with a friend and splitting materials.
 
You can use any hose, but I chose a black rubber hose just like in the tutorial because I liked the look. Since the hot stuff is in the copper, and that is surrounded by the coolant water you don't have to get a special hose rated for high temp. I did buy a 50' hose for about the price you mentioned, but I was also building two of these with a friend and splitting materials.

From The OP
(1) 25' x 5/8" ID rubber garden hose (make sure it's rubber. It will be the only one that does NOT say "do not use with hot water".)

The water is going to get heated up a good bit while exchangin heat with 200+° wort. I'll just try and sell the other 25' peice here or something. or hang onto it and make another one someday to sell.
 
Both the Lowes and Creepo Depot here in town only sell 10ft., 20ft. and 50ft. lengths of 3/8" OD tubing, so I scored a 50ft. roll of the stuff from coppertubingsales.com for $39 shipped. I'll make two of these, and take the other to my LHBS to sell on consignment.

Here's the current price list as of today; since copper is a commodity, the price fluctuates (I think):

http://www.coppertubingsales.com/copper_tubing_prices.php
 
Just to clarify, the outside hose temp rating is really only a big issue if you're going to recirculate boiling wort to sanitize. Since this is done without coolant water, the copper is going to get to 212F which is touching the outer jacket in many places. If you plan to run starsan as your sanitizer, the temp is much lower.
 
Just to clarify, the outside hose temp rating is really only a big issue if you're going to recirculate boiling wort to sanitize. Since this is done without coolant water, the copper is going to get to 212F which is touching the outer jacket in many places. If you plan to run starsan as your sanitizer, the temp is much lower.

Excellent point, Bobby.

:off:, but what the hay......

I've always used bleach for all my sanitizing needs, even with CFC's. Once the boil is up and running smoothly, I prepare a 1 Tbsp/gal. H2O of bleach solution directly in my Igloo mash tun. Hook it up to the CFC and trickle it through for 10 minutes, followed by a rinse using the same method. Bleach is so much more economical than chemical sanitizers, and I've NEVER had a bleach residue/aftertaste in any of my beers, and never had problems with bugs.
 
I'll probably just use Starsan until I get a second Vessel for my HLT. I currenty use my boil kettle to heat and drain run off into buckets. then transfer into boil kettle when all done.

Thanks for all the tips. Can't wait to use the CFC. Build is planned for tomorrow. On vacation all week.
 
I made one of these a couple of years ago and it cools like I can't believe! My biggest problem is the hot wort coming in wants to soften the hose going to the cooler. Make sure you put a hose clamp on that or you might get burned.
 
Just finished my CFC build! Woohoo. SWMBO's dad brought me down a Propane Torch to borrow then told me to keep it when they left!

I think I'm gonna look into the solid banding like Bobby used. Zip ties just make it so flimsy.

To anyone else doing this who has never soldered copper before. Do a couple practice peices first I'm glad My ugly solders were on the scrap and now my chiller looks purty.

As long as my UPS box (Out for Delivery) comes within the next hour or two, I'll will be doing a day of firsts. First SMaSH (3lbs MO and 2.5oz Galena), First 10 Gallon Batch, and 1st time using a CFC :)
 
Nice! Don't forget to flush some water and PBW if you have it through the chiller before running wort in it. I was surprised at some of the gunk that came out when I flushed mine. Oh yeah...post some pics too! :D
 
I'm going to run some boiling water through it tonight. I'll post pics from brew day that got pushed back to tomorrow. Didn't order enough yeast.
 
img025.jpg

I made this manifold. Click around other photos to see the bottom with the holes. http://i388.photobucket.com/albums/oo329/Nikolausxx/img025.jpg With the chiller and gravity feed it will drain the kettle to the little ring at bottom. I hope this works, have only done test runs with water. I plan on using a hop sack, at least first run so that all I have to worry about clogging me is trub.

That will work, but you are going to get a fermenter full of trub (hot break and hops material).

I use something like that in my hlt to drain it nearly empty, but in my boil kettle I re-curve it with two elbows to point right at the keggle wall and I rotate the compression fitting to get it below the spigot (it's lowest point).

Then when my boil ends I currently am whirlpooling with a big ass spoon until my arm is tired (3-4 minutes) putting the lid on it and leaving it be for 10 minutes. Then I can draw off the wort without getting any junk at all. In fact, as it gets low you can peek inside and see the cone of trub in the middle.

I am waiting on parts to switch to an all-pump setup, and I built a little hang-on-keggle whirlpool creator that will use the pump (in my gallery) so I can skip the stirring step.
 
I'm finally using my CFC from this thread and it works great. I'm doing a siphon, and have trouble keeping it up if it's not full-bore, but my wort is coming out around 63f from a boil at full siphon with the hose at full speed in the opposite direction. When I can throttle it I should have no problem pumping it through to get even lower.

brilliant!
 
In a gravity drain system, if you want to slow the wort flow, use a little quick hose clamp on the OUTPUT of the CFC. It will keep the column of wort full and operating efficiently and you won't lose siphon.
 
In a gravity drain system, if you want to slow the wort flow, use a little quick hose clamp on the OUTPUT of the CFC. It will keep the column of wort full and operating efficiently and you won't lose siphon.

Which BTW I also have found is a very nice little feature to have
 
Bobby, good point. I was just trying to throttle with the ball valve on the keggle, which I had lugged up a ladder and set on my upturned blichmann 20g.

Now I have a pump and my fittings arrived, so brew session on the 17th should be all pump.

Like others, I store my chiller filled with starsan. After I finish using it, I remove the garden hose and drain hose, drain them and put them away, then I run hot water from the HLT through wort coil, then cold water backflush through, then I use my keg of starsan and a picnic tap to backflush with starsan. I clamp the outflow tube right at the end and leave it sit full. When I use it, then, I can run it into a bucket until wort has washed out the starsan, lose a little wort, then put it into the carboy.
 
I used mine today for the first time. Let me just start out by saying..This should be in the basic homebrewing kit. Nobody should ever have to brew without a CFC! I used to HATE the chilling process. Now it's cake walk! I just used my ball valve on my keggle and my water spigot to (I'm doing gravity fed) gain the temp I wanted. I found that my keggle ended up just full bore, and I adjusted cooling water to get where I wanted. it took 25 minutes to drain my 10G into my two fermenters at below 70 degrees. Instead of the old hour to chill 5Gallons with my IC. Thanks again for teh build thread Bobby_M
 
Just finished making my CFC. Instructions were perfect. Ending up making a simple jig to to straighten out the copper and feed the line into the rubber hose. AS suggested by IrregularPulse

IMG_1377.jpg


Do have a question though. Il be using gravity feed. I was wondering how you suggest to clean sanitize the thing. I think I remember reading you run boiling water thru then flush star-san.

Can't wait to put this baby in action for my first AG brew this weekend!!! :fro:

IMG_1381.jpg
 
I gravity fed hot water with PBW in it through, then I used a hose to backflush water through it for a while, then backflushed from a keg of starsan until full, and put a clamp on the outflow tube to hold it shut and keep the starsan in between uses.
 
Finished my first homebrew yesterday. Man was this thing awesome!

The wort chilled to 59F at about half faucet pressure (extremely high water pressure here) and full throttle open kettle valve. So actually bumped up the water temp to get 70F wort. The chill lasted about 10-15 minutes and used about 30-40 gallons of water.

Sanitation: 3-4 gallons of boiling water gravity (slow, low height), then siphoned starsan for about 5-10 minutes

Clean-up: Same as sanitation, without the star-san

Here's how I had it ridged up. Post boil pic. You can see the height difference between CFC outlet and water height in kettle is relatively small.

IMG_1394.jpg


Bobby_M thanks for the DIY!:fro:
 
Thanks to Bobby_M and others for posting ideas here. I found this thread after I made my CFC. Apparently great minds think alike ! ;)


Sorry I didn't photograph the "build", but here is my finished CFC.
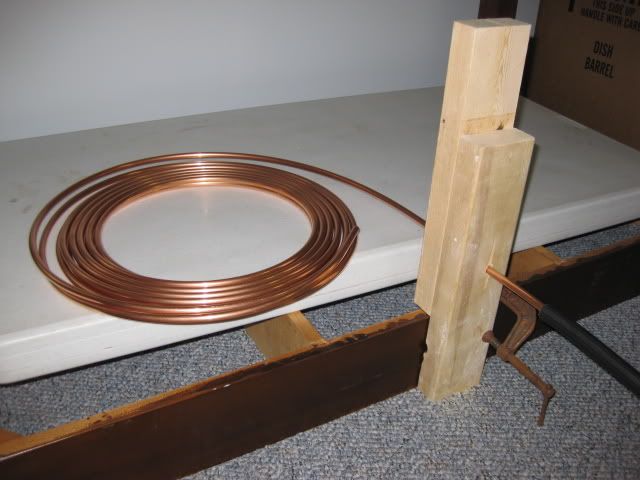
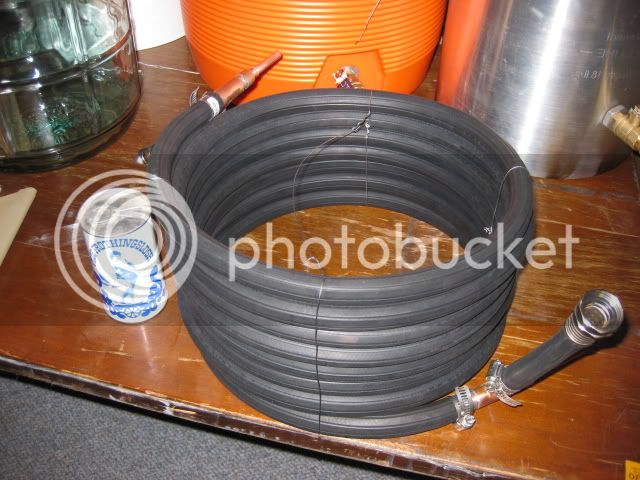
20ft of 3/8" o.d. (type L in my case) copper inside 5/8" high temp rubber hose

img_0948b.jpg


I have a couple comments and suggestions for future builders.

1) Only 20 to 25 feet is really needed for good (actually awesome!) performance. If you buy 50 feet of hose and copper, make 2 as suggested. Sell the second one or gift it to a fellow homebrewer in need.

2) Convoluted copper or wire wrapped copper would increase turbulence and efficiency, but flow is already turbulent so the benefits are marginal. If you are trying to make a VERY short and compact CFC, then these improvements may be necessary. For a 20ft homemade CFC, they only make construction more difficult and expensive.

3) No need to straighten out copper or rubber hose! The soft copper work hardens VERY quickly when flexed, so the less flexing the better.

I first carefully adjusted the 20ft copper coil to fit around a 5 gallon poly bucket. It was almost this size already, so it didn't take much effort. Then I wrapped and secured ~19ft of the rubber hose to the outside of the same bucket. The hose also had a "set" coil to it from its retail packaging, so this was pretty easy. NOTE: Plan it right and make sure both coils go in the same direction!

I then capped one end of copper with a little plastic boot, lubed up with plenty of dish soap, and literally screwed the copper coil into the rubber coil! This technique work well for this size CFC, but I expect that longer lengths and/or larger diameter copper might NOT go together as smoothly.

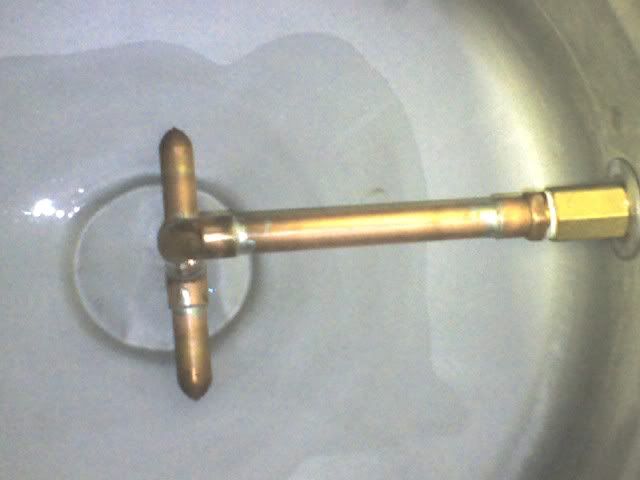
Only my local plumbing shop had the 1/2" to 1/4" reducers. McMaster-Carr also had them. MMC is a good online resource for many of the harder-to-find fittings, washers, and o-rings needed in the home brewery.

I've got decades of soldering experience and all the tools for copper plumbing, so the rest of the assembly was easy.

When I invert the bucket/CFC over the sink after cleaning, the neatly packed coils naturally drain clear. I then store my pump and several hoses and cords IN the bucket when not in use.

img_0949b.jpg


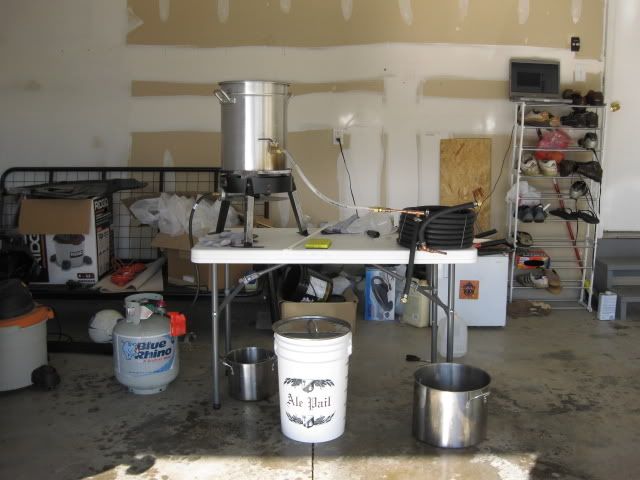
I planned my brew area to be next to my laundry area in my basement. Installed extra copper plumbing and hose bibs specifically for brewing. To minimize wasted water and heat, I'm sending the hot water discharge from the CFC into my washing machine for the next load of whites. Color me "green" ;)

Best Wishes!
2009_01_19
 
I used mine for the first time today. I know it's winter, and the tap water is colder- but I had to slow the tap water down b/c I was getting 52 deg. wort! Good stuff, thanks again Bobby........
 
Back
Top