Countertop Brutus 20

Homebrew Talk - Beer, Wine, Mead, & Cider Brewing Discussion Forum

Help Support Homebrew Talk - Beer, Wine, Mead, & Cider Brewing Discussion Forum:

This site may earn a commission from merchant affiliate links, including eBay, Amazon, and others.
Jkarp, one more thing: I cannot find appliance cord with a standard plug that will handle a 120V 2000W load. Which one did you purchase from Home Depot?? The cables all have non-standard plugs...
 
Jkarp, one more thing: I cannot find appliance cord with a standard plug that will handle a 120V 2000W load. Which one did you purchase from Home Depot?? The cables all have non-standard plugs...

Talk to your IT guys at work. I guarantee you they've got boxes of 20A power cords laying around. Failing that, Lowes / HD should carry 6 foot 14/3 extension cords. Just hack the female end off.
 
I found a 2 pack of outlet strips with 14/3 cords on them for like $6 at lowes. Bonus that I pulled the 110v switches out for later reuse. Buying the wire by the foot was far not expensive without even counting buying the male plug.
 
Jeff,

Thanks for the guide and personal attention to this long-running thread. I know you posted a "typical" brew day in a post many moons ago, but could you give a couple of recipe examples and walk through the process step-by-step? Folks new to brewing (like myself) would benefit, especially as we learn how to scale 5 gallon recipes down to 3 or 3.5 gallons.

I was inspired to put a system together based on your design and am very happy with it so far, but have only used it twice (once for an extract recipe and once for an all grain recipe). The latter was a challenge because I jumped the gun and bought the ingredients for a 5 gallon recipe (milled and mixed at the local store), so couldn't easily cut it down. Worked out pretty well anyway, I just had to add water as the boil proceeded to avoid over-filling my boiler/kettle.

Here are a few picks of my system:

Oracle, this has probably been asked before, but how is that BK insulated? It looks awesome and I'd like to replicate it in my system (when I eventually get around to building it out).
 
Self-stick duct insulation from Home Depot. SKU is 473855.

Looking at that item on Home Depot, it looks like the shiny metallic insulation product (similar to Reflectix). Oracle's BK looks like it has a coating similar to the rubber coating on some kegs? My original plan was to use Reflectix/Insulation, but after seeing Oracle's, I'm thinking I could get a bit fancier.
 
So, my switch combos have 2 extra screws! How do I wire this thing up?

I am assuming that I can wire it the same way as what I have seen on this thread and just leave the second screw alone, but I'm not sure...

Wasn't there a little paper in the box with wiring examples? Add a pic or two here - maybe someone will recognize it too.
 
96988a1f.jpg


bc70ce93.jpg
 
Hard to tell but based on other Leviton Decora instructions, the "single-pole switch controls grounded power outlet" option wants you to wire the black to the opposite side, adjacent to the white. Test and see with a multimeter or lamp to verify that the switch indeed operates the outlet as expected.

Now if you want to use this switch in addition to an SSR, you would break off that tab there and run leads from each black screw to the AC side of the SSR. That way, the switch would have the ultimate say on power, but when on, AC would pass to the SSR which would then turn the outlet on/off as required.
 
So my setup will be identical to.yours with an ssr. You are saying both wires to black screws from power in? I will do the lamp test to be sure.
 
Not sure what you mean by "power in". The SSR has two screws and there's two black screws in that second pic. Wire each to each and break off that tab between the screws. That will put the SSR into the current path between the switch and outlet.
 
Not sure what you mean by "power in". The SSR has two screws and there's two black screws in that second pic. Wire each to each and break off that tab between the screws. That will put the SSR into the current path between the switch and outlet.

Hey, thanks for the help. Finally finished the control box, works great. I did have to put the ssr between the two black screws, so that worked. In the end I only threw the circuit breaker twice, so success? The ai on the pid is really, really cool. Kettle is now finished, all electric!

A couple more parts needed to finish up connecting the pump and my new cfc and we will be online! Will have to build heat stick next to get to 5gal batches so I can brew for the wedding, but that will be easy enough now...

Way bigger project than I really thought I was taking on! Worth it.
 
In the planning/purchasing stage now to build my own jcarp CB, and I got to thinking (excuse me if its been covered, I read the thread in its entirety awhile ago, but don't remeber seeing this).

First off, I plan on doing 5 gallon batches and supplementing the boil with my stove to keep it indoors. I already use a 10 gallon cooler to mash.

Here's my thinking, could I mash in with 1.25 quarts, and keep the sparge water in the HLT/BK, the recirculate/mash out after conversion with 170ish sparge water to reach full preboil volume of 6.5 gallons? I'm certain I've seen this type of two vessel system somewhere here that used this principal, but cannot find the thread. (Edit) After reading around, I'm fairly certain that the origianal brutus 20 was based on this principal of recirulating with the sparge water, correct?
 
That's my "standard" single-rest brew procedure boswell. Traditional mash at 1.5 - 2 q/lb and then I recirculate post-mash until the system hits 170.
 
I'm working on running a set up with a few similarities to this method. The one question I'm working on now is, for the hose that recirculates back to the mash tun it looks like you have the hose just dumping into the bottom of the MT. Why / how does that work as opposed to introducing it via a manifold similar to fly sparging ?

cz
 
I think it was mentioned earlier that the hose just rests on top of the grain bed. There's quite a few folks, including Blichman's Autosparge that do this very thing.
 
I'd say it's cause he recirculates and has a false bottom (not a braid) so he doesn't have to worry about channeling, so the hose works fine.
 
If you have 2 inches of water over the grain bed there's no reason you'd be getting channeling. Worst case the hose may make a divot on the surface due to water flow, if you keep that flow down there shouldn't even be that.
 
If you have 2 inches of water over the grain bed there's no reason you'd be getting channeling. Worst case the hose may make a divot on the surface due to water flow, if you keep that flow down there shouldn't even be that.

Either way, if he cuts the grain bed first with a checkerboard pattern, channeling possibilities are drastically reduced, as the fluid is granted "paths of least resistance" to spread across the surface of the grain bed before moving downwards through it...run some fluid dynamics calcs on it and you'll be amazed at the distribution and reduced pressure on the grain bed from some simple grooves in the top 1/2".
 
I fell in love with this system when the issue came out, but have since missed place the issue.


I must've missed it, but what size batches is the original design set up to do?

Edit*** I found it, 4.5-5 gallons pre boil volume. Very cool system!
 
I'm looking to put together a replica of this system and want to make sure I have the wiring correct. Can someone take a look at this wiring diagram and let me know if anything looks incorrect? Thanks for the awesome system idea!
Electrical_Layout.jpg
 
Looks good Liquidicem. Just double-check the paperwork on the actual combo switches you buy. I've seen some that have slightly different wiring needs. There should always be instructions on how to set the switch to drive the outlet.
 
Hi Jeff and All,

Finished my version not long ago after starting with collecting and
ordering parts over a year ago after seeing the BYO article.

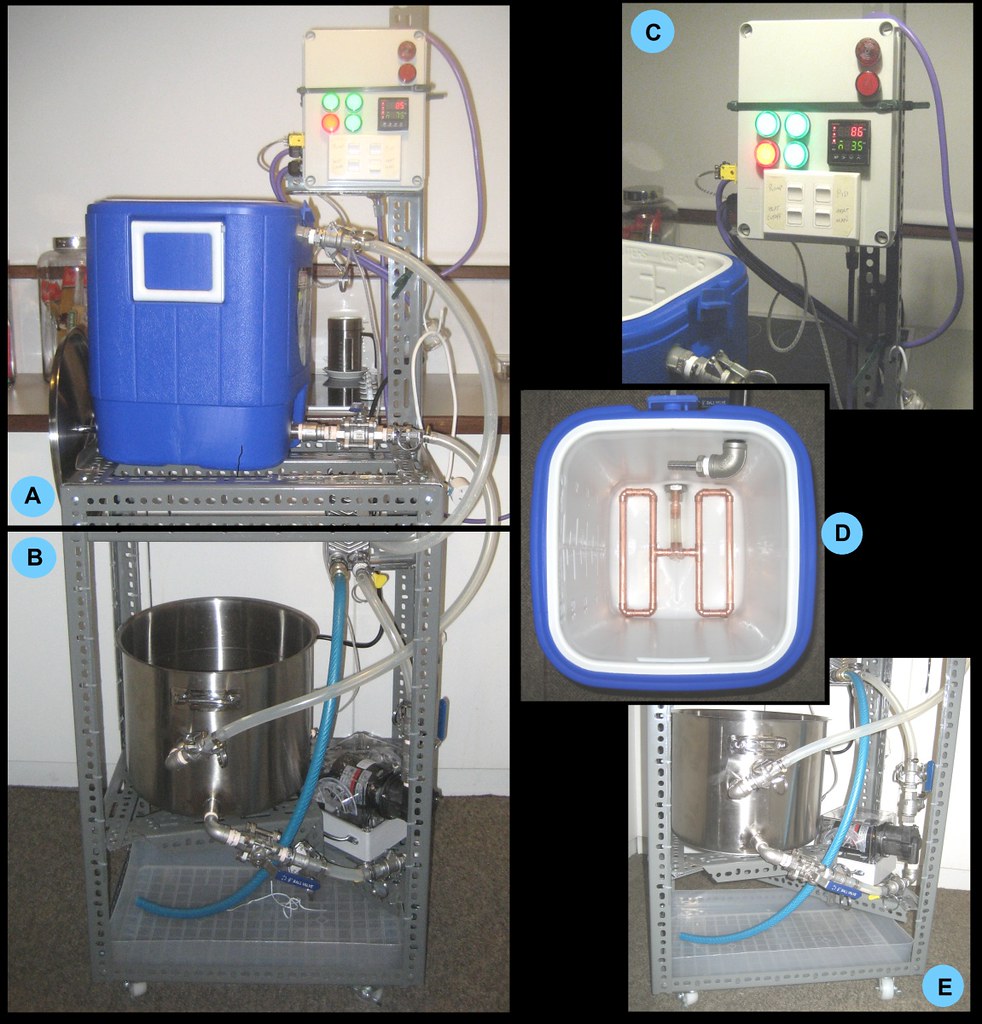
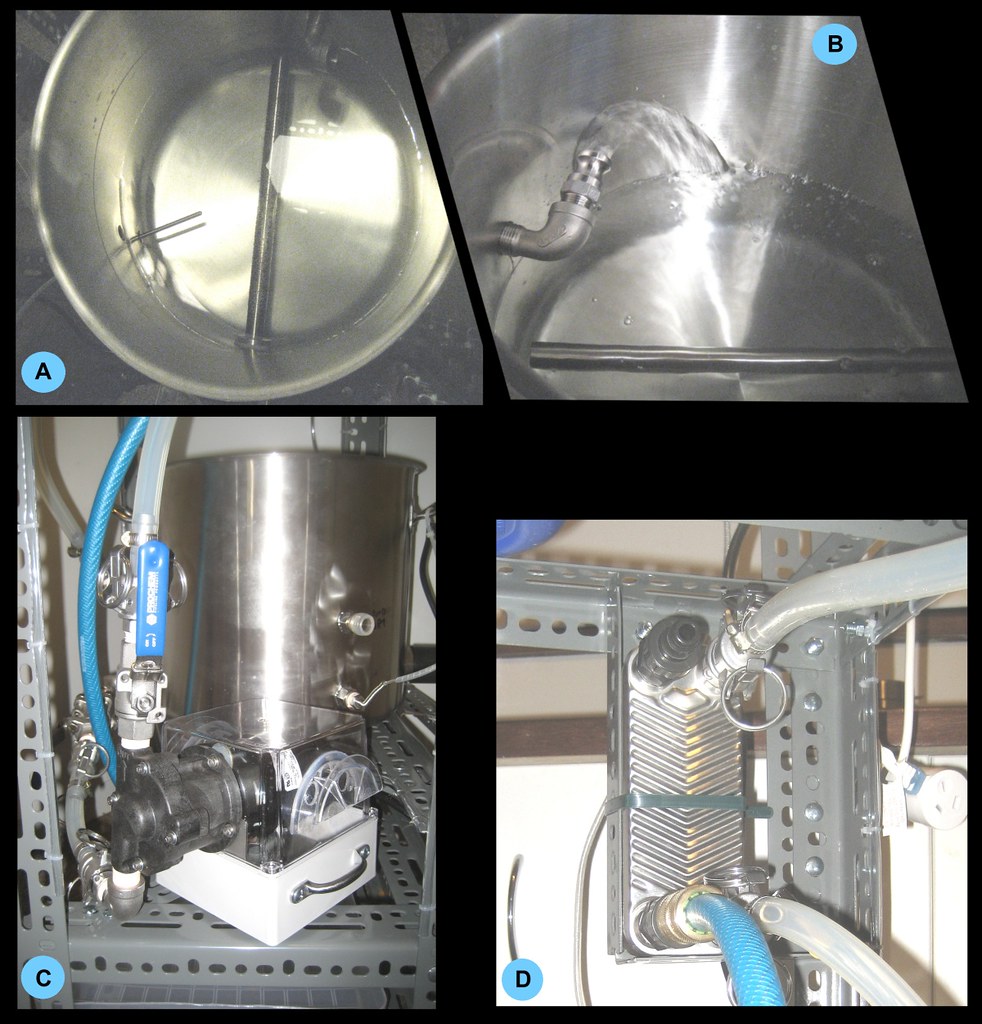
The major difference in my version is use of a plate chiller instead
of an IC. I have a fairly detailed build log in THIS article for anyone
interested (has heaps more photos - though you have to be a member
of www.aussiehomebrewer.com in order to access the article).

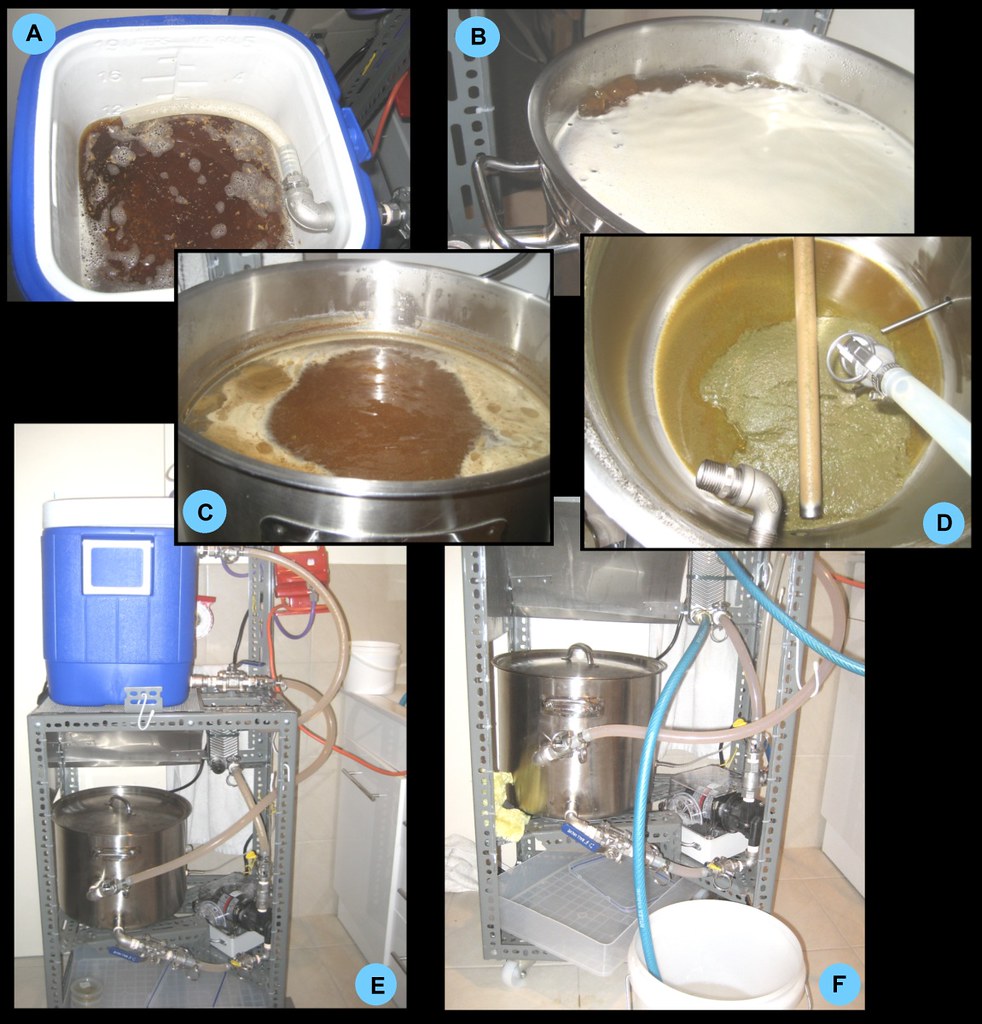
Have lots of questions needing answers to of course and still in the
stage of learning how to use my system - have done two brews on
it so far and both really used a kind of batch sparging rather than
recirculation.

To address the efficiency issues with a CRDFM system, I'm playing
with draining off a few quarts of the really high gravity first runnings
before recirculating the sparge (the first runnings get added to the
boil when sparging is done). The idea is that recirculating with lower
gravity runnings to sparge would draw out more sugars - would be
good if I can get this technique to work.

Cheers,
Tom. :mug:

6943531291_80891f2744_b.jpg


6943529867_583c23c65f_b.jpg


6943525581_38e6452961_b.jpg
 
Oracle said:
Jeff,

Thanks for the guide and personal attention to this long-running thread. I know you posted a "typical" brew day in a post many moons ago, but could you give a couple of recipe examples and walk through the process step-by-step? Folks new to brewing (like myself) would benefit, especially as we learn how to scale 5 gallon recipes down to 3 or 3.5 gallons.

I was inspired to put a system together based on your design and am very happy with it so far, but have only used it twice (once for an extract recipe and once for an all grain recipe). The latter was a challenge because I jumped the gun and bought the ingredients for a 5 gallon recipe (milled and mixed at the local store), so couldn't easily cut it down. Worked out pretty well anyway, I just had to add water as the boil proceeded to avoid over-filling my boiler/kettle.

Here are a few picks of my system:

Oracle, are you using an electric turkey fryer? I saw one on CL and thought about picking one up. What do you think about it? Thanks!
 
rmmepv,

To be honest, I am using a used Turkey Fryer that I modified for the purpose. More or less like this one:
Masterbuilt Turkey Fryer

I tried to cut a hole in the glass lid and it shattered. Had to substitute an aluminum lid from a cheap aluminum pot. The temperature controller was bad, so I bypassed the controller and wired it directly. Now I use a customized temperature controller made using a used (eBay again) Eurotherm PID 2132 switching a solid state relay (eBay, natch). Works pretty well. I replaced the spigot with an elbow joint so I could add the sight/level gauge. I also drilled a hole in the bottom and ran a copper tube out to the front with a valve on the end. I probably spent more time and money trying to cobble this turkey fryer/brew kettle beast together than if I had gone to one of the local homebrew shops and bought one off the shelf. Oh well, it works. My one suggestion is whichever way you go, I would insulate the boiler/kettle. Mine has a 1600 watt electrical heating element in it and it works much better since I added several layers of insulation (like Jeff describes in the thread). I just wrapped more on mine. You just can't see it because of the outer shell of the turkey fryer.
Best of luck. My last batch of beer with this system was a Rye Saison that turned out pretty well. I am quite happy with this scale system that Jeff originally described.
 
I'm on my way to building a 5 gallon batch version of this, puttiong control panel/box together soon. Currently I'm using the priciples of this design but with my propane burner in the garage.

Question for those with this build: How fast do you recirculate the mash during the "sparge" or the full volume recirculation?

I'm guessing much faster than fly sparging (obviously) but not running the pump wide open either.

I've done 2 batches this way and seemed to have lower effeciency both times (less than 70%) - wondering if I'm going too fast/too slow, not long enough, etc.
Might just be growing pains learning a new system but I'm still curious.

thanks
 
I recirculate fairly slowly; perhaps 1 quart per minute through a keggle false bottom.

One thing I have found with the recirculating no-sparge system is that crush on the grain matters far more. I started malt conditioning and crushing finer and got far closer to the theoretical efficiency of the system. I am getting about 97% conversion efficiency which is driven by the crush, and then lauter efficiency is governed by system losses and the pre-boil gravity of the beer. A combination of conversion and lauter efficiency gives you your brewhouse efficiency. Braukaiser has a great write up on this if you are interested.

Joshua
Interesting. I've always kind of suspected this, but have always gone with the standard crush from my HBS. I've been wanting to buy my own crusher so I can have better control over this process. Can you give me some guidance on how best to set up a roller mill for this finer crush?

I'm using a PhillsPhalse Bottom in my cooler and a rather thin mash. Are stuck mashes a concern with a finer crush?

Thanks!
 
I was wondering, using the CB20 is it possible to do parti-gyle batches? or are most of the sugars extracted after the recirculation period?

Either way, I will be building this system in the fall.
 
Don't see why not ToddPEI. I'd draw off 1st runnings and then recirculate before 2nd runnings.
 
OK, I'm new to grain brewing. Never have done it yet. Like to build this system. I have a dumb question but do you ever have clogging of hops in the lines and pump when pumping from the kettle through the chiller? Also, do you have to run your cooled wort from the brew pot through some kind of strainer into your fermenter? How long do you leave the cooled wort in the kettle to settle all the particulates prior to draining? Would be nice to see some recipes that have been used in this exact same design. I really don't understand a lot of the technical aspects of formulation, efficiancy and whatever, but I can easily follow a recipe and time table to make a brew. I have only done extracts on the stove and thought they all were good until I had a bottle of a home brewed all grain. Just a dumb retired fireman and haven't found a beer I didn't like.
 
Back
Top