You are using an out of date browser. It may not display this or other websites correctly.
You should upgrade or use an alternative browser.
You should upgrade or use an alternative browser.
Spunding Valve - Commericial Style DIY
- Thread starter jcaudill
- Start date

Help Support Homebrew Talk - Beer, Wine, Mead, & Cider Brewing Discussion Forum:
This site may earn a commission from merchant affiliate
links, including eBay, Amazon, and others.
OP
OP
jcaudill
Well-Known Member
Alright guys! I know it's been a while but I've finally picked this back up again! I ordered a couple of things to try from MMC. I'm going to try a floating rod inside the spring, and also a tube outside the spring. I suspect the rod inside is going to work better but I want to make sure! I will provide an update soon - no more messing around.
OP
OP
jcaudill
Well-Known Member
Ok so - I've tested the valve on a couple of batches and for the most part it works as it should. The problem now is that the spring is wanting to rotate around the ball. It would be much more ideal if the spring contacted something flat. The side effect here is that as the valve is tightened or loosened you don't quite get an even release of pressure because you can get more pressure on one side of the ball than the other. It would be ideal if I had something that kind of looked like a golf tee but the head would be more cupped to contour around the ball below and the pin would be bigger in diameter to keep the spring straight. Have to do some digging.
wailingguitar
Well-Known Member
I haven't chimed in here in a while, just want to again say I applaud your work on this ")
Stealthcruiser
Well-Known Member
Sub'd!
KPSquared
Well-Known Member
Any progess on this? It's been a while. . .
OP
OP
jcaudill
Well-Known Member
Sorry you are right!
Well, yes and no. So, it works - it's just not perfect. I have two problems:
1) After you've had the spring cranked down on the ball long enough the ball will get stuck. It's not really a diameter issue, it just becomes kind of temporarily "glued" must like TC gaskets do after being clamped for a while. So when you are first opening the valve, you have to pretty much open it up all the way and let it release then tighten it back down.
2) The ends of the spring really need to be ground flat. Since normal springs aren't, the pressure gets applied a little unevenly. This isn't the end of the world, it's just that a full turn may not actually get you more pressure relief because the spring may be pushing to the side.
Again, it works and I have used it on every brew thus far successfully. I will try and post the parts list up tomorrow or Tuesday. I know I've said this before, but I mean it this time haha.
KPSquared
Well-Known Member
If I just ask everyday for a parts list, Will it eventually inspire you?
OP
OP
jcaudill
Well-Known Member
Better late than never - right!

Ok so let me kind of explain how this works and then I can provide some part numbers. Keep in mind - this is not a perfect solution - but it works relatively well. The biggest issue is if you keep cranked down on the ball will get lodged in the NPT adapter unless there is enough pressure to dislodge it. Once that happens everything is fine. Sometimes though as you're releasing tension on the spring this can happen suddenly and water will go everywhere.
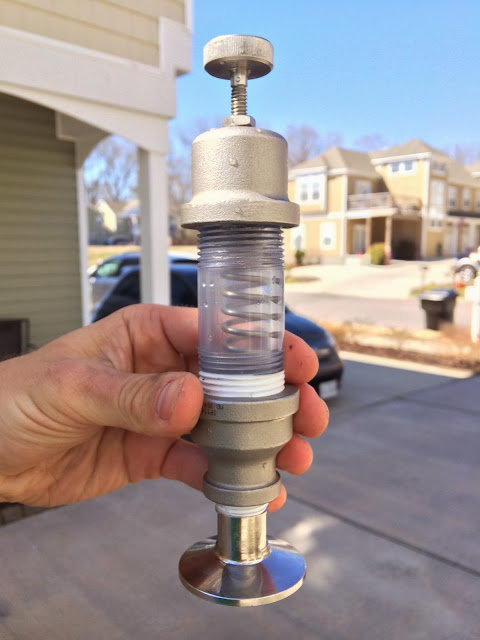
Back to how this works: the top PVC cap is threaded. The thumb screw goes through the tap and hits a thumb nut which sits inside the top of the spring (there is also a washer in between to make sure the thumb nut doesn't bind with the spring). When tightened, the thumb nut compresses the spring against the ball below which will seal up the opening in the NPT adapter. There is a length of 1/2" stainless round tube that floats inside the spring and this prevents the spring from kinking too severely. In my case I've adapted it from triclamp but that is obviously optional. The PVC cap has a few vent holes drilled (around 3/16") to let the pressure escape. It's also a good place to allow you to fill the valve. There is a locknut threaded onto the thumb screw before the cap to allow you to lock the screw from tightening (also a good way to remember where it was last time you used it).
So here are parts:
NPT adapter (reducing coupling 1" x 1/2"): McMaster 4464K534
4" clear PVC, 1" NPT: McMaster 4677T33
3/4" Viton rubber ball: McMaster 3645K7
1" PVC cap: McMaster 4596K44 or 1" Stainless cap: McMaster 4464K512
Thumb screw: McMaster 93015A217
Thumb nut: McMaster 90368A250
Spring: McMaster 1986K132
Stainless round tube: McMaster 8457K26 - I have to verify the cut but I believe it is 2.75-3".
Washer: McMaster 92217A520
Locknut: McMaster 91847A029
All these parts have really specific sizings so take note if you're trying to substitute something. The OD's are tight.
I'd recommend making sure you don't have this plumbed in such a way it could leak back into your fermenter. Mine has never leaked but it is always possible and you fill it with plain water (I use distilled).
Any questions - let me know!
Ok so let me kind of explain how this works and then I can provide some part numbers. Keep in mind - this is not a perfect solution - but it works relatively well. The biggest issue is if you keep cranked down on the ball will get lodged in the NPT adapter unless there is enough pressure to dislodge it. Once that happens everything is fine. Sometimes though as you're releasing tension on the spring this can happen suddenly and water will go everywhere.
Back to how this works: the top PVC cap is threaded. The thumb screw goes through the tap and hits a thumb nut which sits inside the top of the spring (there is also a washer in between to make sure the thumb nut doesn't bind with the spring). When tightened, the thumb nut compresses the spring against the ball below which will seal up the opening in the NPT adapter. There is a length of 1/2" stainless round tube that floats inside the spring and this prevents the spring from kinking too severely. In my case I've adapted it from triclamp but that is obviously optional. The PVC cap has a few vent holes drilled (around 3/16") to let the pressure escape. It's also a good place to allow you to fill the valve. There is a locknut threaded onto the thumb screw before the cap to allow you to lock the screw from tightening (also a good way to remember where it was last time you used it).
So here are parts:
NPT adapter (reducing coupling 1" x 1/2"): McMaster 4464K534
4" clear PVC, 1" NPT: McMaster 4677T33
3/4" Viton rubber ball: McMaster 3645K7
1" PVC cap: McMaster 4596K44 or 1" Stainless cap: McMaster 4464K512
Thumb screw: McMaster 93015A217
Thumb nut: McMaster 90368A250
Spring: McMaster 1986K132
Stainless round tube: McMaster 8457K26 - I have to verify the cut but I believe it is 2.75-3".
Washer: McMaster 92217A520
Locknut: McMaster 91847A029
All these parts have really specific sizings so take note if you're trying to substitute something. The OD's are tight.
I'd recommend making sure you don't have this plumbed in such a way it could leak back into your fermenter. Mine has never leaked but it is always possible and you fill it with plain water (I use distilled).
Any questions - let me know!
KPSquared
Well-Known Member
Thanks! I think I'll cobble one of these together!
- Joined
- Nov 8, 2012
- Messages
- 108
- Reaction score
- 43
I may take inspiration on this and use a teflon ball and install an o ring at the base since teflon is a very slippery surface and won't stick to the gasket. or use a teflon o ring along with your ball. Email me if you want to hear more.
I may take inspiration on this and use a teflon ball and install an o ring at the base since teflon is a very slippery surface and won't stick to the gasket. or use a teflon o ring along with your ball. Email me if you want to hear more.
I was actually thinking something similar. A SS ball and maybe just lube it up lightly so that it seals/does not stick. Of course building one of these is a fair bit off for me but I love to read up on these builds.
OP
OP
jcaudill
Well-Known Member
I am not sure how I missed the replies to this but: you took the words out of my mouth. I'm going to swap the Viton ball for a stainless steel ball instead. I have a couple different sizes on order. I really think this is going to solve the problem once and for all with the Viton ball sticking and they are actually cheaper than those Viton balls! So stay tuned. I should have a chance to test this so stay tuned. This is really the only real problem that I've had with this valve - otherwise it has worked flawlessly.
I may see about the possibility of having a custom part made for it - replacing the floating stainless tube with a stainless tube/cup so that the spring puts better pressure on the ball. That would be the last thing I think that would really clean this up.
I may see about the possibility of having a custom part made for it - replacing the floating stainless tube with a stainless tube/cup so that the spring puts better pressure on the ball. That would be the last thing I think that would really clean this up.
Great engineering, just a few thoughts, perhaps you have tried or not....
Rather than using a soft material for the ball how about using a harder substance like nylon plastic or even stainless steal or copper
For the uneven spring pressure issue how about a slightly larger diameter spring that applies pressure to a flat surface, perhaps a weaker spring in a longer tube will help? The larger diameter spring will allow for a more even for print, spread out the tension better.
Just a few things for the OP or someone else wanting to improve on what seems to be a very well thought out idea....sometimes I think I enjoy the engineering of brewing more then brewing it self...
Sent from my iPad using Home Brew
OP
OP
jcaudill
Well-Known Member
The stainless ball I have on order so I'll be testing that out and will post back. The spring is a tricky matter - finding the right combination of OD/ID and the part to push down on top of the spring is not particularly straight-forward. But let me dig a bit and see what I can find. The rotation around the sphere really is a minor inconvenience more than a real issue I'd say.
OP
OP
jcaudill
Well-Known Member
Ok I'm going to get a slightly wider spring, but in 3" instead of 4" (which means a 3" PVC housing will be required - luckily I have this on hand to test) and in order to stick with the same thumb nut and thumb screw combo (which works well), I'll get a washer to fit around the shaft of the thumb nut and make sure the OD of the new spring is covered. Should have this all by Tuesday so stay tuned!
OP
OP
jcaudill
Well-Known Member
So the updates to the valve are very promising. I'd like to put it in action to test it out but the basic test of how it holds water look good.
Here's a summary of the changes:
- Removed the floating stainless tube.
- Changed the spring out to a 3.125" spring that is about 3/4" wide.
- Changed the viton ball out for a stainless 5/8" ball.
- Added an additional wider washer between the spring and thumb nut (so there are two washers now). This increases the area of the thumb nut and prevents it from moving side to side and it is almost up against the PVC tube.
- Reduced the PVC tube from 4" to 3".
Last thing I'll do is change the TC adapter/reducing coupling combo out for a TC->NPT adapter from Brewer's Hardware. Eliminate a connection = win!
KPSquared
Well-Known Member
Is the stainless ball going to seal? It's not like the inside of that reducer is machined to any specific tolerance.
I hope your redesign works. For $70 that's a pretty cheap valve!
Sent from my iPad using Home Brew
I hope your redesign works. For $70 that's a pretty cheap valve!
Sent from my iPad using Home Brew
Nope the ball does not seal - however: an o-ring fixes that. I'm going to post an update soon.
Depending on what your plans are for this, it may be worth it to have a machine shop machine the part so the stainless steel ball seats better, I wonder, will the o ring cause issues with the ball sticking?
Sent from my iPad using Home Brew
OP
OP
jcaudill
Well-Known Member
Depending on what your plans are for this, it may be worth it to have a machine shop machine the part so the stainless steel ball seats better, I wonder, will the o ring cause issues with the ball sticking?
Sent from my iPad using Home Brew
I have looked into having certain parts machined, but it gets really expensive really fast so I'd have to have critical mass.
I like the idea of keeping it as simple as possible - it makes it easier to source parts and it removes a certain element of complexity from the mix.
I don't know if the o-ring will have any kind of issues. My gut tells me no because even if it does stick it'll stick to the ball or the coupler and either case is no issue as long as it seats again. But only some field testing is going to prove if this is a real problem or not. I think the key will be to find one that fits tightly inside the coupler. If I can do this I predict there will be no problems.
Stay tuned!

Far be it from me to stifle this kind of creativity, but why does it have to be so big?
If the oring is the seat for a ball, you may have some issues with it getting thrown out of position during extreme vent situations. I've had that happen when I was working on prototypes of the same design. It will work for 10 tests and then just the right kind of flutter and boom, it's out of place and leaking. The $12 version you can find on amazon has the oring in a gland on a bullet shaped valve and it seats into a similarly tapered seat. I have to wonder, if a metal ball on an oring seat works, wouldn't a rubber ball work too?
If the oring is the seat for a ball, you may have some issues with it getting thrown out of position during extreme vent situations. I've had that happen when I was working on prototypes of the same design. It will work for 10 tests and then just the right kind of flutter and boom, it's out of place and leaking. The $12 version you can find on amazon has the oring in a gland on a bullet shaped valve and it seats into a similarly tapered seat. I have to wonder, if a metal ball on an oring seat works, wouldn't a rubber ball work too?
OP
OP
jcaudill
Well-Known Member
The o-ring is fully contained inside the coupling and it's pretty deep so I really can't see it becoming unseated. I will take some pictures to illustrate this.
As for the size: it doesn't have to be I suppose. But when it's connected to a 40bbl fermenter it is adequately sized to see it from a distance. I kept it the same size for my 1bbls for this reason. You could use a smaller pvc tube and smaller spring to reduce the height.
As for the size: it doesn't have to be I suppose. But when it's connected to a 40bbl fermenter it is adequately sized to see it from a distance. I kept it the same size for my 1bbls for this reason. You could use a smaller pvc tube and smaller spring to reduce the height.
OP
OP
jcaudill
Well-Known Member
Sorry completely ignored the rubber ball question.
I tried a viton ball first - in 3/4" diameter. The problem there is two fold: 1) the large diameter ball doesn't sit inside the spring very well so the spring likes to rotate around the outside of the ball and thus kinks 2) the bigger issue is the ball gets glued inside the coupler and this is a big problem if you want to maintain low pressure - the only way to unseat it is enough pressure built up inside and this makes a huge mess. Reducing the diameter will exacerbate the problem and a larger diameter will exacerbate the problem I mentioned previously. I just don't see rubber balls ever working right unless they are incredibly hard and then why not just use stainless!
Also - everything I have used is caustic, nitric, phosphoric and peracetic safe which is a big deal in a brewery.
Ok, well size makes sense when you're working with that volume of co2 on a big fermenter. Re: the rubber ball, I'm surpised the rubber ball would get stuck but a metal ball on an oring wouldn't. It would seem that they both offer the same contact patch, rubber to metal. The proof is in the pudding through, carry on.
OP
OP
jcaudill
Well-Known Member
Ok, well size makes sense when you're working with that volume of co2 on a big fermenter. Re: the rubber ball, I'm surpised the rubber ball would get stuck but a metal ball on an oring wouldn't. It would seem that they both offer the same contact patch, rubber to metal. The proof is in the pudding through, carry on.
Well, honestly I can't say that for 100% certain because my initial testing has only been using air from my compressor at certain levels of pressure. I need to put it on my fermenter and go through a brew and then I will know for sure if there will be an issue.
But - here's my thinking. The biggest problem with the viton ball is it's soft enough where it would actual mold itself under spring pressure to the coupling. That is why I would have such a hard time getting it unseated. This is a big problem if you are not spunding but rather doing a pressurized fermentation which I do for my weizens at just 1PSI 24-hours after fermentation begins. 1PSI wouldn't be enough to unseat that ball. But if I'm building say 15 or 17PSI then I can get it unseated but what ultimately ends up happening is you need to loosen it almost to the point there is no spring tension and then you get unpredictable pressure release that blows all the water in the valve out. It's a mess. So my thinking with the oring is there's nothing that can really form. And if the o-ring sticks to the coupling and the ball comes loose things are still good. If the o-ring sticks to the ball and not the coupling we are still good. If the o-ring sticks to both there is a problem but I really cannot fathom this happening. On the stainless ball side there's nothing for the o-ring to really form to.
Make any sense?
As for what I was trying to explain before - the oring is not sealing to the reducing coupling. What it is actually sealing is the end of the 1/2" NPT->TC adapter that is threaded into the reducing coupling. That is why this works and what I said the o-ring is deep enough I don't think it will come unseated.
cyberbackpacker
Well-Known Member
Have you ever considered a Delrin ball? Delrin is frequently used as bushings because it has natural "lubricant-like" properties, and could be of value here. It wouldn't stick to the spring, wouldn't conform to the spring, would be able to rotate freely as pressure dictates, and you eliminate the need for the o-ring-- one less fail point.
Just something to think about.
Keep up the great work!
Just something to think about.
Keep up the great work!
OP
OP
jcaudill
Well-Known Member
I haven't, but I can/will! I always like the idea of more simplicity.
The question is: is it soft enough to seal but hard enough not to conform? That is the real trick. The viton ball wasn't conforming to the spring, it was actually conforming to the end of the adapter inside the reducer coupling.
The question is: is it soft enough to seal but hard enough not to conform? That is the real trick. The viton ball wasn't conforming to the spring, it was actually conforming to the end of the adapter inside the reducer coupling.
cyberbackpacker
Well-Known Member
IIRC you can actually find different densities of Delrin. That said, I do not know if it has the soft enough/hard enough composition that you need, but I do know it is good stuff and thought it might be worth experimenting with!
I've had no luck with delrin. The two versions I've used were too hard to seal on an unrefined seat. I think it's pretty hard to get a good seal on a seat with a 90 degree profile in general. If the ball is being deformed into the cavity, the diameter needs to be bigger. However, I see that it wouldn't be possible because it would hit the next fitting up.
OP
OP
jcaudill
Well-Known Member
It seems to be a never ending cycle of increase diameter of ball which means you really need to increase the diameter of the spring and it gets a little bulkier because now you're talking >1".
I may seek the machining route at some point because there is a better design than using a ball. But I have so much money tied up into trying this and that and so many extra part now that I will just hold off on that a bit!
I may seek the machining route at some point because there is a better design than using a ball. But I have so much money tied up into trying this and that and so many extra part now that I will just hold off on that a bit!
Jeffegale
Member
Hey jcaudill, I saw where you said it passed the compressor test but any updates with the SS ball and o-ring in a real brewing application? I just found this thread and I really enjoy reading what you are doing. Keep up the hard work and us posted!
OP
OP
jcaudill
Well-Known Member
Hey guys! So sorry it's been months since I've replied to this. Unfortunately life got a little busy and I had to sideline this project and brewing in general.
But I'm back to it and here's a little update. The SS ball/O-Ring is definitely more stable but still not perfect. I've had two issues that have been nagging. The first is the o-ring dries and temporarily "glues" itself onto the ball. Usually keeping it under water will solve this but not everytime. Perhaps a little keg lube would do the trick.
The other issue is that sometimes the o-ring can slip out of place. Even though it's a decent fit into the adapter, perhaps it needs to be bigger. Once it slips up the side you have to disassemble the valve and reseat it.
The good news is that, when it does work it works well! I just have to come up with some kind of solution that is going to eliminate nagging issues. It's a real B*TCH when you're first opening the valve and that o-ring gets out of place and you lose all the pressure in your fermenter!
Similar threads
- Replies
- 5
- Views
- 690
