I'm Ready to Build a Stand

Homebrew Talk - Beer, Wine, Mead, & Cider Brewing Discussion Forum

Help Support Homebrew Talk - Beer, Wine, Mead, & Cider Brewing Discussion Forum:

This site may earn a commission from merchant affiliate links, including eBay, Amazon, and others.

KellyL

Active Member
Joined
Dec 26, 2008
Messages
26
Reaction score
1
Location
Belleville, IL
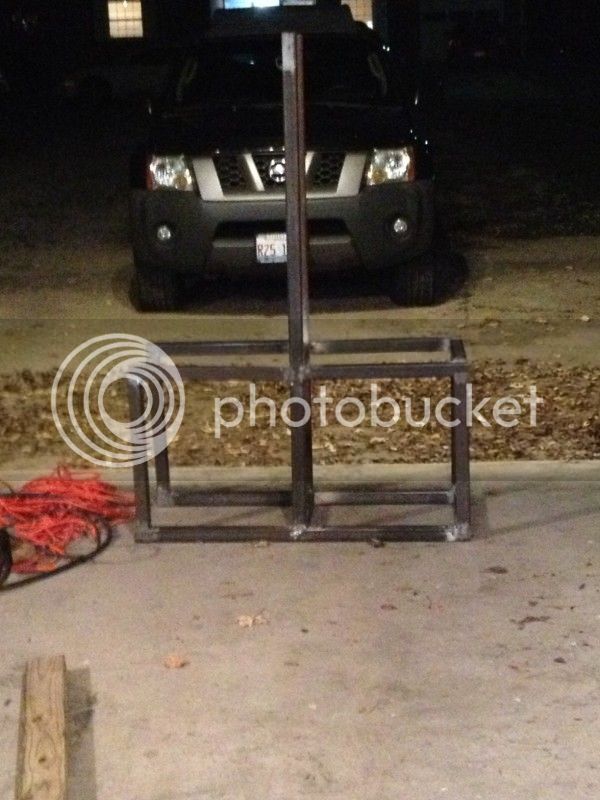
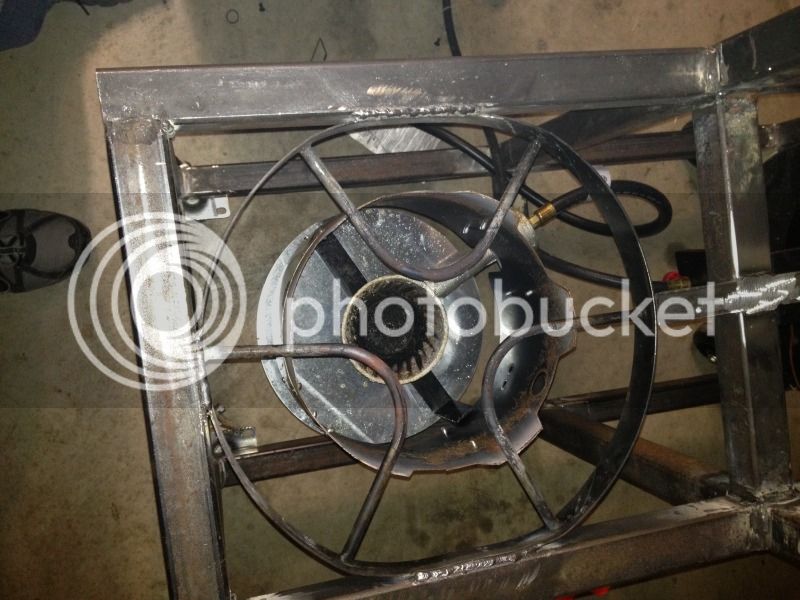
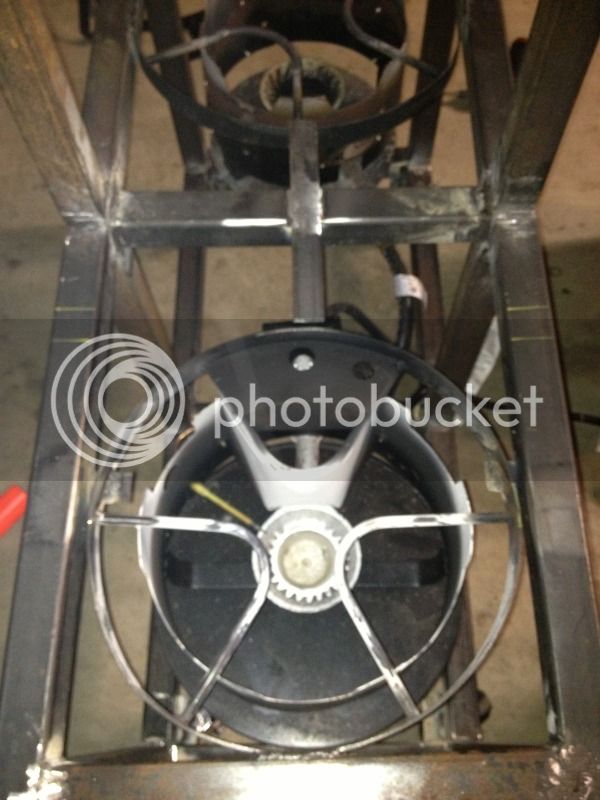
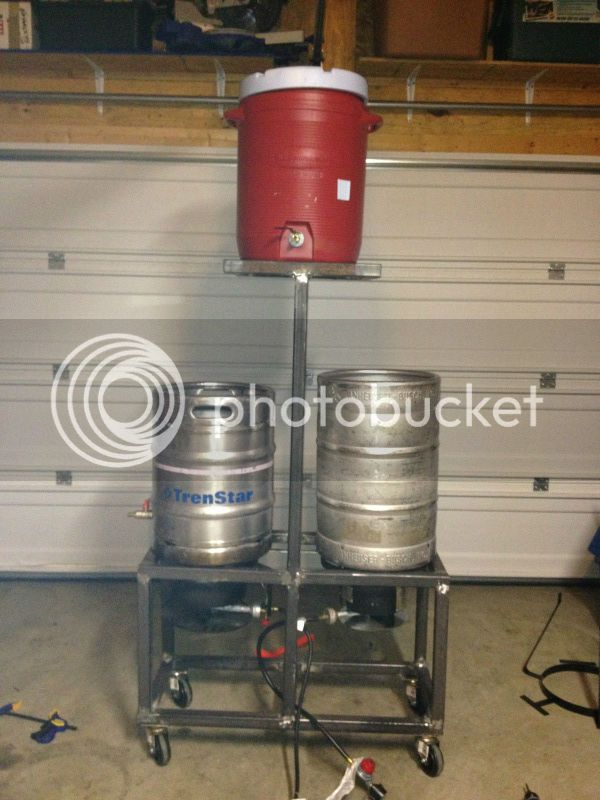
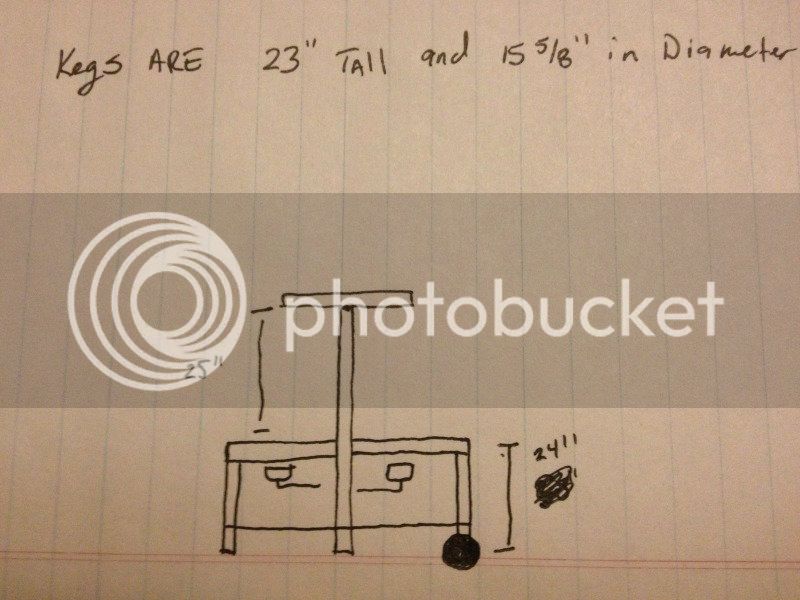
I have a friend that welds and has left over steel. I told him about my idea and he's itching to build. I'll have to buy more steel to complete it but here's my drawing. I don't have a pump but may get one soon if the expenses on this are low enough. I need something compact but cant use a 3 tier because of the height in my garage (it's the midwest and it gets COLD). I came up with this plan to keep the mash tun (cooler) away from the flame. Even without a pump I can use a pitcher for the water and gravity feed the rest. This will also help when I get a pump because I wont have to worry much about sanitation. I plan on installing a water filter as well but this should be a pretty easy, manual stand right?

Thoughts?

standdrawing.jpg
 
If it was me I would try to prevent anything from over haning my two bottom vessles. If you have just enough width to fit a keg on top then there will be roughly 7 inches of overhang, or about half over your lower vessles. I would extend the bottom out wider so there is nothing that is over the two on the bottom. But for the most part looks good.

What type of burners are you planning on using? Is a water filter needed where you live?
 
If you'r pretty set on the width of the bottom section, how about making the top section have a stow position above the lower kegs and a "in use" position to the front or back of the lower section? you could have pins in slots for the stow and half of the in use postion and maybe an added leg for the part that is away from the stand, also pinned in place for security. I like the idea, looks good. But as Tally stated I woulnd't want my two lower kegs half covered which might also be an issue for your cooler due to steam.
 
I need the stand to be compact and short, this is why its set up the way it is. I may make the center mast a bit taller, but not much. I'm going to reuse the burners from two turkey fryers for now but may upgrade later. I want to add the filter so I can use my garden hose as a source.
 
I just spoke with the welder, told him we'll raise the center up and brace it from the center mast to the edge of the top tier. Then we'll tack sheet metal to it as a heat shield and to allow any condensation a path down (other than in the kettle)
 
Garden hose = bad day

Find a potable water hose to use - usually white or blue, from an RV store.
I'd thought of using a hose too, but found out thru the forums that using a garden hose is not a good idea.

Nice setup! I'm trolling these threads too, trying to get an idea for when I clean the ol' garage..

- B916
 
I grew up drinking garden hose water. Used to brew with it for over a year, still alive.

Not saying its perfect but meh
 
"Garden hose" should have been outside spigot. I plan on using a potable water hose just in case. FYI, I service aircraft and we fill our potable water trucks out of a sanitized (and inspected monthly) green garden hose.

Welding starts tomorrow after my son's 9AM football game.
 
We got the steel cut, mocked up and partially welded together today. I changed my mind on the height of the second tier and it's going to give me more room for working in the keggles. Thanks for the suggestion. I still need casters and a way to mount the burners. I'm pretty pleased with today's progress and should get a little more done tomorrow.

RoughStand.jpg
 
We got the stand welded together and most of the welds smoothed out. The casters are uneven and I have to sort that out. His shop floor must have had a huge dip in it right where we were working. I still have to figure out the mounting for the burners and get it painted. I wont be getting any of that done until my own garage gets cleaned out.
 
I like the design but I think you're really going to want a pump ASAP. I'd recommend adding mounts for a pump, water filter, plate chiller, etc. now, even if you don't add these items for a while. Here's a link to my build on my blog that might give you some ideas for simple mounts. Also make sure your heat shield is effective so you don't melt your cooler mash tun when your HLT burner kicks on.
 
I have finally made progress. Between my son's football season, my college classes, my wife's college classes and my 2 yr old twin girls I haven't had time for anything. I went to Harbor Freight and got the cheap flux core welder to finish this up at my convenience. It only took a few minutes to adjust the welder to where I was getting decent beads even with their crap wire.
bead.jpg


I have three turkey fryers, one square and two round. I like the stability of the square one so I cannibalized the round ones. The first one was too big so I flattened out the sides and welded it in.
Burner3.jpg


The second one was too small so I welded some tabs to support it and tacked it in to place.
burner1.jpg


The second one had the stupid safety shut off thing I pulled it apart and took out the spring and rubber gasket. It started like a regular burner so I'm pretty sure I'm in business.

After tonight's work I'm at this point.
Untitled.jpg


I still need a pump and a "Y" fitting for my propane bottle. I will eventually add a mount and caster for the propane and a mount for the pump and water filter. Next is the tedious task of cleaning it up for multiple coats of paint.

It's not as fancy as some, but it's better than what I had. It takes up very little space and best of all, I did it myself.
 
Nice job. Have you test fired your burners with keggles in place? The reason I ask is it looks like they sit pretty much flush on the frame. If exhaust gases can't vent, you end up with a yellow flame and soot. If that happens, it's pretty easy to fix with some pieces of roundbar or angle iron to lift the keggles up a bit.
 
The burners have never given me a really good blue flame even with nothing on top. They aren't as sooty as some burners but they do leave a bit of crud on the bottom.

I'm going to upgrade eventually to either banjos or jets, that's the nice thing about the heavy duty frame. I can grind something off and re-weld in it's place.

I can eventually throw a burner on it for the top tier if I want and the propane holder can fold out from the back side with a hinge and another caster. The base is narrow enough to not take up a ton of room in the garage but I can still add on to it to make the stand more functional.

Now that I have working burners I will throw together a few extract batches to get production up while I think about the pump and other odds and ends.
 
After over two years with no work on this (and a March pump sitting in my garage), I am now able to work on stuff that interests me. Making beer is first on the list (of course). I was traveling at least half of each month from the time I built the stand until now. Anyway, I brewed two doctored up extract kits to wet my whistle and next is all grain.

I was going to use PEX or CPVC but that seemed like a half assed solution in case I wanted to move boiling liquid later. I ended up using copper and silicone and I think I'm pretty pleased with my progress this afternoon.

I didn't like how the pump was sitting vulnerable so I looked in the recycle bin and saw a vinegar bottle. Now I have the pump mounted, the main copper line sweated together, I have the bulk of the work done. I still need to get more silicone tubing to connect the HLT to the bottom (inlet) of the pump.

The copper goes up higher than the Mash Tun, but I haven't connected the spare arm yet. I'm not sure if it will be rigid or flexible (braided faucet line).

I still like this stand because I don't have to worry about cleaning out the pump head. Nothing but hot water is pumped and gravity does the rest.

Thoughts?

Kelly

pump cover.jpg
 
Back
Top