Got a Turkey Fryer Kit.... Now What?

Homebrew Talk - Beer, Wine, Mead, & Cider Brewing Discussion Forum

Help Support Homebrew Talk - Beer, Wine, Mead, & Cider Brewing Discussion Forum:

This site may earn a commission from merchant affiliate links, including eBay, Amazon, and others.

MetallHed

Well-Known Member
Joined
Jun 7, 2010
Messages
831
Reaction score
32
Location
Chippewa Falls
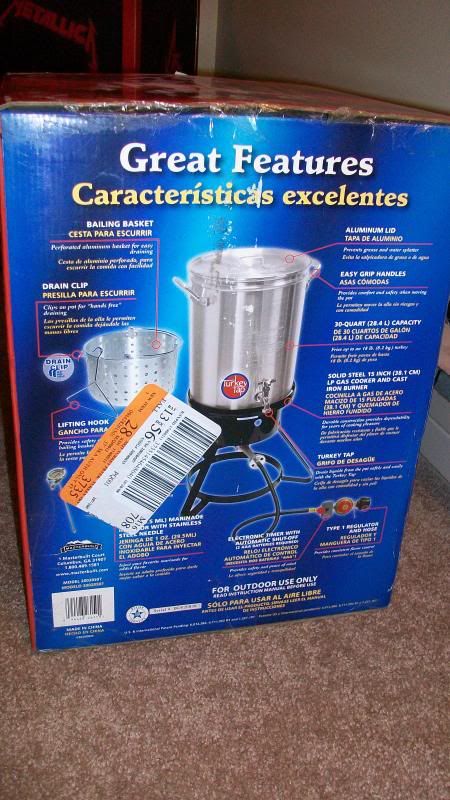
I picked up a turkey fryer kit at Kmart for 60 bucks...

What does this change?

I figured I could do full boils with the 30qt. pot. This affects hop additions, correct?

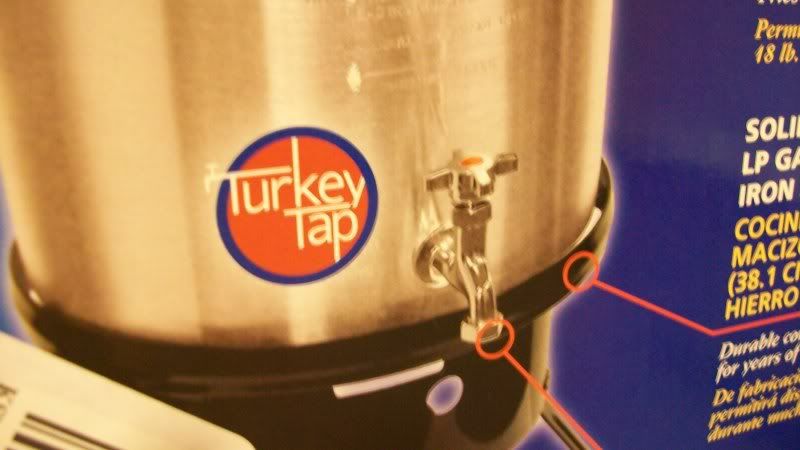
It has a tap at the bottom to empty out the contents, can I use this to put the wort into the fermenter?

I'm assuming that it will take longer to cool the wort if I use a full boil compared to partial; would using a party tub full of ice be effective?

I will probably have more questions as this thread develops, so bare with me.

Thanks for any help!!
:mug:

100_1141.jpg


100_1142.jpg
 
i assume the pot is aluminum as well, so you will need to passivate it (develop an oxide layer) on the interior of the pot prior to use. just do a wet run with the whole setup, fill the pot with water and boil it for 10 minutes or so and you will develop a blackish layer on the inside. this protects you from Al being released into your wort. you should be able to use that spigot, but it looks kinda small, so your flow might be reduced. also, consider that you will have most of your cold break/trub/hop debris on the bottom, so it might clog that spigot or get more than you want into the fermenter. your hop utilization will be affected by boil size, but you should be able to find a number of beer calculators online that will make everything a snap when you brew your first full boil. since you'll likely be around 7.5 gallons preboil, you might want to consider some fermcap drops to control boilover as you'll be near or at capacity of that kettle. you should really look into building/buying an immersion chiller for full boils, a container of ice will take forever to cool 5 gallons of wort. another option is to transfer the wort once you cool it a little to your sanitized fermenter and let it cool in its fermentation environment until it reaches pitching temp and pitch at that point. it can take a lot of frustration out of waiting hours to only reach 80 deg in an ice bath.
 
I plugged my new kettle into beer smith for a sweet stout recipe that I had created. Before I used 2oz of fuggles for a full 60 and it predicted about middle of the style for IBUs. Now since I changed my kettle to a 30 qt it puts the IBUs way over style, so I reduced the hops amount to get it back within style; only using 1 oz of fuggles.

This is an accepted way of doing the adjustment for hops, correct? Using beersmith?

Also, if I understand you correctly, I could brew, cool with ice as far as I can go, transfer to ferment bucket and seal, put in fermentation chiller, and pitch later in the day or next morning after it's at the correct ferment temp without causing harm to the wort?

As long as you have everything entered correctly into beersmith, it will give you a fairly accurate estimate of the IBU on hop additions. There are different formulas that give slightly different numbers, but ballpark is fine. This is what i've always done and it works great. You might want to check the AA of your hops and make sure beersmith doesn't have it way off, their default values for AA% are usually pretty accurate, but year to year differences in hop growing can change the percentage, just adjust beersmith's number with whatever is on the pack of hops you have.

And yes, that's essentially what I meant with the cooling/waiting to pitch thing. With this method, you must be rigorous about your sanitizing and make sure you are pitching the proper amount of healthy yeast. If it's dry, I would definitely rehydrate it, if it's liquid, make sure you are making a starter. The less time the wort has to just before fermentation begins, the less chance microbes have to take over. And you are extending that time already by cooling it slowly, so you want to give the yeast a good head start before pitching. I wouldn't make a regular habit out of this method, but it can get you by a few times before you're ready to make the investment on a proper chiller.
 
If you are a DIY kinda person, you could see if you can change that faucet to a ball lock fitting. I would only do this if it gives you problems.

Immersion chiller is really a must. Before I had one it would take me almost 45 mins to cool a full boil 5 gallon batch in an ice bath. I made my own immersion chiller out of 50' 3/8 inch copper refrigerator tubing. Just coil the tubing and put compression fittings on the ends. Ended up being a lot cheaper and you can build it to the height of your brew pot.

Here are a couple links:
http://three-colours.blogspot.com/2009/01/diy-immersion-wort-chiller.html
 
Last edited by a moderator:
it usually takes me about that long to cool a partial boil down in ice water in my shallow kitchen sink, lol.

I was thinkin about using the party tub full of ice the first couple of times to cool it down until I buy/build an IC.

Thank you for the video! I can't see it at work but I'm going to watch it when I get home.

What advantage would I gain from a ball lock fitting on the kettle?
 
The party tub will take longer but work fine IME. Unless you have a sh$t load of ice, I would do the first soak or two with just tap water to take away some of the heat, otherwise, with just a bag or two of ice, you will still be at 90 -100 degrees and your ice will be long gone. With a little patience, this method works.

You might aslo want to spray a little sanitizer up into the drain valve prior to draining the kettle.

What advantage would I gain from a ball lock fitting on the kettle?

A ball valve is likely more durable and can accept a fitting to connect a drain hose to transfer to your fermenter.
 
cool. I think I will do this for the first couple runs and save to build an IC. I'm looking at the ribcage design and think that'll work pretty slick.

ball valve sounds good too... i'll look into it.
 
I did my first few full boil batches using the ice bath method for cool down. Beer still turned out great so don't sweat it.

That said, the IC should be your next project as it really does get the wort cooled fast. I went from boil to 100 in 10 minutes yesterday.
 
I see from the picture on the box that your turkey fryer has one of the "nanny state" automatic shut-off timers installed. This stupid thing requires 2 AAA batteries, plus you have to press the red button every 15 minutes or else your flame goes out. They do this so that it'll shut off if you walk away from your frying turkey for too long. For brewing, its a huge headache to constantly check to make sure you press that button in time. I have a similar fryer, and I'm ordering a new Bayou Classic from Amazon.com to replace it. Just some food (or beer) for thought.
 
I see from the picture on the box that your turkey fryer has one of the "nanny state" automatic shut-off timers installed. This stupid thing requires 2 AAA batteries, plus you have to press the red button every 15 minutes or else your flame goes out. They do this so that it'll shut off if you walk away from your frying turkey for too long. For brewing, its a huge headache to constantly check to make sure you press that button in time. I have a similar fryer, and I'm ordering a new Bayou Classic from Amazon.com to replace it. Just some food (or beer) for thought.

Could you just remove the timer and thread the hose directly into the regulator? Worst-case, you could replace the entire hose/regulator unit - ones for gas grills are available inexpensively
 
I see from the picture on the box that your turkey fryer has one of the "nanny state" automatic shut-off timers installed. This stupid thing requires 2 AAA batteries, plus you have to press the red button every 15 minutes or else your flame goes out. They do this so that it'll shut off if you walk away from your frying turkey for too long. For brewing, its a huge headache to constantly check to make sure you press that button in time. I have a similar fryer, and I'm ordering a new Bayou Classic from Amazon.com to replace it. Just some food (or beer) for thought.

Thanks for the heads up. Honestly I didn't even see that. I haven't opened the thing up yet.

I'll look at it more closely and open 'er up later this morning when i'm off work. I usually am parked next to the kettle during boils havin a beer and listening to polka so it shouldn't be too big of a pain to hit the button.
 
I did my first few full boil batches using the ice bath method for cool down. Beer still turned out great so don't sweat it.

That said, the IC should be your next project as it really does get the wort cooled fast. I went from boil to 100 in 10 minutes yesterday.

yep IC is my next project. Just saved bobby_m's video for building one and looked at parts online.

...this GD hobby is costing me more and more everyday... but I love it!


:mug:
 
oh yeah, question.

how do you guys steep grains using this? Using a hook or coat hanger or something? Maybe I could just use my paddle to fish the grains out when time's up...
 
I've looked into doing that, but it looks like some kind of non-standard hookup to the main burner that wouldn't accept a standard replacement. However, I'm less than handy so I might just not know what I'm looking at :D

Could you just remove the timer and thread the hose directly into the regulator? Worst-case, you could replace the entire hose/regulator unit - ones for gas grills are available inexpensively
 

Latest posts

Back
Top