How to Remove a Heineken Threaded Keg Valve (not retained by a spiral ring)

Homebrew Talk - Beer, Wine, Mead, & Cider Brewing Discussion Forum

Help Support Homebrew Talk - Beer, Wine, Mead, & Cider Brewing Discussion Forum:

This site may earn a commission from merchant affiliate links, including eBay, Amazon, and others.

outside92129

Supporting Member
HBT Supporter
Joined
Apr 17, 2011
Messages
1,214
Reaction score
73
Location
Carlsbad
I've found many instructions on how to remove the valve assembly from standard Sankey 15.5 gallon kegs, but nothing for Heineken threaded kegs without the spiral retention ring. Miller Brewing has a very similar valve but there are some differences. I'll go into cutting off the top in another thread as the Heineken threads complicate things. I mostly followed Winemaker2's post about Miller kegs (see link for his post):

https://www.homebrewtalk.com/f35/ho...ded-keg-valve-not-retained-spiral-ring-76393/

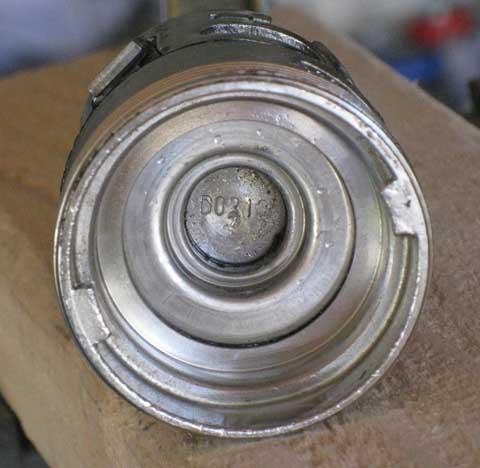
The first step is to relieve pressure, either tip the keg to the side and press the button, or drill a hole in the top. The valve can now be unthreaded, use a screwdriver and hammer on the tabs to turn it. A few taps should be enough to get it started and you can do the rest by hand.
attachment.php


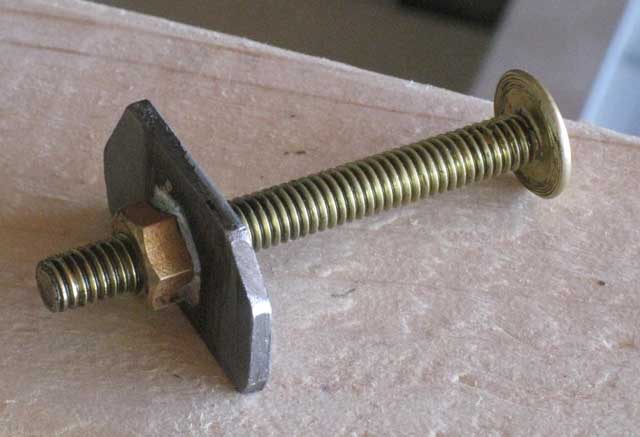
One completely unthreaded you'll notice that the valve assembly still won't come out, there is an safety catch inside that prevents it from flying out. If you're coordinated enough you can depress the valve button while pulling it out. An easier way is to make a tool like below. It's 1 3/4" wide and 1/8" thick with a 3" bolt, a nut soldered to the bottom, and a hole in the middle of course. The main difference between the Heineken tool and the Miller tool is that the Heineken button is in the middle whereas the Miller ball is offset.
attachment.php


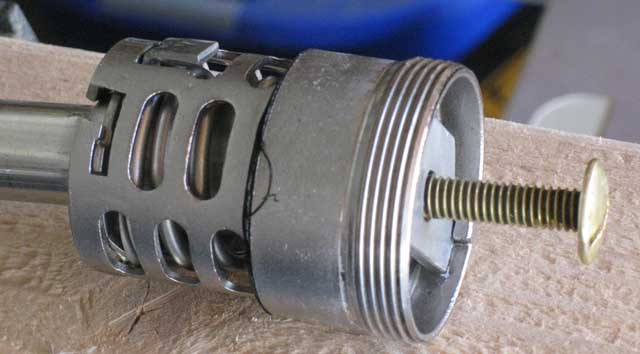
To use the tool, slip the flat steel under the tabs and make sure it's set well as there is going to be a fair amount of force on it. Screw in the bolt about 2" to disengage the safety catch. You can then withdraw the valve assembly by pulling on the bolt. You can also see the safety catch at the top in this image:
attachment.php


Here's the complete breakdown of the valve parts. I already cut the cage part off the top in preparation for keg top removal.
attachment.php


Thanks all! I've been having a great time reading all the posts over the last several months and finally found a way to contribute back to the collective :)

-lance

bits.jpg


inuse.jpg


tool.jpg


valve.jpg
 
Great post! I was a handed a free 5gal wine keg last night and after spilling a little blood I figured it out and was able to remove the threaded valve assembly successfully. Thankfully, I accomplished it without damaging the parts because I am going to reuse it for beer storage and to serve from. Not wanting to go through what I just did every time I need to open and clean it, I've been scouring the internet for an appropriate tool. Turns out there is a tool available for about $90 - $100 but it looks like it is designed for the American style Sanke kegs. I don't think it'll work with the threaded (European?) style because you have to push down on the ball to disengage the safety latch and pull up on the assembly at the same time. I love your ingenuity and will probably be taking your design and modifying it to include a T-handle. Well done!
 
I wanted to add to this post from my experience. If you happen to have a tap for the keg, it is really easy to open it up. Once you unscrew the valve, you can put a dime over the relief button. Then, put the tap on the valve like you would attach it to pump a beer. It will take some force as it will push on the dime instead of the relief button. The dime will push down the metal piece around the button and compress the second spring. You may need to hold the valve when you twist the tap onto it as it will just spin. At this point you can pull the whole thing out connected to the tap as the safety will not catch.

Obviously, the key is actually having the tap which many people won't have. I got lucky as mine came with two. I would be happy to send someone one of mine if they ever need it as long as they agree to pass it along to someone else who might need one.

So, to anyone with an S keg, just hit me up with a PM and a tap is yours as is a super easy method to open the keg (you will have to provide the dime).
 
If you get the spear out once and want to reuse it for homebrew, remove the safty catch so you can screw it in our out easily.
 
I wanted to add to this post from my experience. If you happen to have a tap for the keg, it is really easy to open it up. Once you unscrew the valve, you can put a dime over the relief button. Then, put the tap on the valve like you would attach it to pump a beer. It will take some force as it will push on the dime instead of the relief button. The dime will push down the metal piece around the button and compress the second spring. You may need to hold the valve when you twist the tap onto it as it will just spin. At this point you can pull the whole thing out connected to the tap as the safety will not catch.

Obviously, the key is actually having the tap which many people won't have. I got lucky as mine came with two. I would be happy to send someone one of mine if they ever need it as long as they agree to pass it along to someone else who might need one.

So, to anyone with an S keg, just hit me up with a PM and a tap is yours as is a super easy method to open the keg (you will have to provide the dime).


I was trying to do that trick with a nickel and it wouldn't work. I resorted to using screwdrivers. I did build a tool like the OP, but I couldn't see the latch, so it wasn't much help for the first attempt.
 
Just a heads up, a nickel is slightly too big. I double checked. You need a dime or it likely won't work. I didn't fully test with a nickel, but it covers up a second ring which I think keeps it from compressing the right spring.
 
I have a Hofbrauhaus 13.5 Gal Sanke Euro 'S' keg. I'm not able to release the catch on the valve. I have tried using the tap and a dime which seems like it's too big and it didn't work. The dime actually fits on top of a lip that is attached to the bigger spring, not the center spring that (I think) i'm supposed to press down. I've also tried using small washers and stacking them around the edges of the smaller center piece to compress it and push it down. I was able to compress it at least 1/2 inch but the safety catch still did not disengage. Besides making the tool that the original poster did, I have no clue where to go from here. I'm not sure that tool would help since i've already pressed the thing a TON. Any help would be great.
 
I had a tap head for it and at first couldn't get it in far enough... I use the small extension bar for my mini ratchet..it worked first time...I also tried it using the extension attached to the rachet...it wasn't as easy as you had to keep it still but it worked easy enough
 

Latest posts

Back
Top