I need to get another one of these. Is mixtea still good to purchase from or should I get one from someone else?
Thanks in advance!
Thanks in advance!

I need to get another one of these. Is mixtea still good to purchase from or should I get one from someone else?
Thanks in advance!
Fascinating thread! Great price for these compared to other temp controllers on the market.
Question: have any of you used this specific one? ebay link
It has no model number, but appears to be from the same manufacturer. Price looks good, and I only need one to do cooling, not cooling and heating. Features "Refrigerating control output delay protection", so I assume this will work just fine. Just want to ask before I buy.
Thanks!!
I got one from Mixtea a couple of weeks ago. IIRC, it was here in less than a week!
Dumb dumb dumb! It's only a 5A capacity...
Just because it has a lower contact rating doesn't mean considering one is dumb. I have one of these controlling my keezer and two controlling my HERMS. As long as you only need single stage and you're not switching anything over 5A, these actually have several advantages over the STC-1000. They are cheaper, easier to program, have more programming options, fahrenheit readouts, and SS temp probes.
That's kind of what I was wondering..since I only need cooling, that one looks fine, as long as the freezer is under 5A. The STC-1000 would still work for cooling though If I didn't hook up to the heating side, correct?
 I plugged it into my freezer, set the parameters and off she went. I also hooked up a hair dryer to the heating side, just to see if it was hooked up right, and it circulated just fine - no electrical fires

colinski said:That's kind of what I was wondering..since I only need cooling, that one looks fine, as long as the freezer is under 5A. The STC-1000 would still work for cooling though If I didn't hook up to the heating side, correct?
Just a quick question. I found a freezer with a bad thermostat (guy hard wired the compressor for an hour until he could get a new freezer, kept his food cold). Just wondering if I can use one of these to wire inline as the thermostat instead of buying a new thermostat and building a controller box.
jerdes said:And don't forget, you could use an interposing relay with a higher contact rating if this one has the features you want. In fact an interposing relay is always a good idea in a control circuit, it will protect your controller if something goes wrong with your freezer or wiring. Then you just replace the relay, not the controller.
Blackhawkbrew said:I also hooked up a hair dryer to the heating side, just to see if it was hooked up right, and it circulated just fine - no electrical fires
emjay said:Can't you just use a fuse? I was planning on putting one in my project box. What's the difference?
A fuse will protect the overall circuit, if the contact rating of the controller is greater than the load you are switching by at least 20% you are pretty safe. However no industrial control is wired in this fashion. In practice an interposing relay is always used to protect the controller in addition to a fuse. The advantage here is that you are only switching a control signal with your controller, not line voltage. This will greatly extend the life of the controller contacts.
colinski said:Where are you grabbing your interposing relays from? Everything on line appears to be part of a card frame or larger assembly.
Thanks for the info.. definitely drop one in and save myself from a $25 loss.
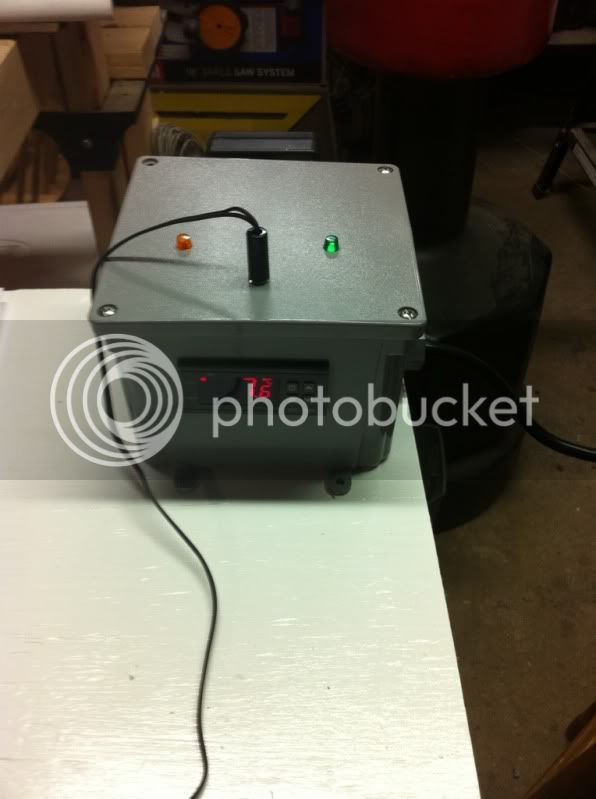
Grrrrrrrrr. Ordered the 220V model. Just re-ordered the 110V. Well at least I have a model to use to fab into the hobby box. and I have a spare temp sensor!
I also purchased the 220V model. I sent you a pm about the replacement transformer.

I just purchased the ebay temp controller. I want to hard wire this unit to my fridge (nucool 2.8). I have read over the posts here but I can't find a clear solution for this. I don't want to create an external box that the fridge plugs into. The nucool 2.8 does not have a compressor, it is thermoelectric.
The picture below is of the electronics on the back of the unit. Anyone know how I could do this? I want the fridge to turn on and off to keep the correct temperature. Forgive me if my ignorance with electronics and wiring has caused me to overlook how to do this.
Thank you for your help!
I can't seem to upload my diagram file, but this is what I was thinking.
From chrod connected to the wall socket:
- Hot goes to pins 1, and 7 (cooling only)
- neutural goes to pin 2 and is tied to ground to the original ground of the fridge (basically nothing changed except now linked to pin 2)
- pin 8 out to the fridge + terminal (power to fridge)
Does this sound right? Assuming that the fridge will stay on all the time. Looking at the picture I could tie a resistor to the NTC of the fridge to trick it to stay on. What ohm resistor should be used?
Thank you for your help.
My recommendation is to wire up the standard box, especially if you do not already have the knowledge to perform a retrofit. It is much more reusable and flexible that way.
Peltier devices have very low efficiency. I would guess about 1/4 (or less) of the input power. This could be an issue for keeping up with the heat output of the beer/wort if used as a fermentation chiller. It depends highly on ambient temps.
1.-form over functionI realize the benefit of having a reusable box design. My main reasoning for wanting to not use that particular design is:
1. It would just look cool having it mounted flush with the fridge.
2. I don't plan on using it for any other fridge (I know this could change)
This is my first fermentation fridge and from the other reviews of this fridge on HBT it seems to work.
1.-form over function
2.-planned obsolescence
Are in marketing by chance?
I read threads on thermo-electric coolers, and recall people had mixed results. As I said before- It depends highly on ambient temps. These will not work in a garage in the south, whereas a compressor based fridge/freezer will. Additionally, I think many of those who thought theirs were meeting ferm temps were only monitoring the ambient air, and not the beer which reaches ~10F above ambient at times.
This cooler will have a hard time dropping the temp of a full carboy, so the wort will need to be at the correct temp before putting it inside it.

thanks for the link.. I found one for 16.99 with free shipping but it makes no mention of the 110V version, just says 220 on everything. Some of the other sellers say they'll ship the one for your country, but not this one. I think I'll go with the link you posted.
If you describe the strange behavior in more detail than just "strange behavior", you might get some advice.Alrighty,
I seem to have everything wired up and working for the moment, but some strange behavior when I was still tinkering with everything has me a bit worried about the sensor.
Was I wrong to double the wire back, and could that be causing the strange behavior I experienced?
EDIT: To reiterate, it's currently working just fine (for the past 20 minutes or so) and appears to be reading temperatures accurately.
EDIT2: A couple hours in and it's running fine. I think I may be in the clear, but if anyone has ideas on things to check, that'd be awesome.
If you describe the strange behavior in more detail than just "strange behavior", you might get some advice.
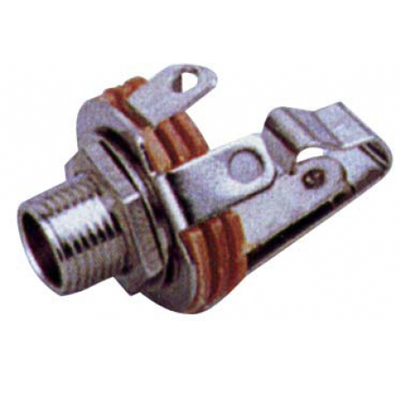
Installing the jack involves more than just soldering. Taking a picture of your completed work, instead of posting stock photos, is sufficient, and easier than documenting your install process in detail.
Enter your email address to join:
