I used liquid flux that came in a squirt bottle. I did pretty much what you described, but on the last few tries I tinned one side of the joint then "tack" soldered the fitting on. I kept heating and squirted it with flux and the joint flowed with no extra solder being added. It worked really well on my RIMS vessel.
You are using an out of date browser. It may not display this or other websites correctly.
You should upgrade or use an alternative browser.
You should upgrade or use an alternative browser.
Soldering Stainless steel
- Thread starter BargainFittings
- Start date

Help Support Homebrew Talk - Beer, Wine, Mead, & Cider Brewing Discussion Forum:
This site may earn a commission from merchant affiliate
links, including eBay, Amazon, and others.
Safety Question:
I noticed at the begining of this thread BargainFittings said he needed to get a new insert for his respirator rated for this type of soldering.
I'm reading a few different types of flux and solder now being used. What safety gear are people using? I have a normal respirator from Lowes with the disk like inserts on both sides.
I just want to make sure before I dive in, which I certainly will thanks to everyone on this thread, I'm not killing the few and weak brain cells I have left.
Thanks
Grimster
Well-Known Member
Safety Question:
I noticed at the begining of this thread BargainFittings said he needed to get a new insert for his respirator rated for this type of soldering.
I'm reading a few different types of flux and solder now being used. What safety gear are people using? I have a normal respirator from Lowes with the disk like inserts on both sides.
I just want to make sure before I dive in, which I certainly will thanks to everyone on this thread, I'm not killing the few and weak brain cells I have left.
Thanks
I just did mine outside on the porch with my back to the wind. Hopefully that was ok
")
I just hold my breath the whole time.
Funkenjaeger
Well-Known Member
I used a similar respirator, worked outside, and used a fan.
Read the MSDS and draw your own conclusion, but it didn't worry me enough to seek out more extravagant PPE.
Read the MSDS and draw your own conclusion, but it didn't worry me enough to seek out more extravagant PPE.
jfkriege
Well-Known Member
Wear safety glasses and closed toe shoes at a minimum. I do my work outside, and if there is no breeze I will use a small fan. Should be fine.
Funkenjaeger
Well-Known Member
yeah, they DO make a big deal of eye exposure in the warning label/MSDS. It is hydrochloric acid, after all, and you are boiling/vaporizing it...Wear safety glasses
jeffmeh
Well-Known Member
- Joined
- Feb 26, 2009
- Messages
- 2,145
- Reaction score
- 216
Very interesting stuff. Any suggestions on whether (and how) this could be done effectively with a 1/2 inch coupling, with nothing protruding into the interior, for a bottom, dead-center kettle drain? I'm wondering whether the vertical configuration and the weight of the plumbing fittings would push the limits of the solder strength, and whether I would be better off with a weld.
I do not weld, but I suspect that I could solder effectively as long as I were not graded on beauty.
I do not weld, but I suspect that I could solder effectively as long as I were not graded on beauty.
chicagojimmyjames
Active Member
- Joined
- Sep 30, 2008
- Messages
- 30
- Reaction score
- 0
The weight won't be a problem, but the danger might be having a long pipe extending downwards that could torque the connection when you open and close the valve.
I say... try it. You'll turn the keg upside down when you work on it, so that makes it easy to add extra solder. Keep the drain as short as possible, or support it from below.
Test before filling with hot wort. : ) Let us know how it goes!
I say... try it. You'll turn the keg upside down when you work on it, so that makes it easy to add extra solder. Keep the drain as short as possible, or support it from below.
Test before filling with hot wort. : ) Let us know how it goes!
conpewter
Well-Known Member
I tried to solder copper to stainless before and was not able to do so. I need to get the proper flux it looks like, thanks for the info!
chicagojimmyjames
Active Member
- Joined
- Sep 30, 2008
- Messages
- 30
- Reaction score
- 0
I hope that jeffmeh was talking about a threaded SS coupling. They have a bit of body.
A 1/2 copper coupling sounds like trouble. The wall is so thin...
Just my 2 cents. I've never tried it.
A 1/2 copper coupling sounds like trouble. The wall is so thin...
Just my 2 cents. I've never tried it.
Jeffmeh,
I am building an electric element heated HLT out of a keg. I have soldered a blocky brass 1/2" NPT elbow directly over a hole in the keg bottom. I plan to run a piece of soft copper water pipe to the keg rim and out a hole in the rim to a valve. The rim will support the pipe and prevent it from being torqued about when opening and closing the valve. I'll post a pic tomorrow of my progress so far, when I get my lazy butt out to the barn with a camera and take some pictures.
Are you planning a gas fired keggle or electric? The heat of the flame on the solder joint might be an issue if it's exposed and boils the wort or water out of the fittings and then overheats them.
jeffmeh
Well-Known Member
- Joined
- Feb 26, 2009
- Messages
- 2,145
- Reaction score
- 216
Jeffmeh,
I am building an electric element heated HLT out of a keg. I have soldered a blocky brass 1/2" NPT elbow directly over a hole in the keg bottom. I plan to run a piece of soft copper water pipe to the keg rim and out a hole in the rim to a valve. The rim will support the pipe and prevent it from being torqued about when opening and closing the valve. I'll post a pic tomorrow of my progress so far, when I get my lazy butt out to the barn with a camera and take some pictures.
Are you planning a gas fired keggle or electric? The heat of the flame on the solder joint might be an issue if it's exposed and boils the wort or water out of the fittings and then overheats them.
Thanks for the suggestion. I am planning to go with electric, and want to be able to fully drain to accomplish clean-in-place. I could probably do something similar to what you described, and perhaps attach the horizontal copper pipe to the stand to take the force of opening and closing the valve.
This is all in concept phase at this point, so mistakes now are pretty cheap.
Why not flip the keg over and cut a large hole in the bottom to make the keggle opening and use the kegs "original" opening as your central drain. It fits a 2" tri-clover sanitary fitting. I am currently doing this to my MT and HLT.
chicagojimmyjames
Active Member
- Joined
- Sep 30, 2008
- Messages
- 30
- Reaction score
- 0
Your HLT project sounds good. I'd like to see what you come up with. Something similar is in my future...
Here's a picture of my boil kettle. http://www.venuti.ca/brazed_joint.html
If I were to do it again, I'd use a 3/4" coupling.
Here's a picture of my boil kettle. http://www.venuti.ca/brazed_joint.html
If I were to do it again, I'd use a 3/4" coupling.
conpewter
Well-Known Member
Why not flip the keg over and cut a large hole in the bottom to make the keggle opening and use the kegs "original" opening as your central drain. It fits a 2" tri-clover sanitary fitting. I am currently doing this to my MT and HLT.
I'm in the process of doing this as well, Swagman made me a nice tri-clover fitting with a 1" NPT SS 90 degree elbow welded in to it.
Henrythe9th
Well-Known Member
my attempt's good I believe they don't leak


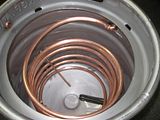


Here's pictures of my eHLT as threatened yesterday. It's not completed as you can see. When done, it will have legs like appliance levelers threaded into the bottom rim to keep the keg off the elbow. In the third picture you can see the soldered-on elbow, in the first a good view of the hole in the rim where the pipe will exit and the valve will be. The secondis the interior of the HLT with the center hole. This hole is 15/16" diameter.


jeffmeh
Well-Known Member
- Joined
- Feb 26, 2009
- Messages
- 2,145
- Reaction score
- 216
Thanks AiredAle for the pictures. To throw out another idea, could one solder on a floor flange, perhaps even bolting it on, and use that to connect the bottom drain? You can get these in brass or stainless.
http://plumbing.hardwarestore.com/52-330-brass-flanges/brass-floor-flange--612867.aspx
http://plumbing.hardwarestore.com/52-330-brass-flanges/brass-floor-flange--612867.aspx
jeffmeh
Well-Known Member
- Joined
- Feb 26, 2009
- Messages
- 2,145
- Reaction score
- 216
Why not flip the keg over and cut a large hole in the bottom to make the keggle opening and use the kegs "original" opening as your central drain. It fits a 2" tri-clover sanitary fitting. I am currently doing this to my MT and HLT.
That's a fine idea, but I am thinking of going with a kettle rather than a keg. The plan is to build a single-vessel with screened basket, electric, full-volume, no-sparge, recirculating rig (basically a BIAB on steroids).
Jeffmeh,
You could use the floor flange. If you bolt it in place you would need a gasket, and I'd suggest you seal the bolt heads to the inside of the kettle with silver solder. That's what I did with the bolt that holds the magnesium anode in my HLT.
You could also try a stainless or brass 1/2" lock nut, see McMaster Carr Part Number: 4464K584, for example. These have straight threads, so one problem might be that the nut will thread loosely all the way down the length of whatever tapered pipe or fitting you want to insert into it. Maybe some thread sealant tape would take care of that.
I went with the elbow because I believe it has more surface area for solder than a lock nut, and so should be more strongly fixed to the bottom of the kettle.
I'd be very careful about using the floor flange. It is cast brass, probably made in China. It will have a high lead content simply because it is not meant for water supply and because it is cast brass.
I would not use it.
Just my humble opinion.
I would not use it.
Just my humble opinion.
FYI - picked up more of the bulkhead fittings I posted earlier in this thread if anyone is interested I'll be posting them in the classified section tonight or tomorrow for a reasonable price. They work really well soldered or weldless.
Here is the classified
Here is the classified
Great_Neck_Brewer
Well-Known Member
I like the idea of soldering stainless steel using flux and silver solder and plan on doing it on my mash tun. My question is, can I solder a copper fitting such as a 1/2" male adaptor (or any other fittings) directly on my keg without getting galvanic corrosion?
nostalgia
Well-Known Member
A little experimentation. I have some lignum vitae lying around so I thought I'd try making a swaging tool. I figured if LV is hard enough for engine bearings, why not for a swage tool for sheet metal? Well, it worked, but kinda sacrificed itself to the cause, so I'll definitely be adding some fittings to my McMaster order.
Here he is fresh off the lathe.
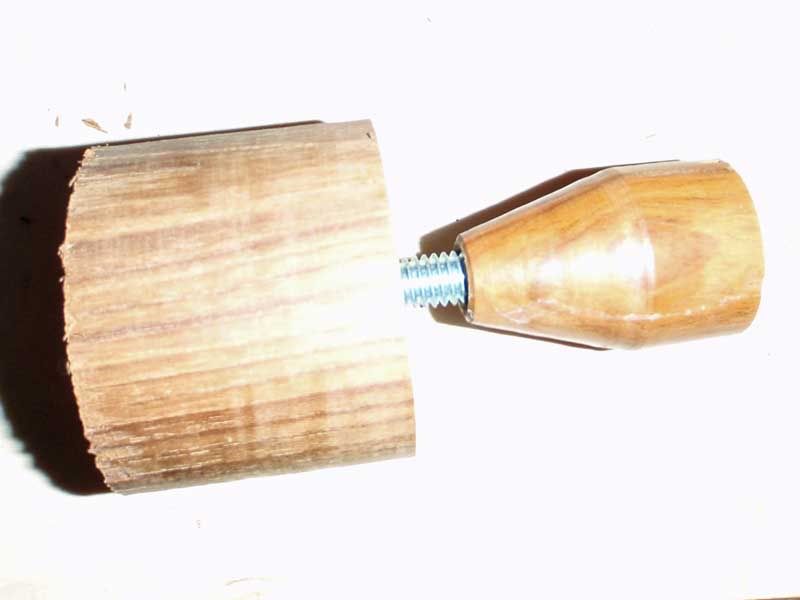
I drilled a 3/4" hole with my step bit then used the tool to create the dimple. I used the tool until it looked like the 3/4" copper pipe would almost come through, then I sanded the joint, applied a little flux and pulled the copper pipe through.
Turns out I needed to stretch a little more with the wood first. The copper's edge caught the sheet metal and tore it on the way through.
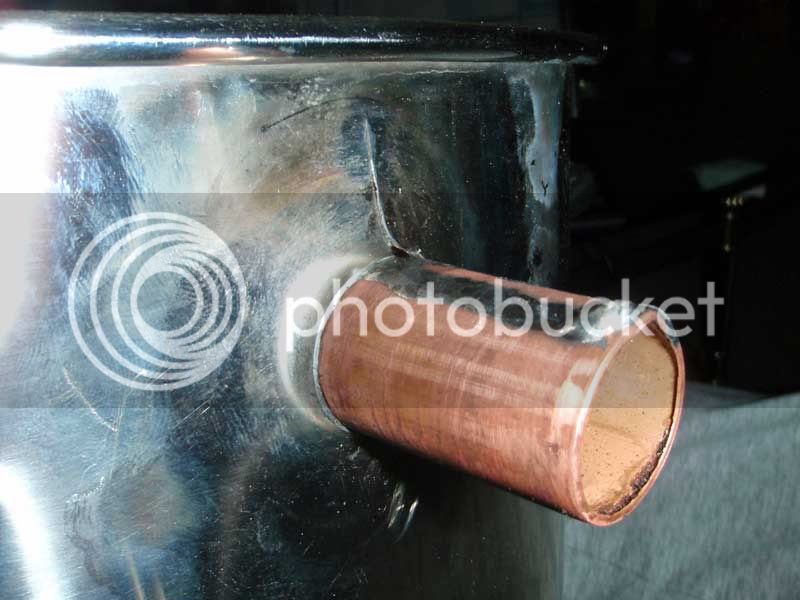
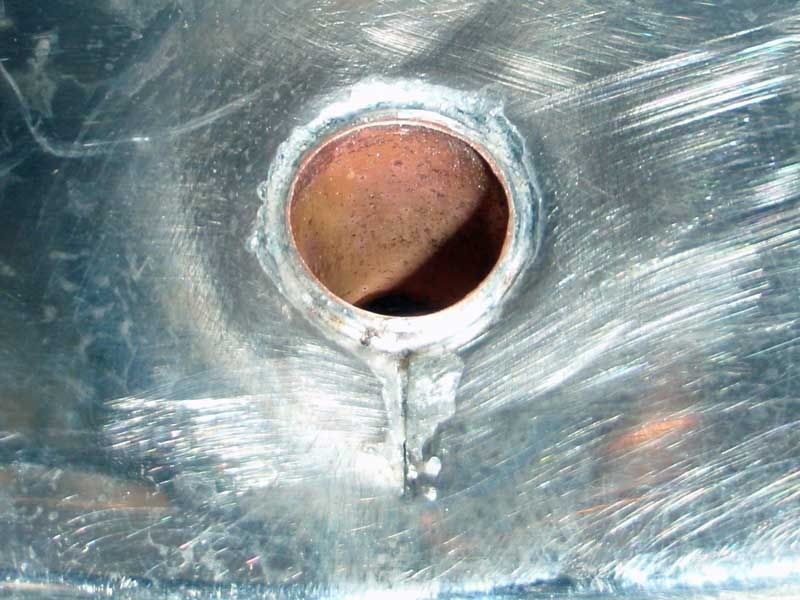
I decided to solder it in place just for practice. I think it came out really nice on the inside at least
Now I've got to figure out how to do this at the bottom of a 25" deep stainless drum
Here he is fresh off the lathe.
I drilled a 3/4" hole with my step bit then used the tool to create the dimple. I used the tool until it looked like the 3/4" copper pipe would almost come through, then I sanded the joint, applied a little flux and pulled the copper pipe through.
Turns out I needed to stretch a little more with the wood first. The copper's edge caught the sheet metal and tore it on the way through.
I decided to solder it in place just for practice. I think it came out really nice on the inside at least
Now I've got to figure out how to do this at the bottom of a 25" deep stainless drum
klyph
Well-Known Member
Ouch, hope that wasn't on one of your nice drums.
nostalgia
Well-Known Member
No, it's a cheapie that I got as part of a turkey fryer kit.
-Joe
-Joe
keithd
Well-Known Member
OK, I'm an idiot.
With that out of the way, I had major problems soldering tonight.
Drilled a hole for the nipple, cleaned it up, sanded the pot around the hole, threaded the nipple in tightly, applied Stay Clean liquid flux, and disaster.
Every time I tried getting the piece hot enough to melt the solder, the flux would burn and blacken up everything. The solder would not wick, but beaded like wax was all over everything. A couple times the nipple got orange-red where the torch was hitting it.
I've soldered using this stuff on SS before, and I've got a couple nice-looking joints, but that was two years ago and I seem to have forgotten completely what to do. What made the flux blacken so quickly? And was cleaning the joint with acetone just before applying flux a critical (missed) step?
I'm wasting alot of Q-tips, Stay Clean, and Sta-Brite 8.
Funkenjaeger
Well-Known Member
Sounds familiar. I had better success with heating the joint gently but stopping short of the flux burning off, and then going around with focused heat + solder to get some blobs of solder (somewhat) adhered all around - being aggressive enough that the solder manages to stick before the flux has finished burning off... Then liberal application of fresh flux and some more heat, going around until the solder flowed everywhere.
With that said, I am still *far* from having it down to a science, and I haven't succeeded in this without getting way too much solder on there overall, then having to carefully use heat + a quick swipe with a wet rag to fling off some excess.
With that said, I am still *far* from having it down to a science, and I haven't succeeded in this without getting way too much solder on there overall, then having to carefully use heat + a quick swipe with a wet rag to fling off some excess.
Through my experimenting I found the technique Funkenjaeger described worked for me also. It's the second application of flux that makes it really flow. I also found that if I'm able to "tin" on or both pieces it worked much better. I attached brackets to my RIMS vessel this way.
OP
OP
It definitely sounds like my first try. Overheating. If the stainless gets to cherry color you have gone way beyond the required temp. Remember this solder melts in the 400 degree range. Cherry red is up in the 1000 degree range.
I have had the best luck heating inside the nipple first. When the flux starts to sizzle, I touch the solder to the joint just a few degrees from the side I am heating. I work toward the flame so that the solder wicks toward the hot side. It goes very quickly.
I wish I had a video camera to film it.
Sounds like too hot and flux too soon. My technique is to heat the cleaned joints dry until the solder will barely melt on it when the torch is off the piece. The solder will ball up at this point. Then spray/spurt the flux in the joint area and immediately apply a little heat and solder. The solder will just flow everywhere the flux coated. Be careful with the boil off fumes from the flux with the hydrochloric acid in it though.
xsevenx6
Member
Hey guys,
I just tried brazing SS for the first time. Like many of you I'm pretty anal about what touches my wort so I researched Brewmoor's suggestion of Saft-Silv 56% silver solder. This stuff is NSF meaning it is safe to use on food product and it works great. I used a plain Bernzomatic torch with MAPP gas (yellow tank). One thing that I found is that you can't heat your parts up too much or the solder will just flow everywhere, and you wont get a good seal, especially if you have a larger gap on your kettle, like I did. You have to balance between the melting point and the "freezing" point of the solder so you can move the solder around to fill the gaps correctly. Also, making sure your surfaces are shiny clean before applying your flux onto the surface (I used Harris Stay-Silv White Brazing Flux ($6). Please be aware, I worked outside with fan blowing the toxic fumes away from me. Here is all the stuff I used to create this joint. Good Luck!!


I just tried brazing SS for the first time. Like many of you I'm pretty anal about what touches my wort so I researched Brewmoor's suggestion of Saft-Silv 56% silver solder. This stuff is NSF meaning it is safe to use on food product and it works great. I used a plain Bernzomatic torch with MAPP gas (yellow tank). One thing that I found is that you can't heat your parts up too much or the solder will just flow everywhere, and you wont get a good seal, especially if you have a larger gap on your kettle, like I did. You have to balance between the melting point and the "freezing" point of the solder so you can move the solder around to fill the gaps correctly. Also, making sure your surfaces are shiny clean before applying your flux onto the surface (I used Harris Stay-Silv White Brazing Flux ($6). Please be aware, I worked outside with fan blowing the toxic fumes away from me. Here is all the stuff I used to create this joint. Good Luck!!
MacBruver
Well-Known Member
It's hard to tell from the size of the picture, but it looks like you have way too much solder there. It also looks like it's not really well bonded to the keg.
GreenMonti
Well-Known Member
- Joined
- Nov 29, 2009
- Messages
- 1,268
- Reaction score
- 67
Hey guys,
I just tried brazing SS for the first time. Like many of you I'm pretty anal about what touches my wort so I researched Brewmoor's suggestion of Saft-Silv 56% silver solder. This stuff is NSF meaning it is safe to use on food product and it works great. I used a plain Bernzomatic torch with MAPP gas (yellow tank). One thing that I found is that you can't heat your parts up too much or the solder will just flow everywhere, and you wont get a good seal, especially if you have a larger gap on your kettle, like I did. You have to balance between the melting point and the "freezing" point of the solder so you can move the solder around to fill the gaps correctly. Also, making sure your surfaces are shiny clean before applying your flux onto the surface (I used Harris Stay-Silv White Brazing Flux ($6). Please be aware, I worked outside with fan blowing the toxic fumes away from me. Here is all the stuff I used to create this joint. Good Luck!!
Not to be a d!c@ or anything but, your using a mix of Propylene and Propane.
I believe the doing away with MAAP, has finally happened. They have wanted to get rid of MAAP gas for a while now.
Edit; When I say mix.........the propane content is only like .5%.
Not to be a d!c@ or anything but, your using a mix of Propylene and Propane.
I believe the doing away with MAAP, has finally happened. They have wanted to get rid of MAAP gas for a while now.
Edit; When I say mix.........the propane content is only like .5%.
I believe they are still labeling it MAAP. At least the bottles I have say MAAP on the outside. The yellow bottles from Lowes. At least the last ones I bought probably in December of 2009. Is this something new as of recently? Why are they trying to get rid of MAAP? Also is there something wrong with using Propylene and propane? Is there something chemically bad that it should not be used, or are you just pointing it out so he is not mis-labeling what he is using.
You kind of left your statement up in the Air. This is a very helpful thread so we should continue explaining why we do and say the things we do.
GreenMonti
Well-Known Member
- Joined
- Nov 29, 2009
- Messages
- 1,268
- Reaction score
- 67
I believe they are still labeling it MAAP. At least the bottles I have say MAAP on the outside. The yellow bottles from Lowes. At least the last ones I bought probably in December of 2009. Is this something new as of recently? Why are they trying to get rid of MAAP? Also is there something wrong with using Propylene and propane? Is there something chemically bad that it should not be used, or are you just pointing it out so he is not mis-labeling what he is using.
You kind of left your statement up in the Air. This is a very helpful thread so we should continue explaining why we do and say the things we do.
Sorry about that. I was well on my way when I was on here last night. I just wanted things to be labeled correctly. His pic of the gas tank is a new cylinder from Benz o matic. It has the propylene/propane mix in it. Its the MAP pro gas.
No, there is nothing wrong with using the gas. Propylene is the replacement for MAAP. I stated it wrong last night too. The company that makes MAAP has shut down in '08'. They call the new gas MAP pro, and is in a yellow tank. They label it that way so users will know it can be used with their MAAP gas appliances.
Again, sorry for being vague and placing doubt out there.
Similar threads
- Replies
- 41
- Views
- 2K
- Replies
- 0
- Views
- 616
- Replies
- 0
- Views
- 576
- Replies
- 0
- Views
- 373
