Upcoming DAR440BL Kegerator Build

Homebrew Talk - Beer, Wine, Mead, & Cider Brewing Discussion Forum

Help Support Homebrew Talk - Beer, Wine, Mead, & Cider Brewing Discussion Forum:

This site may earn a commission from merchant affiliate links, including eBay, Amazon, and others.

CyberMonk

Supporting Member
HBT Supporter
Joined
Mar 12, 2012
Messages
49
Reaction score
1
Location
Berkeley
I'm planning a new two-tap Kegerator build that will hopefully take place this weekend, and I wanted to post my current thoughts and parts list to see if anyone might have any feedback before I jump into it. I'll be using the Danby DAR440BL mini-fridge featured elsewhere on this forum. I'm also brand new to kegging, so I want to make sure I've accounted for everything that I'll need.

Parts List
  • 1 Danby DAR440BL Mini-Fridge ($189 at Amazon)
    This is the fridge; with Amazon, they'll deliver it to me for free and I won't even have to pay sales tax, huzzah!
  • 1 Dry-Erase Board ($26 at Amazon)
    I'll use this as a cutout to replace the original door paneling inside the fridge, and it will double as a space to keep track of what's currently on tap
  • 2 Cornelius Kegs, Ball Lock, Reconditioned ($55/ea at MoreBeer)
    I actually already picked these up this past Saturday as they'd just got a fresh batch in, and according to the guys there the supply is pretty variable for the used stock. Apparently they'll be carrying brand new Corny Kegs in the near future, but given the likely $120+ price tag for those, I'm happy to have grabbed a couple reconditioned kegs now. Note that Corny Kegs qualify for free shipping from MoreBeer, so if you're in the market you might want to place an order before they deplete the stock.
  • 1 Chrome Tower w/ Two Perlick 525SS Faucets (~$185 at MoreBeer)
    The MoreBeer Concord Showroom is only 30 minutes away from me here in Berkeley, and during a visit this past weekend they confirmed they'd sell me their two-tap tower with the Perlick faucets instead of the standard ones. The price listed is what they quoted me, and it seems like a good deal given what I've seen elsewhere online. This should include all necessary tower hardware except the handles, though I'm going to see if they'll ditch the normal 4 feet of tubing per faucet and let me up that to 10 feet per instead.
  • 1 Faucet Wrench ($3.25 at MoreBeer)
    As I'll want to be able to take the thing apart!
  • 20ft. Beer Line (3/16" ID) ($13 at MoreBeer)
    As mentioned above, I may be able to get this as part of the tower package.
  • 2 Liquid Quick Disconnects, Barbed ($5.50/ea at MoreBeer)
    These also might be included with the tower package.
  • 1 C02 Tank, 5lbs. ($81 at MoreBeer)
    I was conflicted given you can buy an empty C02 tank online for about $56, but given the shipping costs plus the initial fill cost on top of that, I think it will be more worth my while to just pick one up at MoreBeer, which means it will come pre-filled.
  • 1 Two Product Dual Gauge C02 Regulator ($105 at Amazon)
    I've already picked this up as well, and I'm glad I did as it now appears to be out of stock. This was the best price I could find on this regulator, and I wanted this version in case I ever want to supply different pressures to each of my kegs as per whatever style of beer I'm kegging.
  • 6ft. Gas Line (5/16" ID) ($3.60 at MoreBeer)
    Seems 3 feet per line is the typical gas line run, so I'll need 6 feet total.
  • 2 Gas Quick Disconnects, Barbed ($5.50/ea at MoreBeer)
    To pressurize dem kegs!
  • 8 Hose Clamps ($.65/ea at MoreBeer)
    By my count I'll need 8 hose clamps; 2 for the lines at the shanks, 2 for the lines at the beer QDs, 2 for the lines at the regulator, and 2 for the lines at the gas QDs. Am I missing anything?
And that's the bulk of it. I'm also probably going to pick up some Keg Lube and some Beer Line Cleaner while I'm at it. I'll be making one of these DIY Beer Line Cleaners to clean the lines, though I'll probably have to order the Ball Lock Post Assembly as I'm not sure that MoreBeer carries the right kind. (Can anyone confirm if this assembly would work with that DIY Cleaner? Not sure that the threading on this post is the correct diameter.)

Anywho, any comments or, most especially, am I forgetting anything? I'll be crafting a fan plus tube device to pump colder air up into the tower for cooling, but I can handle the construction of that with parts from the local Rat Shack. I've also got a 2-1/8" hole saw on order, and a dremel to handle any other cutting needs. Thanks!
 
Last edited by a moderator:
Oh, I meant to add: I discovered after talking with the guys at MoreBeer that the showroom is run independent of the warehouse that supplies online orders. So, for anyone who's within driving distance, the showroom will often have things in stock that are listed as unavailable online--and they're guaranteed to have anything listed as in-stock available, as they also have access to the warehouse (which is on site). E.g., the Bi-Metal Thermometer w/ 2" Probe is currently listed as out of stock online, but they had a whole stack of them in the showroom when I was there this past Saturday, and so I picked one up for my brew kettle.
 
Thanks! I'm looking at this same build and will love to hear your insights.

The biggest difference I can see is that I want to use MFL connections for the disconnects as I currently have pin-lock kegs but want to convert to ball-locks over time.
 
I just got mine yesterday from Amazon. Wife has Prime, thank god. :)

I'm not going to install a tower since this will be in the kitchen and I have little hands in my house. I'm going to use picnic taps on this one. The Danby seems like a simple build. On saturday, I'm going to cut the shelves off of the door then replace the trim, and inside I'm only cutting the plastic "rail" that the bottom shelf slides into.

Definitely looking forward to your build though just in case I change my mind about the tower. Good luck!
 
Got the fridge yesterday (love that Prime shipping) and picked up a dry-erase board at Staples on the way home as the one I was looking at on Amazon has since gone out of stock. I'll be picking up most of the draft hardware on Saturday--though I did receive my C02 regulator yesterday, huzzah!--but I decided to set upon the door last night and replace the standard interior with my white board. Unfortunately I only documented the completed door, but I'll be more thorough with the rest of the build. I'll also post the picture later once home.

The door didn't take that long to do but was a little tedious, mostly because there are a LOT of screws holding it in place. Taking it apart was cake, but getting my dry-erase replacement installed took some time as I was carefully checking the hole alignment throughout the process. My process was: remove the aluminum frame from the white board; mark the desired size and hole locations with a sharpie using the original door backing as a guide; cut the white board to the desired size (used a box cutter to score repeatedly until I made it through the material, then it broke off easily); pre-drill all the holes; and install.

Installation took a bit of time. I first inserted the white board into the rubber door seal and thought I'd just drill the screws in with the board and rubber in place on top of the door, but after a couple screws I started worried about hitting the pre-existing holes in the rubber. So I took the white board and rubber off the door and first drilled in every screw while making sure to properly seat the existing hole in the rubber seal over each screw as I got it through. Then, with all the screws in place, I put the whole thing on top of the door and started drilling the screws in. My alignment was a tad off in places, and the white board made some threatening creaking noises as I angled some of the screws to find their holes, but I got it all installed without mishap!

The door is now back on the fridge and sits nicely, with no pinching of the seal or anything like what I'd seen reported on various other kegerator builds. The board I used was 1/8", for anyone else considering other materials. You could probably also buy a melamine sheet from the hardware store and cut that to size, but picking up the white board was just easier in my case. I can now also write kegging dates and other information on the inside of the door for record keeping purposes (I stole this idea from another kegerator build).

Anywho, I'll post that finished door picture soon, and will follow up with pictures of the rest of the build and accompanying pictures sometime after the weekend.
 
Thanks fornthe update. If you don't mind, since we're doing two different 'builds', I'll put mine here too smothers can find them in one thread.

I was going to start mine Saturday, but the shop with the tools I need isn't open. I'll probably get on it next week.
 
This must be the deal of the month or something; I just ordered one of these guys as well. It will be the home office Kegerator as the Chest freezer will just be used for storage, cold crashing, etc.

Mine is set to be delivered next Wed. so next weekend I should be able to get most everything set.

Really looking forward to seeing how your guys build progresses since you'll be about a week ahead of me.
 
Here's that picture I promised. Note the screws along the bottom are visible at this angle, as the 1/8" white board is actually lower profile than the original door panel, which had a raised bevel of sorts that added some perceived thickness. More to come!

Finished-Door.jpg
 
Love the whiteboard idea. Do you have a brand or model number? No sense reinventing the wheel if yours worked.

I'm set to receive everything next week and then begin my build.
 
I'm not sure of the brand (I've since tossed the packaging) but I picked it up at the local Staples, and I just chose the first size I knew was big enough to use for the door. It did require some cutting/drilling but that wasn't too bad. It had an aluminum frame that I removed with a hex key, and was not a magnetized board or anything like that--just 1/8" melamine. Cost about $25.
 
Did you have any trouble fitting two standard ball-lock kegs in the Danby DAR440BL? I just had this same exact fridge delivered through Amazon yesterday, and I can't get them to fit. The molded plastic shelf brackets don't allow the kegs to fit in. I'm thinking about cutting them out with a box knife and then taping up the opening (only need about another 1/2 inch of clearance), but I was expecting a good fit from everything I've read about this model.
 
Two cornies fit fine for me, despite those molded shelf guides. Perhaps your kegs are actually converted pin lock kegs? I've heard those have a bit more girth and do two might to fit.

I just did the kegerator build tonight! I'll sort through the pictures and post my walk through soon.
 
The build is complete! See below for the build story. Click on any of the image thumbnails to check out a bigger version. Sorry for the flash glare and poor photography!

First off, a couple nights before the build, I built a clone of the cool air blower as seen on KegKits.com. Mine's not nearly as pretty and doesn't have the blue light, but you'll never see it anyway so I didn't really care to finesse it. I also used a smaller diameter hole and tube (3/4" tubing, I want to say) as the original blower's creator said somewhere that his was delivering too much cold air and causing the tower to sweat. I'm hoping the smaller tube will mitigate that, and I won't be running the fan 24/7--I've got it on a switch outside the fridge (which you'll see later on in this post).


Once the actual build began (after a trip over to MoreBeer for most of the hardware), I began measuring and re-measuring the fridge, and used pencil and masking tape to mark out some areas of import. The space between the upper two pieces of tape was "safe space", where nothing inside the fridge would be hit if I drilled down (with the exception of the wire from the thermostat box, which I was taking care to make note of mentally).


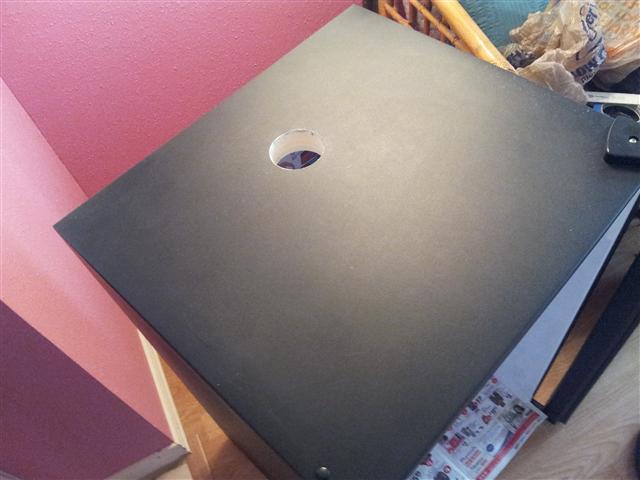
Next I drilled a guide hole once I determined where I wanted my line hole to be (2-1/4" hole saw). Note it's back from the center of the tower's footprint, as I wanted to make sure to clear interior parts, which you'll see in a later picture.


And then the moment of truth! Cutting the hole was by far the scariest moment of the build, only because it was the only part where if you screwed it up you'd really be screwed. Thankfully my measuring was true, and the hole was made! You'll note I managed to scuff up the top of the fridge a little bit, which I did when easing the hole saw back a little, at which point it skidded across the surface a little bit (this was before I'd made it all the way through the metal top). Luckily these skids were inside the tower circle, and so were covered up, as seen later.


Here's the clearance of the hole from inside the fridge. It worked out pretty well! That screw post on the thermostat box was the reason I ended up moving the hole back a smidge.


Next I outlined the tower bolt holes (using the tower as a guide and marking with pencil once again) and then drilled those without mishap. Luckily, with my tower's placement, the holes were positioned such that the thermostat wire was never in danger, so I didn't have to worry about that. Also, though not pictured, I coated the entire hole with a solid amount of aluminum tape to keep the moisture out of the insulation before I mounted the tower.


'Twas time to install the tower! Note I removed all the hardware from the tower earlier, as it came with attached 5' lengths of tubing and Sanke fittings, which I replaced with 10' lengths of tubing and ball lock quick disconnects. The original fittings were a major pain to remove, too, as they had been clamped on with Oetikers. I highly recommend screw clamps so that you can actually work on your hardware down the road if need be.


I know some builds have utilized a backing board inside the fridge to provide extra support for the tower mount, as the top of the fridge is only thin steel. Largely on account of laziness and my lack of desire to build such a backing plate, I instead picked up some oversized washers at Home Depot on the way back from More Beer (I also picked up the makings for that DIY Beer Line Cleaning Pump I linked in the opening post--just waiting on my Firestone post in the mail). I used these washers to provide some extra purchase inside the fridge at the tower mounting points. I removed the thermostat to get the washers under it on that side, and was able to just slide them in at an angle under the cooling element. The tower feels super secure, too!


Then it was time to install the hardware. I actually had to re-do the first line a couple times because I kept forgetting a piece, or putting a piece on in the wrong order (e.g., I discovered the hose clamp was too big to move past the shank bolt). Also, for my own peace of mind, I have to point out that the prominently featured copy of Ayn Rand's "Atlas Shrugged" in the background is NOT a piece of literature I cherish--in fact, it was given to me by a (future) in-law as a sort of prank, and I've been trying to slog through it but keep getting discouraged by the fact that it was written by an insane woman :cross:


And, hurrah, the tower hardware was finished! All that remained was hooking up the gas lines and quick disconnects. And yes, that may or may not be some underwear drying next to my workspace. Such is life living in a modestly sized apartment!


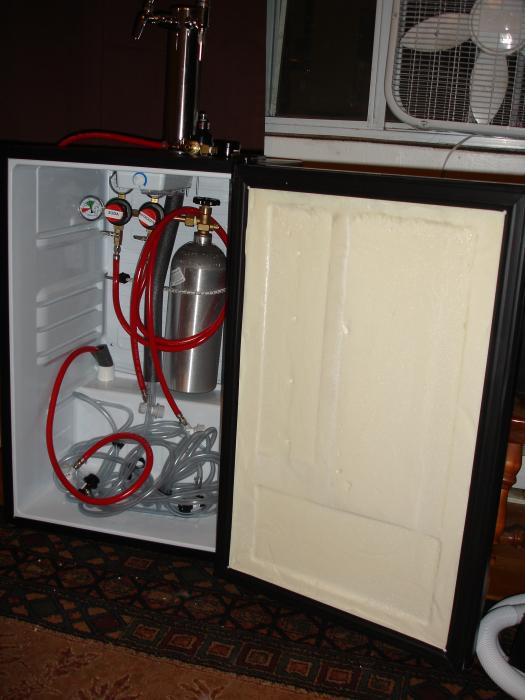
But before throwing the C02 tank in there, I needed to bring in the wire for my cooling box. I wired the box with a barrel tube power connector matched to the 9V DC power supply I'd picked up for it, but unfortunately that connector wouldn't fit through the drainage tube at the back of the fridge. So, I did what anyone with a functional soldering iron would do--I cut off the original connector from the power supply, slid the plain wire up into the fridge, and soldered on a new connector once it was through.


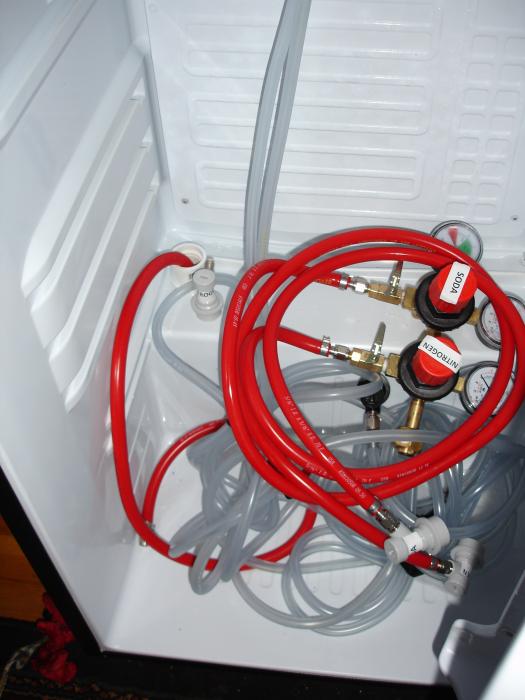
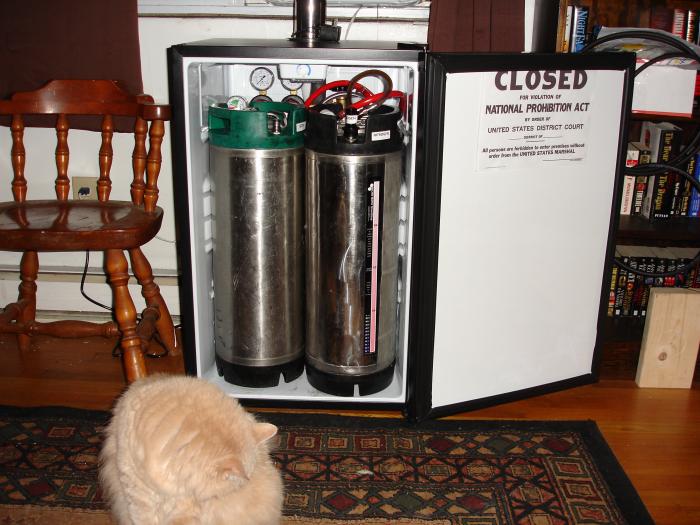
With the blower accounted for and the C02 tank rigged up, I decided to place it inside to make sure everything would fit. (Perhaps a little late to be checking, but it all did!) I'd thought about seeing if a 10 pound tank would fit before purchasing the 5 pound one, but as this shot shows, there's really not much extra headroom once you factor in the regulator.


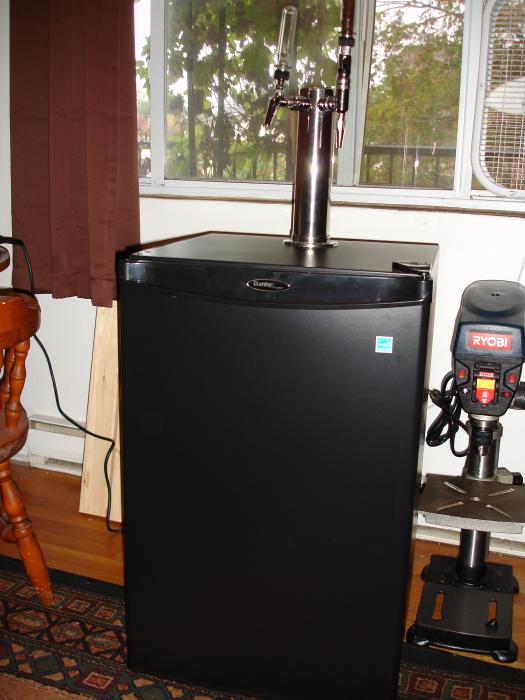
And, last but not least, the newly christened kegerator sitting in its new home on our balcony, pouring out some delicious Star San solution into a bowl. (I'm not going to waste beer testing my kegerator, no sir!) Note that mess of plugs on the right, where I hooked up a switched outlet for the cooler fan power supply so that it doesn't have to run all the time.


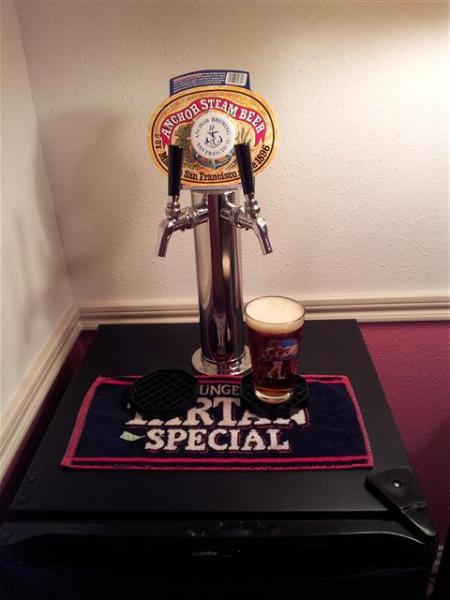
And that's that! I just now (as in 30 minutes ago) racked a batch of the MoreBeer Pliny the Elder clone into one of my corny kegs, sealed it, purged it, and it's now sitting in the kegerator at ~12 PSI. I'll check it again come next weekend and hopefully it will be coming along nicely! My fiance is also working on a cover for the fridge itself, and a separate sock for the tower, as it is sitting outside (albeit in a covered and protected corner). I've also ordered a couple faucet caps to protect those from bugs and whatnot. All in all, I'm very happy with the way the build came out, and very much looking forward to drawing the first pints!

Note: I ended up going with 4 feet of C02 line per regulator tip as I thought the extra working room would be nice, as I don't have a spare C02 tank to handle keg prep away from the kegerator. It's a cozy fit, but everything does fit in there! Otherwise, all the parts listed in the opening post are what I went with. If anyone else is interested in the MoreBeer tower but wants Perlick faucets, just give them a call and I'm sure they'll be willing to accommodate like they did with me. It's really a cool bunch of guys running the show over there.

Feel free to let me know if you have any questions or concerns about your upcoming builds. I'm sure I forgot an annoyance or two that I came across during my own build that I might remember if a question jogged my memory.

Oh, and for anyone interested, I think the total cost of the project was something like $700. Given I started with zero equipment related to kegging, I don't think that's all that bad.
 
Sure; the original is here, though it's a bit short on details: http://www.kegkits.com/kegerator5.htm

The key aspects are the properly sized project box (found at Radio Shack), the 80mm 12V fan, and the 9V DC power supply. My box was uglier because I traced a circle on the box but then freehanded it with a dremel for the fan hole cutout. and the hole for the outlet tube wasn't spectacular either as I first drilled a 1/2" hole (the biggest drill bit I had) then used a dremel sanding edge to round it out to the proper size. It didn't matter though, as I filled in all the cracks with all-purpose silicone. I also connected the fan to the box using some rubberized pull throughs instead of screws (thinking that might reduce any reverberation from the fan), but screws would work just fine--I just happened to have them on hand.

I recommend doing something like a barrel connector to get power into the box, too. The wire is captive in my fridge because I had to solder the connector on in place, but the actual cooler box can be removed really easily.

Here's the 9V DC power supply I used, as Radio Shack only had some stupidly expensive ones: http://www.amazon.com/gp/product/B004LX146Q/?tag=skimlinks_replacement-20

And then the project box, male and female barrel connector pieces, and fan were from RadioShack (though I'd just order a fan from elsewhere, as RadioShack's was kind of expensive in retrospect). I got the 3/4" tubing and barbed plastic fitting for the out hole at my local Ace Hardware.
 
Last edited by a moderator:
This might sound like a silly question (I have not ever done a conversion) but is there insulation between the whiteboard and outer door? If not, should there be?

Here's that picture I promised. Note the screws along the bottom are visible at this angle, as the 1/8" white board is actually lower profile than the original door panel, which had a raised bevel of sorts that added some perceived thickness. More to come!
 
There is indeed insulation there. All I did was remove the door paneling and replace it with the white board; the original insulation is still under there.
 
Did you have any trouble fitting two standard ball-lock kegs in the Danby DAR440BL? I just had this same exact fridge delivered through Amazon yesterday, and I can't get them to fit. The molded plastic shelf brackets don't allow the kegs to fit in. I'm thinking about cutting them out with a box knife and then taping up the opening (only need about another 1/2 inch of clearance), but I was expecting a good fit from everything I've read about this model.

I have this fridge as well (20 dollar craigslist score!)

You can fit 2 ball lock cornies inside with no issues, and no modifications other than the door.

If you have pin lock kegs, you will have to remove the shelf moldings from the side. A sharp box cutter is all that is needed. Once removed, the kegs will be slightly staggered, meaning one will be slightly "behind" the other. They fit snug, but they do fit.
 
My door won't close! I used a 1/8 inch dry erase board and things lined up reasonably well, but the bottom left corner of the gasket won't seal (the hinges are on the right). Any suggestions?
 
kman42 said:
My door won't close! I used a 1/8 inch dry erase board and things lined up reasonably well, but the bottom left corner of the gasket won't seal (the hinges are on the right). Any suggestions?

I have the same issue with my door... The bottom left sits off by an 8th or so. I have to push the door around a bit to get I to seal properly
 
My door won't close! I used a 1/8 inch dry erase board and things lined up reasonably well, but the bottom left corner of the gasket won't seal (the hinges are on the right). Any suggestions?

Remove your dry-erase panel and oversize your holes slightly with a larger drill bit to give yourself some more play. Then when you reattach it, get all the screws inserted and started before you do the final tightening. When you do tighten them, do it in an alternating pattern, like you would tighten lug-nuts on a car wheel. That way, your panel doesn't pull the door from one side and cause it to twist. It took me a few tries of loosening and re-tightening some screws, but I eventually got the door straight.
 
I pulled my first (half) pint last night! It's only been a week at 12 PSI for my Pliny clone so it's not quite ready from a carb standpoint, but it still tasted delicious. I'll post a picture of the working tower when I pull a hopefully finished pint this coming weekend.

We're also now planning a tabletop that will sit on top of the kegerator and extend off to the left in the little alcove it's sitting on, forming a nice table area. This will be covered with a straw mat kind of material that my fiance is working on sewing into an attractive cover (and she's also working on the tower sleeve to protect it from the elements). I'll follow up whenever that's completed, though it probably won't be for another few weeks.
 
Remove your dry-erase panel and oversize your holes slightly with a larger drill bit to give yourself some more play. Then when you reattach it, get all the screws inserted and started before you do the final tightening. When you do tighten them, do it in an alternating pattern, like you would tighten lug-nuts on a car wheel. That way, your panel doesn't pull the door from one side and cause it to twist. It took me a few tries of loosening and re-tightening some screws, but I eventually got the door straight.

This is great advice. Worked like a charm. I have to hold the door shut for five seconds, but after that it seals. Creaking during installation is a bad sign. I just plugged her in, so we'll see tomorrow how well it holds temp (it worked before I started drilling!).
 
I am in the middle of converting a Danby DAR440BL refrigerator. I was wondering if anyone has tried fitting a 3 gallon keg behind the 2 5 gallon kegs (on the "hump" in the refrigerator, where the CO2 tank sits). I will probably be re-ordering my equipment next week from a more reputable supplier.
 
I don't know that another keg, even a 3 gallon, would fit. The C02 tank and regulator takes up most of the space there, plus the ledge is pretty shallow.
 
Ok thanks. I was planning on using 1 keg at times to lager beer, and considered buying the 3 gallon keg if I wanted 2 beers on tap. I haven't had any luck finding a used 3 gallon keg, so will save the cash for other something else.
 
Has anyone tried using a temperature controller with this? I would like to run the temp probe through the drain plug, but not sure if it would fit.
 
fusa said:
Has anyone tried using a temperature controller with this? I would like to run the temp probe through the drain plug, but not sure if it would fit.

Since I had a 20# co2 tank that wouldn't fit inside, I just drilled a hole in the side if the fridge and slipped the probe and co2 line in. The probe is submerged in a plastic drinking cup filled with water, and I also ran a desk fan on the hump, pointed upwards, so the temperature inside wouldn't stratify (no idea if that's the word I'm looking for)
 
I actually have a control box I've built (but not yet wired up) using one of the eBay aquarium controllers so prevalent on these forums. Once I get it wired up, I'll let you know. Even if the probe end doesn't fit through the drip tube, however, it will be easy to just slip the bare wire end through and then clamp it into the box afterwards, so I don't foresee the need to drill further holes.

Note that it's also possible to drill out the drainage hole to widen it--I know I read about someone else doing that.
 
I'm not sure about that, but it looks like that is the case. I'd look around at other DAR440BL builds to see where others have drilled holes--a little Googling should yield pictures, and you can get some ideas as to safe locations in which to drill holes.
 
I actually have a control box I've built (but not yet wired up) using one of the eBay aquarium controllers so prevalent on these forums. Once I get it wired up, I'll let you know. Even if the probe end doesn't fit through the drip tube, however, it will be easy to just slip the bare wire end through and then clamp it into the box afterwards, so I don't foresee the need to drill further holes.

Note that it's also possible to drill out the drainage hole to widen it--I know I read about someone else doing that.

Finally got around to running a temp controller into the kegerator. I bought a Ranco controller and added a 3 outlet power strip cord. I used a dremel to slightly widen the bottom of the drip tube hole. I couldn't get a drill to the drip tube from inside, and it was to long to drill from the top with the dremel. I was able to from the back, but that wasn't very accessible either. I also ran the power cord to the tower fan through the drip tube. To fit both, I put the temp probe through first, then the fan wire.
 
So the only coils on this fridge are exposed on the back wall? No coils in the top and sides?

There are coils in the top and sides, do your homework carefully before drilling. The coils in the top are only in the front half, the rear half of the top is clear. So a tower can be mounted fairly easily.

Again, do your homework as manufacturers change things internally without notice. There are easy ways to determine coil locations, use them to make sure. Google 'Danby 440 kegerator conversion' and you'll find lots of resources along with what's here at HBT.

Here's a pic of mine with the hole drilled and after completion.

20120830_175051 (Small).jpg


20120831_202829 (Small).jpg
 
So I bought a Danby DAR 440bl and the door panel is glued in not screwed in. I was looking at it and thought I could cut out the panel leaving the channel for the door gasket. Then I was going to glue in a piece of plexiglass with silicone to cover the inside part of the door. Has anyone done this? I read that the panel provides rigidity to the door. I am just looking for a clean look when I am done.
 
I just finished changing the new model Danby Designer DAR044A1BDD into a kegerator. Its very similar to the older model. You still have to cut the shelving off the doors. The inside seems to be a tighter fit for 2 corny kegs.

DSC00877.jpg


DSC00880.jpg


DSC00881.jpg


DSC00886.jpg
 
Nicely done! Looking good.

I guess I neglected to post pictures of the temperature control box I eventually wired up. It's a combination STC-1000 with hot and cold outlets on one side (using the cold only at this point), and two switches to control the two outlets on the other side independently. This lets me control the fan blower with one switch, and our balcony lighting with the other.

2013-10-14%2017.23.33.jpg


And for fun, here's some tap handles I made for my wedding a while back :D

2013-05-16%2020.43.13.jpg
 
Back
Top