Teeny Tiny E-Build

Homebrew Talk - Beer, Wine, Mead, & Cider Brewing Discussion Forum

Help Support Homebrew Talk - Beer, Wine, Mead, & Cider Brewing Discussion Forum:

This site may earn a commission from merchant affiliate links, including eBay, Amazon, and others.

ryclo

Well-Known Member
Joined
May 10, 2011
Messages
131
Reaction score
31
Location
marga
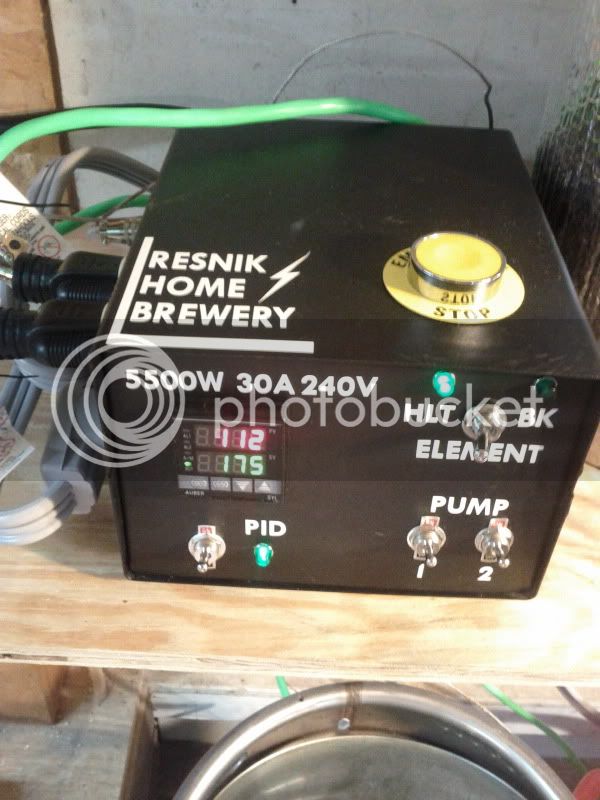
Not sure I could have got much more into this box!

I have upgraded my controller from 120V to 240V and bought a 15 gallon pot and some 5500W elements. These suckers can sure heat up water quick!

Also got a sweet chugger pump which is going to help push my wort through the cfc at a much better rate!

Just about ready for my first 10 gallon batch... :fro:

brew4.jpg


brew2.jpg


brew1.jpg


brew3.jpg
 
you sir. are a hero, I'm setting up my first 4 keg system. how much were your suckers how much was your whole set up and how is that thing only 10 gallons?
 
I bought this pot for $118 shipped off amazon and installed my own valve and element using a step bit and knock out tool from harbor freight. I have been buying bits and pieces for the controller for the last year. I just built the PWM circuit and added a switch so I can plug in my 10 gallon HLT and control the temp with the PID (temp probe is only in the HLT) or I can plug in the boil kettle and use the PWM to control the boil with just my own eyes as feedback. KISS right?

I am thinking about adding a copper herms coil in my HLT to recirculate my mash (10 gallon cooler) to control temps but that probably will wait for a bit.
 
where do you live so I can kidnap you, lock you in my shed and you can help me with my system. seriously though mate, very good finish perhaps you should do a tutorial? its a good set up mate.

I'm doing an internship at a microbrewery and your set up doesnt look too different.

Saint
 
I have the same pot and 5500w element. Love it. My system was probably 10x more expensive than yours and the same functionality :p
 
I have the same pot and 5500w element. Love it. My system was probably 10x more expensive than yours and the same functionality :p

Ha ha, good to know.. I am known to be a cheap ass! Yesterday was my first wet test and everything worked like a charm! I used two 500 ohm resistors in my e-stop and it trips my gfi just fine. I actually think that the pot is great too... I bought my first one on craigslist (10 gal stainless) and had to scrub out the turkey oil for a bit but for $50 with a stainless propane burner I couldnt complain. But now I will never go back to propane!
 
If I wasnt so cheap, I would consider buying another bayou classic for my MLT but the round orange drink cooler works pretty good for now! I could also see another pump in my future someday.
 
Unless you feel the need to move to great than a 10gal cooler I wouldn't bother, honestly. I like my dual-pot setup, and it looks sexy, but it's a little tricky not having insulation. Of course, you could always reflectix it.
 
Nice!...be sure to use full port barbs on the inlet of the pump and from the kettle, they will greatly reduce possiblity of cavitation
 
good advice, how do I know if I have full port barbs? I bought them at Ace!
 
Looks nice and simple. Come to think about it this is really what I should have done for my e-brewery. Mine probably wasn’t 10x more expensive like iijakii’s but I bet it was pretty close to 3-4x and still has the same functionality. But at least I have real decal labels now!
IMG_20120429_130638.jpg
 
How did you hook up that dial/pot?

Can the auber PID have a pot to control the duty cycle in manual mode?

thanks Kevin
 
Look up "PWM" in this subforum. There's a good how-to thread on making your own.

I am familiar with PWM and 555 timers.... my question is do you hook up a PWM circuit some how to one of the auber output legs or is this built into the PID unit.?

I know you can set the auber pid to manual and adjust the output that way... it is better or easier to use a PWM circuit with/in line/etc.
I dont see, have not found how this ties together.

I would like to adjust a dial/pot, seems easier/faster than adjusting the auber unit... but maybe I am wrong.
The OP has both -
How is that wired up?

thanks Kevin
 
I built the pwm and use a switch to contol the 12v out going to the ssr. If I want want temp control, I use the PID. If I want % control, I switch over to the pwm dial.
 
I built the pwm and use a switch to contol the 12v out going to the ssr. If I want want temp control, I use the PID. If I want % control, I switch over to the pwm dial.

Ah... so the Auber is only used to control the mash temp.
For boil....you flip the switch and put the dial and 100% until boil starts and then dial it back as the boil starts to roll?

Curious....Why did you do this when the auber supports this functionality?

thanks Kevin
 
Ah... so the Auber is only used to control the mash temp.
For boil....you flip the switch and put the dial and 100% until boil starts and then dial it back as the boil starts to roll?

Curious....Why did you do this when the auber supports this functionality?

thanks Kevin
He is not using an Auber Instruments PID (Based on his picture). With that said it probably does not have any manual control built into it.

So at the end of the game? More $$$'s to do a work around.

Just saying...
 
He is not using an Auber Instruments PID (Based on his picture). With that said it probably does not have any manual control built into it.

So at the end of the game? More $$$'s to do a work around.

Just saying...

Ah -
light bulb is on now....
I figured he used the auber 2352 model PID.

thanks for getting me straight.

Kevin
 
Yep, I didnt buy my controller from Auber. Even so, a dial is WAY easier than trying to program a % especially if you need to make quick changes (boilover). It cost me $8 for the PWM kit so its not exactly tons of extra money.
 
Yep, I didnt buy my controller from Auber. Even so, a dial is WAY easier than trying to program a % especially if you need to make quick changes (boilover). It cost me $8 for the PWM kit so its not exactly tons of extra money.

Good point with the emergency changes. Although in the event that I have a boilover, I just flip the power switch to the element off, then go in and adjust the percentage in the Auber. Still more of a pain than twisting a dial though.
 
Your setup is exactly what I'm looking for. Could you post a parts list or just send it to me. Also a diagram would be sweet.
Thanks
 
Similar to kpr121, I have an Auber 2352 and if there's a potential boil over I just turn the PID off and the problem's solved. I then dial it down after turning it back on. Adjusting the percentage of power in manual mode is easy on the Auber but it's not as fast or easy as a knob. I like the idea of a dial control for boil, especially if there was a digital percentage readout like the PID has. I'm sure that's doable but I don't know that I really 'need' that so I haven't bothered.
 
Well, my tiny box was just too small and I burned out my second ssr, I assume it overheated...

So I decided to buy a little bigger box and rebuild my controller a bit nicer! I added a pump switched outlet and some status lamps. I plan on putting a fan inside to keep her cool... I am excited to try out the new layout! What do you all think?

dead_ssr.jpg


brewcontroller.jpg
 
Very nice! I am totally with you on the dial. Maybe it's my fumbling fingers and bad eyesight but I have no use for entering percentages on a crummy keypad.

My smoker controller (see sig) uses a similar size box although I didn't cram quite as much in. I decided to mount the heatsink externally. I didn't bother with a fan because I was recycling bits from a previous build and was pretty sure that my combination of SSR and heatsink would not get hot. If it ever does heat up and I catch it in time I can blast it with a desk fan.

There wasn't room to put a PC fan and 12VDC supply inside the box, and anyway I didn't want to drill holes in the box because I wanted it quasi-waterproof.

By the way, how did you do the decals? Neater than my sharpie scrawlings.
 
Thanks, I love the simplicity and speed of the dial for boil control. I used my wifes label printer for the tags (black on clear tape). It looks pretty good. I did use a sharpie for the arrows. Tonight is my first test run, I hope I dont let any smoke out!
 
Ryclo, that control box looks sweet. I am looking to build exactly what you have...with some cosmetic tweaks. Any chance you have a wiring diagram and parts list?
 

Latest posts

Back
Top