Experimental tap handles

Homebrew Talk - Beer, Wine, Mead, & Cider Brewing Discussion Forum

Help Support Homebrew Talk - Beer, Wine, Mead, & Cider Brewing Discussion Forum:

This site may earn a commission from merchant affiliate links, including eBay, Amazon, and others.

purplehaze

Well-Known Member
Joined
Mar 2, 2011
Messages
398
Reaction score
27
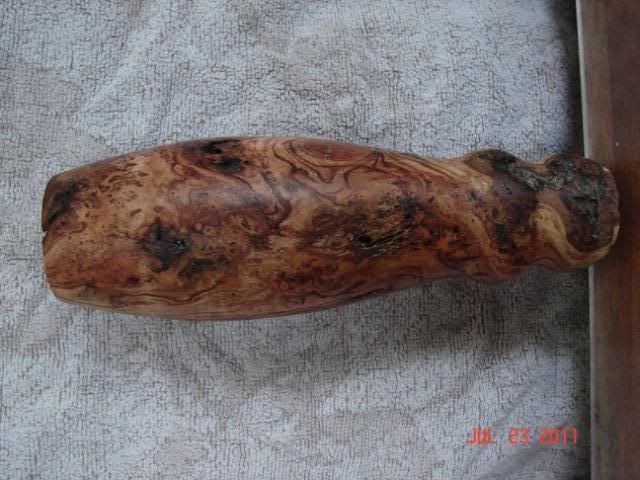
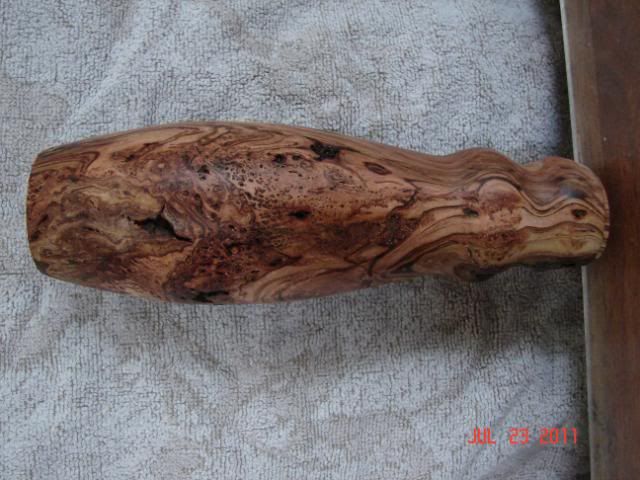
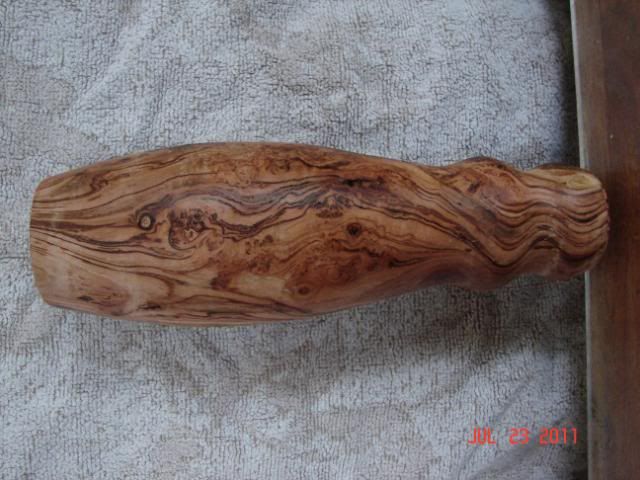
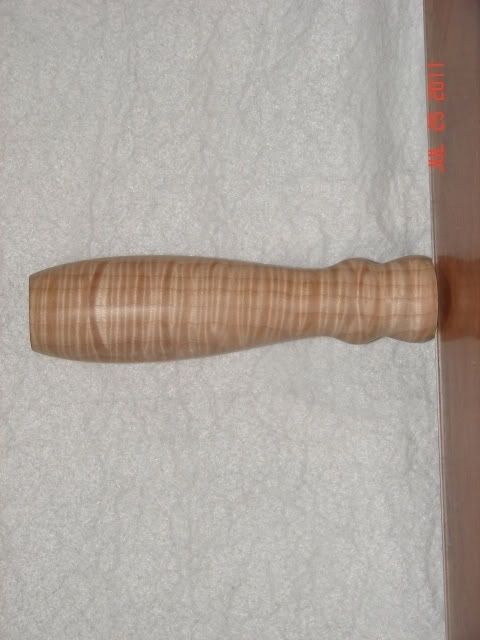
I started out wanting to make a few unique taps for myself which got me into experimenting with different materials. I'm also trying to perfect the inserted threads with some success. I cut all of the wood from logs that I either harvested or were given to me with the exception of the redwood. As you can see from the pics duplication is not my strong suit.

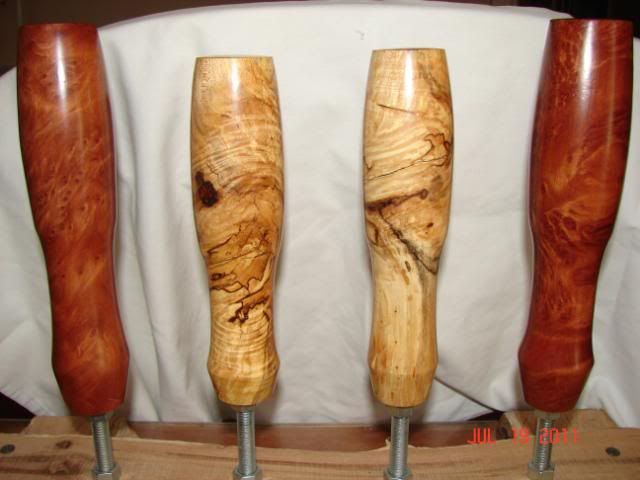
In the first pic there are two spalted maple in the middle and the ones at each end are redwood burl. The maple ones were by far the hardest to turn due to the the wood having hard and soft spots. Hardener had to be applied to the soft spots so it wouldn't tear out in chunks while on the lathe. Plus the softer areas will sand more quickly, warping the wood without it.

taps008.jpg


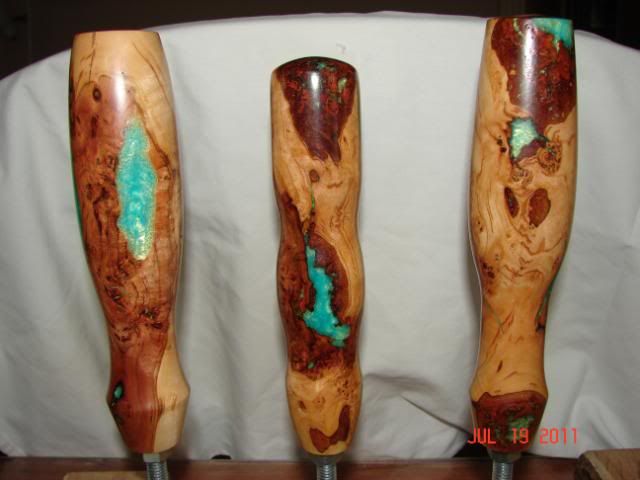
The next set I finished are all wild cherry burl that I force dried. Since most burls will have voids I decided to fill them with an aqua colored resin.

taps010.jpg


The last pic looks like a small child painted the letters on them, its actually more colored resin. Once they were turned I free handed them with a router, it was a real pain due to the round surface. This was my first attempt at routing letters which explains the sloppiness or maybe it's because I'm a lefty. The IPA one is Ash and the ALE one is Cherry.

taps004-1.jpg
 
Nice. I have a friend who is making me some nice turned taphandles.

I like the colored resin in the cherry ones.
 
nice! that wood is beautiful. i like the plain wood ones a lot. but that resin has a really unique look too. kudos
 
Would you consider making ball tap handles from the same woods? I expect to be ready for faucets/taps for my kegs within a month or two. I have vertical space limitations for where they would go, which is why I'm thinking the ball ones would be a better fit. Although I have yet to actually measure what the clearance would be for the handles.
 
Thanks for the comments. I wanted to keep the shapes simple which shows off the wood best. The first four were actually made for someone but that fell through so I kept them. I plan on converting a chest freezer with at least six taps but I haven't found one for a good price yet. I made the Cherry burl taps to see if the resin would hold and it does.

Airborneguy: PM sent

Golddiggie: Where you are limited in height, round tap handles sound cool but you would be limited in diameter also. They would have to be small enough so they wouldn't touch the faucet mounting surface, like on a keezer. Don't forget your hand has to fit on there too. PM sent
 
So how big/how do you drill the holes for the insert threads? I think im gonna make a handle out of a wood baseball bat handle that i broke.
 
Don't say "duplication is not my strong suit", say they're individually crafted and each piece is unique!

What if you router in the letters before putting them in the lathe so you can cut the letters while the surface is still flat?

Even though you're still experimenting your prototypes look damm good.
 
Real nice job. I've turned some lamps and bowls myself and really enjoy turning different shapes. That's the beauty of woodworking each piece has its own character.
 
Thanks again for the compliments.

TJTHEBEST: The steel coarse threaded ones I ordered are kind of heavy duty. For these I use a 31/64" drill bit.

outside92129: That's a good idea to router the letters first. I will probably have to carve the letters deeper and maybe make two passes. I'm not sure but once I turn turn the taps the letters may become distorted. I wont know for sure until I try it though. Thanks for the idea
 
outside92129: That's a good idea to router the letters first. I will probably have to carve the letters deeper and maybe make two passes. I'm not sure but once I turn turn the taps the letters may become distorted. I wont know for sure until I try it though. Thanks for the idea

You'll want to create secure mounting points for the lathe first and then align the layout for the letters parallel to those points. It's the only way you have a chance of the end product looking symetrical and the distortion being somewhat even. The narrower the letters and/or the larger the diameter of the handle the less distortion there will be. I'd try to keep the width of the letters ~1/3 of the diameter of the finished handle if you do it this way.

You can also use the tool rest as a guide for the router if making the lettering after turning. The easiest way is to turn the stock into a cylinder (not the finished shape), and layout the letters on that. Then lock the headstock of the lathe, and use the tool rest to make all of the vertical cuts (now horizontal). Depending on the shape of your rest you may need to clamp a scrap board onto it for the router to ride on. Then release the headstock and secure the router to the tool rest. Make the horizontal cuts by turning the piece as the router sits in one place. Angled cuts can be made similarly to the vertical ones by clamping an angled scrap to both the tool rest and the work piece. Unfortunately I don't know of any easy ways to jig up for cutting rounded sections, so I've always just tried to pencil it in nicely and then freehand those parts. Also, I'm not sure how you freehanded those, but I've found that leaving the piece chucked up in the lathe with the headstock locked gives me the most control for freehand inlays. You can place the toolrest in such a way that it gives you something to steady your hand on.
 
Thanks JuanMoore for the ideas. I actually engraved those letters while the taps was on the lathe. I have a grade 8 bolt mounted in the chuck and the tap handle is screwed onto it. It's an old shopsmith from the 50's. Next week I will look into building a jig using the tool rest bracket. I just have to figure out how to lock it in position so the tap does not move while engraving.

63belair: I will try routing the letters first, the distorted effect may be interesting.
 
another thing about the letters. I don't like the resin or at least the purple

how about routing deeper before turning, and take a flame to get a darker burned look inside the letters before turning?

-=jason=-
 
I couldn't find letter templets smaller than 1 1/2" so it looks like I will have to try and make my own or continue with routing them free hand.

In the mean time here is one rough turned I am working on that needs some filler. It will probably end up being a bit slimmer than it is now. It's 7 1/2" long and 2 3/8" at the widest point. This is wild cherry burl that has some spalting. I know the pics are difficult to look at but when I try and rotate them the pics become distorted and short. I'll take better pics when it's done.

I don't want to use any colored filler because I think it will muddy the colors in the wood. I'm torn between using black or clear as a filler, any suggestions? Then again I could always leave it natural.

taps018.jpg


taps019.jpg


taps020.jpg
 
There looks to be quite a bit of black (or at least darker wood) in the first 2 handles, so I'd think a black filler would look good. The last one, I'd probably go with clear for 2 reasons. It'd give you a good idea for how these will turn out with the clear and with less dark wood in the handle, I don't think it'd stick out as much.

Nice work BTW.
 
Sorry for the confusion but all three pics are of the same tap, just different sides.

There is definitely something wrong with my camera. It makes everything look shorter when I take the pic vertically. Here is another one that is about 8" long, made from tiger maple.

taps027.jpg
 
What would all of you think about the resin filler being color coordinated to match the SRM color of a particular style for that tap (IPA, APA, Brown Ale, Porter, Stout, etc)?

I'd guess you'd have to accentuate somehow so it didn't just appear to be a slight discoloration in the wood, but I think if done right it would look awesome.

That said, the turquoise resin looks awesome. :mug:
 
I couldn't find letter templets smaller than 1 1/2" so it looks like I will have to try and make my own or continue with routing them free hand.

In the mean time here is one rough turned I am working on that needs some filler. It will probably end up being a bit slimmer than it is now. It's 7 1/2" long and 2 3/8" at the widest point. This is wild cherry burl that has some spalting. I know the pics are difficult to look at but when I try and rotate them the pics become distorted and short. I'll take better pics when it's done.

I don't want to use any colored filler because I think it will muddy the colors in the wood. I'm torn between using black or clear as a filler, any suggestions? Then again I could always leave it natural.

taps018.jpg


taps019.jpg


taps020.jpg

hi, two things. when I do letters with a router - even if I can't get the proper template (like if I'm using aprinted overlay), I will still use a straight edge (and a spacer the distance between the router bit and the edge of the router body - it makes layout a snap).

So, I'd cut into one face close to the finished shape, then carve. Add the resin and cure before turning, and it may inhibit splits, digs or just plain wood explosions.

As for the voids, I love using epoxy resin (system3 or west are my favorites) mixed with powdered graphite - those little tubes of graphite for squeezing into locks, etc.

check out my pics, the draft tower door has a vertical stripe, it is actuall a LIQUID inlay (see above). hav fun.
 
Thanks for the comments they are appreciated. The burl tap handles will not have anything engraved on them, I think it would ruin them. The engraving will only be on the plain woods.

deprecated: Good idea but I think it would be pretty hard to duplicate the lighter beer colors. It would require time to experiment mixing colors not to mention the resin and pigments are not cheap. One way to do it would be to drill a hole in the top of the tap handle and fill it with the colored resin. This would stand out more with contrasting woods and may require that you paint the void with a color that would enhance and change the resin color.

brewmonk: I think the graphite wont be dark enough for what I need. I was thinking about grinding up some charcoal and using that. Thanks for the tips on routing. Because the pic is so small it's tough to tell what color that vertical stripe is but the tower looks great. The stripe is a nice touch.
 
these are awesome! Im currently beginning a keezer build and have been dreaming up some ideas to make my own taps and I must say that these far exceed my creativity!! and now i have an even better idea as to how i can go about designing mine... good work!
 
Love all of the handles. Very uniuque. Any luck with routing the letters before turning the wood?
 
Thanks for the comments. I totally forgot about this thread, I'm in the middle of building another keezer.

I never was able to find routing stencils small enough to continue so I will have to try it free hand. Give me a few days and I will attempt it again.
 
Hi

Rather than using a router, you might consider some small very sharp carving chisels. It will be slower going, but you will have more control. It also will be easier to see where you are taking the wood away.

Bob
 
Back
Top