Another E-build

Homebrew Talk - Beer, Wine, Mead, & Cider Brewing Discussion Forum

Help Support Homebrew Talk - Beer, Wine, Mead, & Cider Brewing Discussion Forum:

This site may earn a commission from merchant affiliate links, including eBay, Amazon, and others.

rsklhm10

Well-Known Member
Joined
Jan 9, 2011
Messages
168
Reaction score
4
Location
Saint Augustine
Here it goes... Like many, I recently jumped on the electric bandwagon. In short, I was fed up with my propane setup and was intrigued by Kal's setup (SWMBO not so much). Fortunately she is understanding and supports my brewing habits. After a good amount of research, I began ordering parts and putting things together about a month ago. The biggest decision to make was what exactly I wanted in the setup and how to go about it.

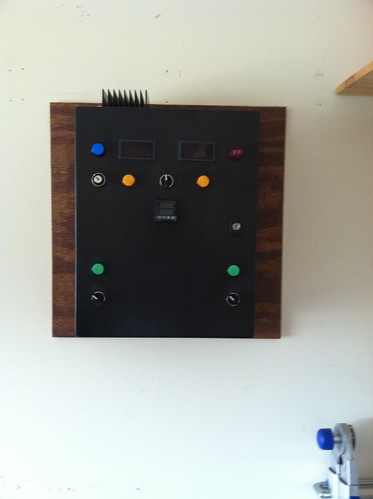
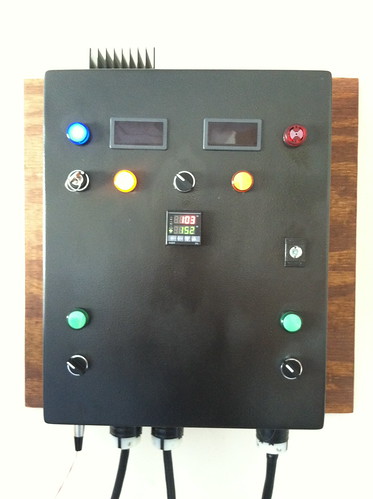
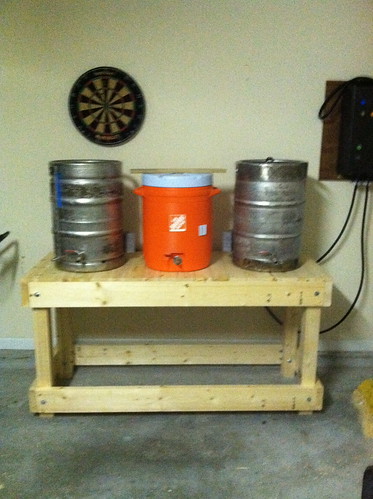
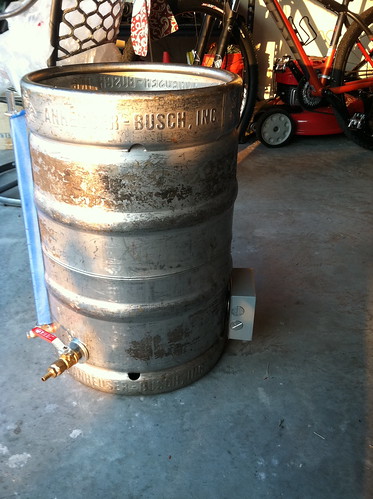
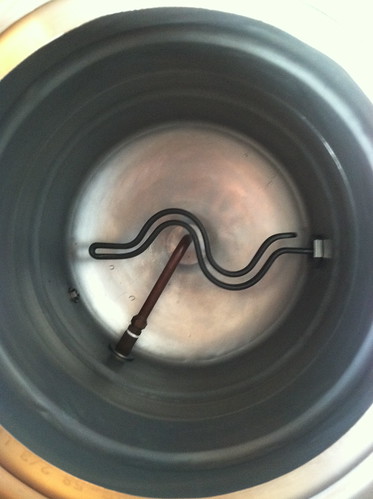
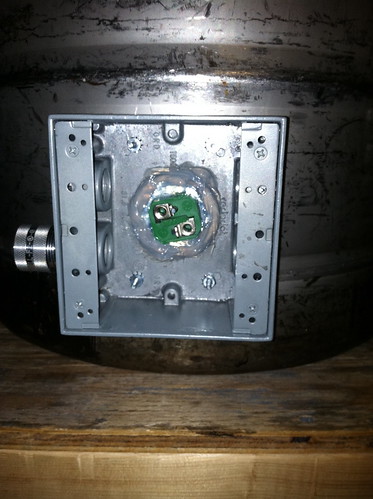
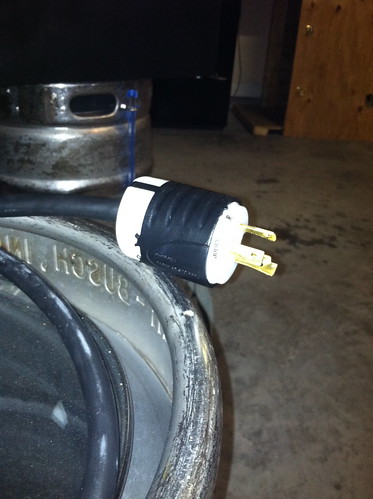
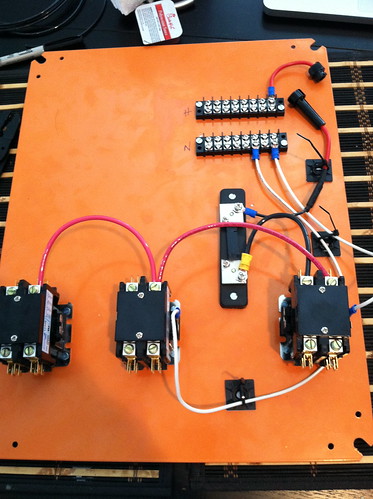
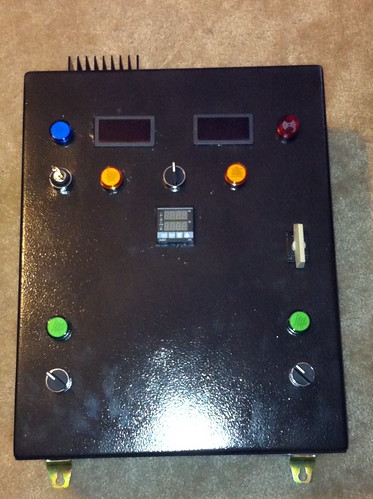
I decided for the time being to turn my keggles (HLT and BK) into e-keggles and continuing to use my cooler mash tun for now. As for the panel, I decided on a slightly more simplified panel than Kals, but that I could expand in the long run. The result is two 5500w elements being controlled by a single pid (the goal is to switch to blichmans and add 2 more pids at the first of the year). I chose an enclosure like the electricbrewery and incorporated a very similar switch setup as well as a volt and amp meter, etc. I plan on continuing to use my single pump and plate chiller for the time being.

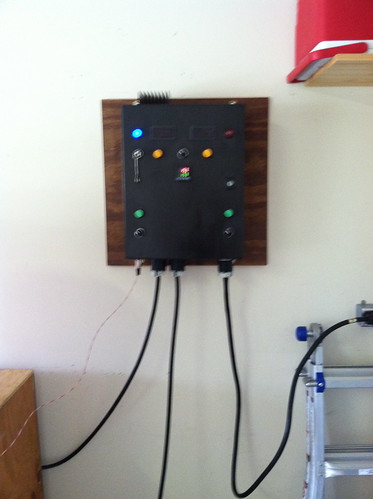
So far I have completed the two e-keggles and have put together most of the control panel. The plan is to finish up the panel tonight if possible. Unfortunately, I put a dent in the panel door that needs to be fixed. After that all I have left is the main power for the panel. For the time being I am going to continue brewing in the garage and decided my best bet was the coveted "Home Depot Spa Panel." Based on my garage layout, I am going to mount the spa panel about 5 feet from the main panel and run conduit to the outlet location (this is what I have been most worried about/putting off).

Once the power is run I should be good to go. My goal is to brew a first batch on the setup this weekend. I have tried to take pictures along the way, but I am not near as consistent as some. When I get home from work this evening I will try to post some up. Any information, guidance, or comments are appreciated.

As a side note, I would like to give a special thanks to Kal and P-J. You guys are the only reason I was able to tackle this build...
 
Thank you, I didn't want to be the first to say it! How can you have a build thread without pics? Impossible! It's a matter of etiquette.;)

(I know you said you were going to post some, just giving you a hard time :))
 
As promised here are some pics. More shortly...

6128603971_f8032d8094.jpg

HLT

6128604247_0bf8741eb5.jpg

HLT Again

6128604797_e06e64eccd.jpg

BK

6129153430_97d3fe3089.jpg

Element mounts (same as Kal)

6128604701_011462e5bb.jpg

Plug

6129153294_c21e1a0eb6.jpg

Start of wiring. I have more pics now, but can't locate them at the moment. Wiring is completely done except for the xlr connector.

6129152874_88fcfc5aef.jpg

Front of the panel. It is kind of plain without tags, but I am working on that. As you can probably tell, the enclosure is a little bigger (16x20). I was hesitant at first but it worked out ok. The plan is to add another pid on either side of the current and then center the timer below the middle one. I should also have room for a decent size badge b/w the pump switches.

6128604999_6c6a6a96a6.jpg

Quick plug of my Keezer. I built this back at the first of the year and this is a pic taken the day i finished it. Since then I have added two more taps, I will try to get an updated pic.

6129154190_939b7d5f04.jpg

Upclose of the tile. I think it came out pretty good. Switch is for leds below the faucets. Controlled via a johnson controller.

That is all I have for now. Should be able to update more through the weekend.
 
Looks great....love the keezer as well. I finished the tap handles and another trim piece to accommodate 4 tap faucets for mine last night and should have my 4th tap/beer line/etc. in a couple of days from kegconnection.com. Check it out when you get a chance. I have 3 SS kegs that are in beautiful condition. I started polishing them about 6 mo. ago, but the basement finishing project took over and I never even proceeded to cut the tops out. My keezer will be 100% complete in a few days and this weekend I am making a big push to wrap up the drop ceiling in the basement. I purchased an angle grinder and cut off wheels a month or so ago, so I am ready to start my keggles soon. Would you mind pricing out the components and listing where you got them from? It would be a great help. Congrats on you builds! :mug:
 
Looks great....love the keezer as well. I finished the tap handles and another trim piece to accommodate 4 tap faucets for mine last night and should have my 4th tap/beer line/etc. in a couple of days from kegconnection.com. Check it out when you get a chance. I have 3 SS kegs that are in beautiful condition. I started polishing them about 6 mo. ago, but the basement finishing project took over and I never even proceeded to cut the tops out. My keezer will be 100% complete in a few days and this weekend I am making a big push to wrap up the drop ceiling in the basement. I purchased an angle grinder and cut off wheels a month or so ago, so I am ready to start my keggles soon. Would you mind pricing out the components and listing where you got them from? It would be a great help. Congrats on you builds! :mug:

I appreciate the compliments on the Keezer. It is probably my favorite thing out of all my HB equipment. As for yours, trust me I have seen your thread and was thoroughly impressed by the rustic feel and overall look. Great job. As for 4 taps, I could use another as my keezer will hold 4 kegs. Problem is that I centered my first tap and would either have to make it 5 to be symmetrical or replace the front board where the taps are mounted. I wish I would have polished my kegs first, but now it would be a pain. I did take the angle grinder to the lettering and grinded them down to smooth with the keg (no more BMC logos). Doing this certainly cleaned them up and I would highly reccommend it as it was relatively easy and not that time consuming. Finally, as for pricing components, I have a word document on my laptop at home with a breakdown of where everything was purchased, etc. When I get home this evening I can gladly post a copy of it.
 
Much appreciated! I need to get to work on this project, because brewing outside with propane in the middle of the winter sucks in Michigan. It's tough trying to maintain temps and I hate having to lug everything up to my garage. I can't wait to be able to brew in my basement, with everything contained to one area in a nice temperature controlled environment. Thanks in advance for the info. :mug:
 
I know this is :off: but how did your Pliny the Elder turn out. I see it in you signature line and I have often considered trying to hunt down a recipe.
 
Pliny the Elder turned out pretty good. Actually used a recipe I found online, I can send it to you if you would like. As for pictures, more are coming either tonight or tomorrow. I cut the system on for the first time today about 1 hour ago. Hearing the relay clunk and nothing going wrong is an AWESOME feeling. First brew on the system tomorrow!!!
 
Any updates? Any more pictures? I think this is the same route that I would like to take.
Do you have a wiring diagram? Also any chance of following up on this - Finally, as for pricing components, I have a word document on my laptop at home with a breakdown of where everything was purchased, etc. When I get home this evening I can gladly post a copy of it.
Looks great!

Sorry, I have been out of town since early last week. I will get some pictures loaded up tonight or in the morning. The panel is mounted on the wall and I got my 240v 30a spa panel wired as well. I did my first brew on the system last Sunday and everything went pretty well. I need to update a couple things on the parts list and I will post that as well.

As for a wiring diagram, I actually created my own "hybrid" diagram. I developed a diagram influenced by both kal's build and some of P-J's diagrams he has posted. To be honest I did not draw it out, but just relied on their diagrams and the concept I had in my head. However, I can attempt to create something as soon as I have a few spare minutes...
 
Sorry for the long delay... I know I promised more pics a couple weeks ago, but I've been super busy at work. Anyway, finally got around to building a brew stand that I finished this evening.

I have brewed 4 batches on the system so far using my old stand and have to say the system is amazing. Like others have said, it does take getting some used to.

6218674895_bd84459845.jpg


6218675119_9199df470d.jpg

As you can see in these photos, the volt and amp meters were not working. When I took these the other week I was still waiting on the adjustable power supplies to cross the pond..

6218674997_0f3c7e3545.jpg


6218675307_805f81c3bb.jpg

Brew Stand! Again I stole Kals' design because if it ain't broke, don't fix it. Still have to add the bottom shelf and stain it. Hopefully next weekend.

6219196722_2331876ea5.jpg


Planning on getting some more stuff done this weekend. I was initially going to switch to 20g Blichmann's, but decided I would wait until at least the first of the year. Based on this decision I am going to go ahead and switch all the fittings on the kegs to stainless steel as the kegs will likely be going to my father-in-law (he is looking to make the switch from extract). Other than that, I really need to finish my fermentation chamber that I started 6 months ago as the wife is sick of carboys around the house...
 
Yea I do have some more recent pictures but I am out of town at the moment. Actually made some changes to the control panel and added two more pids and a timer. Also, I plan on staining the stand in the next week or so. Will work on getting some new pics up ASAP...
 
Very nice build.
Do you have alarm (buzzer) switch on CP?
How do you turn it off?
 
Back
Top