60qt. Ice Cube Mash Tun Build - $cheap and simple

Homebrew Talk - Beer, Wine, Mead, & Cider Brewing Discussion Forum

Help Support Homebrew Talk - Beer, Wine, Mead, & Cider Brewing Discussion Forum:

This site may earn a commission from merchant affiliate links, including eBay, Amazon, and others.
Not really following you on the hose elevation on the outside of the cooler. I'm about to switch mani's to CPVC but previously the mani I linked above pulled out all but a cup or two at the absolute most with no issue and I had the hose going straight down from the outside connection into a pot. Could you elaborate a bit on what you mean by getting enough elevation on the outside? Thanks.

Yes. The distance between the end of the spigot/fitting, to the bottom of the receiving vessel (well, technically, to the top of the receiving vessel's volume).

If your manifold is flush with the bottom, and that the liquid has to go up 3" to get to the valve, you will need at the very least 3" of head (downwards hose) to create enough head to keep pulling to the bottom of mash tun. In reality, it's higher than that as there is friction. If you were testing with no hose (only the ball valve & fitting), that's the source of your larger than normal amount of liquid left behind.

Also, the hose should be small enough to prevent ANY air from being in it. 3/8" to 1/2" should do it.

Refer to this discussion here: https://www.homebrewtalk.com/f51/mash-tun-manifold-suggestions-327949/

MC
 
Oh ok. Phew. You had me worried for a minute. I place the cooler up on top of one of our Islands so it starts a little over 3.5' and even when the receiving vessel is full still has a couple feet between the two straight down. I thought you were meaning something else and I thought I was going to be in deep trouble due to lack of the proper amount of hose soon. :)
 
I'm having issues with my spigot leaking.

It goes like this:

1/2" CPVC Adapter -> Plastic Washer from Cooler Spigot -> Rubber Grommet from Cooler Spigot -> O-Ring -> 1/2" Ball Valve -> Barb Adapter

I went with an o-ring because I couldn't find that "Rubber Hose Grommet" anywhere, or any that would fit onto the CPVC adapter. Any ideas?

The O-Ring is outside, between the wall and the valve? If so, it may be over-tightened/crushed. Take it apart and and tighten it only finger-tight.

MC
 
The O-Ring is outside, between the wall and the valve? If so, it may be over-tightened/crushed. Take it apart and and tighten it only finger-tight.

MC

That's probably it, I'll give it a try. The only rubber on the inside is the rubber washer from the ice chest spigot, right?
 
Can anyone show me their SS braid setup on this one?

Not sure a braid would work real well on this one. I got rid of mine a while ago, but there was a good drop from the point the manifold starts to the bottom and quite a bit of deadspace.

I could be wrong though if someone is having success with a braid.
 
Mine works ok with the braid setup. Thinking about switching to a manifold though, see if I can get better efficiency. I get 70-75% now with the braid.
 
Anyone know where to get a false bottom that would fit this cooler? On occasion I get grain particles in my brew, so I'm thinking of adding a false bottom on top of the braid. It could rest on that lip above the drain, just need a couple posts on the other side to keep it propped up. Looking at my options to impove this. Still thinking of a manifold, wondering if that will fix the issue. Or maybe my crush is too fine.
 
Save yourself the money and trouble and just build a cpvc manifold. I have one in my cube and it works great. I never get any grain bits in the kettle.

Mine has 4 rows. Joined together on the ends with hacksaw blade slits halfway through the cpvc (facing down). The pick up tube comes from one of the two inner rows via a "T" and a 45 degree elbow. I went through the front wall not the existing drain spout as it's not in a good location.

I leave behind less than a quart of liquid draining my mash tun which is great for your efficiency.


Sent from my iPhone using Home Brew
 
Yep, what foos-n-brew said. I have a very similar setup and it works great. Never a stuck mash and predictable efficiency and the vorlaufing is quick and good - hardly any particles at all.

If I do wheat or oats or rye of any significant amount, I always add rice hulls, and so far (4-5 years) it's worked like a charm.

My only "regret" is that for bigger brews, the cooler maxes out at about 32-34 lbs of grains and that ain't enough sometimes for a 10gal+ batch of 1.100+ gravity...

-aledawg
 
Can either of you provide pics? That would be helpful in knowing what I need to build the manifold. Sounds like I'm going that route. Thanks guys!
 
Hey Wreck99,

I'd be happy to, but I'm far away from my home at the moment. I'll try to get a photo done this weekend inbetween travels and post it for you.

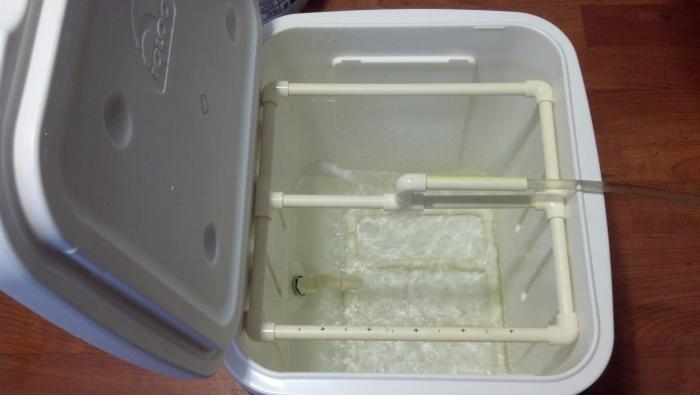
Basically, though, it's just a combination of CPVC tubes and connectors. You create an outside "rectangle" that fits not too tightly inside the bottom of the cooler.

I then have to more "cross-overs" to cover the base at an even space ratio.

To connect to the drain valve, I have another T-connector and a 45-degree connector which fits right into a 1/2" adapter into the stainless steel thingy...

You know what - it's impossible to visualize or describe. I'll get some photos up for you this coming weekend. Stay tuned.

-aledawg

Thanks alot I'm trying to envision this. I'll probably continue to use the existing drain plug for now and see how my efficency is. Also, any suggestions for making the shutoff valve a little more solid? I don't have any leaks, but maybe I could be using better sized washers/connectors in the drain to keep it from feeling a bit wobbly. Just too flexible for my liking. Basically, a full pic and listing of what you've done would probably be an improvement from my setup. I'll try and get a pic of mine for you to visualize what I'm dealing with. It works, but it can be better I'm sure...which I'm hoping to achieve from your advice. Thank you for your help!
 
I just used a mixture of rubber and steel washers until it was nice and tight and stopped dripping. 4+ years in with the same cooler, it still is dry as a bone. Will put up pictures of this as well (but I'm not going to dismantle it for fear of irritating the gods... :)
 
I just used a mixture of rubber and steel washers until it was nice and tight and stopped dripping. 4+ years in with the same cooler, it still is dry as a bone. Will put up pictures of this as well (but I'm not going to dismantle it for fear of irritating the gods... :)

Nah, don't take it apart. Don't want you messing up your rig since you got it all working right. I didn't use steel washers, just the rubber hose ones (which keep it from leaking)...maybe that's my issue there for stability though. I've done about a dozen batches in it as is over the past year. Brews are great, just can't help but think I can improve the process. I guess I've been just dealing with all this for too long.
 
Here's some pics of my current setup aledawg

mashtun1.jpg


mashtun2.jpg
 
Tried my hand at putting together the CPVC manifold. I may swap the 90 elbow out for a couple 45s to lessen the slope to the output. Seems to me you'd be banging that around while stirring alot. Good thing is I made it a tight fit side to side, so the manifold itself doesn't budge. I haven't done anything to the bottom yet. Still deciding whether slits or 3/32" holes are better. Anyone think there's a difference which method to use? Also found this nifty lead free/CPVC coupler that screws right into my ball valve. Haven't tested with water yet for leaks (still need to finish bottom) but have high hopes this will work as it appears to have a good seal with the garden hose gaskets on either side.

mashtun_manifold1.jpg


mashtun_manifold2.jpg
 
Here you go!

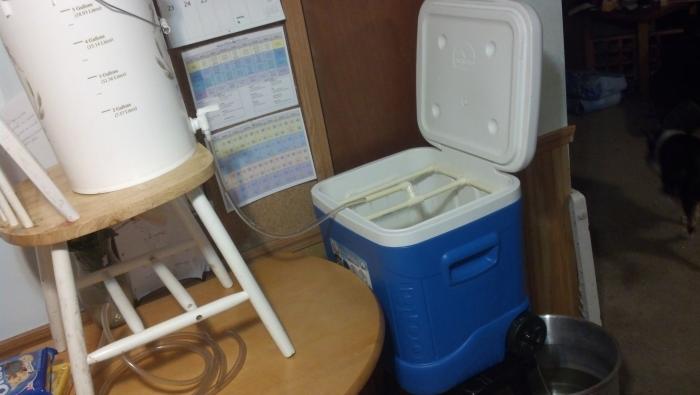
Overview of mash tun

1


The mashing manifold upside down, showing the slits which were cut with a hacksaw and "polished" with sandpaper

0


Showing the "neck" of the mashing manifold

4


This is the fly sparging manifold which is mounted under the lid of the mash tun

5


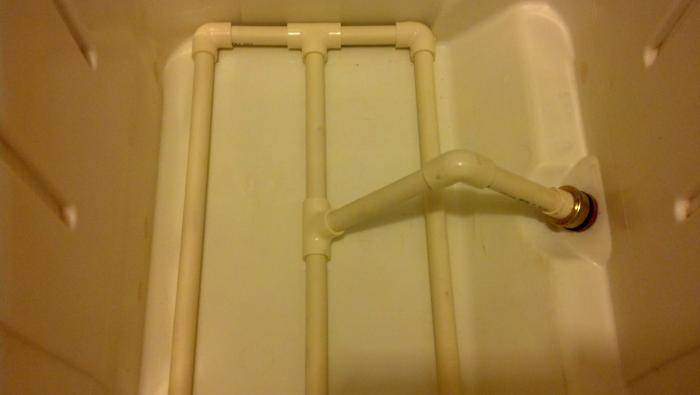
Inside the mash tun, showing the connector from valve-manifold neck

3


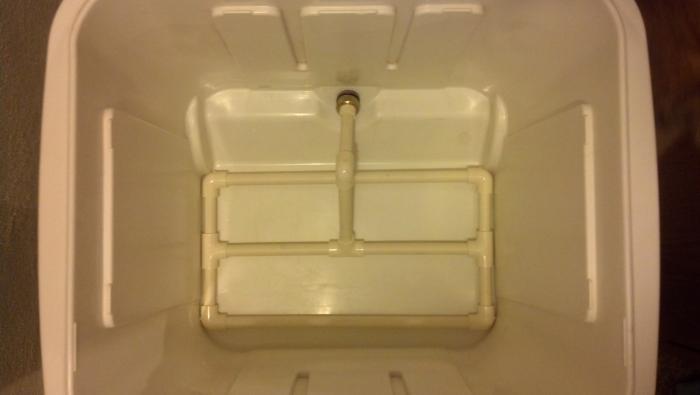
Inside mash tun, manifold connected

2


Close-up of manifold neck connected to valve adapters

6


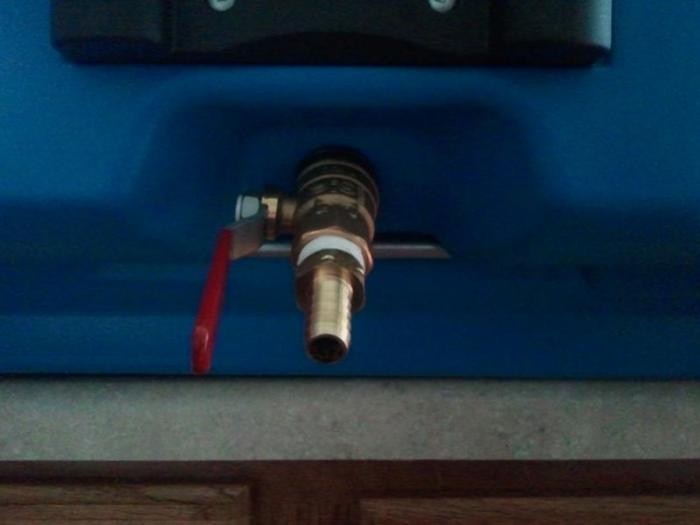
Outside valve

7


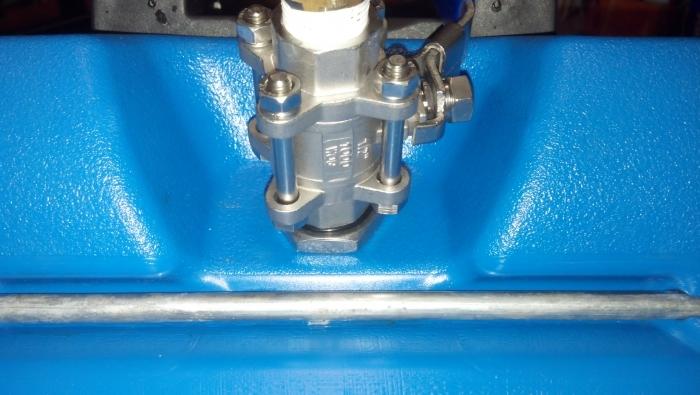
Close-up of outside, a mixture of rubber and metal washers

8


Hope that helps!
 
Here you go!

Overview of mash tun

http://ge.tt/4ZNBmEK1/v/1?c

1


The mashing manifold upside down, showing the slits which were cut with a hacksaw and "polished" with sandpaper

http://ge.tt/4ZNBmEK1/v/0?c

0


Showing the "neck" of the mashing manifold

http://ge.tt/4ZNBmEK1/v/4?c

4


This is the fly sparging manifold which is mounted under the lid of the mash tun

http://ge.tt/4ZNBmEK1/v/5?c

5


Inside the mash tun, showing the connector from valve-manifold neck

http://ge.tt/4ZNBmEK1/v/3?c

3


Inside mash tun, manifold connected

http://ge.tt/4ZNBmEK1/v/2?c

2


Close-up of manifold neck connected to valve adapters

http://ge.tt/4ZNBmEK1/v/6?c

6


Outside valve

http://ge.tt/4ZNBmEK1/v/7?c

7


Close-up of outside, a mixture of rubber and metal washers

http://ge.tt/4ZNBmEK1/v/8?c

8


Hope that helps!
 
That does help alot! Thank you for the very detailed pictures. I think I'm going to re-engineer my setup a little. Your pickup line to the drain is alot cleaner and looks like will solve my concern about knocking into it while stirring compared to what I have right now. Thank you for the pics man. I'll post mine when completed.

I also like your fly sparge arm setup. How did you mount that to the lid? I was originally going to make a 2nd manifold and just lay it onto those lips we have along the sides of the cooler, but that would keep the top propped open (not sure if that's an issue or not).
 
Hi again,

For the fly sparge manifold, I made a rectangle and added one "center tube". The holes were drilled with a small drill bit. I glued the rectangle together, since this one (unlike the bottom manifold) doesn't have to be taken apart for cleaning.

I then drilled a hole in the lid, and glued the tube that goes through the lid to the manifold itself and the top 90-degree connector. I used a CPVC cement as the glue. It smells a bit at first but goes away quickly.

The dimensions for the sparge manifold are here: http://ge.tt/4ZNBmEK1/v/9?c

The dimensions for the mash manifold are here: http://ge.tt/4ZNBmEK1/v/01?c

Best,
-e
 
Thanks aledawg. You inspired my new design, though I didn't feel too comfortable drilling a hole into the lid just yet. Here's some pics. A test run with water was a huge success. I have to think this will improve my product from the old setup. I switched out as much of my copper/brass as possible with the SS fittings I could find. Still need to find a SS barbed adapter for the valve outlet.

I drilled 3/32" holes every 2 inches in the sparge arm. Never fly sparged before, so this should be interesting. But the shower comes out real nice. The arm just sits snug over the lips of the cooler sides. No need to secure it.

manifold_v2_topview.jpg


manifold_v2_sideview.jpg


manifold_v2_bottomview.jpg


new_ss_valve.jpg


fly_sparge_arm.jpg
 
Very nice! I have the same results for left-over fluid, so it's very efficient.

One thing that bothered me for the first few runs: I had a "significant" temperature drop in the mash (5-6 degrees over an hour), so I put some insulation foam inside the lid. This helped a bit, so I now have about 2 degrees drop over 1 hour, which is about as good as I'm going to get it.

Good luck, and enjoy!
 
What I've done over the past couple years using this mash tun (when it had SS braid) was throw a heavy quilt over it. I too noticed that massive temp drop at first and this has helped me get by so far. Great suggestion with the foam though, I may do that in the future. Heck, when I'm ready to mess with the lid I can punch the sparge arm through there too. Thanks again for all your help man. This project was fun to do. Now to test it on some beer!

HEY! I just realized your location lol. Wow, you aren't far from here at all! I'm from Warminster.
 
Test fly sparge run with 5 gallons of water in 30 minutes. Didn't think I was draining that fast. Perhaps having the grain in there will change those numbers some.

Test_Run1.jpg


Test_Run2.jpg
 
So i have the same cooler that i'm ready to convert. One question i have is if
i batch sparge how much liquid will i be able to drain from the bottom of the manifold. I was concerned about the height of the drain plug and was considering drilling a new hole and relocating it lower on the side. I want to be able to get as much of the first runnings as i possibly can so i can achieve the best effeciency posssible.
 
I have one of these that I use with a C-PVC manifold. I only leave big one a pint or two or liquid. I drilled a hole in the front of the cooler for my ball valve. The siphon from the attached hose will drain it down to the bottom of the cooler.


Sent from my iPhone using Home Brew
 
So i have the same cooler that i'm ready to convert. One question i have is if
i batch sparge how much liquid will i be able to drain from the bottom of the manifold. I was concerned about the height of the drain plug and was considering drilling a new hole and relocating it lower on the side. I want to be able to get as much of the first runnings as i possibly can so i can achieve the best effeciency posssible.

When doing "dry runs" without the grains, there's no more than 1-2 cups left of fluid.

In a real world situation, the grains will hold on to lots of fluid which is more slowly "released", so more liquid will be left in the cooler.

But, in a batch sparge scenario, your first runnings will be mixed with the 2nd, and you'll still get the vast majority of the goodness out of the cooler and into your boil kettle
 
I recently built this mash tun and it's worked well for two batches, I did a little experimenting and thought I should share/contribute.

Going by the procedure outlined here: http://www.beersmith.com/forum/index.php?topic=9324.0
I came up with a specific heat for our ice cube cooler of 0.235 and a weight of 12.9 lbs.

I know most people are preheating their tun so this may not matter to you, but thought id share just in case some beersmith users wanted to check that "Adjust temp for equipment" check box.
 
What about drilling a hole in a different spot in this cooler so it is lower and drains better? I am getting the 70 qt version and am looking to see if others have drilled new holes.
Thanks


Sent from my iPad using Home Brew
 
What about drilling a hole in a different spot in this cooler so it is lower and drains better? I am getting the 70 qt version and am looking to see if others have drilled new holes.
Thanks


Sent from my iPad using Home Brew

You can if you want to. However, the manifold siphons all the liquid up from the bottom so it may not be necessary.
 
You can if you want to. However, the manifold siphons all the liquid up from the bottom so it may not be necessary.

Technically, it's the siphon (vacuum) itself that draws all the liquid down to the slots on the manifold, not the manifold itself. As long as the bottom of the siphon hose is lower (preferably significantly lower) than the bottom of the mash tun, the siphon will empty the mash tun. The other condition is that the siphon hose has no air in it and is not allowed to suck back air.

I use the same design.

MC
 
I bought this same cooler, a 1/2" ball valve, (2) 1/2" mpt to 3/8" barb fittings, hose gaskets, and a toilet supply hose....reused the two cooler parts as the OP did...

It works, but the ball valve keeps getting loose and the rubber hose gasket barely fit over the mpt and then when it did finally there wasn't enough thread to install the ball valve.

Thinking I need to convince swmbo that I need a 3" (or so) mpt nipple to thread through the cooler wall, various cooper for a manifold, and nuts for either side of the wall....I know with the elbow for the manifold on the inside and the ball valve outside I shouldn't need the nuts but figured they'd be extra insurance
 
Back
Top