New Toys

Homebrew Talk - Beer, Wine, Mead, & Cider Brewing Discussion Forum

Help Support Homebrew Talk - Beer, Wine, Mead, & Cider Brewing Discussion Forum:

This site may earn a commission from merchant affiliate links, including eBay, Amazon, and others.

Wayne1

Well-Known Member
Joined
Mar 12, 2008
Messages
1,501
Reaction score
586
Location
Littleton, CO
Not quite a year ago I built a single tier brewframe.

https://www.homebrewtalk.com/f51/brewstand-build-finished-1st-brew-today-117290/

Brewstand_HLT.JPG


It worked very well and I have made 30 batches on it in the intervening time.

There were a couple of compromises I made in order to get the system up and running. I really wanted to use stainless steel Cam-locks for disconnects. At the time they were far too expensive. Recently a vendor started offering these connectors from off shore at a price lower than the brass disconnects.

I changed out all the brass fittings for stainless. I ended up selling the brass for half of what I paid for them. This helped offset the cost of the fittings and helped out some HBD members. At the same time I spent about $60.00 to get engraved signs made for the system.

brewframe_upgrade.JPG


I also instigated discussions with Wayne at BargainFittings.com about a couple of other upgrades. The whirlpool fitting in my kettle was another compromise. The original was a coupler with a street elbow. It worked but wasn't optimal.

Brewstand_Trubpile.JPG


Wayne built a more effective fitting for me using a standard elbow and a piece of stainless tubing bent to follow the curve of the keggle.

Whirlpool_fitting.JPG


Another thing I wasn't really happy about was my procedure for adjusting the temperature of the wort entering the fermenter and adding oxygen to help promote effective fermentation. I was just plopping a thermometer into the fermenter and reacting to any temp variations by changing the flow of cold water into my CFC. By the time the wort hit the fermenter and mixed, the temps could vary quite a bit. I really wanted to read the temp of the wort as it was flowing out of the CFC.

I was adding O2 after the wort had filled the fermenter. I felt it might be more advantageous to inject O2 as the wort is flowing into the vessel. There are various studies saying different, but that is the method I used while brewing professionally, so that is what I am used to.

Wayne put together an assembly of different fittings to allow me to do exactly what I wanted.

This past weekend I finally had the chance to brew a batch using all my new toys.

NewToys1.JPG


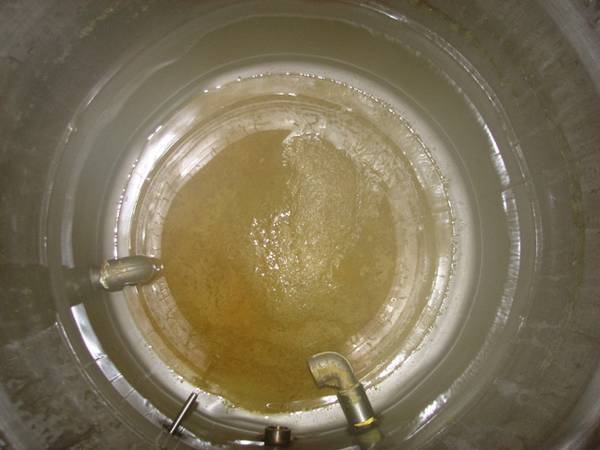
Here is the system set up to whirlpool. The O2 fitting connected to the outlet of the CFC. The O2 stone is in place on the right side of the fitting and a temp probe is inserted in the thermowell on the left side of the fitting.

NewToys3.JPG


A little closer look at the fitting. I asked Wayne if I could have the ability to see the wort as it was flowing. He came up with a threaded PVC piece. I found it very helpful in determining O2 flow and when I used water to push the remaining wort out of the CFC at the end of the run.

NewToys4.JPG


This is how the diverter panel looks for knockout.

NewToys5.JPG


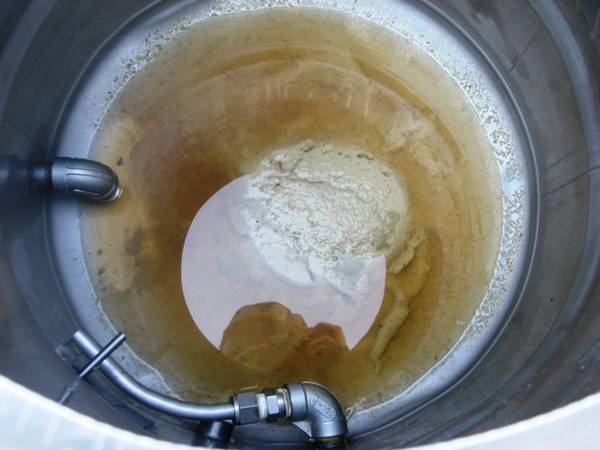
Here is the trubpile left ant the end of my Blonde Ale with some weirdo peeking over the edge of the kettle :rolleyes:
 
Looking good Wayne you still pull from the street elbow ninety at the left hand side of the kettle?

Cheers
Paul
 
So, are you getting a tighter trub cone with the new whirlpool fitting?

The trub cone is quite definitely tighter. The velocity of the whirlpool is also higher. I have to restrict the flow from the pump now.

Paul,

The fitting on the left isn't a street elbow. It is a standard elbow with a close nipple threaded into it. A street wouldn't fit in the space I have. Anyway, I do pull from that fitting.

Ah i see now how much dead space do you have?
 
Ah i see now how much dead space do you have?

Paul,

I'm not exactly sure what you mean. I never measured the physical distance from the fitting to the kettle but I leave behind 0.625 gallons. This does include the trub cone. I take this amount into consideration in my brewing calculations. I usually end up with between 5.5 and 5.6 gallons in my fermenter.

That is excatly what i meant i think of dead space in volume.
 
Maybe a small 90 degree dip tube would help you leave half that much. ;)

--
Josh

Why would I want to?

I have to leave something behind. That is the whole purpose of the whirlpool and domed bottom. I leave the hop pellets and hot break in the kettle. The solids with a small amount of liquid make up the 0.625 gallons.

I plan my brews so I get 5 gallons exactly in my kegs. I don't waste any amount of liquid. I also do not want any solids in my fermenters.

This is a concept that seems foreign to most homebrewers. They try to get everything possible into the fermenter. I DON'T want everything. I only want the fermentable liquid. I ferment 5.5-5.8 gallons of liquid so I do get 5 gallons in kegs.

Carrying this out to an extreme, the COORS pilot brewery had a 30 barrel brewhouse. and 10 barrel fermenters. They only fermented the middle 10 barrels of the run. The first and last 10 barrels were dumped. When I asked why, I was told they just wanted the "best" liquid with the least amount of solids.
 
Carrying this out to an extreme, the COORS pilot brewery... The first and last 10 barrels were dumped. When I asked why, I was told they just wanted the "best" liquid with the least amount of solids.

Did you remind them that the "best" liquid still COORS? ;-)

Seriously nice brewing set up though.
 
I have been whirlpooling for 10 minutes and then letting it rest and "contemplate it's fate" for 10 minutes before starting the pump and sending it through the CFC into the fermenter.
 
So whirlpool hot, then transfer? Your trub cone & clarity of the surrounding wort puts mine to complete shame. Of course, I'm using an IC, cooling first, "whirlpooling" w/ a whisk, then transfering; yesterday I had at least 1 1/2 gl (out of 6.5) of cold break left in the kettle that I ended up putting (most of) in the fermenter. Any suggestions?

thanks

-d
 
I would suggest you whirlpool first. If possible with a pump. I do not believe you can get a good tight cone without the constant acceleration that a pump can provide.

It is also very hard to keep the cone tight with a flat bottomed kettle. The inverted dome of the keggle I use certainly helps with that.

Having an IC in the kettle while whirlpooling is not the best thing. The IC will not allow the centripetal force to form the cone evenly.

I had some trouble with the cone, before I added the smaller fitting that pushed the wort towards the outside of the kettle. The cone does need to be as far below the outlet level as possible. If you are pulling off below the level of the cone top, the cone will loosen up and the trub will flow out to the edges. The faster you can spin the wor,t the tighter the cone will be, but where you remove the wort from also plays into how much trub remains in the kettle.

The picture I posted is from a batch of Blond ale that does not use much in the way of hops. Only 3.5 oz in 10 gallons. The cone looks completely different when I brew an IPA with a pound of hops for 5 gallons.
 
Wayne,

Just so I understand how you make a cone and how that system works, I want to do the same thing. After you are done with the boil, you move some hoses around so that the wort is being pulled from the keg, through the regular elbow with close nipple, into the pump, out of the pump and into the keg where the elbow and stainless steel exhaust pipe is, this creates a whirlpool. Then you move your hoses so that all the wort is being pulled from the elbow with close nipple, through your pump, into wort chiller, and then into fermentor? When you do this, what do you use to close off the other openings in the keg thats not being used?
 
The outlet and inlet of the keggle have ball valves on them.

kettle_camlock.JPG


brewframe_upgrade.JPG


In fact, all of the brewing vessels have two ball valves on each one.
 
Can you help me out with my other question or confirm that how I stated that your whirlpool system works is correct?
 
NewToys1.JPG


This is a picture of the frame set up for whirlpool. The outlet, which is the elbow with a close nipple, connects to the inlet of the pump. The outlet of the pump goes to the inlet of the whirlpool fitting.

The valves are opened, slowly, and the pump started. Depending on the amount of wort, 5 or 10 gallons, I may adjust the whirlpool inlet valve to reduce the velocity of the whirlpool. I would normally whirlpool for 10 minutes, then close the valves and allow it to rest for 10 minutes. At that point I would move the hose from the whirlpool inlet to the inlet of the heat exchanger.
 
So Wayne, your wort return in the BK for whirlpooling is on the bottom of the BK, even with the outlet? Does this improve your velocity, making a tighter cone?
 
Having the whirlpool inlet in the bottom third of the kettle does seem to help achieve a tighter cone.

I have been experimenting with running through the CFC heat exchanger while whirlpooling in order to leave both hot break and cold break behind in the kettle.

Velocity is slowed down quite a bit by running through 25' of 3/8 copper. There does appear to be some temperature stratification issues with keeping the whirlpool outlet towards the bottom. With this fitting, I can tilt it up at an angle to try to resolve that issue.

I have only done two batches using that method. Results so far are mixed. I will keep trying it with more batches. At some point I may just decide to spend the money to get a 1/2" stainless steel with 3/4" food grade hose CFC to get the flow rate back up. That way I could also use it for a CFC HERMS.

The camlock fittings were first sold by ProFlow Dynamics

Currently BargainFittings.com and Austin Homebrew also sell them.
 
Yea, I am about to slice and dice my 50' 1/2" immersion chiller and turn it into a cfc, using the remaining copper for a prechiller when the water temp goes up. I would imagine that the flow will still be reduced, but much less so.

Right now my whirlpool return is on just below the middle of the keggle, but I may try angling the arm down on my next batch to see how that affects the whirlpool, thanks for the tip!
 
On your whirlpool fitting, is it exactly horizontal or is it angled up or down?
 
The fitting can be adjusted anyway you want. Try it out flat and then angle it. Use it the way that works best for you.

I have tried it flat, highly angled up and slightly angled up. The jury is still out on the angle. If used just as a whirlpool without cooling, flat works very good.
 
I wonder if you could leave it flat to whirlpool it then get something to push it down to do a whirl pool. Does the fitting allow it to be changed at anytime or once you set the angle thats it without completely removing the fitting to adjust? Why not just add a pick up tube so i have a whirlpool fitting and a pick up tube, well i only 1 inlet/outlet at the bottom. However, I do have a thermometer halfway up the keg. I was thinking i could add a tee to it so i can add a valve and have the thermometer there. I would pull from that valve and then push it through the whirlpool fitting. What do you think?
 
I have been experimenting with running through the CFC heat exchanger while whirlpooling in order to leave both hot break and cold break behind in the kettle.

I have only done two batches using that method. Results so far are mixed. I will keep trying it with more batches. At some point I may just decide to spend the money to get a 1/2" stainless steel with 3/4" food grade hose CFC to get the flow rate back up. That way I could also use it for a CFC HERMS.

Keep us informed of your findings. Great thread.
 
Hey Wayne,

Just wondering if you made a change in your CFC, to 1/2"? I made mine from 1/2" copper and put it inside of 1" Goodyear Horizon rubber hose. In order to chill really fast I use a sump pump in a small kiddie pool with ice water. Works really well. How often do you take apart you setup to clean it? I haven't broken down my 3 piece ball valves and wondered how often you do this? I thought the hot PBW wash at the end of brew day was enough, but have read that it isn't. Since your the man with all the experience I thought I would ask.
 
The CFC is still the same and it is the biggest point of restriction in the wort flow. I changed the impellers in my March 809HS pumps to the 815 series and they improved the flow rate by quite a large amount.

Everything does slow down once it hits the CFC. I am hoping to get an all stainless CFC with 1/2 ID for the inner tube. Someone is working to build this for me, but it is taking a long time. No worries. The rig is working great and helping me to make fantastic beer.

I usually do a very through clean of the three piece ball valves about every third brew. I take them off the kettle and soak them in PBW for a day. I then use a small brush to physically remove any soil loosened by the PBW. I rinse the valves and repeat the soak in Acid 5 for a day. I repeat the scrub with the brush, rinse and reassemble.

Once a year I will disassemble the valves completely and soak and scrub each part individually.

One thing that may help in keeping the valves in better shape is to get some of the heat shields Bobby M is offering.

HS3PBV.png


They should divert quite a bit of the heat from the valve and prevent any wort in the valve from evaporating. He also has them for site glasses.

SMshield1.jpg


At $10.00 each, I think I will be adding a few of those to my kettle.
 
I agree with the heat shields. I've been wrapping mine with heavy foil. I did a poor job with my burner/stand design and it allows the heat straight to the valve. I will break my stand down over the next few days and PBW soak all the parts. Never heard of acid 5. Guess a hot PBW soak is all they will get. Keep us posted on the stainless CFC. My Uncle owns a shop where they roll and bend steel. I looked at coiling some 1/2" stainless as well. The copper was too easy and I already had it. When the cold weather really sets in I'm going to make me a new stand and make the valve front like yours. Really like it! Your new upgrades got me thinking about an in-line O2 injection. Breaking down my rig is going to freak me out with the funk, I have a feeling. Thanks
 
Acid 5 is a phosphoric/nitric acid blend available from Five Star. It is just the thing for removal of mineral deposits such as beer stone.

It is readily available from the distributors than sell PBW and Star-San. You may have to ask your LHBS to order it in for you. Do be careful with it. It is a stronger acid than the phosphoric used in Star-San. Gloves and goggles strong.

If you are brewing outside in the colder weather, make sure you blow out all your pump cavities, valves and CFC when you are done for the day. Water stuck in copper or stainless pipes when the temp get below freezing does tend to expand in many directions. It will burst pipes.
 
Will do Wayne, thanks for the help. I pulled apart all my 3 piece valves and OMG! Had no idea that flowing hot PBW wasn't getting it all. I'm so glad that my valves that touch wort are 3 piece. Goes to show that they pay for themselves when you see what is inside. I remembered you telling me you used a shop vac to blow your rig out. I followed suit and still doing it proud.:D Now I'm ripping you off again this coming week and converting my IIPA recipe to Ringwood. Never used it before, but your advice hasn't failed me yet!

Thanks Again :mug:

Thread Resurrection!

I am always amazed at how much gunk comes out of my ball valves when I open and close them during my PBW recirc; if you're leaving the ball valves open full tilt while doing a recirc, you're probably leaving a whole lot of gunk behind.
 
Back
Top