My first wort chiller

Homebrew Talk - Beer, Wine, Mead, & Cider Brewing Discussion Forum

Help Support Homebrew Talk - Beer, Wine, Mead, & Cider Brewing Discussion Forum:

This site may earn a commission from merchant affiliate links, including eBay, Amazon, and others.

deyoung

Active Member
Joined
Oct 7, 2009
Messages
29
Reaction score
0
Location
Vancouver, BC
Finally got sick of dunking my kettle in an ice bath and built a wort chiller. Thought I would share the results here.

After going back and forth I decided to build only by bending the tube and not soldering. Here is the result:
wortchiller.jpg


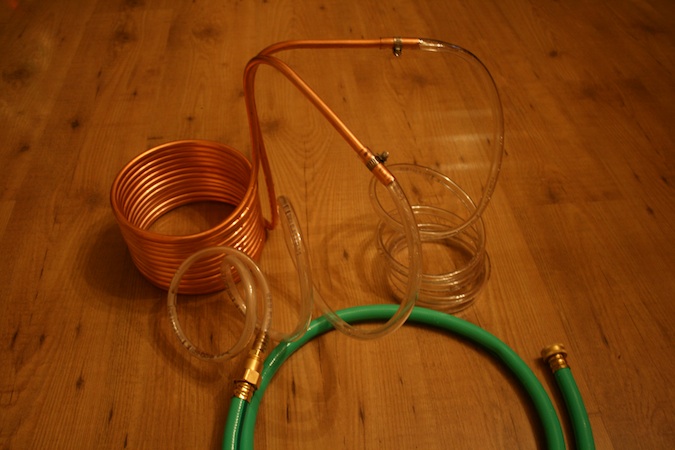
For the intake I got a short garden hose. This connects to an adapter that brings the size down. That connects to another adapter: one side is threaded and the other is shaped to grab onto a hose that is slipped on. The vinyl hose I used is sized so that it was a snug fit on that adapter as well as the 3/8" copper pipe I used (it's 1/2" outer / 3/8" inner vinyl). For the vinyl hose/copper connections I did use small hose clamps which worked really well.

The copper is 25 feet long. For the main coil I wrapped it around a paint can. Going slowly this was pretty easy. For the other bends I used a tube bender tool. This tool was not readily available in my local hardware stores--I had to go to a large car parts retailer to get one. They actually had a number of styles available and some were quite expensive. I got a mid-priced one which was only $13. Make sure it is made for the size pipe you're using and that you figure out how to use it first. I suppose inadvertently crimping the pipe could blow the whole project.

I haven't used this for brewing yet so I can't vouch for its performance. It has a single leak on one of the adapters, but I'm pretty confident that will be easily fixed with a standard sized rubber gasket.
 
nice bending job! remember to check the tightness of the hose clamps after running water through. The heat tends to shrink the vinyl hoses a bit and if you don't keep the clamp tight it can fly off and hit you with a blast of hot H20. . . trust me this has happened.
 
IMO, you also might want to replace the hose clamps on the intake side of the IC with compression fittings. That way there's far less chance of leakage. There's just too much opportunity for incoming water to get under the clamp, especially if you're running it pretty quickly through the IC. On the outflow side hose clamps work fine because the water's only flowing, well, out.
 
IMO, you also might want to replace the hose clamps on the intake side of the IC with compression fittings.

Can this be done without welding? I'm looking at building a IC soon and I was planning on doing it just like this one.
 
Can this be done without welding? I'm looking at building a IC soon and I was planning on doing it just like this one.

Absolutely. Just use compression fittings. You can google them to see how they work, or any reasonably-knowledgeable hardware store employee should be able to show you. All you need is a wrench or pliers, some teflon tape if you attach a female hose adaptor to the fitting itself, and you're good to go.

Good luck!

Cool! Thanks! :mug:
 
An update: the chiller worked great! Cooled an entire kettle (1/2 of our full-batch boil) in 10 minutes. Probably helped that it was done outside and it was 0 deg C. :)

@Lunarpancake: the total cost of the chiller was $65. $25 of that was the copper and $17 was the short hose. I'm sure it could be done for cheaper if one more aggressively sourced the best price or already had some plumbing fittings on hand. Also, copper prices vary greatly over time and base metal prices are headed back up these days.
 
just made one myself today. lowes has 20' coiled copper (3/8") for $9. add 10 for gaskets and 10' tubing and was under 20 bucks. works great :)
 
The thing I noticed with the chiller is that stirring makes a huge difference. I just did an extract brew and so my kettle was only a little over half full. But with vigorous stirring it went from boiling down to 25 deg C in under 5 min! If I left the wort alone the outflow was cold but as soon as I stirred it warmed up significantly.
 
Sure. The cooled wort sitting directly outside your IC forms a boundary layer - i.e. a temperature gradient in the surrounding wort which slows the cooling rate. When I used my IC I noticed this also - stirring the wort sped up the cooling immensely. This is why putting the brewpot in a tub full of ice water is such a fail. You would need to be continually stirring the wort AND stirring the cool bath water near the pot to eliminate boundary layers on both sides of the metal. If you simply leave it there then the temperature gradient grows and continues slowing your cooling and it takes damn near forever. At least with the IC, you can leave it and it still chills everything rather quickly... it's just if you're hellbent on speeding it up a LOT (or if you have a shorter copper coil) you could stir it.
 
nice bending job! remember to check the tightness of the hose clamps after running water through. The heat tends to shrink the vinyl hoses a bit and if you don't keep the clamp tight it can fly off and hit you with a blast of hot H20. . . trust me this has happened.

Use you use a double flare tube flaring tool set but only use the double flare start then you will have created a bulb at the end of your copper tubing preventing any vinyl ot other tubing from blowing off. A simple 30 second task
with a Imperial-Eastman Flare tubing set or other brand of tool.
 
Well for Xmas i got my first brew kit and so I made my own wort chiller. Not as pretty but works very well.

http://imnotadoctor.posterous.com/home-made-wort-chiller-for-only-40

That's got to be the ugliest immersion chiller I've ever seen :cross:

But it gets the job done, and that's all that really matters.


I test drove my chiller for the first time on a 5 gallon batch last night. What an amazing difference. The best part is not having to move the hot kettle. The second best part is the 30min you save cooling.
 
Back
Top