Simple wort aerator

Homebrew Talk - Beer, Wine, Mead, & Cider Brewing Discussion Forum

Help Support Homebrew Talk - Beer, Wine, Mead, & Cider Brewing Discussion Forum:

This site may earn a commission from merchant affiliate links, including eBay, Amazon, and others.

pickles

Well-Known Member
Joined
Feb 27, 2008
Messages
2,019
Reaction score
58
Location
Columbus
This thread inspired me to try my hand at this.

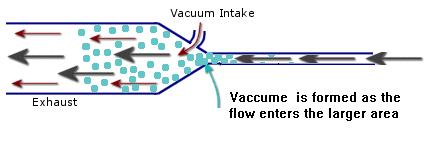
It relies on the Venturi affect to introduce air into the wort flow. For those not familiar, the Venturi effect is the increase in velocity and corresponding decrease in pressure that results when a fluid flows through a constricted section of pipe. A venturi injector has an inlet at the site of the constriction. As a result of the low pressure the fluid passing by the hole creates a vacuum and pulls in another fluid. In this case the passing wort draws in air.

venturi-diagram.gif


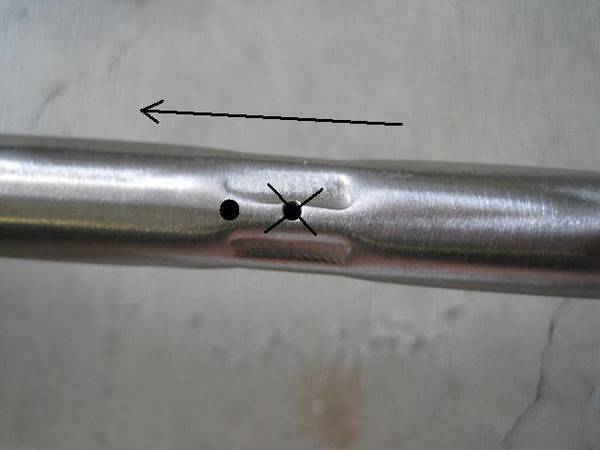
In the referenced thread, the constriction was caused by placing a smaller diameter tube inline with the output from the boil kettle. This seemed to work well, but I wanted a device that was one-piece, easy to attach and stainless steel. I decided to crimp a section tubing to make the restriction. I tested it on a small piece of soft copper. Using the two halves of a flaring tool, I placed the tubing in the flaring tool registry that was one unit smaller than the OD of the tubing (i.e. 1/2" OD tubing in 3/8" flaring registry). Then placed the assembly in a vise and crimped it.

fig04a_big.jpg

4927102490_b34beeaac1_z.jpg


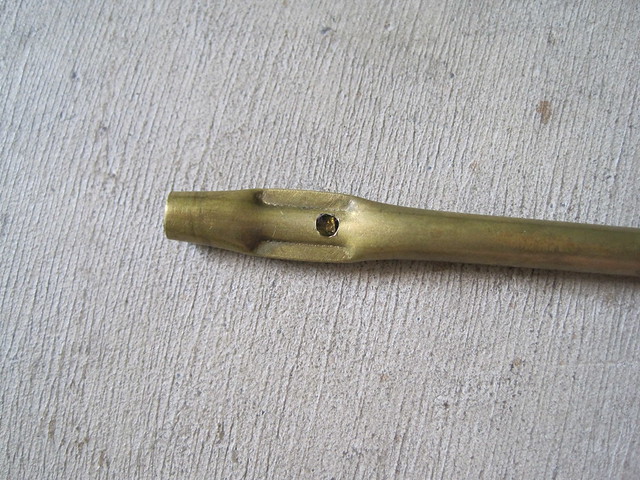
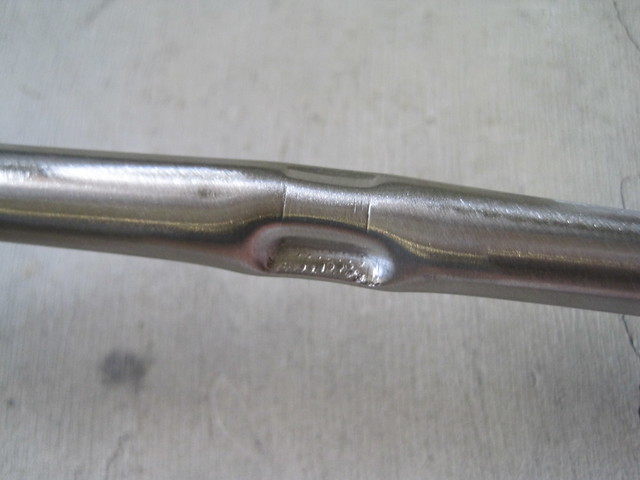
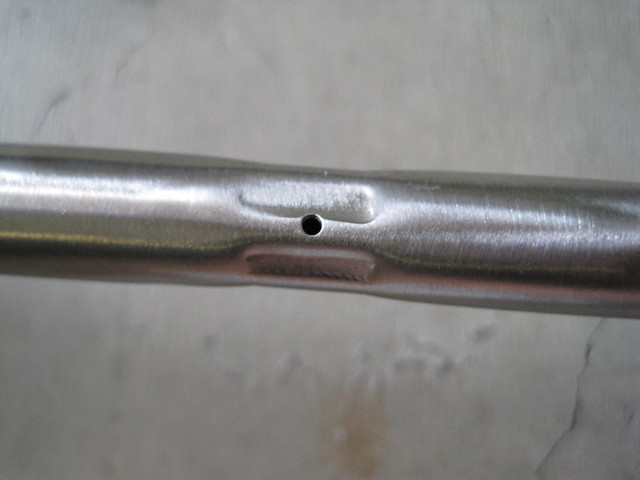
I then drilled a hole at the restriction and tested. It took a few tries to get the hole placement right to yeild the most amount of bubbles. I then moved to 1/2" stainless tubing, brazed on a 1-1/2" tri-clamp fitting. It works really well. I'll post some pics of it in action when I brew on Saturday.

4927103796_113b79fc01_z.jpg

4926509665_f9a561f8fa_z.jpg

4926510323_dd72045fb0_z.jpg

4926508473_aed56be787_z.jpg


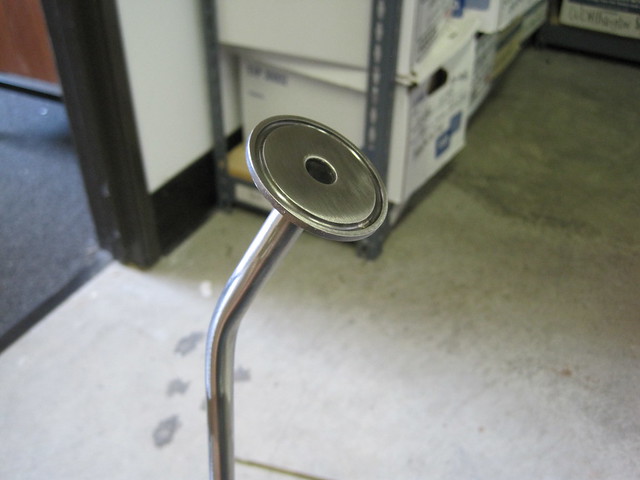
The aerator wand is placed into fermenter. I pass the wort through the plate chiller, through the aerator and directly into the fermenter. I have tested it with a March 809 pump at full throttle and it worked flawlessly. The restriction didn't cause a noticeable reduction in flow rate.
 
Nice, I use a venturi on my system as well. Works nice. I just pump to the fermentor now through my CFC and never have to worry about infection as much.

-Dustin
 
I've seen other using a thing called a Wortwizard to aerate wort, my main concern was simplicity. Either way, the venturi really whips up a froth in the wort.
 
Did a more ghetto/less bling approach with a piece of 3/8 copper at a break in my silicone 1/2" hose. Worked great even by gravity until the flow slowed toward the end
 
The wort is flowing left to right in that pic. The extra tube length after the veturi is to allow the air to be more easily entrained in the wort.

"The reduced section should have the highest pressure and if you move the hole to the outlet side of the restriction you should get the highest vacuum"

No, the velocity in the narrow portion is greater therefore the pressure is lower.
 
A normal venturi affect is caused by flow into a larger volume pipe. A flow is required and it is the flow as it enters the wider or larger part which sucks the air in.
What happens is as the wort/water flow exits the narrow part to fill the bigger pipe there is a slight void as it expands to fill this larger volume pipe. If pumped too slow the fluid will simply fill the void and no venture effect is created.

The reason holes in a racking cane work is gravity pulling the wort down is causing less than atmospheric pressure in the line. This is also why the hole in the middle of the crimp works.

If the hole in your pipe were moved to just as the tube is transcending back to normal shape on the down flow side, it will pull in more air. Adding another hole on the opposite side will help too.
 
It has nothing to do with a gap in the fluid flow. Here is some modeling showing how the secondary flow is induced by the low pressure created in the restricted orifice.

venturi_conc.gif


here is a depiction of a venturi flow meter.

venturi.gif


The holes in a racking cane do work when you use a siphon because of the flow as you say. It doesn't work so well with a pressurized transfer (i.e. pump).
 
I have no idea where the idea of a gap came from or what the difference is in a Separating and a non-separating nozzle is. A slower increase to the larger diameter is all I see.

Your first post’s first image shows the vacuum intake at a point it is widening. (A correct view of a true venture function.)
venturi-diagram.gif


This image shows that at P1 there would be a decrease in the narrow part. No problem, I agree
venturi.gif


However, this image is a modified one of your first image to better explain my point
venturi-diagram2.JPG


If you used a modeling program to create these images, then try moving the inlet to this location and see the results.
venturi_conc.JPG


Here is an image of a carb showing where the fuel enters and where the system gets a vacuum for other functions. The fuel enters at #5 and vacuum is picked up at #4. For maximum vacuum as I said, move the inlet to the side toward the larger volume side of the flow as in YOUR first post’s image.
CV12.jpg


This simple change might make all the difference in the world.
Mod-tube.jpg
 
Please excuse my ignorance, but why doesn't wort leak out of the hole?
On a gravity fed siphon tube, the weight of the wort below the hole pulls air in the hole instead of the wort over the top of the loop into the jug, bucket or pot. To big a hole and the siphon will stop. Even if fed from a spigot it still works the same. The weight of the wort below pulling down.
 
Like I said originally, I tried many hole locations to get the best air flow and the winner was the one with the hole in the restriction. I'll admit it was as far from a scientific approach as you can get. I just transfered water and observed the bubbles. The arrangement I chose had the largest amount of very tiny bubbles. Either way it works well for aeration.
 
Like I said originally, I tried many hole locations to get the best air flow and the winner was the one with the hole in the restriction. I'll admit it was as far from a scientific approach as you can get. I just transfered water and observed the bubbles. The arrangement I chose had the largest amount of very tiny bubbles. Either way it works well for aeration.
Reasons for the hole in the restricted area:
In a carb, you want to atomize the fuel into air. In an aerator tube you want to “atomize” the air into the wort.

Good catch Pickles. Thanks.
 
Clogged with what? The restricted area 1/4"+, besides if the wort males it through my plate chiller there's no way the aerator is getting plugged.
 
Oh man. Why did you bring that quote in this thread? Now I've gotta leave this one and take a shower. ;)

In other news, Pickles, nice work!
 
This simple change might make all the difference in the world.
Mod-tube.jpg
[/QUOTE]

I think this is a common misconception of how pressure changes in a liquid (not gas) flow. Remember that water, like all liquids, is essentially incompressible. This means that it has the same density at all times, even if it's flowing through strange shapes.

In order for pressure after the restriction to be less than pressure at the restriction, the water would actually have to become less dense after the restriction. This isn't happening.

Think about it this way: for pressure to be less after the restriction, the water would need to be flowing along the length of the tube so fast that it doesn't have enough time to fill the larger diameter after the tubing. It would have to be flowing so fast, that the assumption of the incompressibility of water no longer applies. A thin metal tube would collapse under atmospheric pressure before the water flowed fast enough to have this effect.

To be sure: the pressure of the wort is lowest at the restriction. You can think of it like this -- there is only so much energy contained in the flowing water. When it goes faster, it picks up kinetic energy and it loses pressure energy. When it slows down, it loses some kinetic energy, and it gains pressure.

Put the hole somewhere along the restriction.
 
I think this is a common misconception of how pressure changes in a liquid (not gas) flow. Remember that water, like all liquids, is essentially incompressible. This means that it has the same density at all times, even if it's flowing through strange shapes.

In order for pressure after the restriction to be less than pressure at the restriction, the water would actually have to become less dense after the restriction. This isn't happening.

Think about it this way: for pressure to be less after the restriction, the water would need to be flowing along the length of the tube so fast that it doesn't have enough time to fill the larger diameter after the tubing. It would have to be flowing so fast, that the assumption of the incompressibility of water no longer applies. A thin metal tube would collapse under atmospheric pressure before the water flowed fast enough to have this effect.

To be sure: the pressure of the wort is lowest at the restriction. You can think of it like this -- there is only so much energy contained in the flowing water. When it goes faster, it picks up kinetic energy and it loses pressure energy. When it slows down, it loses some kinetic energy, and it gains pressure.

Put the hole somewhere along the restriction.[/QUOTE]

This confirms my original testing. I've used it multiple times and no clogging. On Saturday I brewed 10 gallons with 8 ounces of leaf hops and no clogging.
 
Where is this located in relation to the fermentor? I would assume that the wort is chilled before going through the venturi.

How is it that you don't worry about infection from airborn materials here?
 
Where is this located in relation to the fermentor? I would assume that the wort is chilled before going through the venturi.

How is it that you don't worry about infection from airborn materials here?

4926508473_aed56be787_z.jpg


The pointed end to in right of the picture goes all the way to the bottom of my fermenter. A length of silicone hose connects it to my pump via 1.5" tri-clamps. The wort is at pitching temps as it enters the aerating wand. I'm not much of a worrier anyway, but as long as you're pitching a healthy amount of yeast it should be fine. I haven't had any problems so far.
 
Cool,

This seems like a very simple solution. I do worry because I have had some infected batches.

I assume that you place it in the boil kettle to sanitize through heat. I would be very leery of the small voids that crushing with a flare tool would make. But boiling would solve this problem.

I may have to try this.
 
Interesting. I've been trying to develop a similar idea where I fashion an injector powered by a garden hose stream to draw the wort to various process pots/tun to avoid the need for a pump or multi-tiered setup. I'm just not sure if it would provide enough lift.

Also, not sure what that part is on the end of your wand but seems like a faucet aerator would be a good choice also. Maybe your device is the same sort of thing idk.
 
.
Also, not sure what that part is on the end of your wand but seems like a faucet aerator would be a good choice also. Maybe your device is the same sort of thing idk.

That is a 1-1/2" tri-clamp fitting. I connects it the the hose from my chiller. The pointed end is te outlet.
 
Holy complicated batman....

OK, this is going to sound WAY over simplified, but it works. I am an EE from purdue and I took fluid dynamics, so I understand how this works too. I literally have my counter flow chiller, which is 1/4" copper, going into a tube that is 3/8" beer line, and have a pin hole in it.

Same concept as this contraption, but a LOT easier and probably cheaper to build. It aerates the hell out of the wart. You can make the line as long as you like to keep air in contact with wort. This Venturi tube (similar to the wine version Vinturi thinger) accelerates the wort past the copper tube, and the pin hole fills the void. It really is that simple.
 
It's hardly complicated, but you are correct that your method will work. There are several threads on exactly what you described. I wanted a one piece device that was made from stainless.
 
Back
Top