ReeseAllen
Well-Known Member
I'm trying to get my new brewstand running and have run into an issue with my march pump. I got the pump from a coworker who bought a bunch of homebrew gear but never got into the hobby, and it seems to work fine. I have mounted it with the motor axis horizontal and the inlet/outlet horizontal, with the outlet higher than the inlet. I've mounted it under a table, so I had to flip the pump head 180 degrees to keep the outlet higher than the inlet.
The first picture I've attached shows my kettle connected to the inlet and the outlet connected to a hose that's slung over the edge of my MLT. I used it in this configuration to successfully pump 4 gallons of hot water into the MLT in preparation for mashing.
After I pumped the hot water into the MLT and turned off the pump, I spent about an hour screwing around with some thermometers and during that time, the temperature dropped well below my strike temp. "No problem," I said to myself, "I'll just reverse the hoses, pump a gallon or two back up into the kettle, and fire up the burner for a few minutes. Boy, this pump sure is great."
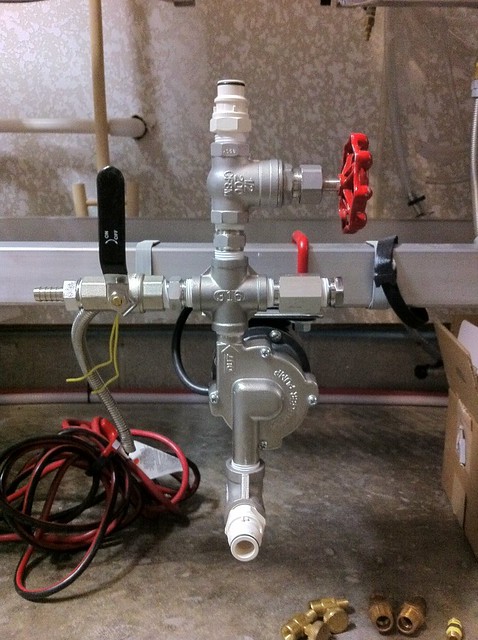
The second picture shows how I plumbed the MLT outlet into the pump inlet, and the pump outlet to the kettle. I opened up the valve on the MLT, the valve on the kettle, and the valve on the pump outlet. Very little water flowed from the MLT down to the pump. It was as if I had a stuck sparge, or had pinched the hose shut near the pump inlet. I had expected the tube leading from the MLT to the pump inlet to quickly fill with water, but lots of air remained in both lines. I turned the pump on and although it appeared to fill the lines with water, it failed to pump any water up into the kettle.
With the pump still on, I disconnected the hose from the kettle and dropped the free end below the height of the pump. Quickly, the pump primed itself, blasted some air bubbles out of the hose, and started shooting a healthy geyser of hot water onto the ground. Lifting the free end of the hose back up to the kettle level, it continued to blast lots of water all over the place. So, clearly disconnecting the hose and dropping it below the pump for a second cleared up whatever was wrong. Obviously, this isn't a long term solution.
I can't figure out why this is happening and it's quite frustrating. I'm a mechanical engineer (which makes it extra frustrating, I'm supposed to be the expert, dammit) so feel free to go as technical as you want if you've got advice to offer. It seems to me that there is no good reason why it would work one way and not the other, considering both vessels are located well above the pump head, and the pump outlet is definitely higher than the inlet which should allow it to clear any air bubbles. Do I need some kind of bleeder valve? Is the orientation of my pump wrong?


The first picture I've attached shows my kettle connected to the inlet and the outlet connected to a hose that's slung over the edge of my MLT. I used it in this configuration to successfully pump 4 gallons of hot water into the MLT in preparation for mashing.
After I pumped the hot water into the MLT and turned off the pump, I spent about an hour screwing around with some thermometers and during that time, the temperature dropped well below my strike temp. "No problem," I said to myself, "I'll just reverse the hoses, pump a gallon or two back up into the kettle, and fire up the burner for a few minutes. Boy, this pump sure is great."
The second picture shows how I plumbed the MLT outlet into the pump inlet, and the pump outlet to the kettle. I opened up the valve on the MLT, the valve on the kettle, and the valve on the pump outlet. Very little water flowed from the MLT down to the pump. It was as if I had a stuck sparge, or had pinched the hose shut near the pump inlet. I had expected the tube leading from the MLT to the pump inlet to quickly fill with water, but lots of air remained in both lines. I turned the pump on and although it appeared to fill the lines with water, it failed to pump any water up into the kettle.
With the pump still on, I disconnected the hose from the kettle and dropped the free end below the height of the pump. Quickly, the pump primed itself, blasted some air bubbles out of the hose, and started shooting a healthy geyser of hot water onto the ground. Lifting the free end of the hose back up to the kettle level, it continued to blast lots of water all over the place. So, clearly disconnecting the hose and dropping it below the pump for a second cleared up whatever was wrong. Obviously, this isn't a long term solution.
I can't figure out why this is happening and it's quite frustrating. I'm a mechanical engineer (which makes it extra frustrating, I'm supposed to be the expert, dammit) so feel free to go as technical as you want if you've got advice to offer. It seems to me that there is no good reason why it would work one way and not the other, considering both vessels are located well above the pump head, and the pump outlet is definitely higher than the inlet which should allow it to clear any air bubbles. Do I need some kind of bleeder valve? Is the orientation of my pump wrong?