- Joined
- Nov 6, 2007
- Messages
- 62,016
- Reaction score
- 6,922
Thanks to Bobby_M and others for posting ideas here. I found this thread after I made my CFC. Apparently great minds think alike !")
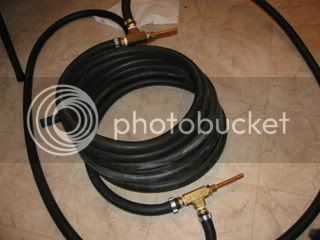
Nice clean looking build.

Thanks to Bobby_M and others for posting ideas here. I found this thread after I made my CFC. Apparently great minds think alike !
I haven't seen what the brewer's apprentice builds other than the pic further up in this thread. It's certainly comparable in design. At $70, you're really close to a Shirron plate chiller though. It's a tough call.
Anyone want to contribute to the debate between a plate chiller nad a counterflow? I've heard that it's much easier to plug up a plate chiller. What are the benefits?
 I bet if you try searching for it you will find many threads on it already rather then pulling this thread off topic.
I decided to build this and my local store only had 50' sections of copper and 50' hoses. So I cut the hose in half. Due to my stupidity/inexperience whatever you want to call it I now have a 25' CFC and 20-23' of rubber hose/copper tubing. Would a CFC thats only 20' following these directions be enough or should I just save the materials for something else? I was hoping to make a second one and sell it to help offset my costs.
Wow, I read through all 23 pages of this thread. There's some great stuff here. I was looking for some ideas on installing quick disconnets to the wort side of my CFC (recently built using this very tutorial). Just wondering what's worked well for others before I go and start ordering parts.
Thanks
Scott.

...My tap water is running about 50 degrees, so I really need to throttle back the water to get the output into the carboy around 65 degrees.
I am using gravity, so the flow is pretty slow, and dialing the temp takes some time since changes of the flow of coolant take about 20 seconds to register on the thermometer.
Anybody ever tried using the braided PVC tubing with their chiller to recirc for about 10 min.? Will this tubing hold up under boiling temps until I can get my silicone? Thanks for the help.
I went to the LHBS this weekend to show off my chiller, and the owner offered to trade me a chiller for $100 worth of supplies, so I'm going to make my second one this week. I just have to make it narrower with more copper sticking out and less garden hose on the ends. Thank you again for helping me get more supplies. I'm going to buy an 8 gal. pot with the trade in so I can do full boils.
I'm planning on making the leap to AG this summer. I think it will be more cost-effective in the long run if I can buy bulk grains. What started out as a Christmas present has turned into an all out obsession. In the future, when my daughter asks why I can't afford to pay her way through college, I'll simply hand her a glass of IPA
Star-san does have a warning label that stats use with soft metals is not recommended. You should be fine though. Just don't let copper or aluminum sit it in for like weeks at a time. It will turn really really shinny.
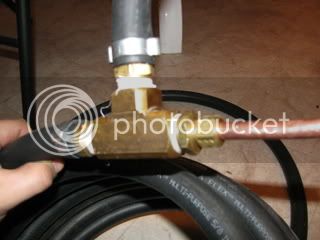
Bobby - I made one of these but am having a hell of a time getting a leak-proof seal between the reducer and the 3/8" pipe. I have solered, re-soldered, and soldered again but always spring a leak. Any suggestions? How about that copper glue stuff?
Enter your email address to join: