Hoppo's Hops Garden

Homebrew Talk - Beer, Wine, Mead, & Cider Brewing Discussion Forum

Help Support Homebrew Talk - Beer, Wine, Mead, & Cider Brewing Discussion Forum:

This site may earn a commission from merchant affiliate links, including eBay, Amazon, and others.

Hoppopotomus

Cedar Hollow Brewing
Joined
Nov 18, 2010
Messages
1,423
Reaction score
104
Location
Ortonville/Oxford
You would think that with a cheesy username like Hoppopotomus that I would know a lot about growing/cultivating hops vines, but unfortunately that is not the case. :eek: I love me some hops....everything that I brew tends to lean towards the hoppier side (IPA's/DIPA's/Indian Browns/Indian Wheats/etc.), but I have never grown them......until now. Thanks to the likes of Gridlocked and my local HBS, I have 8 rhizomes ready to grow! I have 2 cascades, 2 chinooks, 1 centennial, 1 hallertau, 1 glacier, and 1 columbus.

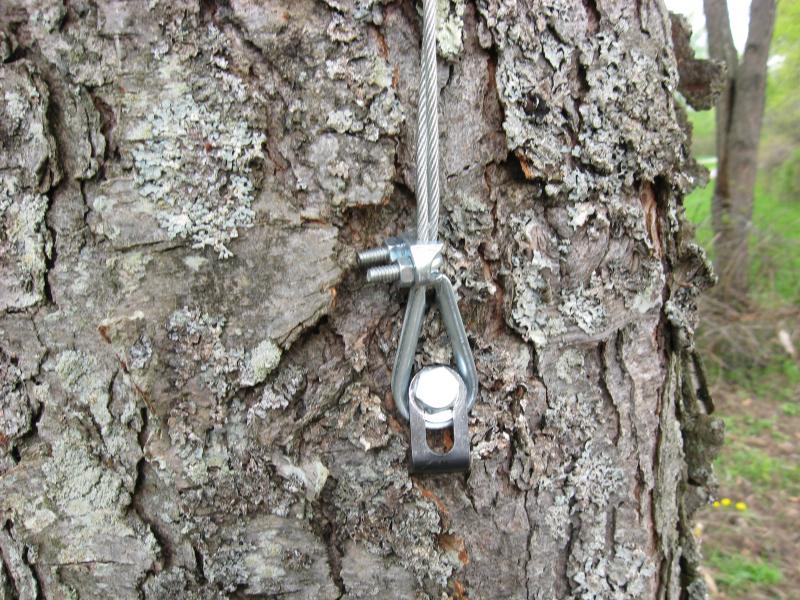
The only place on my property where I have sandy, well draining soil is in the front of my property. I'm going with an unconventional approach for my trellis system. I have 2 sets of wild cherry trees about 35 feet apart. Yesterday I installed heavy duty ss eye lag bolts into the trees about 20 feet in the air after trimming all of the lower branches of the trees. I'm using 246lb. rated aircraft cables from eye bolt, to eye bolt between the two sets of trees to create two seperate trellis system. The ends of the cable for each run go through the eye bolt and down the side of the tree where they are fastened with ss lag bolts. I put one side in first, then pulled the cables tight and then fastened the other side. When harvest time rolls around, I can back the lag bolts out and lower the entire cable down for each run.

The area chosen is not a heavily wooded area at all, so the canopy is not thick, and the ground span between the trees gets full sun in the morning to early afternoon, then again in the late afternoon throughout the rest of the evening. It's just up off of the front corner of my lawn, so the sprinkler heads can by adjusted to water that area automatically. Each cable has 4 climbing ropes spaced 5 feet apart, centralized between the trees. I used rough textured 1/4" rope rated for 90 lbs., which is staked next to where the rhizomes will be planted. I'm not concerned about the load on my cables with 4 vines each the first year, but may have to consider doubling up the cables or install a middle support if there is too much sagging of the cables once the vines become heavier and more mature over the years. What do you guys think?

I'll take some pics. when I get home and get them posted. I do have a couple of pics from my cell phone that I took after I installed the first cable with 4 climbing lines, which I'll post in a bit to give you an idea of what I have going on.

I plan on weeding the area and burrowing my neighbors rototiller. I plan on tilling it, adding some peat moss, cow manure, and top soil....then tilling it again before planting. It's supposed to rain this weekend, so I'm not sure how much progress I will make, but at least the trellis system is complete. Any and all feedback is welcomed, because I can use all of the help and advice that I can get. Thanks! :mug:
 
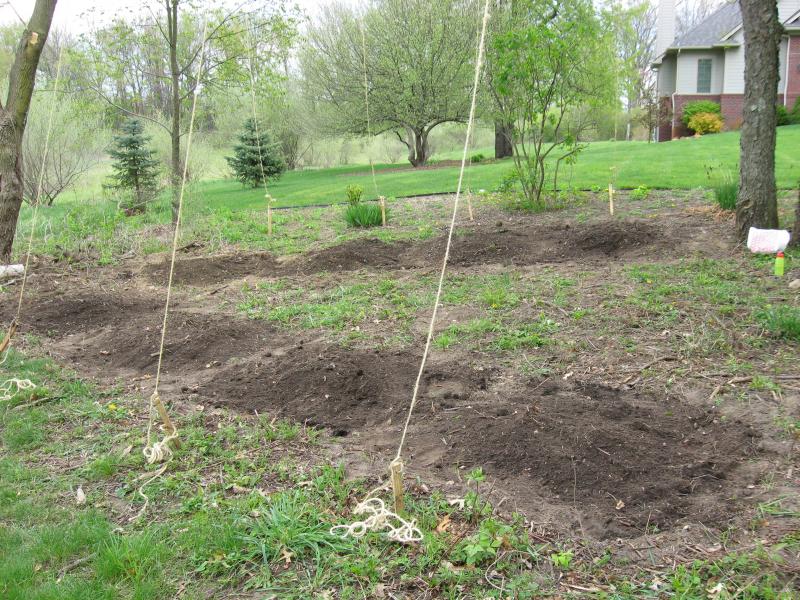
Sorry guys.....I'm usually pretty good about updating my threads, but this one got away from me. The trellis system is complete and I spent nearly 5 hours yesterday weeding, pulling out underground vines/roots, and hand tilling the frickin' hops garden. There was a patch of scrub brush and russian olive bushes in this area prior to us clearing it out.....unfortunately, most of the root structures were still present. After hours of working my a$$ off and a really sore back today, all of the crap is pulled out (weeds/vines/roots), the soil is tilled and it seems to be a very nice base to work with. There was a nice base of topsoil with silty sand underneath, so it should drain well. Despite a good draining area, I'm still going to plant the rhizomes in mounds for each of the 8 rhizomes.

Each mound is going to consist of a 40 lb. bag of topsoil, a 20 lb. bag of potting soil, a 20 lb. bag of peat moss, and a 20 lb. bag of cow manure. I plant on dumping the materials in each mound area, tilling and raking into the existing soil, and then mounding the material up under each climbing line. I'll create a dish on top of each mound to catch water, plant the rhizomes, and then mulch over the top. Does this sound like a sound plan or is there something else that could be done to increase the probability of health growth? What would the ideal rhizome depth be for planting?

I plan on doing the final soil preperation, planting, and mulching tomorrow when I get out of work, so I'm open to any and all suggestions!!!! I took some pics., but haven't had time to post them, so I'll have them posted tomorrow, so you can visualize what I'm working on. Thanks for any and all feedback and sorry about the delay in the pics. :mug:
 
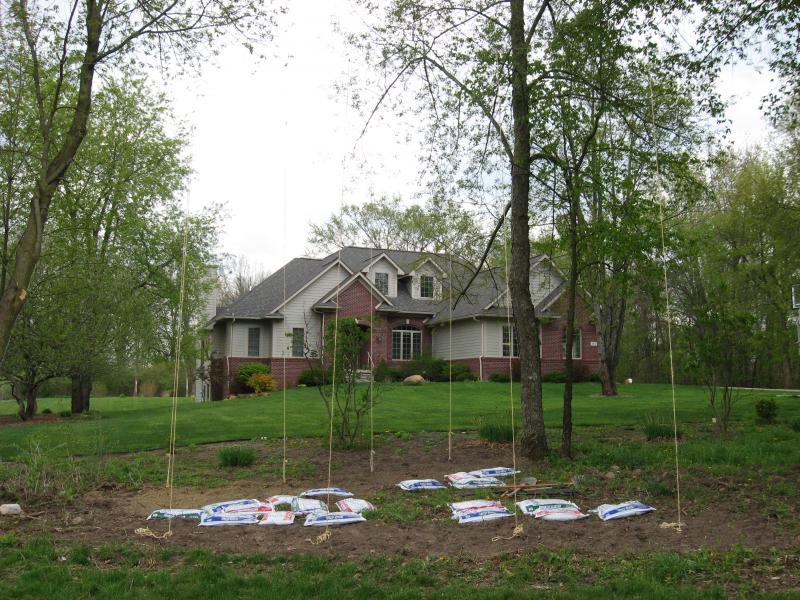
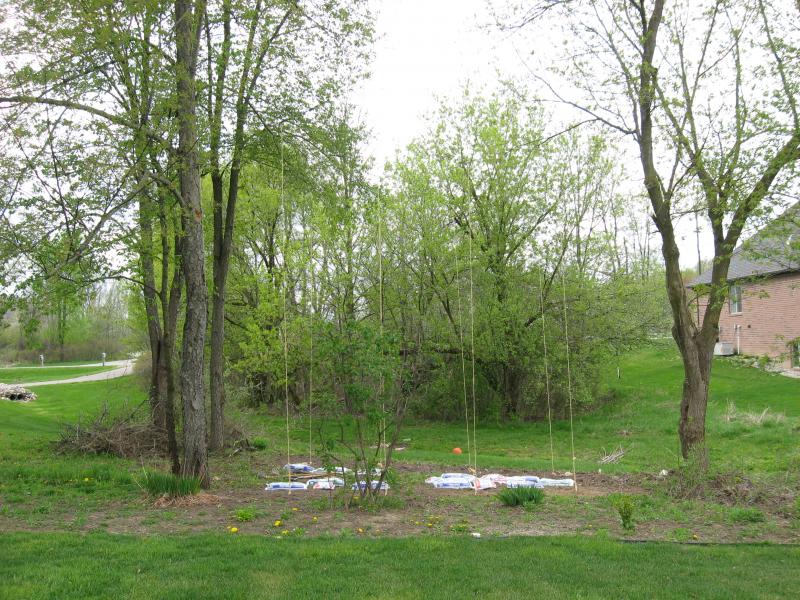
OK.....Sorry about the delay, here are some pics. of the cables, eyebolts, and lag bolt fasteners that secure the aircraft cables. Another couple of pics. of the 2 cables with the 8 rope climbing lines attached (4 to each cable).......kinda hard to see in the pics.

IMG_2477.jpg


IMG_2476.jpg


IMG_2478.jpg


IMG_2479.jpg
 
In my 2nd post I described my soil mixture additives and how I prepared the area. Here are a few pics. of the soils/compost/etc. poured into piles, then blended with the existing soils, then mounded back up.....ready for planting. :tank:

The prep. work sucked!!!!!! :eek:

I sure hope it was worth the effort in a couple of years!

IMG_2480.jpg


IMG_2482.jpg


IMG_2484.jpg


IMG_2487.jpg
 
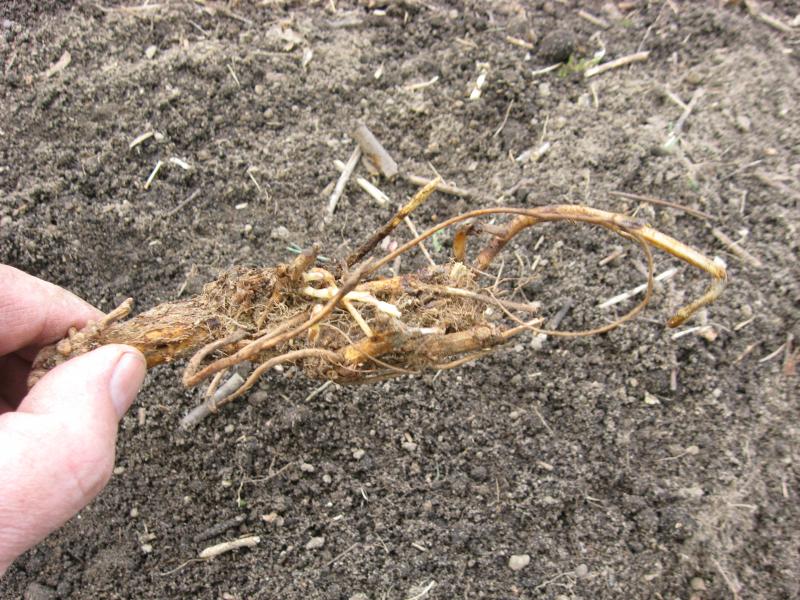
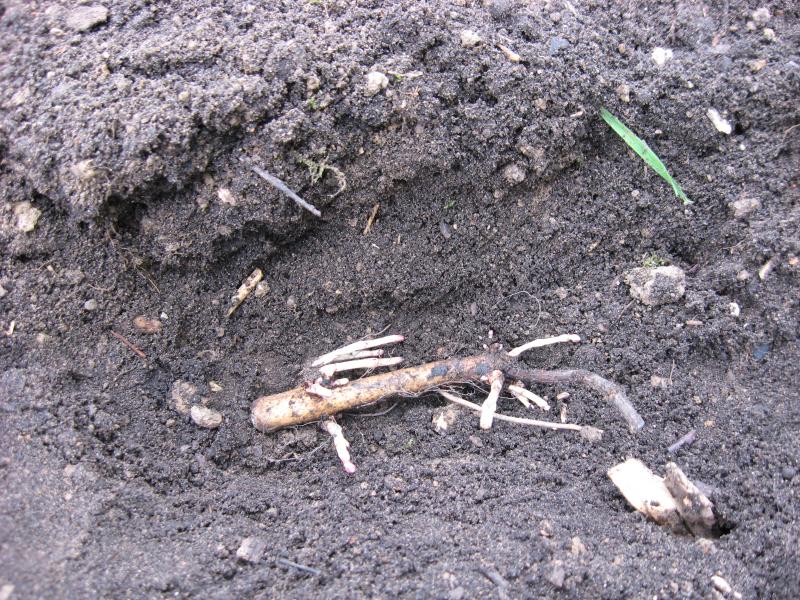
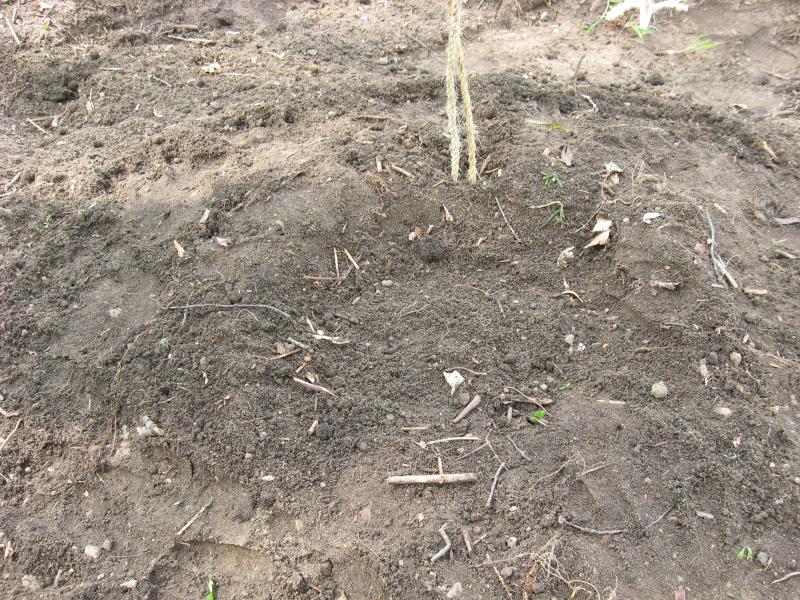
Here are some pics. of a few of the rhizomes going into the ground. I received 5 from Gridlocked (2 Chinooks, 2 Cascades, and 1 Centennial), which I put in planters a week or so ago to get some sprouting underway. Thanks man.....I appreciate it! The other 3 rhizomes from my HBS (1 Hallertau, 1 Columbus, and 1 Glacier) were already sprouting, so I just stored them in the fridge until today. The first pic. is a Columbus, the second pic. is a Glacier, and the third pic. is a Cascade. The final pic is with one rhizome in the ground and the top of the mound dished to collect water. All rhizomes were planted about 4 inches below the surface of the soil. Hopefully I see something coming through the ground in a week or two!!!!!

IMG_2491.jpg


IMG_2493.jpg


IMG_2496.jpg


IMG_2489.jpg
 
Dude those are some beefy rhizomes. Makes my brand new ones that got shipping with tiny 1" bine sprouts look like little twigs.

Also the set-up is very very cool. It's kind of hard to make out the structure in the photos. Where is the twine suspended from? Maybe photoshop in some arrows or outlines?


Regardless, awesome stuff!

The ropes are suspended from long aircraft cables that are strung between the trees. There are two sets of cables with 4 climbing ropes each. If you look closely at the first set of pictures, in the final picture you can see where the ropes attach to the cables up high (just look in the sky above my house). It's kinda hard to see, but you should get the picture of what I have going on when you look close. The cables are 20 feet in the air, with a large ss eye bolt on each end lagged into the tree trunks, that will serve as the "pulley" system. The cables were fed through the eye lag bolts on one end and then anchored into the tree further down with lag bolts (see the first two pictures in the second set of pictures). Then they were strung through the eye bolt in another tree 35 feet away, the cables were pulled tight, then lag bolted into the other trees. When it come time for harvesting (probably not this year), I can back out one lag bolt and lower down the cable on one end, then the other end to make them accessible from the ground.

Thanks for the compliments guys! :mug:
 
Ah, yup. Now that you've pointed that out I can see them. Good idea! Way to use your environment instead of adding structure.
 
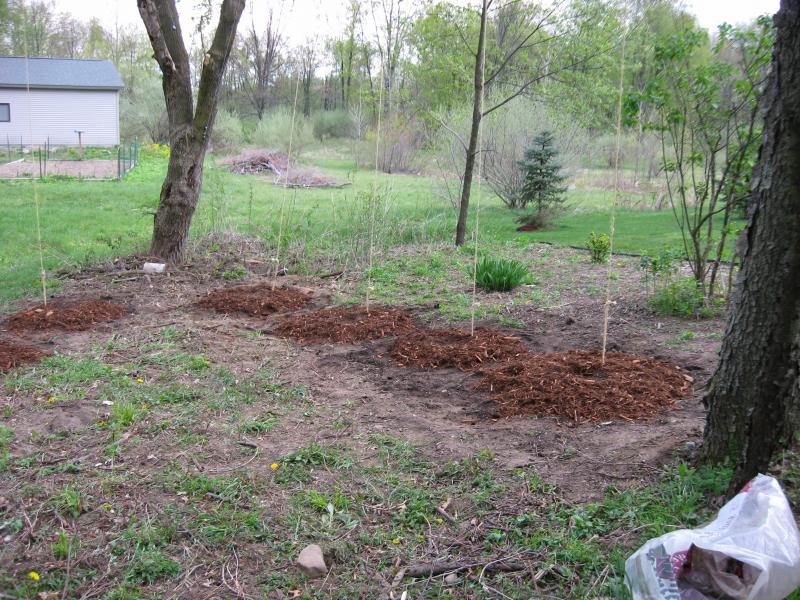
OK, here are some final pics., as I just finished up before it started raining! :ban: I got them all planted, dished the tops of the mounds, and watered each rhizome mound. I then put 1/2 bag of cedar mulch around each mound to help maintain moisture. My sprinkler system in the front of my yard can be adjusted to irrigate this area, so I'm all set there. This area was originally filled with thick scrub brush and vines when we built the house. We cleared it out last summer and kind of created a large perimeter landscape bed. It looks like crap now, but we plan on spraying total vegetation killer in the perennial bed adjacent to the hops garden (don't worry, there's some distance between the bed and the garden), then laying landscape fabric and mulching the entire area. The cedar mulch around the mounds is for now, but that entire area will be heavily mulched eventually.
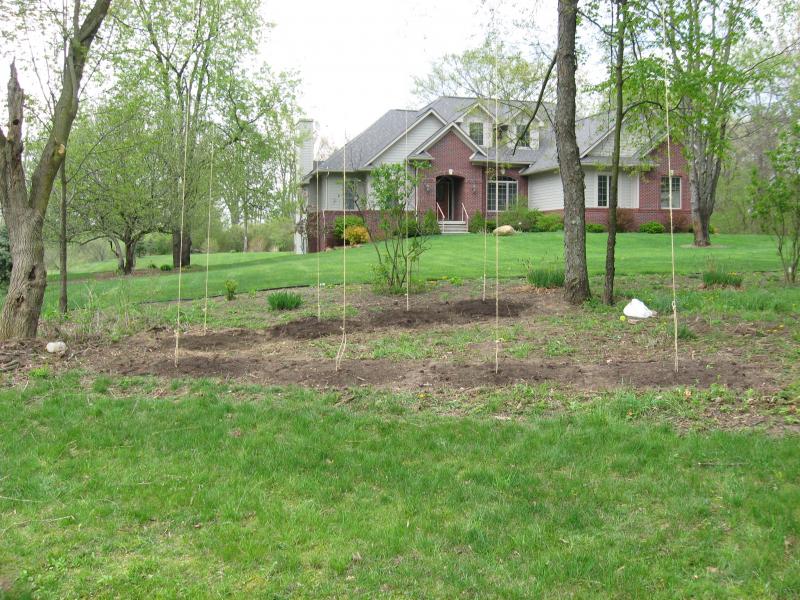
I need to back down on some of these brewing projects, because there just isn't enough time in the day to keep up with everything. :D

IMG_2499.jpg


IMG_2500.jpg


IMG_2502.jpg


IMG_2503.jpg
 
Ah, yup. Now that you've pointed that out I can see them. Good idea! Way to use your environment instead of adding structure.

I originally was going to build a big beefy trellis system in my back yard, but remembered that when we build our home that the back of my property is all clay and the front was all sand. If I would have planted in the back, I would have had to build an elevated bed and brought in a crap load of material. Our house sits 400 feet off of the road and when you pull up our driveway, you can't even see hops garden if you aren't looking for it. The only way that I could talk my wife into letting me grow hops in the front was to do so at the front corner of our lawn, which isn't visible from the road. I hope this works, because it has been a lot of work! :drunk:
 
A comment, don't know if you thought of it or not, securing the aircraft cable completely may cause problems if those trees need to be able to sway in the wind or storm, you could risk pulling a lag eye out, snapping a cable or something else destructive. You now the trees in questions better than I do so I'm only throwing this out there.

What I have done with large dipole antennas for ham radio is to secure he cable on one tree, but use a pulley on the other and run the cable to a weight near the ground that is capable of supporting the load, this allows the trees to continue to sway in wind without affecting the cable at all, because it can free-float through the pulley... You can add tension simply by adding weight to the end with the pulley....

Thanks for the feedback. I will certainly keep a close eye on things to make sure that the cables aren't being stretched or the eye bolts aren't working their way out. If I detect any signs of failure, I will certainly take your weighted pulley system advice. Thanks again! :mug:
 
My medium trees ( under 16 inches diam) move in high winds especially 2o feet up. Great idea. I used 3 x 3 x 1/8 tubing because I did not think of the weight idea. Super thought!! I was thinking of a spring attached to coated clothesline wire to take the shock when the trees moved. Your weights allow more movement. I abandoned trees for posts in inserts (larger tubing) in the ground so I could lower them in place with a bobcat and chain with was attached to a short chain welded in centre of each upright. The insert piece had 3 plates on the sides at the top to direct the long tube in place. Worked like a dream as the piece was arched in position with a chain on the bucket. Copper water pipe was used to lock the pipes together and finally hardwood wedges acted as a secondary backup.
 
Cool setup - one concern I'd have growing that close to big trees like that is your hop plants will be competing with tree roots for water/nutrients. Once the tree roots find the area of loose, enriched soil that you tilled up, they'll be sending out more roots there which will likely run right through your hop beds. Hops are tough plants, but they can't compete with a tree. You may have to keep an eye on it and maybe cut back any invading tree roots.

:off: My sister owns a house on Seymour Lake in Ortonville - I lived in her boathouse for 9 months a while back when I was going thru my vagabond phase of life. I love that area.
 
Great advice. I plan on tilling around the perimeter of the hops garden several times per season with my neighbors rototiller, which can till down pretty deep. Hopefully this will help cut down on root infiltration into the hops garden region and help maintain a well draining area. We'll see what happens. :mug:

Plan on doing the same thing for an asparagus patch next week. My dad gave me a bunch of asparagus root and I don't have anyplace else to put it. I think that as long as I do a consistent deep till to the surrounding soil, it should prevent root infiltration. Thoughts?
 
:off: My sister owns a house on Seymour Lake in Ortonville - I lived in her boathouse for 9 months a while back when I was going thru my vagabond phase of life. I love that area.[/QUOTE]

My first home was in a subdivision at Seymour Lk. and Baldwin Rd. in CountryView Estates. I now live north off of Oakwood Rd. about 1/4 west of Baldwin Rd., which I like so much better. I went from 1/2 acre to 2 1/2 acres with lots of seclusion. Small world! :mug:
 
I'm using 246lb. rated aircraft cables from eye bolt, to eye bolt between the two sets of trees to create two separate trellis system.

Here's your first problem. This rated capacity is not even close heavy duty enough. Take it down and start over. :cross:

This is great to see! I'm very much looking forward to how well those rhizomes do. I'll give you your money back if they don't take off. Oh, and by the way, one of those Chinooks is actually a Simcoe. SHHHH. ;) :D

An honest question though - How are you going to harvest these? Do you have a big-ass folding ladder? Or, is the plan to lean a ladder against the 5,932,069lb rated aircraft cable?

Also, for future years, you may want to build open-bottomed boxes around your crowns for two reasons: (1) to keep the hops from taking over your acreage and (2) because it is a lot easier to trim a crown that is confined. Trimming the crowns makes the plant focus it's energy and efforts where YOU Want them rather than where they want.
 
This is great to see! I'm very much looking forward to how well those rhizomes do. I'll give you your money back if they don't take off. Oh, and by the way, one of those Chinooks is actually a Simcoe. SHHHH. ;) :D

Sweet....Send me an Amarillo and a Citra as well! :D

An honest question though - How are you going to harvest these? Do you have a big-ass folding ladder? Or, is the plan to lean a ladder against the 5,932,069lb rated aircraft cable?

Smart A$$! The entire cable lowers down. I just have to back out the lag bolts that secure the ends of the cables further down the tree trunks and lower the entire cable down for harvesting. I'm going to tie heavy duty rope to the ends of the cables and wrap it around a cleat, so that I can control the descent of the cable and it doesn't come crashing down once the lag bolts are backed out. I plan on backing out the lag bolts this weekend and giving the cable a little more slack to allow sway of the trees. We had a descent storm yesterday and I kept a close eye on the cables and there were not issues. I figure if I provide a little slack and drop the middle of the span by a foot or so, I'll still have plenty of height and it will allow for unrestricted sway of the trees.......seem logical?

Also, for future years, you may want to build open-bottomed boxes around your crowns for two reasons: (1) to keep the hops from taking over your acreage and (2) because it is a lot easier to trim a crown that is confined. Trimming the crowns makes the plant focus it's energy and efforts where YOU Want them rather than where they want.

OK.....how deep do the boxes need to go to prevent the root system from going underneath? I'm sure I can whip something together in my spare time. :drunk: I assume that I will need to use pressure treated lumber....what dimensions would you recommend.....would 3 ft. x 3 ft. be enough?
 
Ah, you're smarter than I am, I didn't know the whole cable was able to be lowered. Well done! The boxes that I built were only 12" deep and I think that's enough to contain the rhizomes. You can let the root system go as deep as it wants. I used some super cheap treated cedar fence boards for like three bucks a piece and untreated 2x2's for the corners. I think 3'x3' would be perfect. I think mine are 2'x2' and they are just fine..
 
There isn't any danger of them spreading too far during year 1, is there? I have a laundry list of sh*t that I need to do around my house and property, so if I can put this off until next year, that would be great. My property was ravished by emerald ash bores over the past years, so I had 8 standing, dead ash trees and another 5 or six on the ground. I spent the entire day yesterday felling several trees and cutting them up. On the bright side, I have plenty of campfire wood for the year. :D Luckily, the majority of the other hardwoods on my property are cherry, oak, and a few maples. I still have 3 more standing trees and a few leaners to take care of......not to mention weeding all of the landscape beds, bringing in 30 yards of mulch, planting my garden, planting my asparagus patch, power washing/re-sealing my patios, filling/rebalancing my hot tub, getting the sprinkler system up and running......and the list goes on, and on, and on...... :drunk:
 
Nope, I built and dropped my boxes down on the 2nd year. They'll put their energy into establishing themselves this year rather than spreading. Get to your laundry list and let them do their thing. Ah, the joys of being six-figures in debt (home ownership) right? I have a side irrigation business so if you ever run into a problem you can't figure out and need someone to walk you through it, just let me know.
 
Nice setup Hippo... same basic theory as mine but much better built. The only thing you have to add now is patience and TLC... you know, keep the weeds out, don't overwater, blah-blah-blah...!

I'll be keeping an eye on your thread so keep the pix coming as those little buggers sprout and turn into hoppy beasts..!
 
Thanks guys! Going home to check on the little b*stards right now and to do some mowing and get the sprinkler system up and running. I should be good Ted, but I'll let you know if I need your expertise. I installed sprinkler systems for a landscaping crew for 3 years while in grad. school, so I'm good with the basics. I may need some advice on how to add another control panel and extend the system down to the front of my property. I'll keep pics. coming once things get a little more exciting. :mug:
 
Well it has only been 6 days since the rhizomes went into the ground, so I wasn't expecting anything yet. I got home from work and checked the mounds and the Hallertau broke through first. Nothing exciting at this point, but at least there are signs of life already. The rhizomes that I potted for a week or so to start the growth (cascades, centennial, chinooks) were planted a little deeper than the three that I got from my HBS, but I still expected one of them to break the surface first. It's funny, the hop variety least likely to succeed in my region (as I have been told by a few HBT members) shows the first signs of life. Here are a couple of crappy little pics. of the little guy......nothing terribly exciting at this point. :mug:

IMG_2505.jpg


IMG_2506.jpg
 
Looks great. Only concern I have is this. How much will that area get shaded by the trees when they are full leaf? I bring this up because with my setup 3 plants get shaded by the cherry tree growing in the corner alot. their growth is 1/10 of what the others are. Those 3 plants only get like 3-4 hours of afternoos sun, where all other plants get sun almost all day.

Hoping this does not become an issue, setup looks great. looking forward to seeing it when you have the surrounding landscape done, and the hops are full climb.
 
Points well taken. I addressed my concerns earlier in the thread. The span between the sets of trees is in a SE orientation, so there is full sun for the morning and early afternoon. There are a few hours where the trees do block out the sun, but then in the late afternoon and early evening, there is full sun again from the backside. I'm going to see how they do here first and then if it's obvious that they aren't getting enough sun or not producing viable cones, I will have to move them to the back yard and build a more elaborate elevated bed and trellis system. For now, I'm going to just ride it out and see how they do where they are at. Thanks for the input! :mug:
 
awwww. They are so cute! Two years from now you're going to look back and remember what it was like when they were so teeny. ...they grow up so fast...
:mug:
 
Just a quick update.....of the 8 rhizomes planted, all but 1 have broken the surface with multiple sprouts. Nothing worthy of pictures at this point. The hallerau, the one least likely to succeed in my region, is still in the lead and already leafing out. Once these little b*stards grow a little more, I'll post some pics. I also extended my sprinkler system and installed a 360 degree pop up sprinkler head right in the middle of all of the hills. It is a head that I can damper down the flow rate, so I have it on a fine mist, as to not over-saturate the rhizomes. Now it's a waiting game. :D
 
sweet man i swear all your threads are awesome i will be watching this on too lol
 
Your too kind.

There are signs of life from all 8 rhizomes! I know my hops garden location isn't ideal, with the trees sheilding the sunlight for a few hours during the day, but I'm going to ride it out. After 2 days of solid rain, I'm going home today to mow my lawn and then plan on trimming the cherry trees a little more to maximize sunlight exposure to the hops garden. Unfortunately, there is only so much trimming that I can do. My cable system seems to be functioning just fine. I tooks some of the tension out of the cables and we have had some really windy days over the past few weeks, a couple with 40 to 50 mph wind gusts and I think that the slack left in the cables allows for enough sway in the trees, as there has been no damage to the trellis system.

I know this is :off:, but this past weekend I dug the trenches for my asparagus roots and covered them with 4 inches of top soil. I will then back fill the trenches as they start to grow until the dirt level is back up to the surface. I put the asparagus patch on a south facing slope, about 5 feet off of the edge of my lawn in the back yard. The soil is a mixture of tops soils, sandy loam, and clay. Hopefully they can survive with these soil conditions, but unfortunately the back of my property has a high clay content, hence my hops garden going up front. I also planted my vegetable garden over the weekend as well, so now I can just sit back with a beer and watch all of this stuff grow! :mug:
 
Update?
It's been a while since you've posted. What you been doing? Working? :D
Remember to stop and enjoy a pint every now and then.
Hope things are well.
 
As Gridlocked indicated almost 2 months ago, I have neglected this thread for quite a while. I have been extremely busy at work and just got back from a vacation in the Smokey Mountains. Just a quick update. Those of you that had concerns about my cable/trellis system not allowing sway with the trees....I added slack to the cables and have had no problems through several nasty storms with high winds. Initially, I was not very hopeful that these vines were going to thrive, so I wasn't updating the thread. Once the canopy of the trees filled in, it did cut down on the direct sunlight that I was expecting for this location. They do get several hours of direct light in the a.m. and a couple of hours of partial sunlight in the late afternoon, but there is far more shade than I expected during the middle part of the day. Some are doing well and others are not. I plan on transplanting to a full sun, elevated bed in my back yard next spring with a new and improved trellis system, but for now I just have to roll with the punches.

I'll post some pictures when I get a chance, but the status is a follows.

Hallertau: Was doing great and growing the quickest out of the gait, but the stake in the ground that secured the lower end of the climbing rope was slightly below grade and it rotted the rope and snapped. During a thunderstorm, the rope not being secured at the ground snapped the 2 bines in half. I replaced the rope with a nylon rope and restaked it. There have been several other bines and they are now climbing, but are still only 3-4 feet tall.... :(

Chinook #1: Leading the way at about 15 feet. There are 4 bines that are climbing and side shoots starting to sprout. It was a slow starter, but is doing great now. :ban:

Chinook #2: Similar to the Hallerau, the climbing rope rotted and needed to be replaced. The first climber snapped off. I now have 3 bines climbing and it's a little behind the pace of #1 at about 8 feet.

Glacier: Was by far the beefiest rhizome with the most shoots that I planted. It was also by far the slowest starter and although there are numberous bines, 4 of which are climbing, it's very slow. Probably 2 feet at best.

Columbus: Slow starter, but has 3 bines climbing and is at 6-7 feet.

Cascade #1: 3 bines and thriving similar to the chinook climbing to around 15 feet with some side shoots forming. Mild aphid damage early on, but corrected with an organic spray to keep them away.

Cascade #2: Lagging behind cascade #1 at about 9 feet tall. It also had an issue with rotting rope that had to be replaced, so I had to carefully unwind it from it's ascent on the climbing rope and re-wrap it on the new rope. It also had early mild signs of aphid damage, but got under control with an organic spray. I'm not sure if it somehow stunted the grown a bit, but it seems to be doing ok.

Centennial: Sucking A$$. :confused: Lots of bines, but not really thriving and wanting to climb. I think that there are 2 bines that are a couple of feet up the line at best and seem to want to keep letting go. I go out there every other day and keep trying to train them, but they are being stubborn. Early on there were moderate signs of insect damage (small holes in the leafs), so I also had to spray with an organic spray to keep the aphids away. It was the most affected of the bunch. Maybe it stunted them????

That's the update, I'll snap some pics tomorrow, so you can see the growth. I am obviously brand new to the hop growing game, so any and all advice is appreciated. :mug:
 

Latest posts

Back
Top