DITCHES (Dual Immersion Thermal Coil Heat Exchange System)

Homebrew Talk - Beer, Wine, Mead, & Cider Brewing Discussion Forum

Help Support Homebrew Talk - Beer, Wine, Mead, & Cider Brewing Discussion Forum:

This site may earn a commission from merchant affiliate links, including eBay, Amazon, and others.
Thanks!

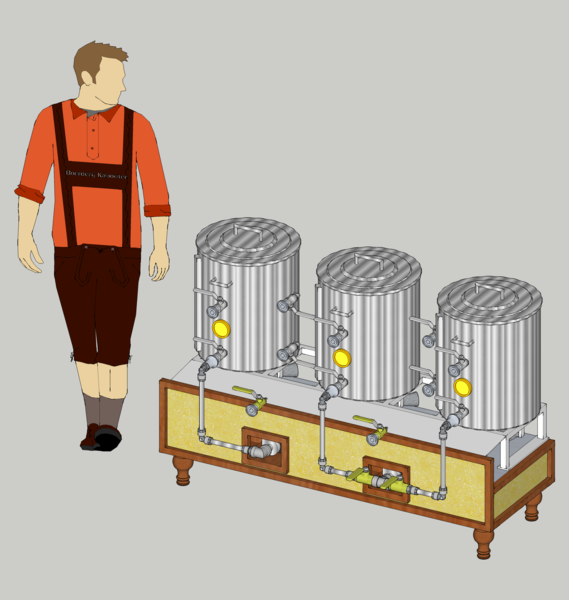
The connectors are called Tri-clover or tri-clamp fittings. They are standard in professional food processing and and brewing.

They include a gasket and a clamp that compresses the gasket between the two fittings.

The advantage over regular QD's is that the are bomb proof with no moving parts, and are very easy to clean/sanitize.

I just had my first brew day with them and could not be happier.
 
So the first brew day was yesterday and I already know I will love this design even though I am only half way there.

My cooling circuit with the hard mounted coil and the cfc in parallel chilled 13.5 gallons of wort from boil to 58º in 15 minutes with 55º ground water temps. Needless to say I was pretty happy :rockin:

I can't wait until I can get the rest of the system and be able to use ice for getting to lager temps in 10 minutes!
 
I think I have squashed the idea that a hard mounted SS coil in the BK will be hard to clean. A simple rinse down after brewing, and a 30 minute soak in PBW and it is shining more than before I brewed. Easy as pie, everything just rinsed right off.

I am really happy with the system.
 
I think I have squashed the idea that a hard mounted SS coil in the BK will be hard to clean. A simple rinse down after brewing, and a 30 minute soak in PBW and it is shining more than before I brewed. Easy as pie, everything just rinsed right off.
... and even if you miss a few bits here and there, who cares? It'll just be boiled again for 60+ minutes next time. Sanitation is not an issue.

Just out of curiousity, what did you brew? How much hops were used and what type (whole, pellet)?

Kal
 
I brewed a American IPA, a Helles, and an Oktoberfest. The IPA had 14 oz. of pellet hops in it, the Helles and the Oktoberfest were both in the 5-6 oz. of pellet range.

Watching the cooling be that fast was awesome. The cold break in these beers is a bit silly compared to what I am used to. Definitely a huge step up.
Very cool! Thanks! (And you're making me thirsty too...) ;)

Kal
 
Thank you for the compliment!

I have not made anymore progress toward the rig. The functionality of the brewery is about 80% there and I am really happy with the design. All I need to add is the HERMS. From there, the rest of the upgrades are bells whistles and for my next stainless fix.

I have been brewing a lot lately and loving it. I had a year and a half stretch there where I was using all my budget funds for equipment and it was starting to wear me down.

I have to buy some more kegs, and some other odds and ends, but then I should be back to building the system up.

Cheers!!! :mug:
 
Thanks!

The connectors are called Tri-clover or tri-clamp fittings. The advantage over regular QD's is that the are bomb proof with no moving parts, and are very easy to clean/sanitize.

The Tri-clover clamps I have seen have a body that pivots at one end on a pin with a threaded stud that also pivots on a pin and with a threaded knob to tighten the clamp down. No moving parts, I see 4 in each clamp?
 
Yes there is a clamp. It does move, however, it is not a part that I will be able to break with significant forethought and effort. I would literally have to saw through a 1/4" stainless pin to break the clamp... if you can find a more indestructible quick connect, I will retract my statement.
 
Yes there is a clamp. It does move, however, it is not a part that I will be able to break with significant forethought and effort. I would literally have to saw through a 1/4" stainless pin to break the clamp... if you can find a more indestructible quick connect, I will retract my statement.

Just picking on ya with the "no moving parts". A collection of them would bust my bier money stash bank account, it's rather small at the moment.
 
During recirc, I just put the hose on top like the Sabco system does. It seems to work just fine.

In the two batches I've done since ending my 10-year hiatus, I find that the hose starts to burrow down into the grain with my SABCO RIMS. My flow rate may be too fast so I plan do slow it down a bit next time - i did not time the sparge but I will. I have to consult my ancient brewing logs. Hmm....says here I used to listen to "Culture Club" during a brew session. Well, scratch that. I have also considered a false top to disperse the flow.

Awesome plan, BTW. You are completely obsessed but I respect that.
 
The hose thing does take some tweaking but once I have the angle right it floats on the top for the whole sparge.

I am obsessed, but that's what happens when you have a $4,000.00 system planned out and have to build it on a budget of $100 a month or less. :D Sometimes it makes me crazy.
 
I am obsessed, but that's what happens when you have a $4,000.00 system planned out and have to build it on a budget of $100 a month or less. :D Sometimes it makes me crazy.

Been there done that raising a family while scratch building a $17K engine with the machine work required. I know the feelings well besides going over budget seems to happen every time.
 
Looking for some ME opinions. I do not have any advanced modeling software or FEA software anymore so I can't analyze this as I normally would. Please give you opinions.

Here is my "final" version of my stand:

Brewery.png


It is wood framed with a stainless rack to hold the burners and the kettles. The rack also includes a drip and heat shield that will be removable for cleaning.

Here is a view with the kettles gone:
Brewery_I.png


My engineering question comes about the design of the rack. I plan on framing the base with 2x6 pressure treated and dressing it out nicely so I looks good in the room. The base will be very substantial and I am not worried about that.

The rack will be 1"x1" square stainless tubing. The total length it 4' 8" or 56". I have designed it only with two supports on the ends.

I think this will still be overkill but wanted the groups opinions.

Here is the detail of the rack with the shield clipped in place:
Rack_I.png


And with the shield removed:
Rack_II.png


Go? Or no go?
 
What is your intended gap between your burners and the stainless sheet under the burners? The drawing makes it look kinda close.
 
I priced out the rack too. I came up with about $300 in materials using 304 SS, and figured about $100 for welding services, although I may have a connection for some free welding...

Does that sound about right? Too expensive?
 
I designed it with 2 3/4" below the bottom edge of the burner. Is that too tight?

That's about what mine is at and it works really well with a keggle. I'll take a look when I get home from work.
 
I have 1.5" from the tip of the burner to the skirt of the keggle. I wouldn't go any lower than that. I targeted the 2" from burner tip to keggle bottom, it has worked really well.
 
I like the design. We were just talking about building a combo heat shield/pump cover. (as ours is more of a brutus design) and thinking about how far away the heat shield should be. The only down side I can see to this (and some of our ideas) is that unlike a traditional heat shield placed as a circle in the center of the square frame, the frame will absorb and conduct more of the heat from the system. I have no idea to what degree this will matter but just something to think about. As your system is so low to the ground it doesnt look like this will be a problem. Also like the 90' angles to bring the tri clovers facing forward. Something we may look into. We give your design the go ahead!
 
Question since my setup is very similar:

How are you planning or drying out the pipes and hard mounted heat exchanger coils after a brew day? Right now I flush mine with hot water/Oxyclean to clean them but I still got a spot of mould forming inside my HERMS coil because of the sitting water when I went to brew 4 weeks later. It flushed right out when I pushed water through it but I still don't like the idea of mould forming...

I think pushing out as much water as possible too with a shop vac for 10 mins would work but am open to suggestions!

Kal
 
I was planning on using my air compressor and blasting the water out...

I thought that would be sufficient, but now you have me momentarily worried. I think the air should be sufficient and any water left would just evaporate in a couple hours. I guess I don't really know.
 
I was planning on using my air compressor and blasting the water out...

I thought that would be sufficient, but now you have me momentarily worried. I think the air should be sufficient and any water left would just evaporate in a couple hours. I guess I don't really know.
My HERMS coil isn't 100% perfectly coiled such that there's water left behind in it if you just gravity drain it.

I think the problem is that even if it's mostly dry the remaining water has nowhere to evaporate really. Short pipes yes, but water in the middle of a 50' coil isn't going to easily evaporate and find its way out and around 25' of coil. Getting 99% of the water out and then circulating air for ~10 mins is probably needed to get it dry. (Hence the reason I was thinking shop-vac which I was already planning on buying for other projects).

Kal
 
I like the shop-vac idea. My coil drains fine and hasn't been a problem, but I am more worried about my pump and drain design. I think that an initial high pressure air blast out then 30 minutes with the shop-vac would be good enough. Great ideas!!!
 
Good stuff! I'm hoping just using the shop-vac's good enough (I don't have an air compressor or any use for one and they seem expensive for *just* emptying beer lines!).

Kal
 
Man your hard work really shows! That was truely awesome. One thing I would add an inline areation system to the outflow to the fermenter.
 
Really nice! Other than the chilling in the BK at the end, this is exactly like my setup, step by step.

Kal
 
this is an amazing design. I have spent many hours studying and building what you are showing in your designs with a few alterations. I am finally going to do my first all grain brew day this weekend and am laying out what my steps will be. How would I go about opening your process description/illustration on my computer? Can you send me the file?
 
If you are talking about the animation thing, just right click and save as a .gif file. Then you can open it in GIMP and it will show up as a crap load of layers.

Glad you like my ideas! :mug:
 
Thanks. How far along are you in your build? How did you determine the right distance to mount your burners from the bottom of your kettles?
 
I have the BK done and the MLT done. I have both pumps and all my TRi fittings. I need the stand, burners and mostly everything now. I build slow as funds allow. It makes this thread a lot less fun....
 

Latest posts

Back
Top