MalFet's bottle washer for lazy homebrewers

Homebrew Talk - Beer, Wine, Mead, & Cider Brewing Discussion Forum

Help Support Homebrew Talk - Beer, Wine, Mead, & Cider Brewing Discussion Forum:

This site may earn a commission from merchant affiliate links, including eBay, Amazon, and others.
Well, I'm decidedly taking the hard route by using fittings and fully sweated copper risers. I'm about 8+ hours of labor into this thing. My unit is not even close to being the product of a "lazy homebrewer." Haha. But, I'm getting close to wrapping it up...just need to finish gluing up the CPVC.

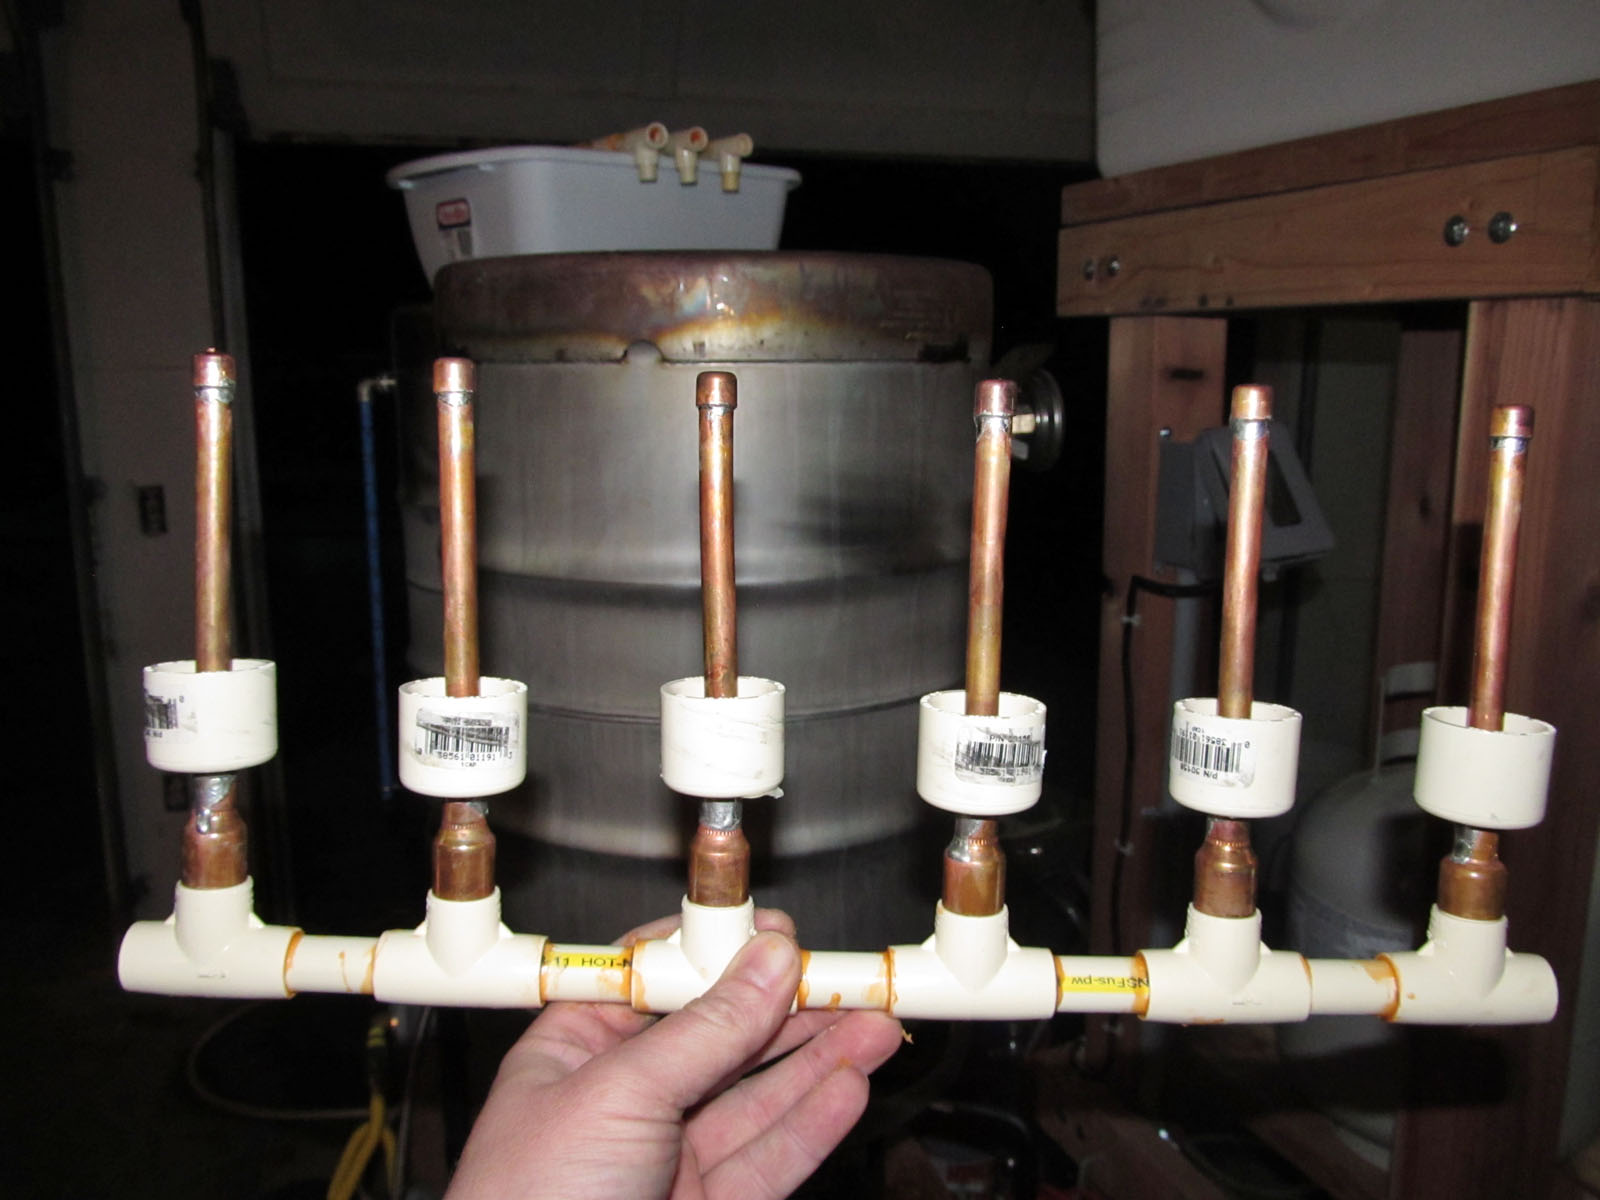
Thought I'd provide you an update, though. I finished the copper sweats tonight for all 24 risers, including my drilled caps. I'm happy to report that, with full restriction across all risers and using 1/8" holes in the caps, I'm getting upwards of 5-6' of water height from each riser. The stream has some pretty decent power, too, especially at 4-5" above where the base of the bottle will be . I'm going to hold off on drilling out the caps to 3/16" until I can get a better test.

My initial testing was somewhat precarious since I haven't glued it together yet. There's some serious water pressure going on & it's blowing the fittings! Unfortunately, it was too precarious to get any pics of it in operation before it fell completely apart on me. But so far, my short testing showed it's going to perform.

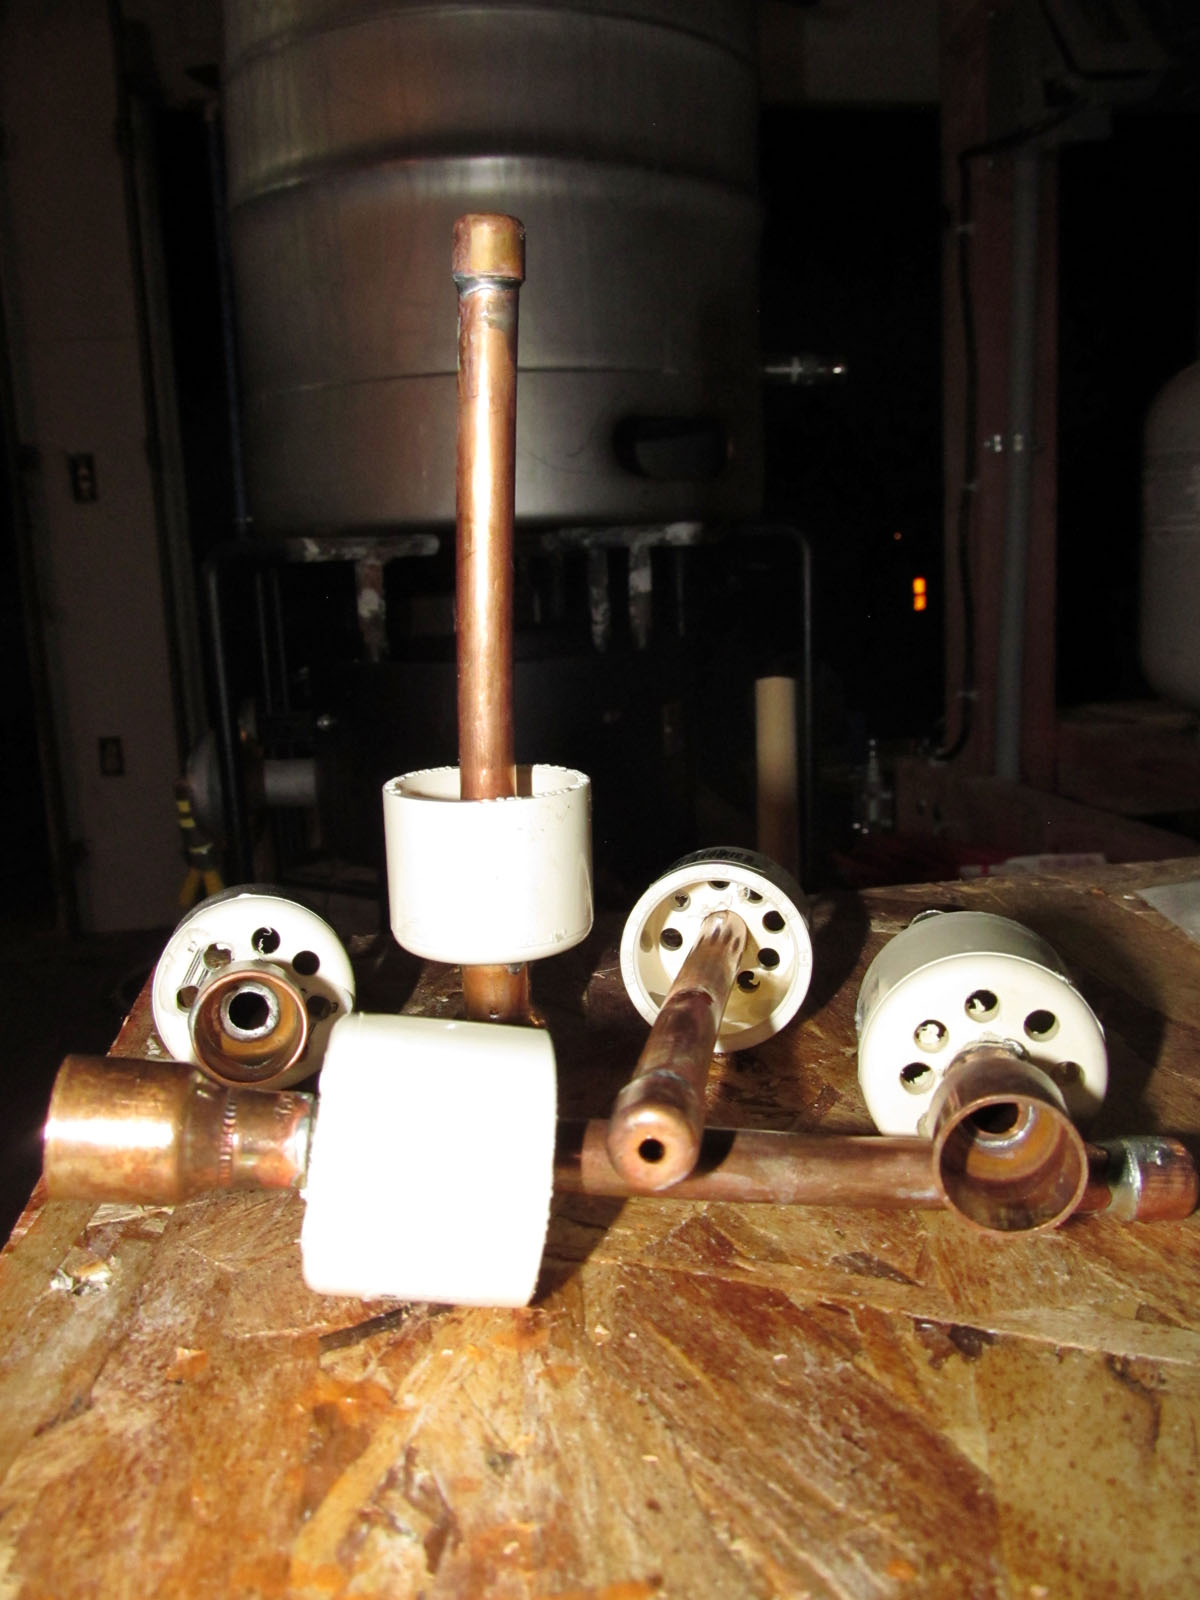
I'm not 100% settled on my bottle mounting mechanism, a 1" cap. I discovered when using the 1/2" to 1/4" reducer couplings, it will virtually plug up the entire mouth of the bottle and this will fully stop the spout from working at all. So, if you intend to use fittings, you have to figure out a way to get the bottle off the riser to allow it to properly drain. As you'll see, I drilled out a pattern in the 1" caps to address this issue. They're mostly sturdy, but I think I may seek another method. I'm still tossing around a few ideas.

I'll try to wrap things up tomorrow night, at least so I can show you what my design looks like overall, but for now, I'll leave you with this:
bc_bottlerisers.jpg

bc_manifoldstraight.jpg
 
Well, I'm decidedly taking the hard route by using fittings and fully sweated copper risers. I'm about 8+ hours of labor into this thing. My unit is not even close to being the product of a "lazy homebrewer." Haha. But, I'm getting close to wrapping it up...just need to finish gluing up the CPVC.

Thought I'd provide you an update, though. I finished the copper sweats tonight for all 24 risers, including my drilled caps. I'm happy to report that, with full restriction across all risers and using 1/8" holes in the caps, I'm getting upwards of 5-6' of water height from each riser. The stream has some pretty decent power, too, especially at 4-5" above where the base of the bottle will be . I'm going to hold off on drilling out the caps to 3/16" until I can get a better test.

My initial testing was somewhat precarious since I haven't glued it together yet. There's some serious water pressure going on & it's blowing the fittings! Unfortunately, it was too precarious to get any pics of it in operation before it fell completely apart on me. But so far, my short testing showed it's going to perform.

I'm not 100% settled on my bottle mounting mechanism, a 1" cap. I discovered when using the 1/2" to 1/4" reducer couplings, it will virtually plug up the entire mouth of the bottle and this will fully stop the spout from working at all. So, if you intend to use fittings, you have to figure out a way to get the bottle off the riser to allow it to properly drain. As you'll see, I drilled out a pattern in the 1" caps to address this issue. They're mostly sturdy, but I think I may seek another method. I'm still tossing around a few ideas.

I'll try to wrap things up tomorrow night, at least so I can show you what my design looks like overall, but for now, I'll leave you with this:

That thing looks like a beast... That's what I was shooting for with mine, but after 10+ hours and not a lot of progress, I gave up and went with the original design. It's not as sturdy as what I was shooting for, but only took me 2 hours to put together.... Can't wait to see this thing completed though.
 
Well, if you're looking for bottle rattling pressure, I've found it.

I finished the primary gluing on my unit tonight and the manifold is far more stable with so many connections using fittings. I'm leaving some parts friction fitted, particularly the risers, because I may want to swap them between manifolds that are custom designed for each bottle size. When thinking about it, the entire manifold (with fittings) costs about 20 bucks a piece. Whereas the copper risers run almost $2.00 a piece these days, or close to $50 with 24 of them. So it's sensible to make the risers removable and I'm gonna stick to that concept, hell or high water.

This system features a 1" pump input that has been optimized for the minimal total head as possible, given the pump's height and the necessary fittings to reduce the 1-1/4" output to 1" slip style fitting. I did this because I understand that the more vertical height a pump has to push, the less flow and pressure will be exerted at the given height. As was observed last night, I'm still getting 5-6 feet of water column height. Come to find out, as designed, it's doing the job a little too well.

I discovered a new (presumably good) problem tonight in my testing. The pressure of this system is definitely enough to push 12oz bottles right off the manifold, since my risers aren't glued down. That means my "bottle drenching stream" is enough to lift a 12oz bottle, 7" of copper and a 1" CPVC cap over 5/8" off the manifold. I wasn't expecting that. I couldn't get the system stable enough to actually observe the bottle coverage, because it kept throwing everything except bomber bottles off the manifold. But in between unplugging the pump, it looked excellent.

Seems I have few ways to solve this. Use a temporary adhesive (tape) to strap the copper reducer to the CPVC tee. Figure out a more secure, stable and effective stabilization mechanism. Or I can simply open the copper cap's opening a wee bit (1/16"), which should reduce the overall pressure and thus the strength of the stream. I'm going to think on it for a bit because once I drill out the caps, what's done is done.

P.S. Please forgive my crappy sweating job. I didn't pick this up until I started building my own copper mash tun manifolds and I'm by no means an expert plumber. 1/4" fittings took some getting used to.

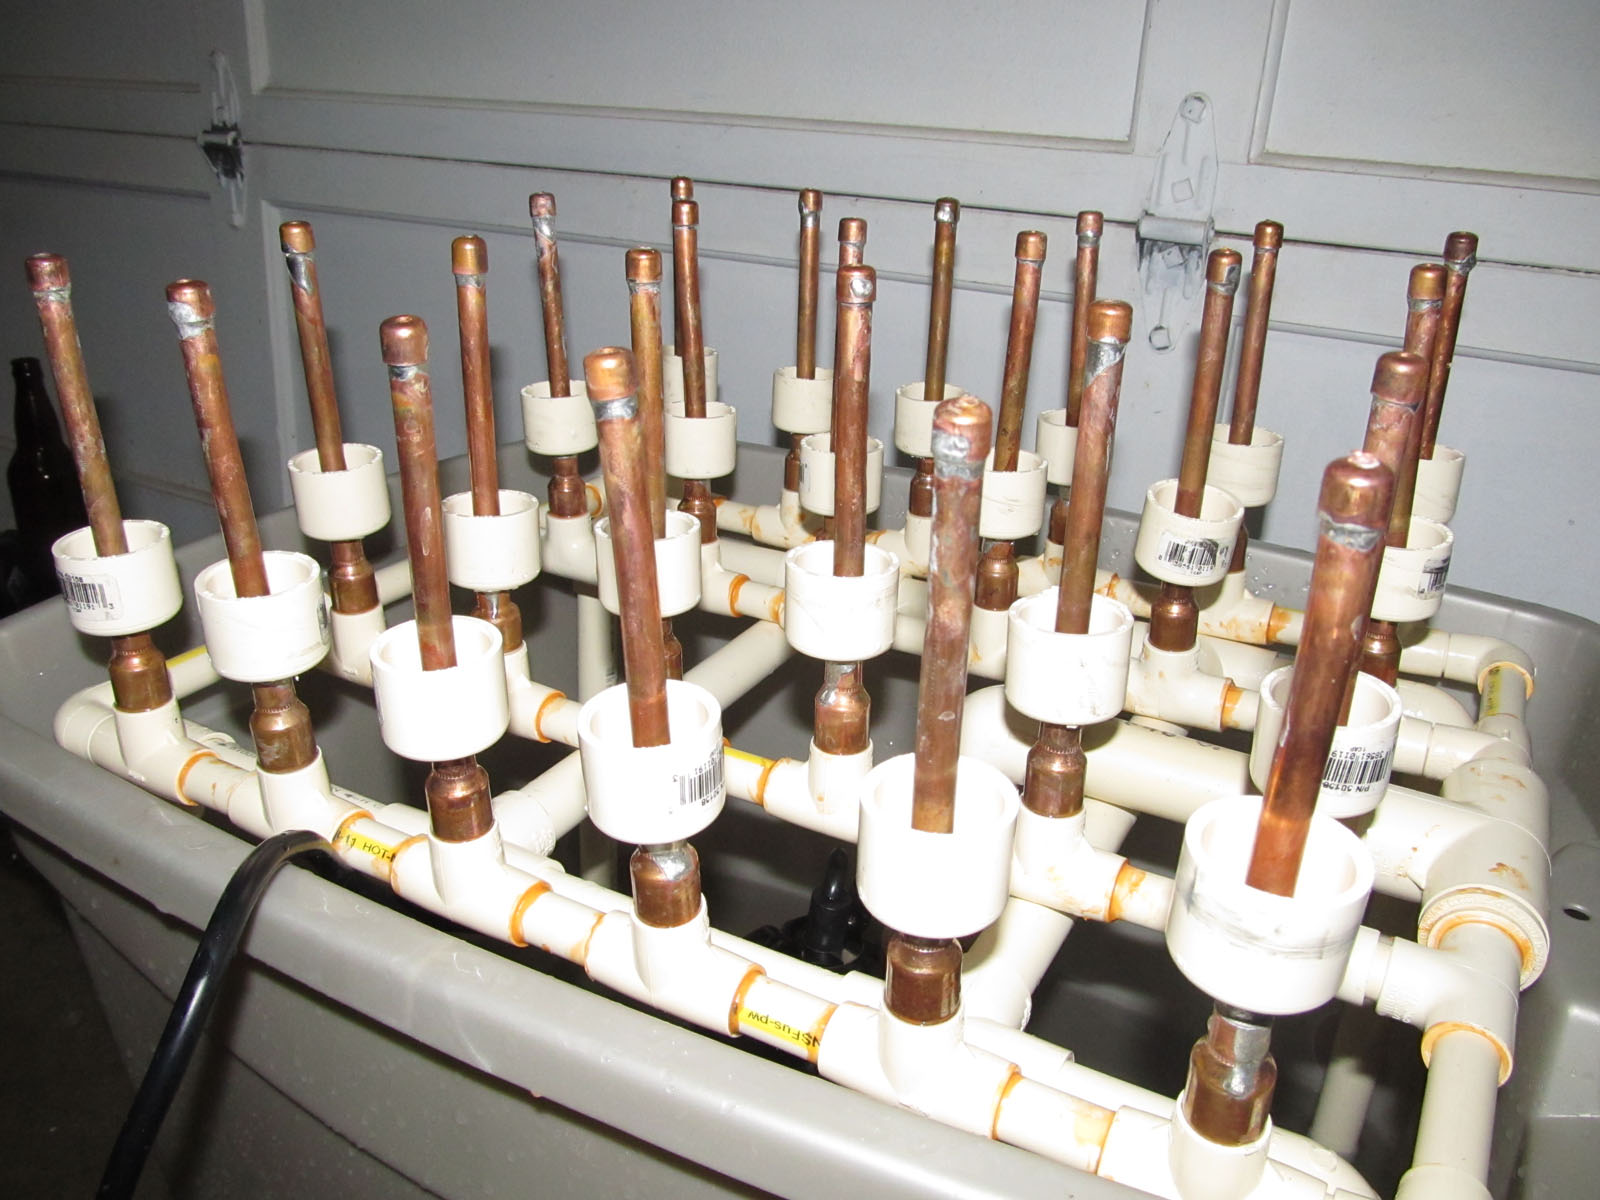
Here's the basic concept, to be refined:
bc_bottlecleanercompleted.jpg
 
Wow, that's stunningly cool! Are you getting sufficient drainage from the caps?
Yeah, thanks. I do seem to be getting decent drainage, it's emptying as it's filling. There's eight 3/16" holes drilled per cap, so plenty of room to drain. I suspect I'll get a little more foam once I add the PBW, but I'm hoping that won't have a serious impact.

I'm still not totally happy with the caps and am trying to think through various possible solutions. They're mostly stable, but a couple aren't as stable as the others. Right now, I'm leaning towards a board with holes drilled per riser that is lifted about 2" above the manifold somehow, probably with CPVC since it's practically dirt cheap. That would pretty securely hold the bottles vertically and wouldn't cost much. I've got to do some testing, though, to find out the exact size hole I want and how that affects various bottle types. I'm trying to make this work with 12oz, shorties and bombers.
 
I'm on the home stretch! System is mostly stable, but still occasionally blowing the copper risers, even when tightly taped with electrical tape. I may end up being forced to glue the copper risers to the manifold, but I'm going to think on some better potential solutions.

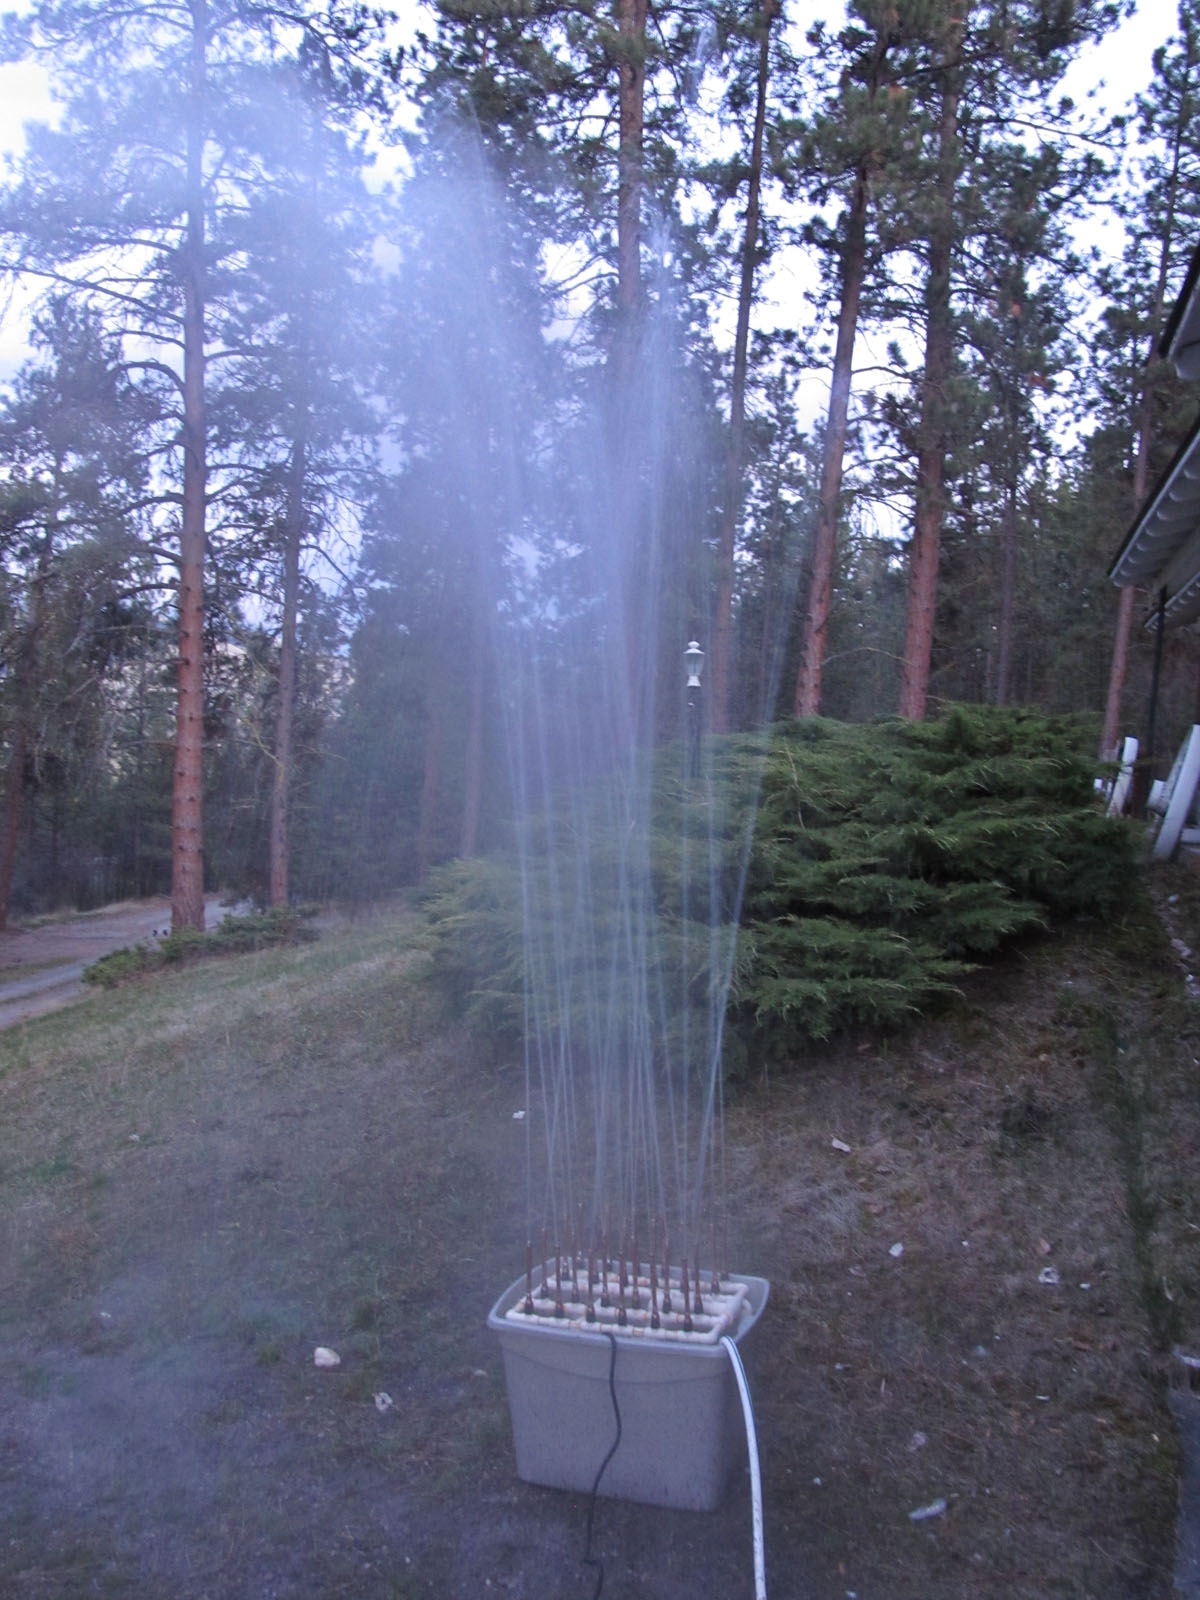
Oh, and a minor correction...this system, once stabilized, will launch water about 10-12 feet in the air. It's a pretty incredible sight and the bottle cleaning power is unreal. Plain warm water is knocking gunk out of the bottles almost immediately. It's almost as good as having the bottles under a jet washer, except I have 24 of them working at the same time.

I did away with the 1" cap bottle holders, it was just too unstable for my tastes. I ended up building a wooden bottle holder, using 1-1/8" drilled holes, that rests on top of the risers at the perfect height. It will comfortably & snugly hold regular 12oz, shorties and bombers all at the same time. Drainage is also much improved.

I'm almost done hijacking your thread, Malfet! Thanks for indulging me while I build a kick a$$ bottle cleaner, inspired by your design! I'll get some more pix once I get the thing fully stabilized and have good light...but for now, I'll wet your appetite with this:

bc_bottlecleanerworking.jpg
 
Holy guacamole! How is that happening? Is that the bigger pump and the smaller exit diameter?

I'm not a fountain expert, but I can estimate that it's a few things working in tandem.

The larger pump (1/3HP) has better GPM ratings across the middle of the of the pump's performance curve, and therefore pressure at a given height. It's not the be-all-end-all, but the power is definitely contributing.

It's also the 1" input into the system. Effectively, I've doubled the possible amount of water that can enter into the manifold from the pump at any given time and it all wants to get out in a hurry. The fittings probably also contribute a little bit, since they're designed to constrict water flow without disrupting the flow.

But the 1/4 drilled caps (to 1/8") are the magic, because it's what is creating the final amount of back pressure against the pump. I'm also using 3/8" copper risers, which allows more water to push against the final restriction at each riser.

I suspect you could get even squeak a bit more performance from the pump if you used a 1-1/4" input into the manifold and 3/4" CPVC for the manifold. That's a pain for me, though, because it's harder to find 1-1/4" CPVC where I live.
 
Where was this DIY before I switched over to kegs!!!

Simply Amazing MalFet!!

I wish I saw this before I switched over to kegs. This is truly a great idea and so easy to do.
My vote for project locator!
Redbeard5289
 
[ame="http://www.youtube.com/watch?v=CiXKP-8IgQQ"][YOUTUBE]CiXKP-8IgQQ[/YOUTUBE][/ame]

It's finally completed! Thanks for the inspiration, Malfet. I'm really happy with my design. My unit turned out to be considerably more expensive, difficult and challenging...but I think it's worth it in the end. Here's my parts list:

Container, Pump & Output:
(1) Sizable Rubbermaid Container - $20ish
(1) Superior Pump 1/3HP Utility Pump (Same as Malfet, but 1/3HP version) - $59
(1) 1-1/4" Lead Free Brass or SS Coupler - $11
(1) 1-1/4" x 1" Lead Free Brass or SS Reducer Bushing - $10
(1) 1" MIPS x 1" Slip CPVC Fitting - $2.50

Note: The above output could be optimized if you can find a 1" FIPS x 1" Slip adapter

Sub Total: $102.50

Manifold:
(~8") 1" CPVC Pipe - $1.50 ($14.60/10ft)
(1) 1" 90* Elbow - $1.64
(1) 1" CPVC Tee - $2.73
(2) 1" x 3/4" CPVC Bushing - $1.76
(2) 3/4" x 1/2" CPVC Bushing (or Qty 2 1" x 1/2" CPVC Bushing) - $1.04
(~15') 1/2" CPVC Pipe - $5.80 ($3.91/10ft)
(28) 1/2" CPVC Tees - $8.96
(4) 1/2" CPVC 90* Elbows - $1.84
(1) Jar CPVC Glue - $4.00

Sub Total: $29.27

Copper Risers:
(24) 1/2" x 1/4" Copper Reducer Couplings - $39.60
(24) 5" Lengths of 3/8" Copper Tubing - $12.93 ($25.86/20ft)
(24) 1/4" Copper Caps - $27.12
(24) 3/8" to 7/16" SS Clamps (Optional, CPVC glue if not) - $12.00

Sub Total: $91.65
(Now you know why I spent the cash to make these removable!)

CPVC Manifold Stand:
(4) 3/4" 90* CPVC Right Elbows - $1.72
(4) 3/4" CPVC Tees - $2.28
(~5') 3/4" CPVC - $3.15 ($6.29/10ft)

Sub Total: $7.15

Bottle Stand:
(4) 24" 1"x3" Furring Strips - $2.00
(2) 24" 2"x4" - $1.50 ($3.00/8ft)

Sub Total: $3.50

Grand Total: $234.07(ish)

For a couple more bucks, you can make a fermenter/keg cleaner as well from the same pump. So it's pretty economical if you look at it that way.

I know that I, personally, spent a fair bit more than the above price, by probably close to $50. I go out of my way to support smaller, local businesses most of the time and therefore I pay more. But that's what you'd pay if you went to your average Lowes or Home Depot.

If you all have any questions, let me know.
 
revco - NICE!

What was your final cost if you don't mind?

I'm totally building one once I can get things sorted around here!

Thanks to everyone on this thread that has shared their experiences on building their versions. Quite inspiring!
 
I haven't finished calculating it, but I suspect, in all, close to $200 give or take. Some of the stuff I all ready had and I had all the necessary tools.

It's probably more than a lot of people want to spend, when a tub of oxyclean is all you really need, but I really wanted to get away from that mess somehow. I'm managing around 30 cases of bottles, so something had to be done and I'm not convinced that kegging is right for me.

I'm really happy with how it turned out, overall, and so long as it holds up over time, it'll be well worth the investment.
 
nicely done, imma build one....may make a few more mods. I'd love to figure out how to add some filtration w/o reducing the flow rate. I'd also like to mod the tube tips to work more like sprinkler heads. nice project and what's better...no rush. me thinks it will be a six-banger and I will clean them as I use them.....don't want to store up 24 "dirty" bottles.....

and many thanks to you and Malfet for sharing.

After I finished mine, I was actually thinking about how a 6 or 12 bottle unit could be a little more functional in some cases. It would also presumably require less pump and obviously less investment overall.

I looked at a lot of tips (like TeeJets), but they added considerable dollars to the overall project. I also didn't know how to calculate the final PSI across a multi-output vessel like this, so I couldn't even begin to determine if I was close to the recommended range or not. That was actually one of the reasons I made my risers removable, was such that some day I could possibly look into options like that.

Good luck to all!
 
I just made one based on your design. I used rubber grommets to connect from the cpvc to the copper. I also went with the pump recommended but the 1/3 hp one. Got it all together and works great! My one question is do you think there will be any leaching of chemicals from the rubber grommets? I do not think they are food grade however they came with limited information. The grommets have a "tire" smell out of the bag.
 
I just made one based on your design. I used rubber grommets to connect from the cpvc to the copper. I also went with the pump recommended but the 1/3 hp one. Got it all together and works great! My one question is do you think there will be any leaching of chemicals from the rubber grommets? I do not think they are food grade however they came with limited information. The grommets have a "tire" smell out of the bag.

Great idea about the grommets! I have no idea about the food safety. If you could find pure silicon grommets, that would certainly be good, but we'd have to know more about the kind of rubber to really guess about food safety.
 
Great idea about the grommets! I have no idea about the food safety. If you could find pure silicon grommets, that would certainly be good, but we'd have to know more about the kind of rubber to really guess about food safety.

Interesting concept. Here's my suggestion for testing "food safety". Put a couple/few grommets in hot water for about 30-60 minutes. Taste (don't drink!) the water after that period. If it tastes nasty, it's definitely not safe. Just don't swallow it, even if it doesn't taste bad.

You can find operational temperatures of most materials somewhere online. If you know what it is, you can look up safety and maximum temperatures that are fairly accurate.

Pics?
 
well I asked the seller I bought the grommets from and he said he would not use them for this application. Now the search continues to find the proper grommets. Dang! was hoping to use this thing today for the first time with bottles.
 
Funny, I had this same idea not too long ago because I have many cases of wine bottles that I need to wash. I however, want to wash both inside and out. I also want the ability to toss labeled bottles in and have the heat/water/cleaning solution de-label the bottles. I'm working on mine now and I'll post my results soon. Nice job!
 
Funny, I had this same idea not too long ago because I have many cases of wine bottles that I need to wash. I however, want to wash both inside and out. I also want the ability to toss labeled bottles in and have the heat/water/cleaning solution de-label the bottles. I'm working on mine now and I'll post my results soon. Nice job!

That's certainly possible with this solution. Obviously your first wash should be thorough, probably with an Oxy soak for de-labeling and heavy gunk cleanup. But after that, this concept is far easier (and cheaper) for bottle maintenance than repeated soaks.

I put mine on my washer then run them through a dishwasher cycle with a wee bit of PBW. (Regular dish soap is bad for beer.) This gets both the inside and outside with minimal effort. From there, I jet wash the inside, rinse the outside and with a little bit of drying, I'm done. In all, I actively spend about 10 minutes per case, if that.. You can't come even close to that with a soaking method, at least from my experience.

The biggest benefit, though, is that I only need about 2 gallons of water with this washer, thus around an ounce of PBW with this solution. It'll eventually pay for itself with the savings from decreased PBW or Oxy use, not to mention it will be easier on my plumbing and septic tank.
 
evancold said:
well I asked the seller I bought the grommets from and he said he would not use them for this application. Now the search continues to find the proper grommets. Dang! was hoping to use this thing today for the first time with bottles.

I'm really intrigued by the grommet idea.

I love all the various directions people have run, but I'm personally still very attached to the 30-bottles-in-a-milkcrate design. Being able to go seamlessly from storage to washing is key to my needs.

But, the one part I'm still unhappy with is the JB Weld. It works fine enough and I'm comfortable that its food safe, but it's just more futzy, fragile, and time consuming than I'd like. Some simple grommets would be incredibly convenient.

Please keep us posted if you find anything!


This is the closest I can find, says they are silicone. Do you think these will work?

http://www.drillspot.com/products/5...military_specification_rubber_grommet#reviews
 
The measurements look good, but man-oh-man, that ain't cheap. If we could figure out the type of rubber in the other stuff, I'd feel more confident.

Yeah the price is scary that's for sure. I was able to find them somewhere else for 7.77 per 10 pack with free shipping. I was not able to find what material the other ones were made of. However as a test I left a few in a cup of water. After 48 hours the water was cloudy and even has some floaties from the rubber grommets. If you think these will work I am going to order them in the morning. :mug:
 
lol they had a link saying click here to be emailed a better price. Just got the email 7.61 with free shipping per 10 pack

ahh crap! they said free shipping till i went to the site and added them in the cart. now it says 16 bucks shipping for 4 packs! So much for that idea
 
Did you check the section in the OP labeled Parts? ;)

I just figured it out... I went from the home page and could not get to the parts list.

Went in DIY and there it was....


Edited my post so I did not look like a complete (xxxxx)!
 
This thread is AWESOME!

I have WAY too many bottles that don't get much use anymore cuz I started kegging but will keep this thread in reach just in case I find myself wanting to clean some bottles.
 
I think those will be just fine. At a melting point between 400-450 degrees, you'd be pumping aerosolized gas before you had any problems. I couldn't find any particular food safety info on the standards, but silicone is usually safe.

I'm a bit confused, though. Elsewhere in the description they're described as "Styrene Butadiene Rubber". IANAPolymerChemist, but I'd double check to make sure which is what.
 
Back
Top