You are using an out of date browser. It may not display this or other websites correctly.
You should upgrade or use an alternative browser.
You should upgrade or use an alternative browser.
Redwood Electric Rig
- Thread starter Chosenwon
- Start date

Help Support Homebrew Talk - Beer, Wine, Mead, & Cider Brewing Discussion Forum:
This site may earn a commission from merchant affiliate
links, including eBay, Amazon, and others.
Troubs
Well-Known Member
I love wooden rigs for some reason! Looks very nice!
- Joined
- Nov 14, 2008
- Messages
- 259
- Reaction score
- 0
I love wooden rigs for some reason! Looks very nice!
heh heh heh... you said wood.
Sawdustguy
Well-Known Member
Looks very nice and compact!
Looks very nice and compact!
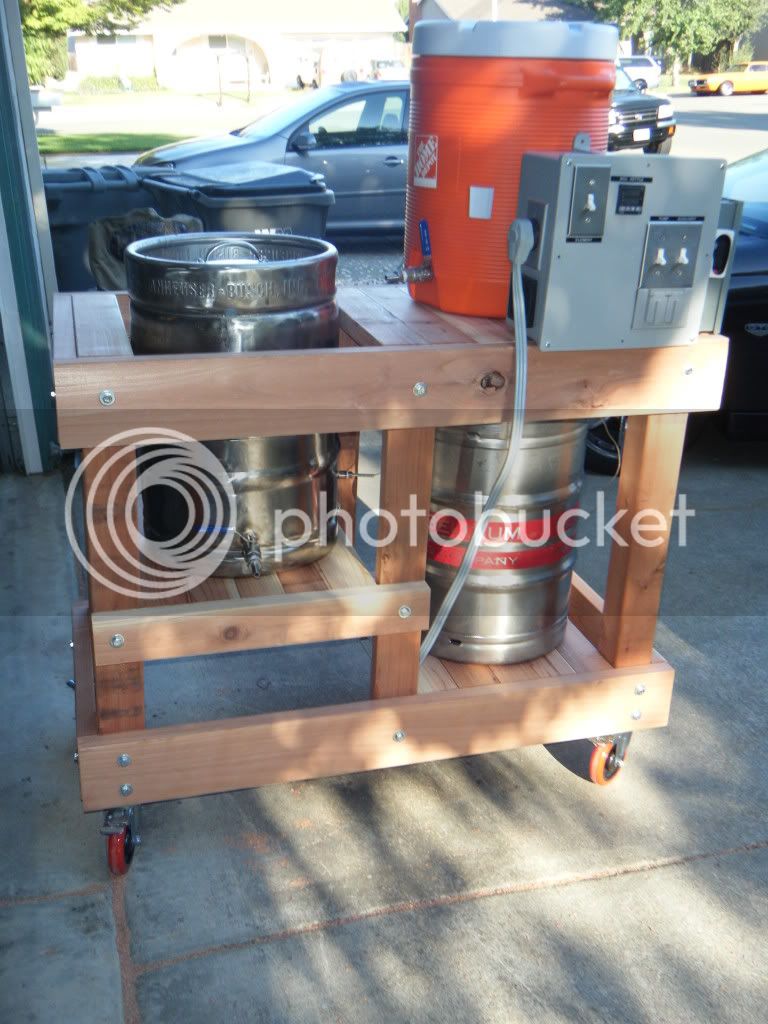
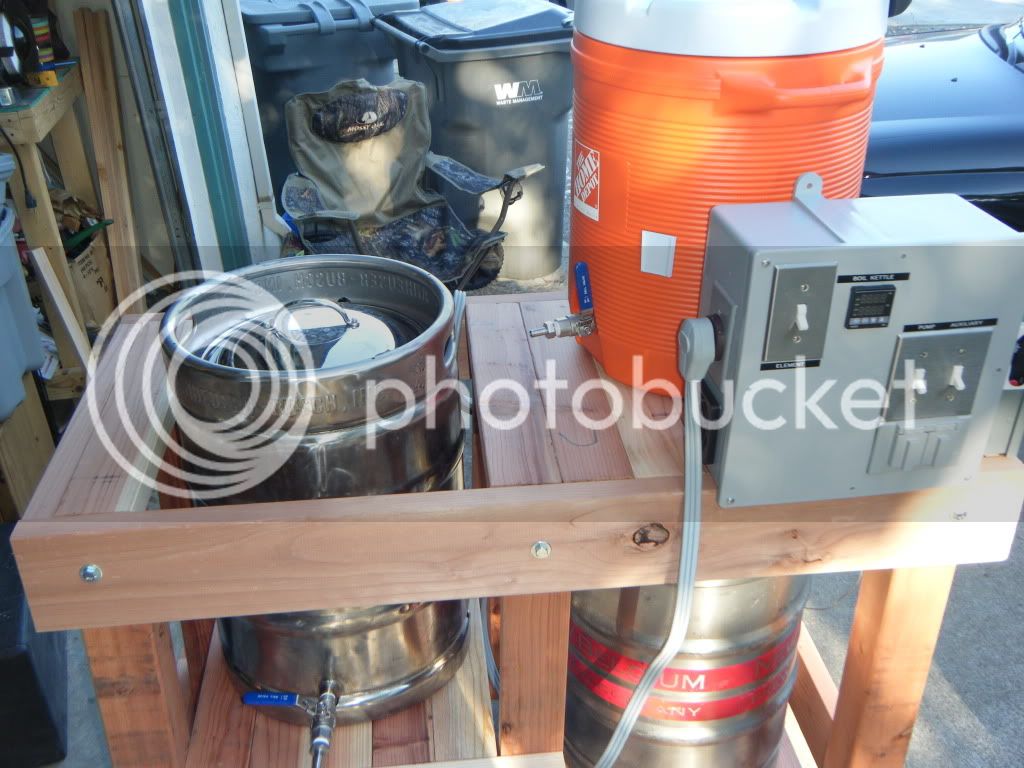
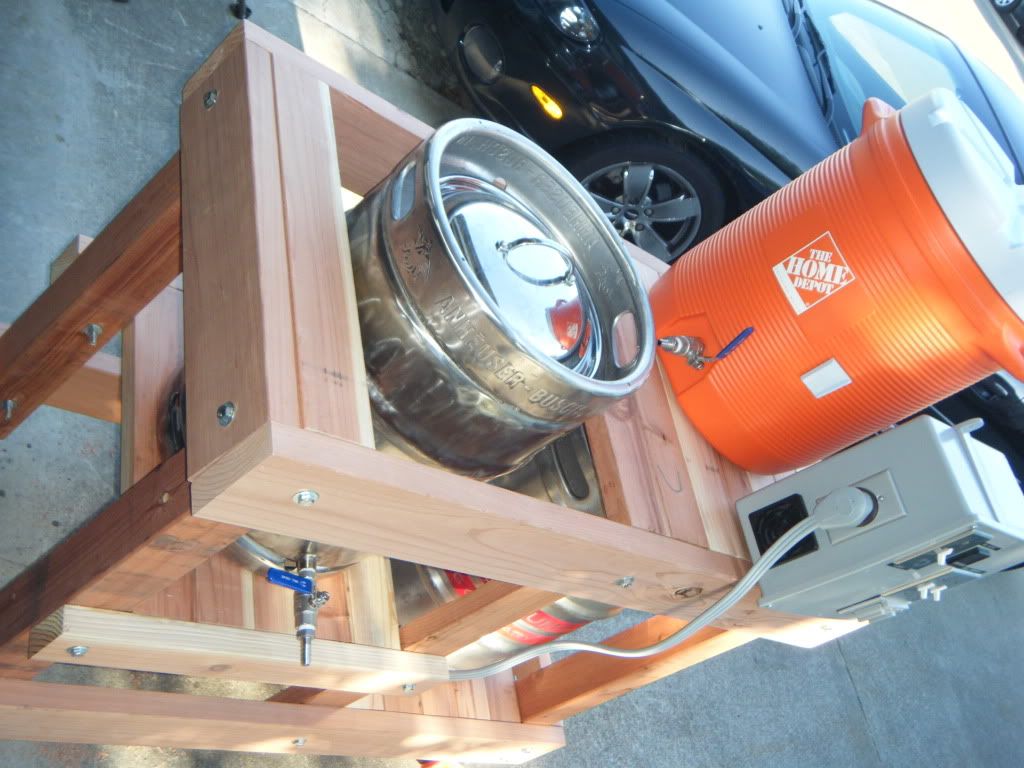
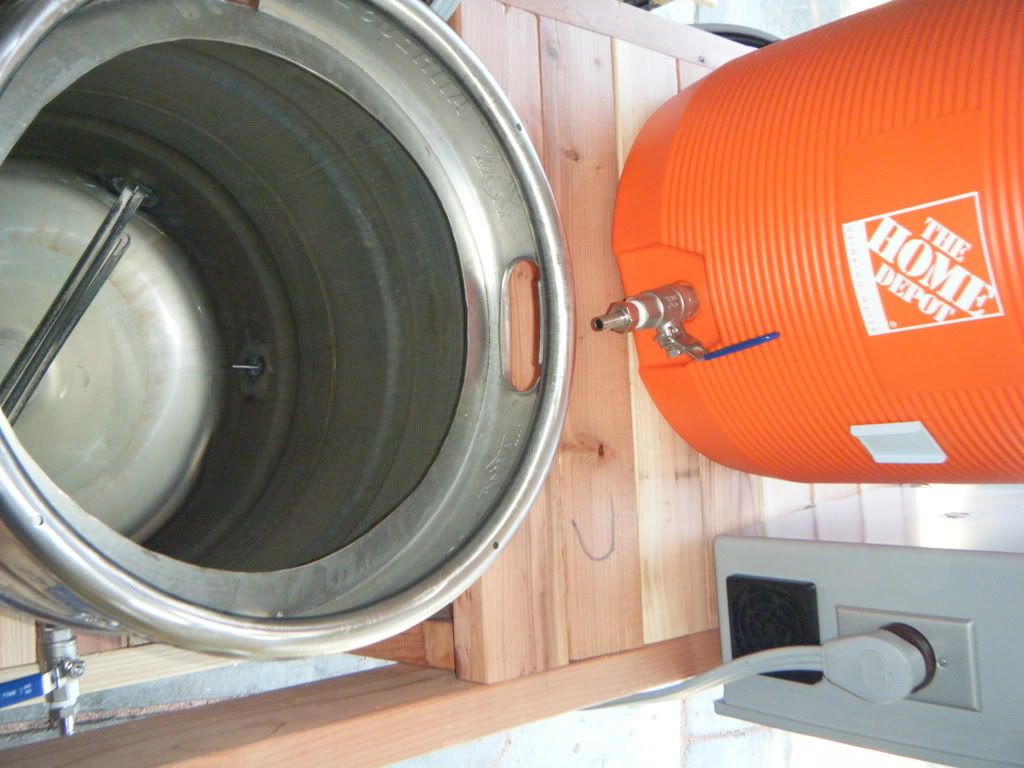
That was one of my main goals. I didn't want something that was too big, its just high enough to drain into just about any fermenter with gravity, and high enough if I use a plate chiller i could get away with gravity for filling my better bottles. The Mash Tun drains through the handle of the keggle to shave a few inches. Lots of drawing before I started this, but I did build it (the wood framework) on one Sunday afternoon. The control panel and keggle are different stories. I have 4 batches on the kettle and control panel but zero on the system as a whole-Friday looks like a good break in day!

AB I can understand, but NB!?!? There'd better be a good explanation for this.
All legal-Scouts honor.
I got the AB one first, wish I would have gotten the NB first and made the kettle with that. Next step is to convert that NB into a mash tun, build the rims and wait for my last keg to get in from CHI for the HLT.
bendavanza
Well-Known Member
Nice.
I think electric is in my future.. I dislike brewing in the summer and getting a face full of heat blasting out around my kettles, feeling the BTU's wasted.
I think electric is in my future.. I dislike brewing in the summer and getting a face full of heat blasting out around my kettles, feeling the BTU's wasted.
Nice.
I think electric is in my future.. I dislike brewing in the summer and getting a face full of heat blasting out around my kettles, feeling the BTU's wasted.
I also did not like sweating into the kettle. All the heat is dumped directly into the wort on this system. Of course you lose some heat through the keg, but your heat doesn't have to penatrate through the keggle either. Let me know if you have questions. The Pol's stuff is great to use as a reference as are the others who have commented on his pages who have built simular systems.
Nothing beats heating up water for mash in at around 4-5 degrees a minute!... well I am sure some things would, but its pretty awesome :rockin:
CodeRage
Death by Magumba!
Looks nice! I priced out a wood rig and steel is cheaper than decent wood, at least around here. Ought to be proud brother!
Remember when everyone kind of scoffed at electric brewing 2 years ago? Seems to be gaining serious ground now.
Let us know how Friday goes!
Remember when everyone kind of scoffed at electric brewing 2 years ago? Seems to be gaining serious ground now.
Let us know how Friday goes!
Looks nice! I priced out a wood rig and steel is cheaper than decent wood, at least around here. Ought to be proud brother!
Remember when everyone kind of scoffed at electric brewing 2 years ago? Seems to be gaining serious ground now.
Let us know how Friday goes!
TELL ME ABOUT IT! I would have done this years ago if it wasn't for all the nay-sayers. "it will scorch your wort", "you will electricute yourself", "you couldn't get a consistant boil" Well my friends all of these things are wrong-I get incredible hot break, the boil is unbelievably even and gets there really quickly!
I like it...nice wood...nice compact and efficient footprint!
The Pol
Well-Known Member
- Joined
- Feb 12, 2007
- Messages
- 11,390
- Reaction score
- 117
I also did not like sweating into the kettle. All the heat is dumped directly into the wort on this system. Of course you lose some heat through the keg, but your heat doesn't have to penatrate through the keggle either. Let me know if you have questions. The Pol's stuff is great to use as a reference as are the others who have commented on his pages who have built simular systems.
Nothing beats heating up water for mash in at around 4-5 degrees a minute!... well I am sure some things would, but its pretty awesome :rockin:
Very nice bro, very nice. Enjoy brewing on it!
Sweet. That is exactly the type of setup I see myself with, probably 5 years from now when I get a house and garage.
Anywho, I assume you have some relays in your control boxes, but I did not see any heat sinks. Is your only heat dissipation that 120mm fan on the side? Also, what length is that cord going from the control panel to the outlet? If it is greater than 6ft could you tell me where you got it?
Anywho, I assume you have some relays in your control boxes, but I did not see any heat sinks. Is your only heat dissipation that 120mm fan on the side? Also, what length is that cord going from the control panel to the outlet? If it is greater than 6ft could you tell me where you got it?
Very nice bro, very nice. Enjoy brewing on it!
Thanks Pol, your rig pushed me over the edge to start mine! Maybe I can help you catch a break answering every electric question on the forum...

Sweet. That is exactly the type of setup I see myself with, probably 5 years from now when I get a house and garage.
Anywho, I assume you have some relays in your control boxes, but I did not see any heat sinks. Is your only heat dissipation that 120mm fan on the side? Also, what length is that cord going from the control panel to the outlet? If it is greater than 6ft could you tell me where you got it?
Just one SSR for the 240. Its a 40 amp SSR with Auber Ins. big heatsink inside. I don't even have a fan rigged up right now, I have holes for ventalation, and I left room for a fan, but I stuck my finger through the hole and touched the heat sink and it didn't even feel hot to the touch, barly warmer than ambient temp.
I would have gone with a more compact box, but I saw how tight things had to be in the Pol's build so I went the next size up and I have room for a RIMS system in my future. I have two 6 foot dryer cords. One goes to the separate 30 amp GFCI I have mounted on the side of the control panel and the other goes from the element in the keggle to the outlet in the side of my control box.
I wish you luck in your build-It makes my brewing much more enjoyable. Remember to keep safty in mind when building anything like this.
nebben
Well-Known Member
That looks beautiful! You should be proud. Time to brew up an amber with it 
Whiskey
Well-Known Member
Very Nice!
The Pol
Well-Known Member
- Joined
- Feb 12, 2007
- Messages
- 11,390
- Reaction score
- 117
TELL ME ABOUT IT! I would have done this years ago if it wasn't for all the nay-sayers. "it will scorch your wort", "you will electricute yourself", "you couldn't get a consistant boil" Well my friends all of these things are wrong-I get incredible hot break, the boil is unbelievably even and gets there really quickly!
You know, it is humorous how human beings seem to always think that thier generation has it all figured out.
Just think, many think that the brewing books and methods written about in the 1990's are the holy grail. Accepted without question.
I can imagine that was the same perception in the 70's, 30's... maybe thousands of years ago. Things are not the same now as they were in the 70's, 30's or thousands of years ago. I have no reason to believe that how we are brewing now, will remain the same 10-20 years from now either, that would be wholly arrogant.
Ingredients, processes, equipment and understanding are always evolving... we would be ignorant to think that the way it is done now, or 10 years ago... will be the future of our craft. It is simply illogical.
That looks beautiful! You should be proud. Time to brew up an amber with it
I agree! The Redwood Amber. I only have one free better bottle availavle. I have 5 batches in the upright freezer now, Just fit it for a shelf and I have a 40 gallon capacity. Looks like I need more better bottles!
You know, it is humorous how human beings seem to always think that thier generation has it all figured out.
Just think, many think that the brewing books and methods written about in the 1990's are the holy grail. Accepted without question.
I can imagine that was the same perception in the 70's, 30's... maybe thousands of years ago. Things are not the same now as they were in the 70's, 30's or thousands of years ago. I have no reason to believe that how we are brewing now, will remain the same 10-20 years from now either, that would be wholly arrogant.
Ingredients, processes, equipment and understanding are always evolving... we would be ignorant to think that the way it is done now, or 10 years ago... will be the future of our craft. It is simply illogical.
Wise words Pol. It seems like we may need some new Palmers and Papizans, no disrespect to them as they are legends, but the craft is always evolving. I loved your write up on no chill brewing too-which would have been a definate no-no to conventional wisdom of cool your wort as fast as possible.
We need more people to take a chance here and there and try new things. This hobby is for fun after all and experimentation is good (in small batches of course!).
Here is to figuring it all out!
The Pol
Well-Known Member
- Joined
- Feb 12, 2007
- Messages
- 11,390
- Reaction score
- 117
Wise words Pol. It seems like we may need some new Palmers and Papizans, no disrespect to them as they are legends, but the craft is always evolving. I loved your write up on no chill brewing too-which would have been a definate no-no to conventional wisdom of cool your wort as fast as possible.
We need more people to take a chance here and there and try new things. This hobby is for fun after all and experimentation is good (in small batches of course!).
Here is to figuring it all out!
For our generation anyhow!
Quick question for everyone-How/where should I mount the march pump? I was thinking vertically against the middle support beam with the heat at the level of the bottom 2x6? Should I be worried about splashing the pump? Maybe make a hood for it of some sorts?
Pol-has your pump been a problem or had any problems?
Pol-has your pump been a problem or had any problems?
bendavanza
Well-Known Member
Make a hood for sure.
brrman
Well-Known Member
I run my pump in the same orientation as Pol and it works just fine.
The Pol
Well-Known Member
- Joined
- Feb 12, 2007
- Messages
- 11,390
- Reaction score
- 117
Quick question for everyone-How/where should I mount the march pump? I was thinking vertically against the middle support beam with the heat at the level of the bottom 2x6? Should I be worried about splashing the pump? Maybe make a hood for it of some sorts?
Pol-has your pump been a problem or had any problems?
My pump has run flawlessly, 5 seconds to prime for a whole brew session. These pumps are bullet proof IMHO
That's a great setup!
Thanks for the kind words guys, a lot of planning but it has all paid off so far.
Can't wait to pop this things cherry tomorrow!
So I invested even more money into my rig, More Beer has a sweet sale going though through August and those guys are top notch! Big props to the guys at More Beer in Concord, CA.
Here is the latest:

I still need quick disconnects, sand and stain, and a few misc. items, but it is close.
The only problem I am concerned with right now is my March Pump has a lot of problems priming from my HLT (bottom right) and once it does get going it can not pump the last 2 or 3 gallons out of the hlt before it loses its prime. The HLT is clearly above the pump, am I not getting enough headspace? Any Suggestions to the March pump users out there?
Here is the latest:
I still need quick disconnects, sand and stain, and a few misc. items, but it is close.
The only problem I am concerned with right now is my March Pump has a lot of problems priming from my HLT (bottom right) and once it does get going it can not pump the last 2 or 3 gallons out of the hlt before it loses its prime. The HLT is clearly above the pump, am I not getting enough headspace? Any Suggestions to the March pump users out there?
frolickingmonkey
Well-Known Member
Beauty! Any chance of a parts list and measured drawing for this rig? I only ask because I'm in the process of designing something similar for my tiny brew barn... wood, compact, etc. I'll definitely be following this thread. Nice work!
Hopefully the HLT+Pump issues can be easily resolved.
I only ask because I'm in the process of designing something similar for my tiny brew barn... wood, compact, etc. I'll definitely be following this thread. Nice work!Hopefully the HLT+Pump issues can be easily resolved.
Beauty! Any chance of a parts list and measured drawing for this rig?
Hopefully the HLT+Pump issues can be easily resolved.
I think the pump just was not getting a proper prime. I will fool around with it until I get it working properly. After reading other posts about March pumps it seems like just a slight amount of air will prevent the pump from priming properly so I just need to work the air out of the lines and it will work like a champ.
You can send me a private message and I can scan a drawing to you, although you probably don't even need one. Its 4' wide by 2' deep. The top and bottom 2x6s are 4 feet wide making the pieces sandwiched inbetween 21''. 4x4s are 32'' tall. The top pieces are mounted 1.5'' above the top of the 4x4s to compensate for the top 2x4s.
You will need about 25 6'' bolts (I used 3/8'') and 6 4'' bolts.
4-2x6x6' Redwood
2-4x4x6' Redwood
8-2x4x6' Redwood
2-2x4x8 Doug Fir
4 casters (I used 6" urethane wheels-works great but they are pricey and over 6" tall overall.
I built as I went and it really did go quickly having about 6 hours total into the build.
When you think about building a structure, don't think about the structure itself as much as the vessels you are trying to hold and where they need to be, build your structure around these dimensions and you will have something that is compact and efficient. Think about how high you want your kettle, do you want to be able to turn a valve and empty directly into a carboy? This was one of my goals so I made sure my kettle was high enough. I also wanted to be able to drain my MT into the kettle by gravity, by going through the handle of the keggle I shave a few inches off of the height. The HLT is low and out of the way because I don't really need to look into it, I just need it to hold sparge water and have it higher than the pump so it can pump sparge water over my Mash Tun.
If you have any other questions I will help you out the best I can.
samc
Well-Known Member
Nice job! I suggest you just sand & clear coat as the natural wood color is nice already.
Seriously thinking of going all electric someday from the 2/3 NG 1/3 electric I have now.
Seriously thinking of going all electric someday from the 2/3 NG 1/3 electric I have now.
frolickingmonkey
Well-Known Member
When you think about building a structure, don't think about the structure itself as much as the vessels you are trying to hold and where they need to be, build your structure around these dimensions and you will have something that is compact and efficient. Think about how high you want your kettle, do you want to be able to turn a valve and empty directly into a carboy? This was one of my goals so I made sure my kettle was high enough. I also wanted to be able to drain my MT into the kettle by gravity, by going through the handle of the keggle I shave a few inches off of the height. The HLT is low and out of the way because I don't really need to look into it, I just need it to hold sparge water and have it higher than the pump so it can pump sparge water over my Mash Tun.
Sage advice. Your ideas to stick the HLT below the MLT, as well as draining the MLT through the handle, really shook up my vision of how a brewrig could be put together. I've been stuck on single-tier and two-tier ideas, and this two-and-a-half-tier(?) build has been a real eye opener! Did I just coin the new term for this type of brewstand?
Probably not...Thanks for sharing the materials list. Based on the pictures and the list, I'm sure I'd could build a replica... It's a good starting point for me. I'll probably tweak/customize it, but I LOVE the concept of your stand.
Really BIG PROST and thanks for sharing your build!
Sage advice. Your ideas to stick the HLT below the MLT, as well as draining the MLT through the handle, really shook up my vision of how a brewrig could be put together. I've been stuck on single-tier and two-tier ideas, and this two-and-a-half-tier(?) build has been a real eye opener! Did I just coin the new term for this type of brewstand?
Thanks for sharing the materials list. Based on the pictures and the list, I'm sure I'd could build a replica... It's a good starting point for me. I'll probably tweak/customize it, but I LOVE the concept of your stand.
Really BIG PROST and thanks for sharing your build!
I think you may have been the first to coin it a two and a half tier. The only real effective gravity again is the MT to Kettle, but hey it works. Another design concept I had was to only use one pump, I definately didn't want to buy two pumps! It basically functions as a two tier, I just don't have to have a footprint that is two feet wider than it needs to be.
Good luck on your build, let me know if you need any pointers.
JSherwood
Member
I'm very impressed by this setup! I live in a 1br apartment, and I'm looking to build an electric rig with a small footprint that will still allow keggles. I will be making a 240v switcher box to shut off power to my stove while using that power on the rig. Not sure exactly what I'm planning (In the concept phase still), but I definitely like the 2 1/2 tier approach. I think the style of your setup could be tightened up even a bit more to make an even smaller footprint.
Anyway, kudos for a sweet setup, and I'm subscribing to see how it turns out with the stain etc!
Anyway, kudos for a sweet setup, and I'm subscribing to see how it turns out with the stain etc!
jkarp
Well-Known Member
That's nice and compact. Schweet...
Similar threads
- Replies
- 1
- Views
- 492
- Replies
- 1
- Views
- 374
- Replies
- 3
- Views
- 449
- Replies
- 0
- Views
- 534
Latest posts
-

-

-

-

-

-
-
 The Dysfunctional-Palooza Obnoxious Masshole BS Thread
- Latest: Hoppy2bmerry