Modified BIAB Process Thought

Homebrew Talk - Beer, Wine, Mead, & Cider Brewing Discussion Forum

Help Support Homebrew Talk - Beer, Wine, Mead, & Cider Brewing Discussion Forum:

This site may earn a commission from merchant affiliate links, including eBay, Amazon, and others.

jleiii

Well-Known Member
Joined
Sep 9, 2013
Messages
582
Reaction score
114
Location
Rock Hall
I've done a few BIAB brews using Beersmith, and I'm not wholly impressed with my results. I'm studying up on the way mash time and temp impacts the end beer to address that part, but I need to be able to better manage the process as well. I think my process was negatively impacting the mash.

I have a 30 qt pot that based on actual measurement is more like 28 (7 gal). For full batch mashing this is too small, but a bigger pot is not an option. I'm too 'invested' in this one, plus I think my modified process will resolve this.

The last 2 brews I did were with 24 qts of water in the pot which leaves enough room for a good grain bill. After the mash is over I lift the bag out (and into the 'steamer basket' that came with the pot - more on that later) and do 2 batch sparges for about 2 more gallons and leave it to drain while I start the boil. I've hit my preboil volume and OG fairly close this way so far.

I'd like to use Beersmith to accurately build the full recipe and brew process, but as soon as I click BIAB it sets the initial water to 28+ qts, and won't let you edit it. What I'm wondering is if it's possible to use a standard single infusion process in Beersmith and adjust my water numbers to target my desired 24 qts. I know that BIAB is supposed to be full volume no sparge with results that can compete with regular AG, but I really think I can make my process very efficient without loosing any benefits of BIAB.

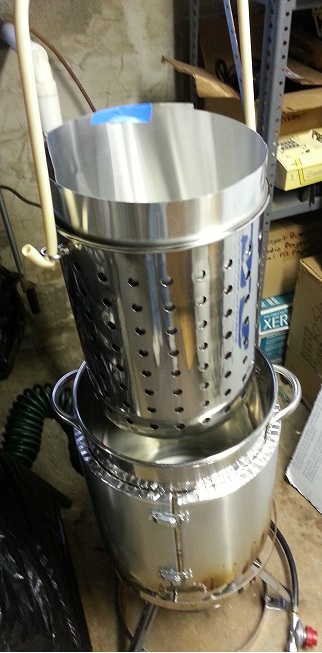
The hardware I'm looking to use in future brews would be a hanging basket that fits the pot as closely as possible to minimize dead space around it, and holes only in the bottom. The steamer basket I have now is way too small to use in the pot to start so I have to lift the bag out, then squeeze it into the basket along with flexible plastic cutting boards around the bag to block the holes in the sides of the basket. With them open the water just runs off the top. This works, but it's messy, hot, and no fun.

With a close fit basket, I drop that in the pot during the initial heat to strike temp, then add BIAB bag and grains. My bag hook doubles as a grain bucket support so I can pour the grain with 1 hand while I stir it in with the other. No lumps!
When the mash is over I hoist the bag & basket up, fire up the boil, batch sparge with 1 gallon then a second. I'd leave it hanging as long as I can while I bring up the boil, and then it's done without squeezing. Anything that continues to drain out by the last 15 min of the boil would be a "late addition".

Anyone else doing a similar process, and are you using Beersmith and NOT BIAB mash? I've played with the single infusion mash, but not enough to know if I'm on the right track with it.
Any ideas would be appreciated!
John
 
from your post, I can't quite tell why you aren't happy with your process or what exactly is wrong? Maybe you can share what it is that you're trying to improve. I do not like using Beersmith to calculate my mash volumes (I do BIAB), I prefer to use this for mash volumes: http://www.simplebiabcalculator.com/.
 
Maybe I'm just dumb but I gave up trying to get Beersmith to calculate BIAB water volumes, etc. I only use it for recipe tracking. I've learned how my particular system works through trial and error. My mash water volume varies depending on the amount of grain for each recipe. For a 5 gallon batch it usually is somewhere between 7 and 8.5 gallons of total mash/strike water.

There are other calculators out there, like this one. Maybe play around with them to see if they help.
 
from your post, I can't quite tell why you aren't happy with your process or what exactly is wrong? Maybe you can share what it is that you're trying to improve. I do not like using Beersmith to calculate my mash volumes (I do BIAB), I prefer to use this for mash volumes: http://www.simplebiabcalculator.com/.

The beer is not as good as I was making with extract. My MASH specifics are the root of this, and the process is what I'm trying to refine for ease of method and consistent results. Too 'thin', too sweet, too dry, that kind of thing.

Beersmith wants full volume, but it won't fit in the pot even though I've got equipment settings right. BIAB full volume seems to trump what fits, in the calculations. When I 'override' this in my pot, the data is no longer in agreement with beersmith. I'd really like to stick with 1 tool if I can figure out a way to adjust the numbers.

I just got back from the LHBS and even they with 2 yrs use of Beersmith had no idea you can't change the strike volume. We tried both BIAB and Single Infusion, and both allow you to edit some data in the mash steps, but not volume.
 
A senior moment (or longer...) has passed. Beersmith has Mash tools built in, doah! The brew sheet will still be wrong, but I can save it and edit it before I brew. Sure would be nice to change the numbers.....


Still looking for any thoughts/comments on the basket and sparging part.
 
Gotcha. I still would look toward using the web-based calculators, they would only take 1 minute of your time and you'd get it right every time. The basket method you describe sounds good to me. For what its worth, my method is to do my mash in my kettle per the usual, then pull the bag and place it into two buckets that I have nested into each other, the top one having a bunch of small holes drilled out of the bottom. This allows the bag to drain, and lets me pour over sparge water (I just use cold sparge) to extract whatever last bit of sugar I can. Then I will take the lid from a stock pot and push down on the bag to squeeze out any sugar I can. My method is really similar to what you have in mind, its costed me $10 for the two buckets and its super simple, I never have to touch the grain bag other than pulling it out of the mash.
 
I spent some time with Beersmith tonight, and somehow managed to get it to allow me to modify the mash in volume. Not quite sure how I got there now though.

Still working on using standard mash profiles instead of BIAB so I can control the numbers better. The only problem I see is that I still have more pre-boil water than I do pot volume, but that's partly to do with the expectation of using multiple vessels for AG.

On my last brew I did 2 1 gal sparges, then let bag drain in the basket over the pot till it was about to boil, and there was very little dripping left. What continued to drip during the boil was maybe another quart, but did not check the gravity.

On an earlier brew I was still refining my sparge/squeeze methods, and forgot about the grain till I was done. I rinsed with 1 gallon and the squeeze out had a gravity of only about 1.020, so I used it for starters rather than dump it. The boil was done by then, but with the low gravity it would have reduced my batch gravity.

Based on what I'm seeing the sparge is better than squeezing for me. Raise the bag, flame on, pour in 1 gallon of boiling water wait 15 min or so and add another gallon. I end up with just about the perfect volume in the pot, and no extra effort with the grain bag (or distraction from the about to boil over pot!). It goes out for the local wildlife after it cools.


John
 
Don't over complicate the process, I would mash in your kettle close to the full volume(say a gallon shy of the top) check mash volume using "can I mash it",
http://www.rackers.org/calcs.shtml

Then add a hot / boiling water addition after the mash to max out your kettle, remove the bag, then run sparge water slowly over and thru the bag with it suspended above your kettle, in a basket, colander or whatever you can manage, simply sparge until you reach preboil volume in your pot.

Regardless of what the software tells you, monitor what you have in the kettle by making simple volume marks on your brew spoon. With a 7 gallon kettle and a 5 gallon batch, it is very simple as you basicly need to almost fill the kettle...there is no room to over sparge, so simply sparge near the top and boil down.

KISS
 
A kettle of that volume indicates you are doing batch sizes of 5 gallons or so. The wet grain weight is small enough you can move it around and use a separate bucket for sparging.

Like you, I use a pot about that size and use less than the full BIAB volume to start. I use an online calculator to estimate strike water temp for the mash volume used, I do not use BeerSmith for that.

After mashing, I dunk sparge in a separate bucket.
  • I lift the bag and give it a spin (slowly!) to squeeze out most of the wort,
  • then transfer it to an empty bucket,
  • add a gallon or so,
  • stir the heck out of it
  • Then squeeze out the bag as best I can.
  • Done with grain.
  • The thin wort in the bucket is poured into the kettle.
  • Add makeup water to the kettle to the desired volume
  • I scratched lines inside the kettle to indicate gallons and liters
  • Continue with the boil
 
When I wet up my BIAB process in BeerSmith, which includes a batch sparge. I set it up using a single infusion profile modified for my equipment. Ignore the BIAB setting in BeerSmith and get some accurate readings on grain absorption, mash volumes, sparge volumes, and specific gravity at every stage of the process. You can then use the results from a couple of batches to re-tune the equipment and mash profile to meet your process.
 
Sounds like I'm not blazing any new trails here. Thanks for the feedback.

Now that I remembered there are calculators in Beersmith, I'm surprised to see the number of people using beersmith, but not using them. When I was playing with the mash profiles it clearly was adjusting the temps as I changed the initial strike water. I guess I'll see how these numbers work for me for now.
 
A kettle of that volume indicates you are doing batch sizes of 5 gallons or so. The wet grain weight is small enough you can move it around and use a separate bucket for sparging.

Like you, I use a pot about that size and use less than the full BIAB volume to start. I use an online calculator to estimate strike water temp for the mash volume used, I do not use BeerSmith for that.

After mashing, I dunk sparge in a separate bucket.
  • I lift the bag and give it a spin (slowly!) to squeeze out most of the wort,
  • then transfer it to an empty bucket,
  • add a gallon or so,
  • stir the heck out of it
  • Then squeeze out the bag as best I can.
  • Done with grain.
  • The thin wort in the bucket is poured into the kettle.
  • Add makeup water to the kettle to the desired volume
  • I scratched lines inside the kettle to indicate gallons and liters
  • Continue with the boil

Since you should know at that point how much makeup you need to add, why not a second sparge with that amount of water and pick up the other 2 or 3% efficiency? I'm pretty sure you are leaving sugars in the grains with only one sparge step.
 
There are stock profiles in beersmith, but they still need to be customized for your particular equipment. Once I started doing a batch sparge with the BIAB, it really falls into the same category as a single infusion with a batch sparge not much different from a standard mash tun set-up.
 
Since you should know at that point how much makeup you need to add, why not a second sparge with that amount of water and pick up the other 2 or 3% efficiency? I'm pretty sure you are leaving sugars in the grains with only one sparge step.

Good idea. Although I have tried a 2nd dunk sparge and it is extremely thin, there is no harm in doing that.
 
Gotcha. I still would look toward using the web-based calculators, they would only take 1 minute of your time and you'd get it right every time. The basket method you describe sounds good to me. For what its worth, my method is to do my mash in my kettle per the usual, then pull the bag and place it into two buckets that I have nested into each other, the top one having a bunch of small holes drilled out of the bottom. This allows the bag to drain, and lets me pour over sparge water (I just use cold sparge) to extract whatever last bit of sugar I can. Then I will take the lid from a stock pot and push down on the bag to squeeze out any sugar I can. My method is really similar to what you have in mind, its costed me $10 for the two buckets and its super simple, I never have to touch the grain bag other than pulling it out of the mash.

Hey, I like this. I was doing a 1.076 OG double batch of milk stout, and used a ladder/pulley to lift out the wet bag. The pulley rig really helped, because it was a heavy bag all loaded up with wort. After pulling it out, I placed it into a Homer bucket, but the grain just sat there in the bag reabsorbing the wort in the bucket. Your approach makes sense. What is the largest grain-bill you've been able to fit into your system, and does this work okay for that?
 
Yeah, my system is really simple and works great every time, I've essentially made a ghetto false bottom in a bucket. I tend to make 3 or 4 gallon batches mostly because I prefer variety over quantity so my grain bills are never huge. I think that the biggest one so far was roughly 12lbs. I could easily have done much more though using this setup. I never have to stand there holding the grain bag to let it drain. For me, the decisive part is the size of my kettle - which is 8 gallons.
 
I talked to the LHBS guy about the buckets and he strongly suggested against using plastic buckets, even the ones made for brewing. They simply are not rated for higher temps. Great idea he thought, but not with plastic.
Most are not even food safe, so beware. There are lots of sources for food safe ones in this forum, and Lowes sells them for $4.
Guess I'm staying with my undersize basket till I find a better one that fits the pot for a single lift then batch sparge and drain.
 
I talked to the LHBS guy about the buckets and he strongly suggested against using plastic buckets, even the ones made for brewing. They simply are not rated for higher temps. Great idea he thought, but not with plastic.
The Homer Buckets are not even food safe. There are lots of sources for food safe ones in this forum, and Lowes sells them for $4.
Guess I'm staying with my undersize basket till I find a better one that fits the pot for a single lift then batch sparge and drain.

You might want to question any other advice you LHBS guy gives. The HDPE buckets can stand up to 250 degrees F. for short times, 230 degrees F. continuously. Try getting your wort to those temps. You can dump boiling wort directly into the HDPE buckets and you sure can't do that with a glass carboy. You can also drop a HDPE bucket from benchtop height without damaging it although if it is full of wort it might split the side out. Dropping a carboy from a couple inches will be a disaster, full or not.
 
You might want to question any other advice you LHBS guy gives. The HDPE buckets can stand up to 250 degrees F. for short times, 230 degrees F. continuously. Try getting your wort to those temps. You can dump boiling wort directly into the HDPE buckets and you sure can't do that with a glass carboy. You can also drop a HDPE bucket from benchtop height without damaging it although if it is full of wort it might split the side out. Dropping a carboy from a couple inches will be a disaster, full or not.

The research I did on plastic buckets supports his opinion. 150 continuous, 180 briefly. I never saw the specs you noted before, although my research was limited. According to DOW Chemical, HDPE melts at 266F, and a Certification Notice I read says Max use 190F for HDPE.
The discussion is about draining & sparging grains with BIAB. Not about the benefits of HDPE buckets over carboys. That's in over played different posts.

With some of the uses people have noted, they can easily reach up to 212 when pouring boiling water in for a batch sparge. And, with them hanging in the air filled with hot water and grains, softened plastic sounds risky.
 
I talked to the LHBS guy about the buckets and he strongly suggested against using plastic buckets, even the ones made for brewing.

You mean the guy with a financial interest in you buying an expensive 3 tier system from him? My LBHS didn't even know what BIAB was, he thought it was just some variation on steeping grain for extract brewing. LBHS guys are generally great to ask questions like "do you have any more victory malt in the back" but I'd never ask my nearby guy any questions that extend beyond that. The issue of plastics and temps has been debated elsewhere in this forum, I only have a small portion of my wort in contact with the plastic with my system and by the time that it hits the plastic along with my cold sparge water its probably down to about 120 degrees, plus its only in contact for about 10 minutes so I don't worry about it too much.
 
According to Dynalab (http://www.dynalabcorp.com/technical_info_hd_polyethylene.asp) HDPE can withstand 120 C. (248 F.) for short periods, 110 C. continuous. At 250 they get pretty pliable but you shouldn't be able to get your bucket that hot unless you put it in your oven.

The Plastics Properties page has a footnote for HDPE:
"Please note that the polymer may become malleable at temperatures above 80ºC..." (176F)
 
Let me clarify my LHBS statement: "against using buckets for hot liquid".

This particular LHBS has nothing but dedicated brewers working there, they do 3 vessel and BIAB, and teach All Grain classes on a regular basis. I think they are qualified to offer reliable opinions.

The idea I was running with was a vessel in my pot with minimal deadspace around it, and the bag with grains it in. At the end of the mash I pull the vessel up, bag and all, leave it hanging just above the pot, and pour sparge water through it to get my proper/max pre-boil volume.
Since the large fermenting buckets are almost the perfect size, I was pondering using one of them after punching the bottom full of holes, and people were weighing in on their variations of this process, further advocating plastic bucket use that they had come up with.
The LHBS suggestion to not use plastic for this makes sense given they were not intended for hot use, in spite of any temperature ratings.

I'll continue my quest for a metal vessel. The minimal deadspace around it is the challenge. Most places don't give detailed measurements of pots and strainers. Most are either the same as my pot, or too small.

If anyone has a strainer basket 11.5 - 11.75" OUTSIDE, and at least 14" tall, let me know. That way I know what to look for, or I can take it off your hands if you don't need it.
John
 
The idea I was running with was a vessel in my pot with minimal deadspace around it, and the bag with grains it in....

I'll continue my quest for a metal vessel. The minimal deadspace around it is the challenge.

If anyone has a strainer basket 11.5 - 11.75" OUTSIDE, and at least 14" tall, let me know. That way I know what to look for, or I can take it off your hands if you don't need it.
John

John,

Why the strong desire to use a strainer basket? I have never used one am curious why you feel compelled to?

Thanks!
 
Let me clarify my LHBS statement: "against using buckets for hot liquid".

This particular LHBS has nothing but dedicated brewers working there, they do 3 vessel and BIAB, and teach All Grain classes on a regular basis. I think they are qualified to offer reliable opinions.

The idea I was running with was a vessel in my pot with minimal deadspace around it, and the bag with grains it in. At the end of the mash I pull the vessel up, bag and all, leave it hanging just above the pot, and pour sparge water through it to get my proper/max pre-boil volume.
Since the large fermenting buckets are almost the perfect size, I was pondering using one of them after punching the bottom full of holes, and people were weighing in on their variations of this process, further advocating plastic bucket use that they had come up with.
The LHBS suggestion to not use plastic for this makes sense given they were not intended for hot use, in spite of any temperature ratings.


I'll continue my quest for a metal vessel. The minimal deadspace around it is the challenge. Most places don't give detailed measurements of pots and strainers. Most are either the same as my pot, or too small.

If anyone has a strainer basket 11.5 - 11.75" OUTSIDE, and at least 14" tall, let me know. That way I know what to look for, or I can take it off your hands if you don't need it.
John

Thanks for the clarification. The reason you don't put the plastic bucket into your pot for BIAB is that sometimes the bucket touches the metal pot and has no liquid in between. That lets the heat transfer from the pot to the bucket directly and it can get a lot hotter than boiling wort, hot enough to melt even HDPE. That isn't the same as pouring boiling liquid in at all.
 
John,

Why the strong desire to use a strainer basket? I have never used one am curious why you feel compelled to?

Thanks!

Ease of process. Summarized - Heat to strike temp, drop basket & bag in, hang bucket of grain over it on hook/pulley, pour with one hand, stir in with the other, mash. Lift basket with pulley, pour ~2 gal of boiling water through basket, stirring to get good flow to bottom, leave to drain while I fire up to boil. Add a little more if needed to max level, ~6.5 gal. Once the basket is pretty much done dripping it's ready to boil and I'm done with it.

Only did 1 pass exactly this way while working out the current undersize basket, and hook issues. The only pro to a low ceiling basement is the hook.
I used flexible plastic cutting boards to cover the basket side holes to prevent the water from running off the top. All flows down.

I did not get an action shot, but here's the undersize basket pulley and custom bent handle.
I can't use this in the pot to start, so I have to lift the bag, put this under it, and ease the bag into it.

basket.jpg


basket2.jpg


plastic.jpg
 
Thanks for the clarification. The reason you don't put the plastic bucket into your pot for BIAB is that sometimes the bucket touches the metal pot and has no liquid in between. That lets the heat transfer from the pot to the bucket directly and it can get a lot hotter than boiling wort, hot enough to melt even HDPE. That isn't the same as pouring boiling liquid in at all.

I would leave it out until I am ready to mash in, so never heating with it in. Strike temp is all it really gets, and that can be pushing 170, plus maybe residual heat in burner support at bottom, but I don't expect to get that close to bottom. The pouring of boiling liquid is all done hanging in the air.
 
There isn't a reason to pour boiling liquid over the grains. All you would be doing at this point is rinsing out the sugars that remain in the grain. Since the grain is already pretty warm, pouring in cold water will result in pretty warm water in a matter of seconds and that will dissolve the sugars pretty readily. If you lose more that a couple percentage points of efficiency that way I'd be surprised.

When the spec sheets say that HDPE becomes mallable at 170, it still won't deform. Just don't sit on the bucket then.
 
When I wet up my BIAB process in BeerSmith, which includes a batch sparge. I set it up using a single infusion profile modified for my equipment. Ignore the BIAB setting in BeerSmith and get some accurate readings on grain absorption, mash volumes, sparge volumes, and specific gravity at every stage of the process. You can then use the results from a couple of batches to re-tune the equipment and mash profile to meet your process.

As far as BeerSmith calculation is concerned, this is exactly what I do, because the fact that I'm using a bag to lauter is essentially useless to BeerSmith. It assumes BIAB is a full-volume BIAB, and I do a dunk/batch sparge. It has given me very accurate results volume wise.

-Start mash profile by editing a single infusion batch sparge profile
-You can set it as single or multiple/step infusions
-Make sure your Mash Tun in your equipment profile is your kettle size
-Set "drain mash tun before sparge"

My strike water goes in my kettle and my sparge volume goes in a bucket for the dunk or pour (depends on the recipe or volumes) and gets heated with a heatstick. 80%+ efficiency and I'm able to fit more grain into my 8 gallon stovetop kettle without having to do a full volume mash. I generally strike with 20 or 24qts and the remainder becomes the sparge(s).
 
There isn't a reason to pour boiling liquid over the grains. All you would be doing at this point is rinsing out the sugars that remain in the grain.

I'm using the boiling water as a substitute for a mash out. That way I know the conversion will end, and not impact the sugar profiles anymore. May only be a minor difference, but part of my objective is to have greater control of the mash process for more consistent/expected results.

When the spec sheets say that HDPE becomes mallable at 170, it still won't deform. Just don't sit on the bucket then.

With a bottom full of holes and hanging with 15-20+ lbs of wet grain and 16 lbs more water, it could be enough to deform the bottom. My quest for a metal solution continues.
 
Mashout isn't really needed in biab. Biab tends to get 80% efficency if you grind your grain to grain to powder.
But if you insist on a to mash out, just raise bag a few inches using a pulley so its not resting on bottom of pot or element and turn on heat source to your mash out temp then pull bag as per normal.

Some problems with using a basket are:
-creates temperature stratification zones, hard to stir well
-more stuff to clean
-doesnt drain as well as bag
-takes up volume in kettle

Example of my process:
-fill up kettle 75% full with water.
- heat water to 156ish (this is totally dependant on your kettle)
-put bag in kettle, dump in grain, overall temp should be 152ish, otherwise next time start water at + or _ few degrees
- if you want, add hot or cold water until kettle is topped off or your temp is hit.
- cover kettle with blanket
- go watch tv for 1 hr

-pull bag with pulley and let hang until boil is over or you feel bag is empty enough
-top up again if you want

-when boil starts, measure volume in kettle and take gravity reading (using refractometer, 20 bux on ebay)

-boil for 20 min, measure volume and gravity again. since you now know your boil off rate and your concentration increase rate...
-adjust heat +/- to increase or decrease boil off speed so you will end up with 24 L or your target gravity (1.050 or whatever) after your 60 or 90 min boil

If you have way too much water, then just boil for an extra 30 min or whatever, not a big deal. Just start your hop schedule during last 60 min.

I dont like to ever add water after I start boiling, i find it adds a watery taste. Maybe it doesnt mix the water in well? i dunno. just me.

I think the only reason I would ever use a basket is if i didnt have a location to put a pulley, and didnt have a ladder to use. then you can pull the basket and have it sit cockeyed and allow it to drain.

Oh ya, another easy thing is, to determine your % alchohol just take difference in SG and FG
say 1.050 and 1.010, difference is 40 points.
then multiply by .131 = 5.24% abv

sorry this post is a bit haphazzard, i gotta head out to hockey!
 
While I'm interested in how this comes out, (Because I think it is an interesting approach to handle the hot grains and get a little extra efficiency.) how did we get this far without asking about the insulated pot!

I am going to start BIAB shortly after Christmas (New 10 gal pot) and was wondering if I could come up with a way to insulate the pot in a way that was safe to use while heating on my burner. I can see why you are committed to your pot. Is this a DIY or something you bought?

If you do your setup right and hit your mash temperature, you won't need to add heat. I made a batch today (indoors, it was below zero out and the wind was blowing) and just wrapped the pot with a bath towel. The digital thermometer showed that I lost less than half a degree when the mash was over in 30 minutes.
 
was wondering if I could come up with a way to insulate the pot in a way that was safe to use while heating on my burner.

Never heard of an insulated kettle, and really cant imagine a way to do that without creating a fire hazard. Most of us just wrap our kettles with something during the mash (a big jacket, towels, blankets, camping sleeping pad, etc) and we do just fine with that. To me, the the biggest point to BIAB is making all grain beer while keeping the whole process simple. I'm guessing that goes for most of us BIABers.
 
Never heard of an insulated kettle, and really cant imagine a way to do that without creating a fire hazard. Most of us just wrap our kettles with something during the mash (a big jacket, towels, blankets, camping sleeping pad, etc) and we do just fine with that. To me, the the biggest point to BIAB is making all grain beer while keeping the whole process simple. I'm guessing that goes for most of us BIABers.
Wrap the kettle with an old sleeping bag after dough-in, only lose a couple degrees. No added heat necessary. :mug:
 
Just me, but I would sell your 7 gallon kettle and sell your copy of BeerSmith on ebay or Craigslist. Then use that money towards the cost of a 15 gallon kettle with a 3 ply bottom.

Go to BIABrewer.info and get a free copy of their BIABacus spreadsheet which calculates everything for you. Then start doing full volume BIAB mashes and never look back:mug:
 
... how did we get this far without asking about the insulated pot!

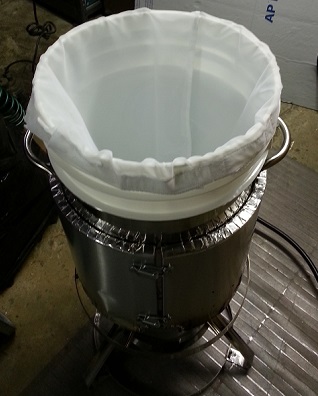
Aluminum flashing from Home Depot/Lowes and 2000+F thermal blanket inside. The blanket is left over from a bronze foundry oven I built a while back. It took forever to get it done for various reasons. Made from 4 flashing panels, about 200 rivets, 2 hinges, 2 catches and 3 tries to get the 4 panels cut, bent and punched for rivets correctly. I wrapped the top edge with aluminum tape to seal it against drips/spills. Yeah, I'm kinda committed to this pot for now.
Flashing - $28 (would have been $14 if I bent it right the first time.)
Rivets - $10
Hinges & catches - $5
Thermal blanket - $3
Misc aluminum rectangular tubing saved from a patio umbrella repair. This is inside where the hinges and catches attach as the flashing is too thin by itself.

I only take it off for cooling & washing. During the mash I throw a blanket over the pot to minimize losses from the top, and generally lose less than 1 degree for the hour, including 3 stir cycles. I should try without to see what the difference is. I'm hoping to do a Maibock in the next week or so for a March competition, so maybe then is a good time to try.

I will say it is fragile due to the thin flashing. Almost ruined it by stepping on a corner after I took it off when I was headed for the sink to cool. That's why it stays on all the time otherwise. It's quite safe on the pot.

Regarding the points ODI3 made:

Some problems with using a basket are:
-creates temperature stratification zones, hard to stir well
No different from the bag in the pot.

-more stuff to clean
Yes, could add a minute to cleanup.

-doesnt drain as well as bag
Maybe, but the objective is to get the water to drain THROUGH the bag. Without the basket this does not happen. It drains off the tops, sides, etc.

-takes up volume in kettle
Yes, but I'm trying to find one that is a close fit so this not an issue. That is the #1 reason I mentioned the plastic bucket. The bottling bucket is almost a perfect fit in my pot. Less than 1" at bottom, and less than 1/2" on the sides at the bottom, less than 1/8" at top. Probably adds up to about 1/2 gallon, and similar to false bottoms. I had fully planned to buy one when I was at the LHBS until he suggested otherwise for the reasons well debated already.

I really don't see how some folks think this is over complicating things. Throw in the basket, bag and grains then mash. Pull the whole thing up, pour the additional water (that I need anyway) through it, let it drain, done. For me this is easier (and cleaner) than handling the wet bag of grain - once I find the right vessel for the basket.

The first time I did this 'rinse' in a separate pot the runoff was about 1.030, enough to justify the minimal effort for me. And besides, I get to play with my beer stuff more while figuring it out.
 
I brew using a 26 gal pot and 5000w electric element. I wrap my kettle with folded cargo blankets and bungee cards and only take them off every 6 or so brews to wash when they get dirty.

I dont add any liquid aside from the original fill up.

I personally just use a wine whip to lightly stir while immersion chiller is cooling, then when I am low enough temp I whip the snot out of the 15 gal of wort. The wort goes completely foamy and white. Instead of dealing with hoppy sludge, you end up with hoppy foam. The foam doesnt compact when you are trying to drain but still creates a filter bed if you drain slowly.

I like this because you remove hotbreak, coldbreak, and hop additions and aerate all at once. It keeps the yeast cake nice and clean for reusing the yeast, then you also dont have to wash the yeast. There is a pic of the foamy beer in my signature

I dont add any liquid aside from the original fill up.
 

Latest posts

Back
Top